In the first article in this series, you learned how to leverage MongoDB from within your cloud-native applications written in Quarkus. While developing a sample application from scratch, you've been introduced to a few selected Quarkus extensions that speed up the development process and remove friction when it comes to deploying the containerized application to Kubernetes.
This second article will allow you to seamlessly continue your Quarkus and MongoDB development journey. Based on where you left off in part 1, in this article we will continue iterating the same example application. We will walk through the steps to carrying out the following tasks:
- Perform a Quarkus version upgrade for your application.
- Add Entity <=> DTO (data transfer object) mapping.
- Introduce a service layer.
- Switch to the repository pattern for data access.
- Add an auto-generated REST resource.
- Switch to managed MongoDB Atlas instance.
Quarkus project upgrade
It’s been a while since you worked on the sample application in part 1 of this series, so let’s take the opportunity to learn how to update existing Quarkus applications using convenient tool support.
- Option 1: If you happen to have the Quarkus CLI installed (recommended!) you can execute the following command in the root folder of your application project. By specifying the
--streamflag you can pinpoint the update procedure to a Quarkus version of your choice. Here we decide to use the 3.8 stream, which is the newest at the time of writing this article:quarkus update --stream=3.8
- Option 2: As an alternative, you can make use of the Maven wrapper available in your Quarkus project to achieve the same thing. Also in this case, you can specify the Quarkus version stream by using the
-Dstream=3.8flag accordingly:./mvnw io.quarkus.platform:quarkus-maven-plugin:3.8.2:update -N -Dstream=3.8
Because the existing application is a rather trivial one, not a lot is happening during the automated update procedure besides doing a few dependency-related patches in the pom.xml file of this Quarkus application. A Git diff shows just three line changes:
diff --git a/pom.xml b/pom.xml
index 64b0871..76391ad 100644
--- a/pom.xml
+++ b/pom.xml
@@ -6,15 +6,15 @@
   <artifactId>my-quarkus-mongodb-app</artifactId>
   <version>1.0.0</version>
   <properties>
-    <compiler-plugin.version>3.11.0</compiler-plugin.version>
+    <compiler-plugin.version>3.12.1</compiler-plugin.version>
     <maven.compiler.release>17</maven.compiler.release>
     <project.build.sourceEncoding>UTF-8</project.build.sourceEncoding>
     <project.reporting.outputEncoding>UTF-8</project.reporting.outputEncoding>
     <quarkus.platform.artifact-id>quarkus-bom</quarkus.platform.artifact-id>
     <quarkus.platform.group-id>io.quarkus.platform</quarkus.platform.group-id>
-    <quarkus.platform.version>3.5.1</quarkus.platform.version>
+    <quarkus.platform.version>3.8.2</quarkus.platform.version>
     <skipITs>true</skipITs>
-    <surefire-plugin.version>3.1.2</surefire-plugin.version>
+    <surefire-plugin.version>3.2.3</surefire-plugin.version>
   </properties>
   <dependencyManagement>
     <dependencies>
It’s worth noting, though, that the automated version update can do a lot more. Based on OpenRewrite—in particular recipes for Quarkus—more sophisticated code changes can be executed automatically. For instance, switching from Quarkus 2 to Quarkus 3 requires package upgrades from javax.* to jakarta.* across source files.
Let the coding begin
During the course of this article, you are going to extend and refactor the existing sample application. The GitHub repository accompanying this article can be found here.
In addition to the final state of the source code for this sample application, it also provides separate tags (step6 ... step10) pointing to different revisions that reflect every “milestone” of the development activities discussed in the sections below.
Bump artifact version and container image tag
Because the app sources will be significantly modified, let’s change the artifact version as well as the container image tag for your Quarkus application right away. Open the pom.xml file and change the version from 1.0.0 to 2.0.0:
<?xml version="1.0"?>
<project xsi:schemaLocation="http://maven.apache.org/POM/4.0.0 https://maven.apache.org/xsd/maven-4.0.0.xsd" xmlns="http://maven.apache.org/POM/4.0.0"
    xmlns:xsi="http://www.w3.org/2001/XMLSchema-instance">
  <modelVersion>4.0.0</modelVersion>
  <groupId>com.redhat.developers</groupId>
  <artifactId>my-quarkus-mongodb-app</artifactId>
  <version>2.0.0</version>

...
Additionally, open the application.properties file and also change the container image tag from 1.0.0 to 2.0.0:
...
quarkus.container-image.image=quay.io/<YOUR_USER_HERE>/my-quarkus-mongodb-app:2.0.0
...
Info alert: Note
You can get to the state of this sample application up to this point by cloning the GitHub repo and checking out the tag step6.
Introduce DTO mapper and service layer
Currently, the application uses the active record pattern and calls data access methods directly from within the REST resource. To change this, let’s first introduce entity to DTO mapping. For that purpose, you are adding MapStruct as another dependency to the pom.xml file. In the properties block, define the MapStruct version to be 1.5.5.Final and add the two dependencies like so:
...
  <properties>
...
<mapstruct.version>1.5.5.Final</mapstruct.version>
...
  </properties>
...
  <dependencies>
    ...
    <dependency>
      <groupId>org.mapstruct</groupId>
      <artifactId>mapstruct</artifactId>
      <version>${mapstruct.version}</version>
    </dependency>
    <dependency>
      <groupId>org.mapstruct</groupId>
      <artifactId>mapstruct-processor</artifactId>
      <version>${mapstruct.version}</version>
      <scope>provided</scope>
    </dependency>
    ...
  </dependencies>
...
With these dependency changes in place, it’s time to define a data transfer object (DTO) by adding a Java record named MovieDTO in a new file MovieDTO.java:
public record MovieDTO(
    String id,
    String title,
    List<String> genres,
    Integer runningTime,
    Boolean released,
    Year yearReleased
) {};
From the record definition, it’s immediately visible that the chosen data representation of movie entities communicated to the “outside world” is different. This is purposeful and serves as an example on how to come up with a strategy to avoid exposing the internal data representation of movie entities as stored in the database.
In order to be able to convert between the internal (entity) and the external (DTO) data representations, you need to define a bi-directional mapper. Create a new file MovieMapper.java and add the following interface to it:
@Mapper(componentModel = "cdi")
public interface MovieMapper {

    @Mapping(target = "id", expression = "java(m.id.toHexString())")
    @Mapping(target = "genres", source = "genre")
    @Mapping(target = "runningTime", source = "duration")
    @Mapping(target = "yearReleased", expression = "java(Year.of(m.year))")
    MovieDTO toDTO(Movie m);

    @Mapping(target = "id", expression = "java(m.id() != null ? new org.bson.types.ObjectId(m.id()) : null)")
    @Mapping(target = "genre", source = "genres")
    @Mapping(target = "duration", source = "runningTime")
    @Mapping(target = "year", expression = "java(m.yearReleased().getValue())")
    Movie toEntity(MovieDTO m);

}
Based on this interface definition together with all the proper annotations, MapStruct has everything it needs to generate an implementation that can perform the conversion in both directions. More specifically, you can then call either of the two declared methods in your code whenever you have to convert between the two data representations.
Next, you introduce an explicit service layer by creating a MovieService.java file according to the snippet below. Note the @Inject annotation which—based on CDI—will inject an implementation of the MovieMapper interface that you can use to perform the entity to DTO conversion in any of the three methods which wrap the data access:
@ApplicationScoped
public class MovieService {

    @Inject
    MovieMapper movieMapper;

    public List<MovieDTO> getAllMovies() {
       return Movie.<Movie>listAll().stream()
                .map(movieMapper::toDTO)
                .collect(Collectors.toList());
    }

    public MovieDTO getMovieById(String id) {
        return movieMapper.toDTO(Movie.findById(new ObjectId(id)));
    }

    public MovieDTO addMovie(MovieDTO dto) {
        var movie = movieMapper.toEntity(dto);
        movie.id = null;
        Movie.persist(movie);
        return movieMapper.toDTO(movie);
    }

}
Finally, let’s get rid of the direct data access calls from within the REST resource. For that, open MovieResource.java and make the necessary code changes so that any data access is delegated to the MovieService:
@Path("api/movie")
@Consumes(MediaType.APPLICATION_JSON)
@Produces(MediaType.APPLICATION_JSON)
public class MovieResource {

    MovieService movieService;

    public MovieResource(MovieService movieService) {
        this.movieService = movieService;
    }

    @GET
    public List<MovieDTO> allMovies() {
        return movieService.getAllMovies();
    }

    @GET
    @Path("{id}")
    public Response getMovie(@PathParam("id") String id) {
        var movie = movieService.getMovieById(id);
        return movie != null
            ? Response.ok(movie).build()
            : Response.status(Response.Status.NOT_FOUND).build();
    }

    @POST
    public Response addMovie(MovieDTO dto) {
        var movie = movieService.addMovie(dto);
        return Response
                .created(URI.create("/api/movies"+movie.id()))
                .entity(movie)
                .build();
    }

}
If you aren’t in Quarkus dev mode already, go to your terminal and run either quarkus dev or ./mvnw quarkus:dev. Once the application is up and running, verify that your REST endpoints are still working as expected after introducing all the changes so far.
Info alert: Note
You can get to the state of this sample application up to this point by cloning the GitHub repo and checking out the tag step7.
Switch to repository pattern for data access
Remember, the first article mentioned that MongoDB Panache supports both the active record and the repository pattern. To understand the differences, you are going to change the existing application to make use of the latter. As first step, adapt Movie.java like so:
@MongoEntity(collection = "movies")
public class Movie {
    public ObjectId id;
    public String title;
    public List<String> genre;
    public Integer duration;
    public Boolean released;
    public Integer year;
}
Note, that this modified Java class does not extend PanacheMongoEntity any longer, which means you have to explicitly specify the ID field—by default it’s of type ObjectId—for the MongoDB entity.
Next, add the repository class MovieRepository.java to manage these Movie entities. There is no need to implement any methods manually because all the standard CRUD operations are auto-generated behind the scenes based on the PanacheMongoRepository interface this class implements:
package com.redhat.developers;

import io.quarkus.mongodb.panache.PanacheMongoRepository;
import jakarta.enterprise.context.ApplicationScoped;

@ApplicationScoped
public class MovieRepository implements PanacheMongoRepository<Movie> {

}
Finally, refactor the MovieService to perform all data access operations by delegating to the MovieRepository:
@ApplicationScoped
public class MovieService {

    private final MovieMapper movieMapper;
    private final MovieRepository movieRepository;

    public MovieService(MovieMapper movieMapper, MovieRepository movieRepository) {
        this.movieMapper = movieMapper;
        this.movieRepository = movieRepository;
    }

    public List<MovieDTO> getAllMovies() {
        return movieRepository.listAll().stream()
                .map(movieMapper::toDTO)
                .toList();
    }

    public MovieDTO getMovieById(String id) {
        return movieMapper.toDTO(movieRepository.findById(new ObjectId(id)));
    }

    public MovieDTO addMovie(MovieDTO dto) {
        var movie = movieMapper.toEntity(dto);
        movie.id = null;
        movieRepository.persist(movie);
        return movieMapper.toDTO(movie);
    }

}
Sooner rather than later, you might wonder how to add custom data access methods. Let’s figure that out by adding one such custom method to randomly select a certain number of movies from all available ones in the database. For that, you add the following method to the MovieRepository which didn’t yet contain any methods:
    public List<Movie> getRandomMovies(Integer count) {
        var aggIter = mongoCollection().aggregate(
            List.of(new Document("$sample",new Document("size",count))),
            Movie.class
        );
        return StreamSupport.stream(aggIter.spliterator(), false).toList();
    }
This method executes a simple MongoDB aggregation pipeline using just a single operator named $sample to pseudo-randomly select a specific number of documents from a given collection.
With this custom repository method in place, you provide access to it via the service layer by adding a corresponding method to the MovieService:
    public List<MovieDTO> getRandomMovies(Integer count) {
        return movieRepository.getRandomMovies(count).stream()
            .map(movieMapper::toDTO).toList();
    }
Finally, you expose this new data access functionality via the MovieResource class and introduce a new REST API endpoint for HTTP clients to call:
    @GET
    @Path("/random/{count}")
    public List<MovieDTO> getRandomMovies(Integer count) {
        return movieService.getRandomMovies(count);
    }
If you aren’t still in Quarkus dev mode, go to your terminal and run either quarkus dev or ./mvnw quarkus:dev. Once the application is up and running, verify that all your REST endpoints are working as expected after introducing the changes in this section.
Info alert: Note
You can get to the state of this sample application up to this point by cloning the GitHub repo and checking out the tag step8.
Generate API endpoints using REST data with panache
Looking at this simple Quarkus application, you might wonder if you could take any shortcuts and do away with some of the boilerplate code. Well, it turns out there is an experimental extension which you can use in the context of demos or PoCs to auto-generate REST resources with CRUD functionality on top of Panache. When working with MongoDB the proper extension is quarkus-mongodb-rest-data-panache and you can add it either by means of the Quarkus CLI or the Maven command:
- CLI:
quarkus ext add quarkus-mongodb-rest-data-panache - Maven:
./mvnw quarkus:add-extension -Dextensions='quarkus-mongodb-rest-data-panache'
After adding the extension, you can create an interface, say MovieResourceAutoGen.java, which extends PanacheMongoRepositoryResource:
@ResourceProperties(path = "api/auto-gen/movie")
public interface MovieResourceAutoGen
    extends PanacheMongoRepositoryResource<MovieRepository,Movie,ObjectId> {

}
All you have to provide is the base path for this REST resource, which is api/auto-gen/movie here. Everything else is auto-generated so that the CRUD endpoints for this REST resource are available at runtime which call the underlying MovieRepository for the data access. Similarly, you can use this mechanism also when working with the active record pattern, the only difference being that you’d extend from PanacheMongoEntityResource instead.
Warning alert: Caution
Using such auto-generated REST resources means that all calls happening behind the scenes are directly wired to the data repository in question, meaning there's neither a service layer nor any kind of DTO mapping present in-between your REST and persistence layers. This is usually not a recommended approach for real workloads.
Even with this approach in place, you have the possibility to add custom methods and expose additional data access functionality. Using your custom method introduced earlier in the MovieRepository as an example, you can expose this functionality by adding the following method in the snippet below to the MovieResourceAutoGen interface:
    @GET
    @Path("/random/{count}")
    @Produces(MediaType.APPLICATION_JSON)
    default List<Movie> getRandomMovies(@PathParam("count") Integer count) {
        return CDI.current()
            .select(MovieRepository.class).get()
            .getRandomMovies(count);
    }
Once again, make sure that the application is up and running and verify that all your REST endpoints are working as expected after introducing the changes in this section.
Info alert: Note
You can get to the state of this sample application up to this point by cloning the GitHub repo and checking out the tag step9.
Introduce managed cloud database
So far your application has connected to a containerized MongoDB database instance. When running in Quarkus dev mode locally, the container was automatically started in the background thanks to Quarkus DevServices for MongoDB. When deploying the same application to Kubernetes, you provided a custom YAML manifest to launch a single ephemeral Pod running a MongoDB instance. In this section you are setting up a fully-managed database instance using MongoDB Atlas.
Register for free Atlas instance
Follow this link to register for a completely free Atlas instance which is the easiest way to get started with a fully-managed MongoDB database instance running in the public cloud. The following procedure is pretty straight-forward and guided by the Web UI's wizard and step-by-step instructions:
- Sign up and verify your email address.
- Fill out the Atlas welcome form.
- Set up your first database instance deployment using the M0 free tier option.
Create new database
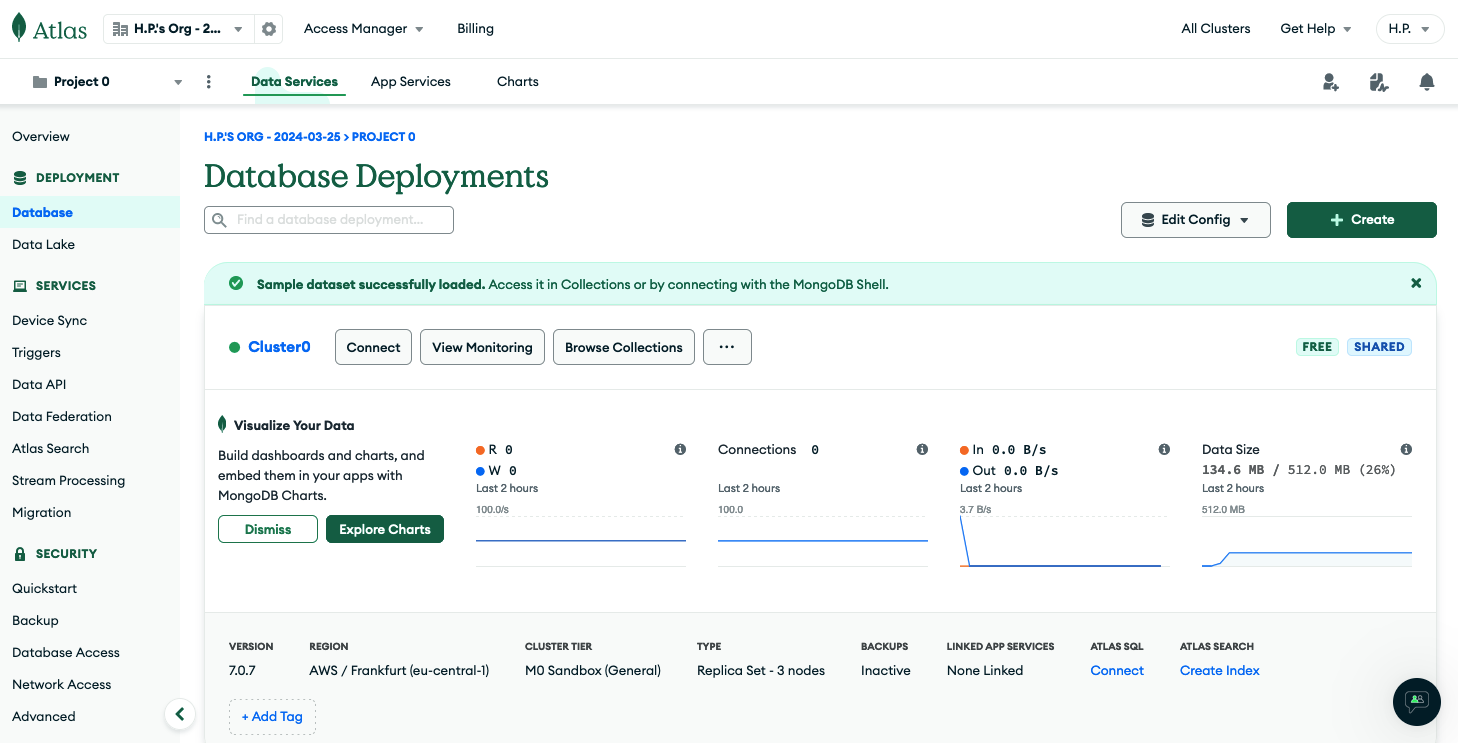
Once you are done, select Deployment > Database from the left navigation menu and click Browse Collections for your cluster instance, here named Cluster0 (Figure 1 and Figure 2).
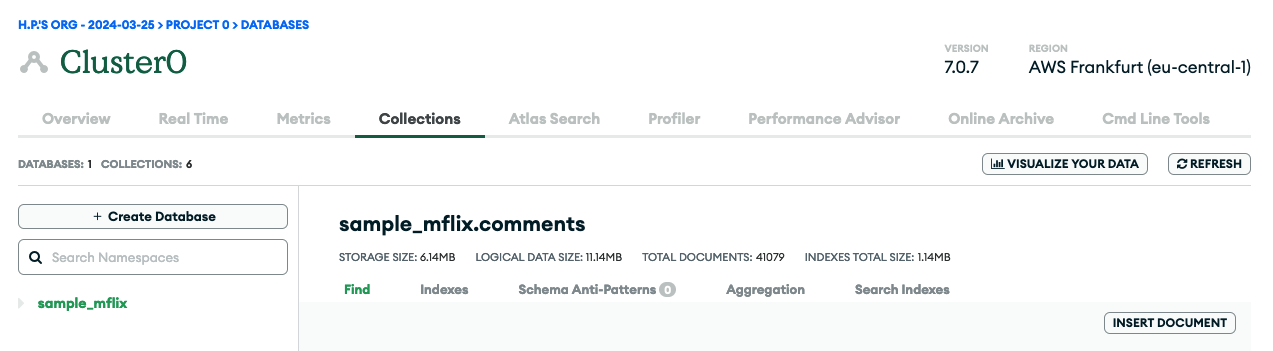
In that view, you might already see a sample database called sample_mflix if you checked the load sample data option during the provisioning / deployment. Click + Create Database and enter my_movie_db for the database name and movies as the collection name. There's no need to select anything from the Additional Preferences drop-down field (Figure 3).
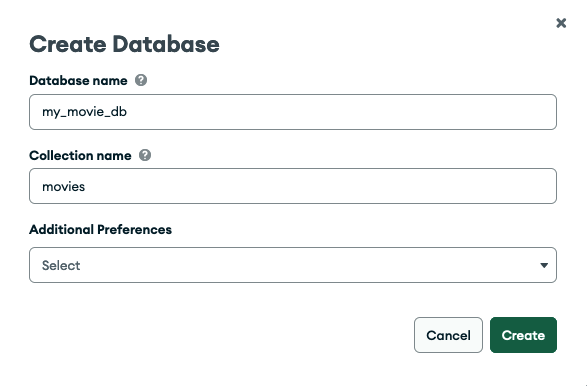
Hit Create to confirm.
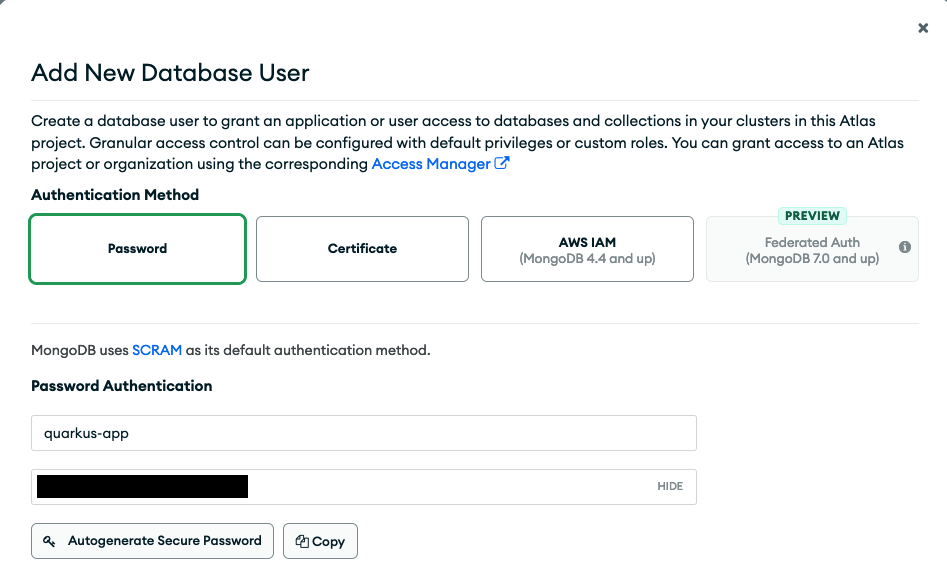
Add new user and permissions
With the database and collection in place, select Security > Database Access from the left menu to set up your database user accordingly. In this view, click + Add New Database User. Choose Password for the authentication method and fill out the username (e.g., quarkus-app) and password fields (Figure 4). Keep a copy of the credentials; you are going to need them in one of the next sections.
Scroll down and expand the Database User Privileges section and add two specific privileges (Figure 5).
- Click + Add Specific Privilege, select the readWrite role in the drop-down, and enter the previously created database
my_movie_dbwhile leaving the collections field empty. - Click + Add Specific Privilege and select the dbAdmin role in the drop-down and enter the previously created database
my_movie_dbwhile leaving the collections field empty.
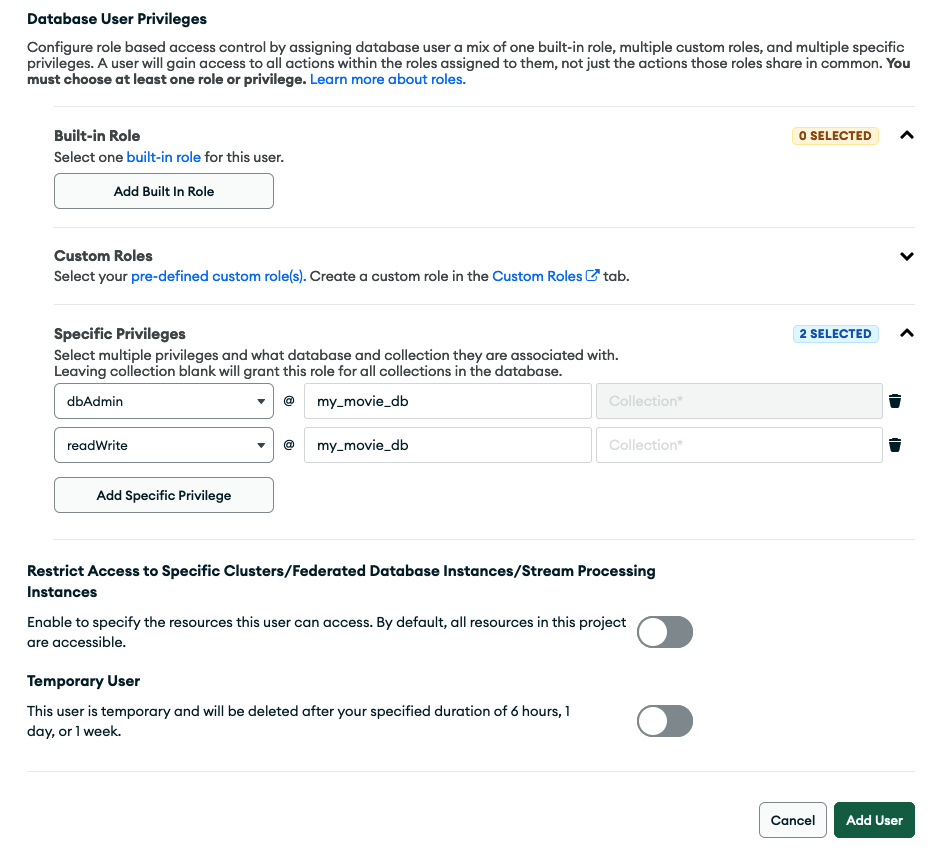
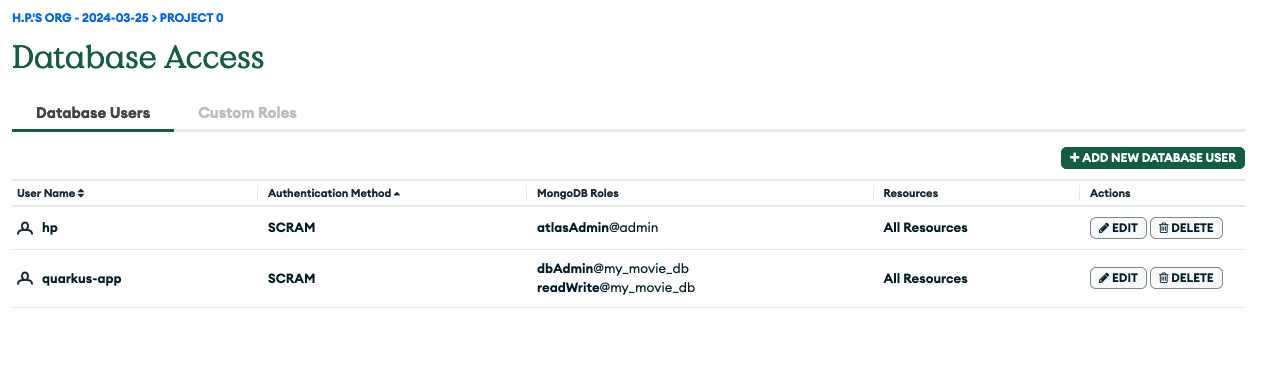
Finally hit the Add User button to confirm all these settings. The Database Access view should reflect this new user in the tabular listing, as shown in Figure 6.
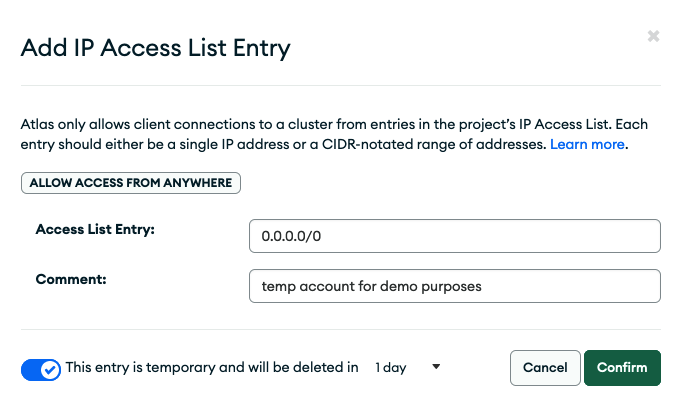
Set up network access
The final step is to select Security > Network Access from the left menu to allow Atlas connections from clients. For demo purposes you are setting up a temporary IP access list entry which allows access from anywhere. Click +ADD IP ADDRESS and fill out as shown in Figure 7.
Info alert: Note
You can of course restrict this as you see fit and should do so for any real workload you plan to run. The only thing you'd need to make sure though, that the environment you deploy your application will use a public IP address that is part of the allowed ones otherwise your connections to the Atlas database instance will fail for security reasons.
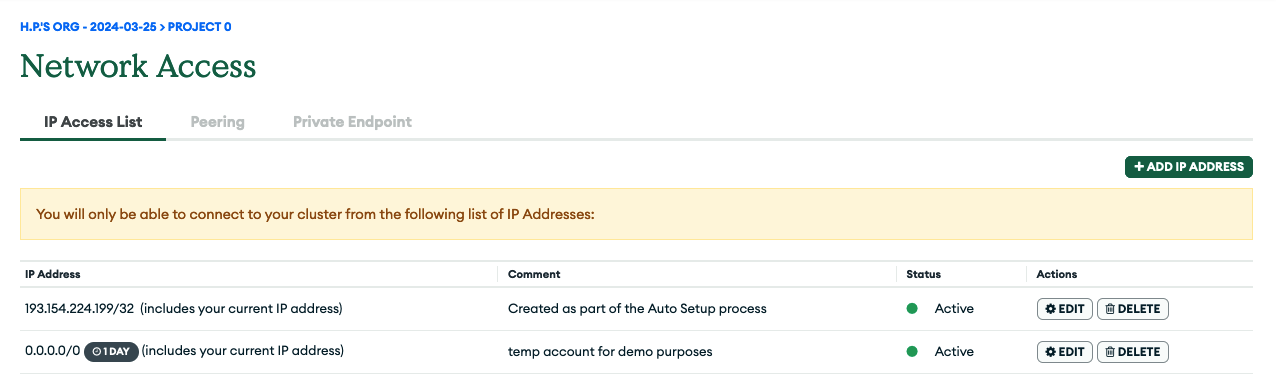
The listing (Figure 8) shows your new temporary entry to allow client connections from any IP address.
Update deployment manifests
In order to connect to your MongoDB Atlas database instance, you need to provide a different connection string. For deploying the application into Kubernetes you are going to introduce a Secret to store this. Open the already existing file src/main/kubernetes/kubernetes.yml and a Secret named mongodb-connection by appending the following YAML snippet at the end of this file.
---
kind: Secret
apiVersion: v1
metadata:
  name: mongodb-connection
type: Opaque
stringData:
  managed: <YOUR_MONGODB_ATLAS_CONNECTION_STRING_HERE>
  selfhosted: mongodb://mongodb:27017
Make sure to modify the data for the managed field in this Kubernetes secret with your actual MongoDB Atlas database connection string. This includes your DB user credentials that you previously defined when setting up the database instance and user on MongoDB Atlas. You can easily get the necessary connection string from the Atlas Web UI by going to Deployment > Database and then clicking the Connect button for your cluster—here, Cluster0 (Figure 9).
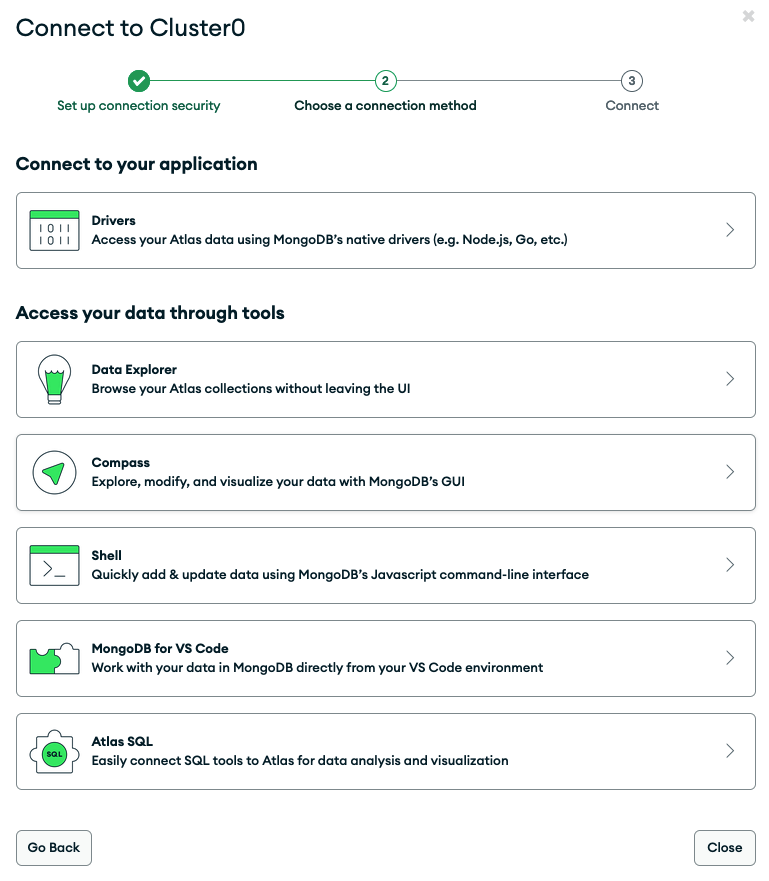
In the pop-up (Figure 10), expand the first section (Drivers), select Java from the drop-down and copy your connection string, which starts with mongodb+srv://<username>:<password>@...
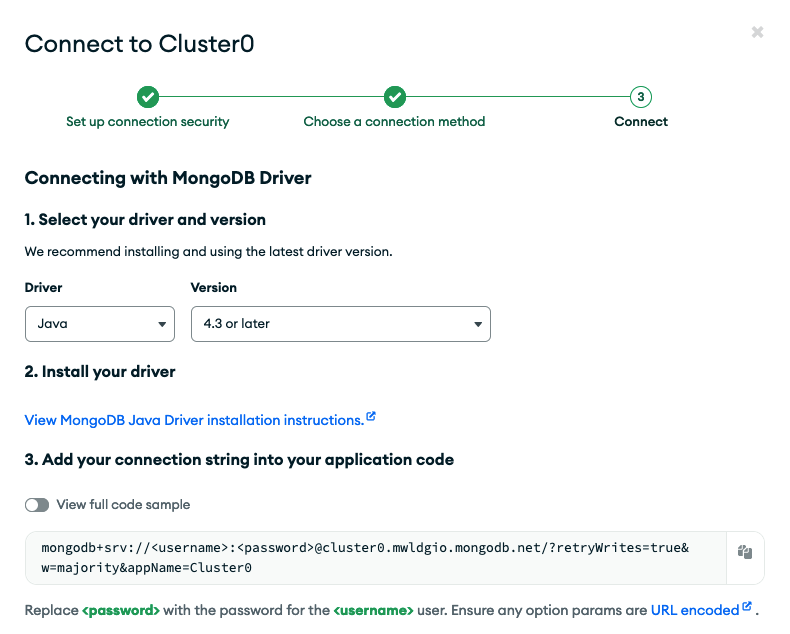
Don't forget to replace the <username> and <password> placeholders with the actual database user credentials you previously set up.
Additionally, change the application.properties by inserting configuration properties which allow the Quarkus application to have the necessary connection string injected via the Secret that will get created during the deployment to Kubernetes:
quarkus.kubernetes.env.mapping.quarkus-mongodb-connection-string.from-secret=mongodb-connection
quarkus.kubernetes.env.mapping.quarkus-mongodb-connection-string.with-key=managed
#NOTE: using the 'selfhosted' key like below would keep using the MongoDB instance running in your Kubernetes cluster and namespace
#quarkus.kubernetes.env.mapping.quarkus-mongodb-connection-string.with-key=selfhosted
Now, all that needs to be done to switch between the self-hosted in-cluster MongoDB instance and the fully-managed cloud MongoDB Atlas instance is to change the quarkus.kubernetes.env.mapping.quarkus-mongodb-connection-string.with-key property from selfhosted to managed.
Build your application once more to make sure all these changes are reflected in the generated artifacts:
- CLI:
quarkus build --no-tests - Maven:
./mvnw clean package -DskipTests
Info alert: Note
You can get to the state of this sample application up to this point by cloning the GitHub repo and checking out the tag step10.
Let the deployment begin
You learned in the previous article that there are several ways to build Quarkus applications, create container images, and deploy them as containers to Kubernetes. You can keep using the same extensions and familiar settings this time.
Generate and push new container image
In the beginning of this article you modified the artifact version and container image tag already, which is why you can directly build a container image for your Quarkus application using JIB.
- CLI:
quarkus image build jib --no-tests - Maven:
./mvnw install -Dquarkus.container-image.build=true -DskipTests
Both commands result in a new container image being built and stored in your local image cache/repository using the fully qualified image name you specified in the application.properties file.
Make sure that you also push this container image to a some public registry by running either podman push or docker push command, for example. Also, there is a corresponding Quarkus CLI command, quarkus image push, as well as a Maven command, ./mvnw install -Dquarkus.container-image.push=true -DskipTests, to push locally built container images to the registry in question.
Claim your Developer Sandbox
Before proceeding, make sure you have access to your Developer Sandbox for Red Hat OpenShift.
In case you haven’t already done so before, you can claim your personal instance here by clicking the Start your sandbox for free button and following the instructions. Once it is running and you can access the OpenShift web console, make sure that you are logged in/authenticated against this instance via kubectl.
Deploy application
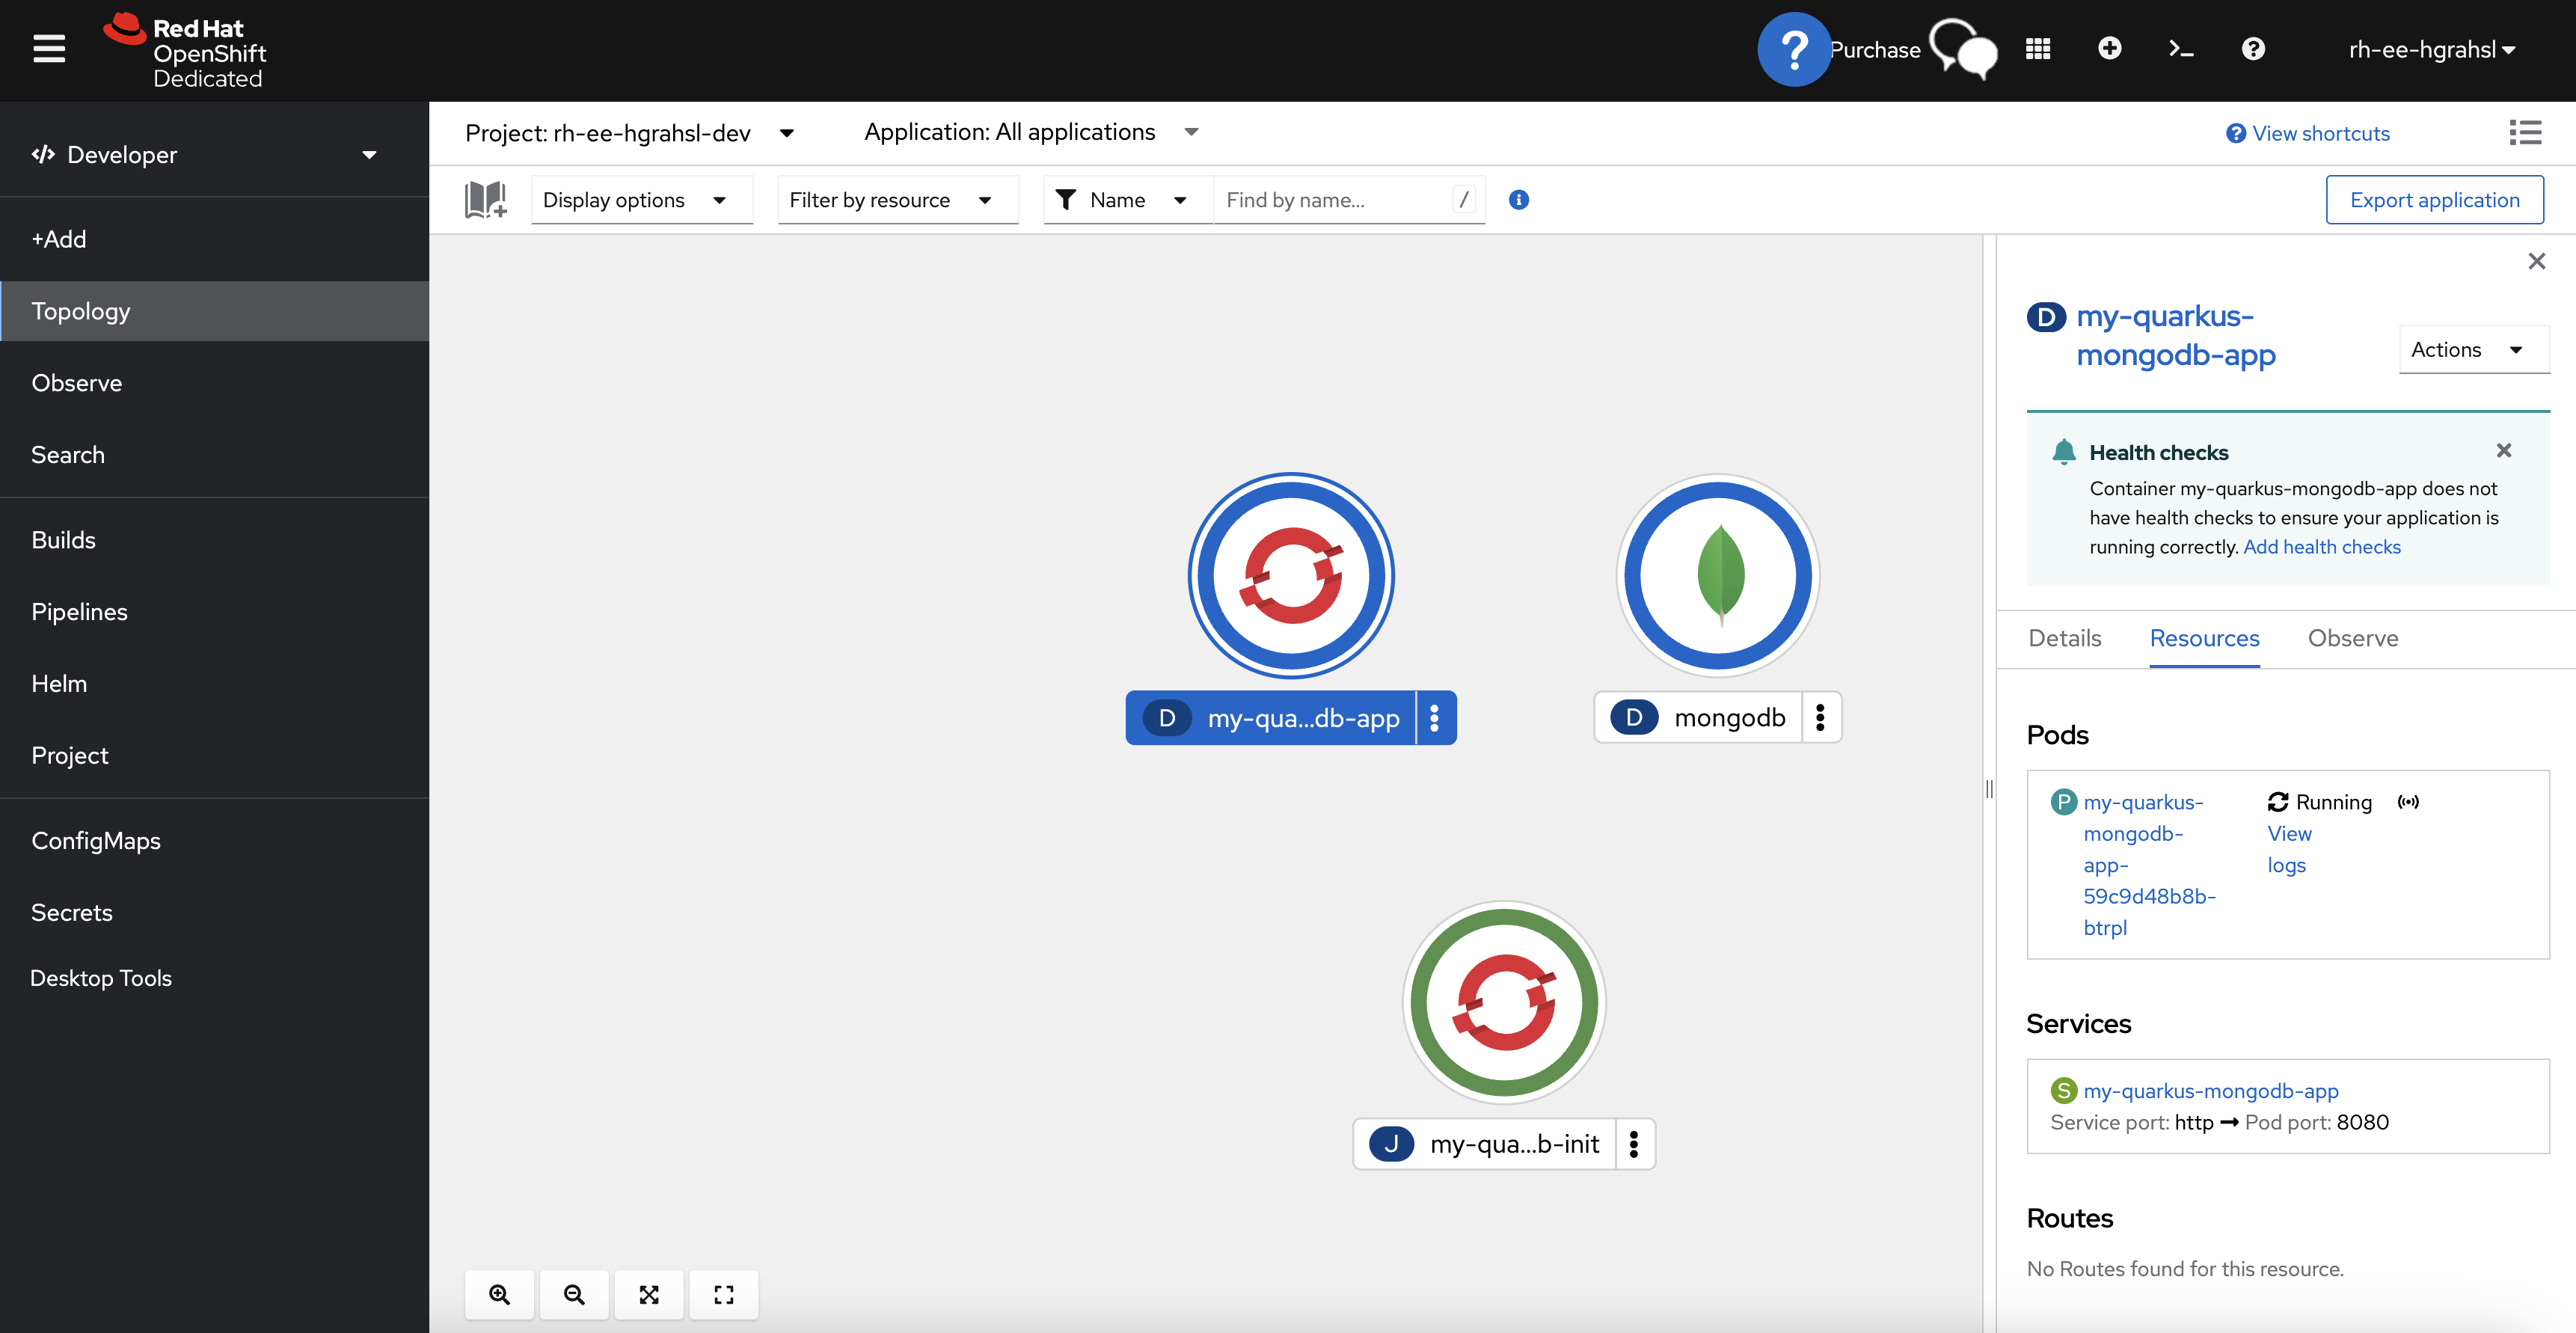
From the project's root folder, either run kubectl apply -f target/kubernetes/kubernetes.yml or go with the more concise Quarkus CLI command quarkus deploy. After a few moments, you should be able to inspect a successful deployment in the Topology view of your user's project/namespace in your Developer Sandbox environment (Figure 11). The application is now talking to your fully-managed MongoDB Atlas database instance.
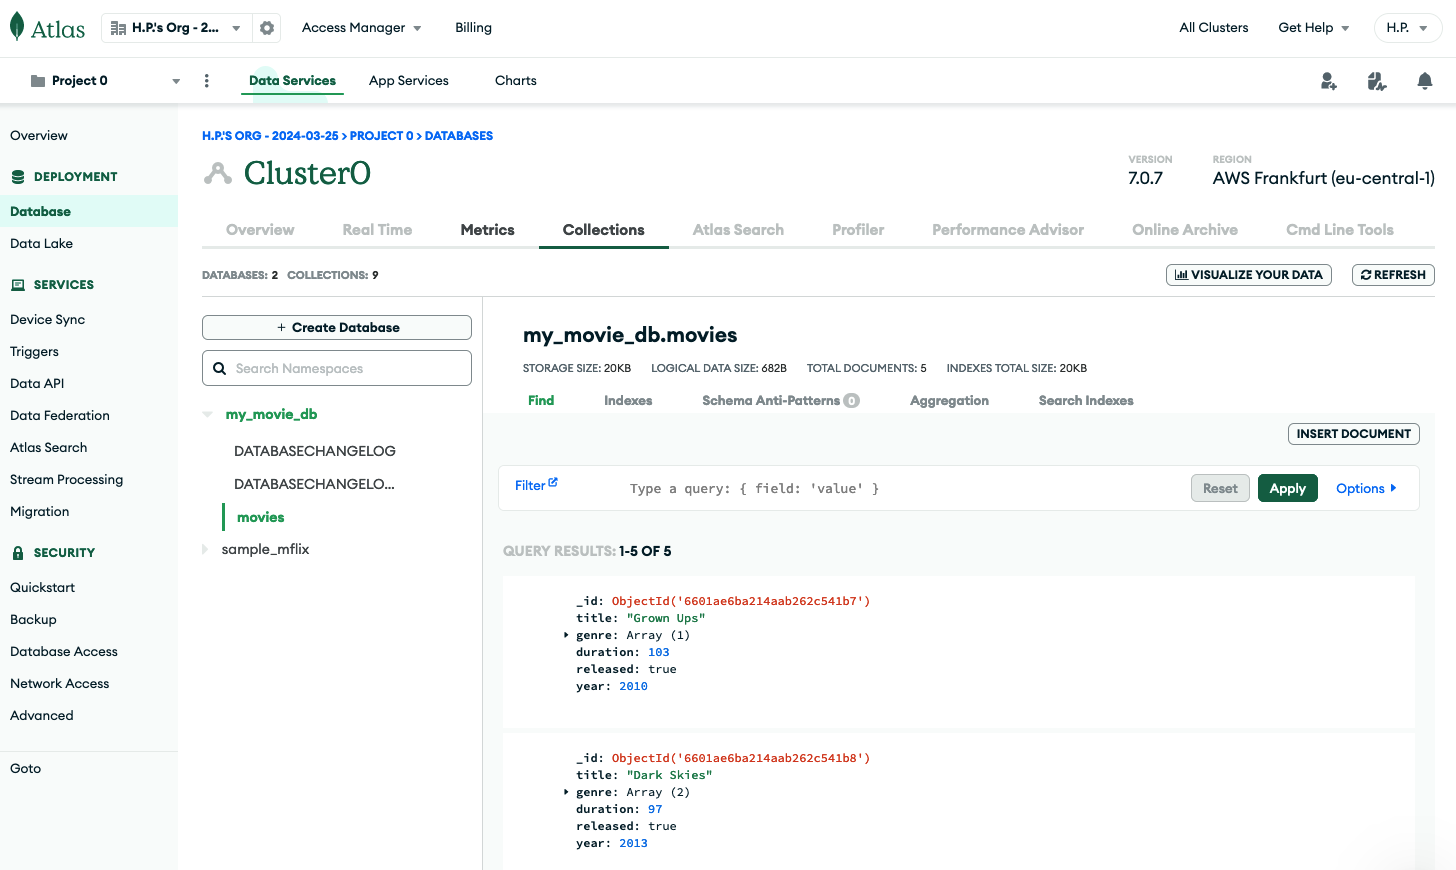
If you now switch to the MongoDB Atlas Web UI and go into Deployment > Database and then click Browse Collections, you should be able to see the my_movies_db.movies collection and the movie documents that are stored there (Figure 12).
Summary
Congrats on your improved Quarkus application, which now talks to a fully-managed MongoDB database instance and runs successfully on Kubernetes, more specifically the Developer Sandbox for Red Hat OpenShift:
- Do a Quarkus version upgrade for your application.
- Add Entity <=> DTO (data transfer object) mapping.
- Introduce a service layer.
- Switch to the repository pattern for data access.
- Add an auto-generated REST resource.
- Switch to managed MongoDB Atlas instance.
Stay tuned for part three in this series. Meanwhile, happy coding.
