Have you ever wondered how voice assistants on your phone understand your questions so well? Or how email spam filters can so accurately identify junk mail?
The answer lies in natural language processing (NLP) and its powerful tool, large language models (LLMs). In this post, we'll focus on BERT, a cutting-edge LLM, and demonstrate how to leverage the OpenShift AI environment to train and fine-tune this model for practical applications in your own projects.
Red Hat is making accessible the AI world to everyone with a free Developer Sandbox for OpenShift. The Red Hat Developer Sandbox contains your personal AI playground, providing a risk-free environment to explore, experiment, and learn the ropes of OpenShift AI. If you want to have a quick and easy intro to OpenShift AI and its feature offered by the RH Developer Sandbox, I recently wrote an introduction article on it -> Red Hat Developer Sandbox: Your Free OpenShift AI Playground.
Creating a new Workbench for training our BERT model
Once logged in OpenShift AI you can create a brand new "Data Science Project" that it could be already created for you if you are using the RH Developer Sandbox. After that in the "Workbenches" section you should have a button to start the wizard to create a new one, you should see something like in the following image:
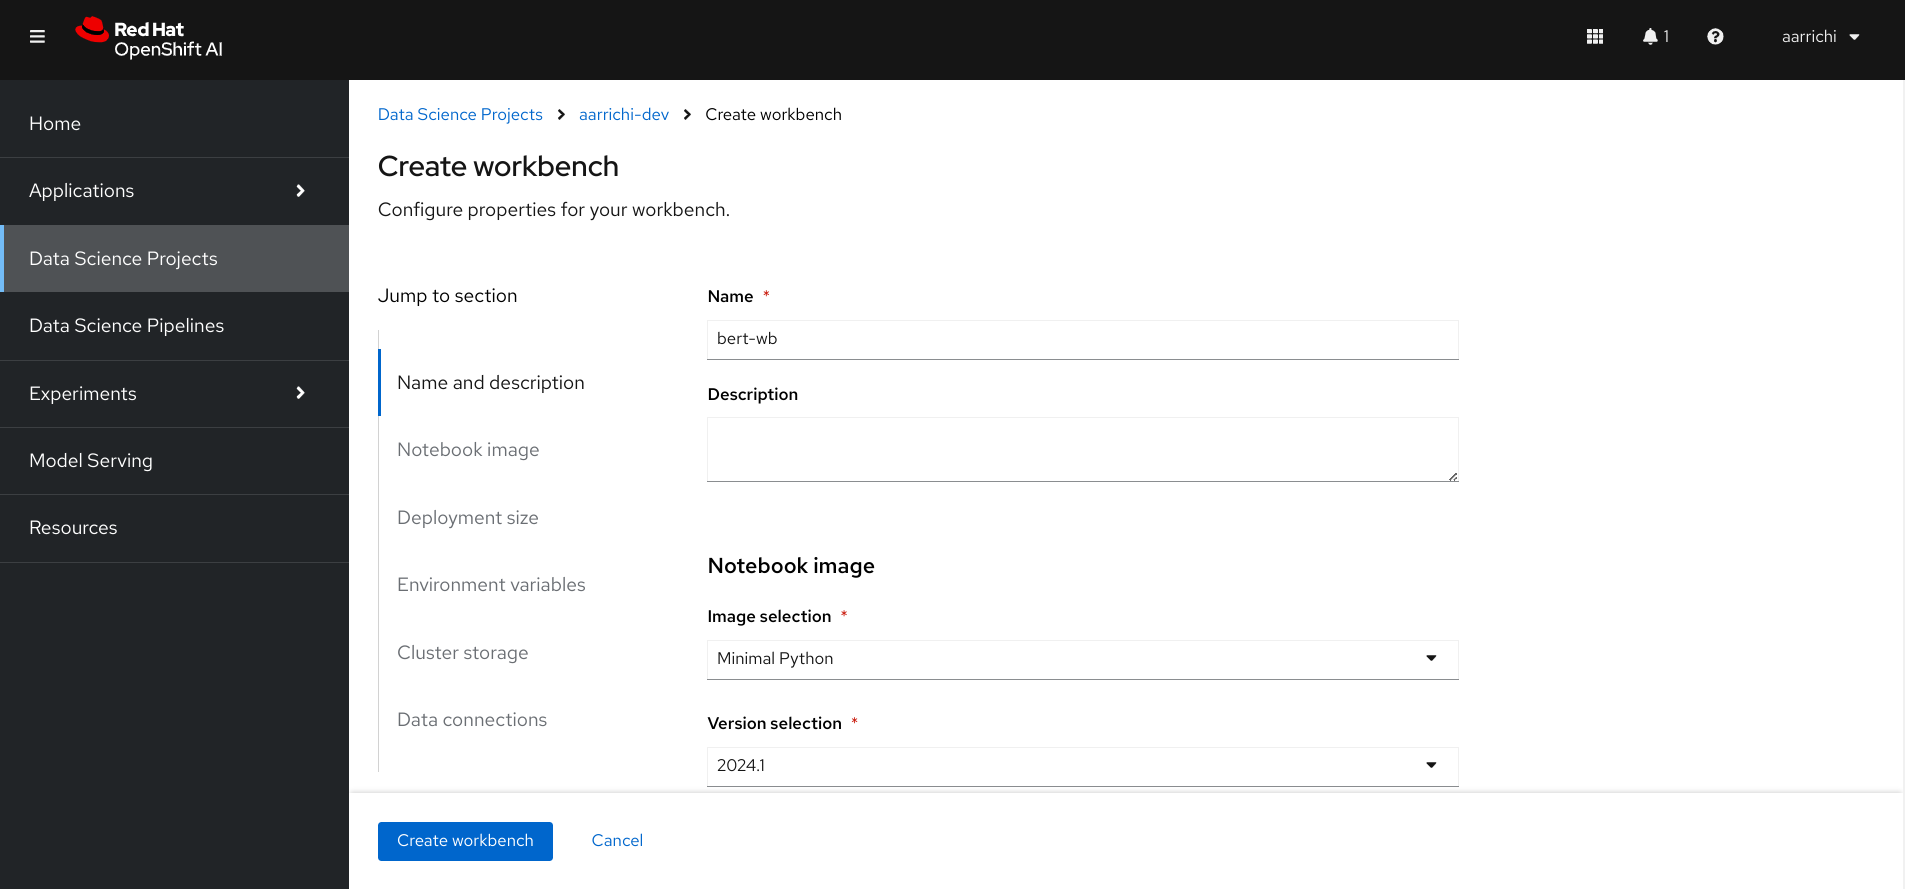
Our workbench should have the following details:
- Image selection: Minimal Python 2.9
- Version selection: 2024.1
- Container size: Medium (2 CPU, 8 GB Memory)
- Accelerator: none (just the CPU should be fine for our example)
- Cluster storage: Create a new persistent storage (10 GB should be fine)
- Data connections: Create or using an existing S3 storage (in case you have no access to S3 provider please consider following the introduction article I linked at the beginning on this post)
Once created you should have something similar to the following image on your environment:
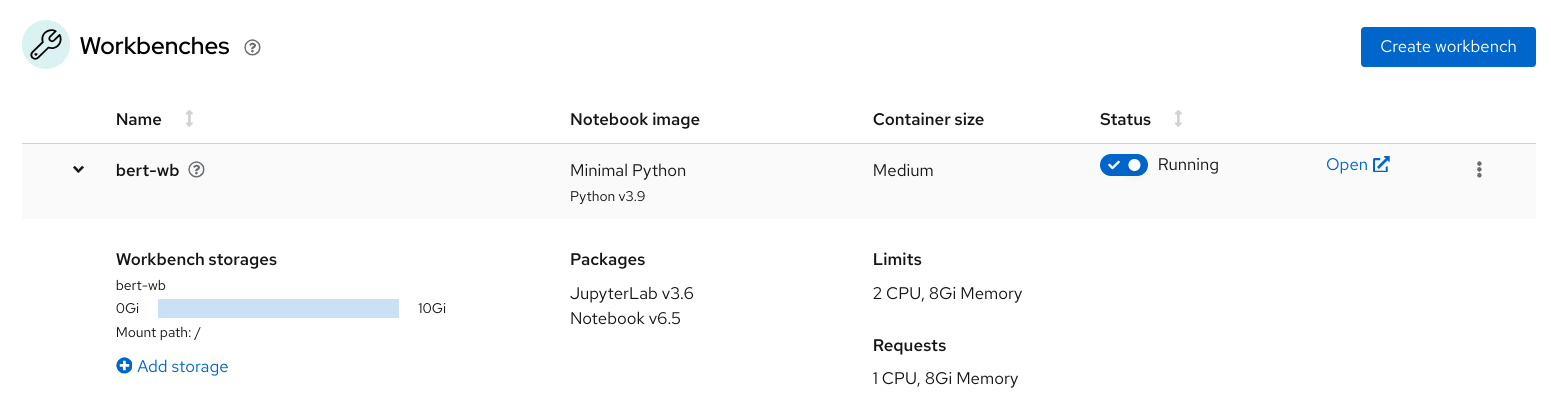
Then you can click on the link named "Open" to access the just created environment, you will be prompted to authorize the login via your OpenShift credentials.
Setting up the Workbench
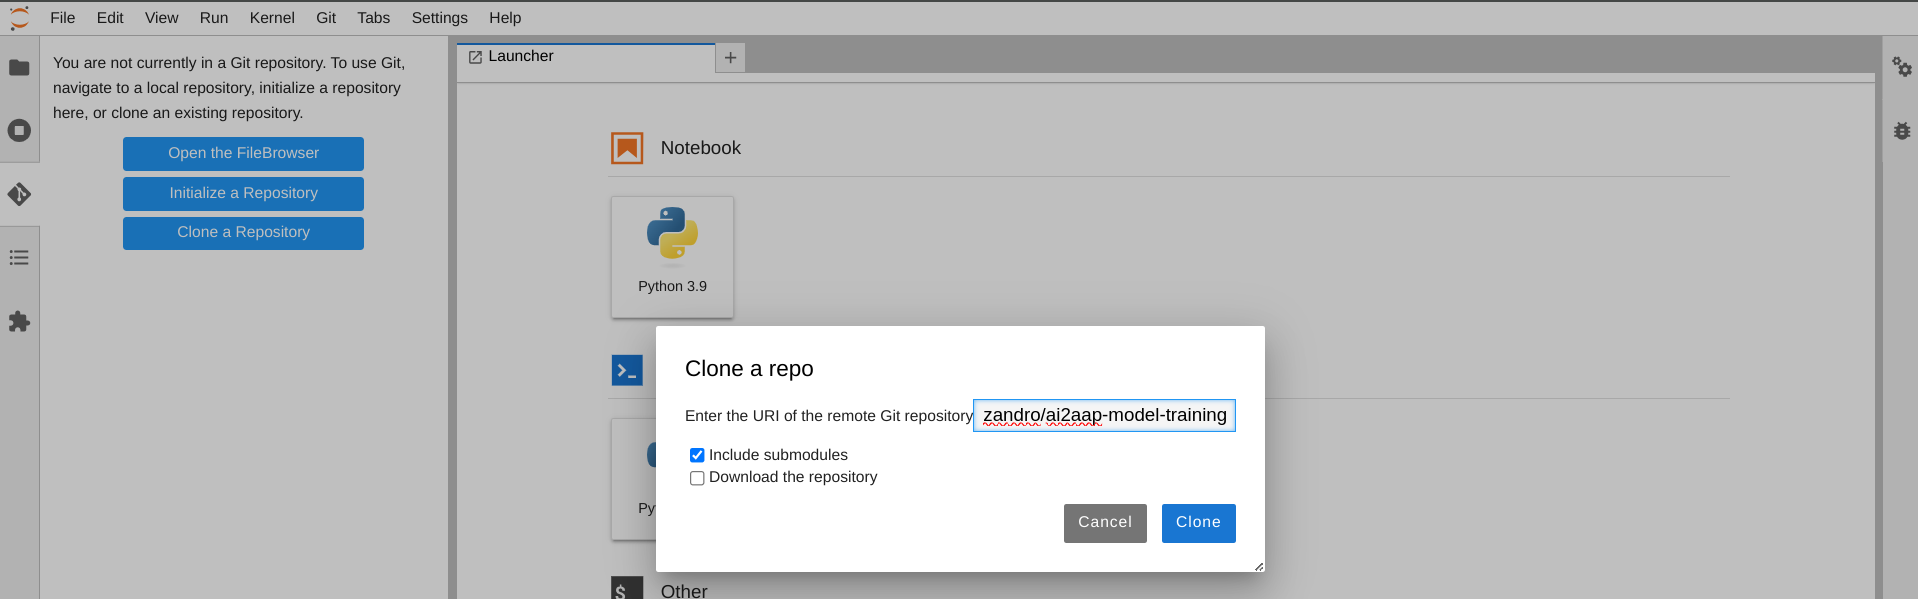
Once logged in your JupyterLab we are ready to start our machine learning experiments. I've setup a Github repo containing some useful Jupyter Notebooks ready to use for the training of a BERT model. Moving on the JupyterLab section for managing GIT repos, you should see a blue button named "Clone a Repository", the repo we are going to clone has the following URL: https://github.com/alezzandro/ai2aap-model-training as shown on the following image.
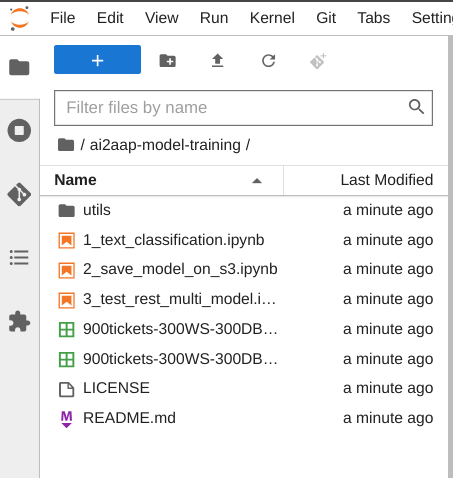
After cloning the repo you should have on the JupyterLab's file browser a brand new directory, containing a set of Jupyter Notebooks that we will explore during this article. The list should be something similar to the following image.
The Incident Classification Example
The Jupyter Notebooks that we will see in this blog post are part of a full demo that showcases the integration of Red Hat products to automate IT incident resolution. It demonstrates how to train a machine learning model on OpenShift AI to classify incident descriptions, create a microservice to interact with the model, and use Ansible Automation Platform to attempt automatic resolution. The process involves updating ServiceNow incidents with progress and results and reassigning for manual intervention if necessary. The demo utilizes a hosted Ansible environment and a free OpenShift tenant for demonstration.
Start the model training
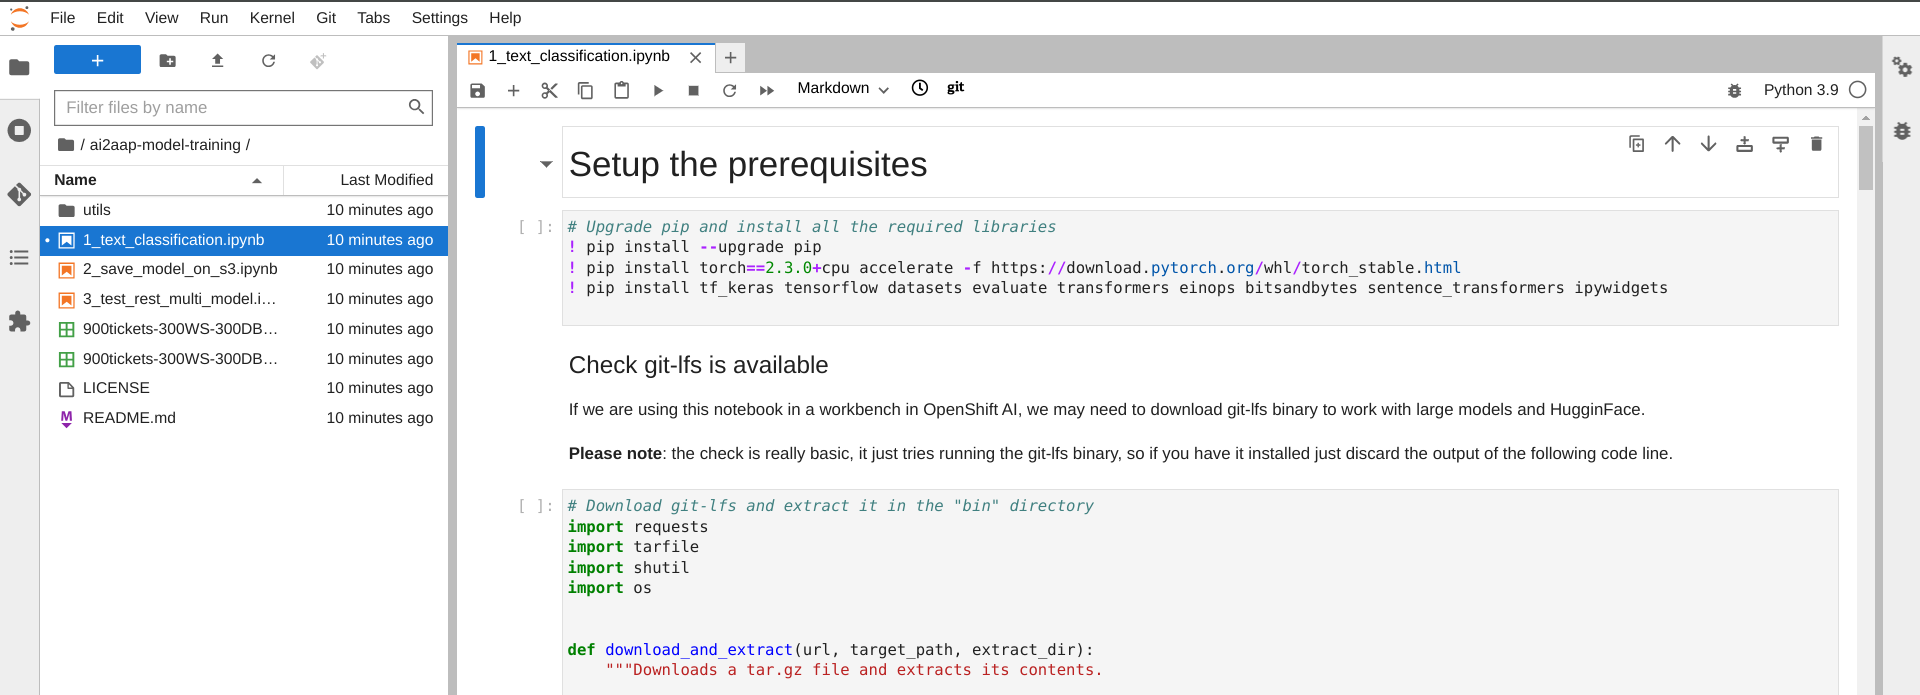
Let's start with the first Notebook "1_text_classification.ipynb", this is the main Jupyter Notebook containing all the needed steps for training an existing model with a custom dataset. Once opened you should see the first steps that will guide us in the training activity as shown in the following image.
If you are not familiar with a Jupiter Notebook you may ask why there is a mix of shell commands and Python code: Jupyter Notebooks are like interactive coding documents. They combine text, equations, visualizations, and code cells (Python, R, etc.) in one place. You can run code, see the results, and add explanations all within the notebook.
The mix of shell commands and Python code happens because:
- Shell commands (e.g., pip install, ls) help you manage your environment, prepare data, and interact with the system directly from the notebook.
- Python code is the core of your analysis, where you work with data, build models, and create visualizations.
This integration makes Jupyter Notebooks very versatile and a popular tool for data science, research, and education.
In the first steps of our Notebook we will setup the workbench with all the required libraries for correctly executing the training and the fine-tuning of our model. After that we will also check if we have a working git-lfs binary. Git LFS (Large File Storage) lets you version large files (models, datasets, etc.) without bloating your Git repository. It replaces large files with small text pointers in Git, while storing the file contents elsewhere. This keeps your repo small and fast, while still allowing you to track changes to large files.
Finally we will also login to Hugging Face in case you want to save your custom model to the cloud.
Hugging Face is a platform and community focused on machine learning, particularly natural language processing (NLP). It provides a Model Hub, Tools and Libraries, Datasets, A Collaborative Community. Hugging Face's purpose is to democratize AI and make cutting-edge NLP technology accessible to everyone.
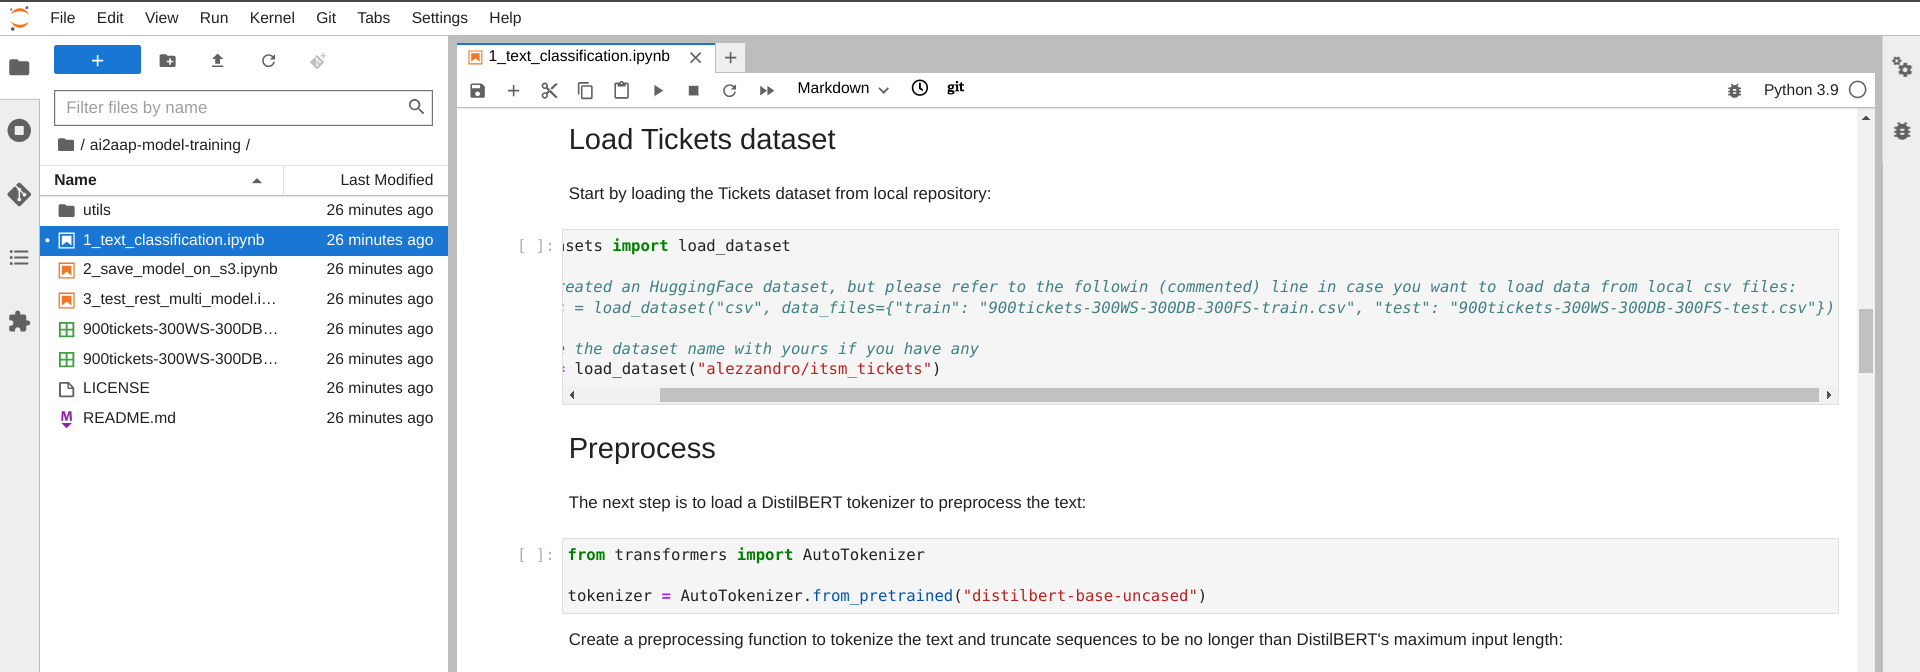
After the prerequisites setup we can start working with our model, first of all we need to defined and import a Dataset and a pretrained model as shown in the following image.
A dataset in machine learning is a collection of examples used to train, evaluate, and fine-tune a model. It typically consists of input features (e.g., images, text) and corresponding labels or targets (e.g., image categories, sentiment labels). The model learns patterns from the dataset to make predictions or decisions on new, unseen data.
Think of it like a textbook for the model, providing it with the information it needs to understand and solve a specific task.
In our case the Dataset is already available on Hugging Face and I created it with the help of one of the Generative AI Assistant, asking to create some IT Incident descriptions for three different categories: "Webserver", "Database", "Filesystem". You will also find the source CSV files available in the repo for your convenience in case you want to edit or import them from the local environment.
Now we are ready to take a look to the steps needed to train and fine-tune a machine learning model. We are not going step by step in the notebook but I will try to summarize the process:
1. Preprocessing with AutoTokenizer
- Choosing a Pretrained Model: in our case we chose the DistilBERT model.
- AutoTokenizer: The AutoTokenizer class from Hugging Face simplifies the process of loading the correct tokenizer for your chosen model
- Tokenization:
- Tokenization: The tokenizer breaks your text data into smaller units (words, subwords) and converts them into numerical representations that the model understands.
- Attention Masks: It creates attention masks that help the model differentiate between actual words and padding tokens.
2. Evaluation Metrics
- Choosing the Right Metric: Select evaluation metrics that are relevant to your task. Common for text classification is the Accuracy
- Defining Metric Computation: Create a function that takes the model's predictions and the true labels to calculate your chosen metric.
3. Training with AutoModelForSequenceClassification
- Task-Specific Model: For sequence classification (e.g., sentiment analysis, text classification), we are going to use AutoModelForSequenceClassification
- Training Arguments: Use TrainingArguments to configure your training process
- Trainer: The Trainer class orchestrates the training loop, evaluation, and checkpointing
- Setting an optimizer function: You can leverage an optimizer function, setting the learning rate schedule, and some training hyperparameters.
The whole process should not last more than 30 minutes and at the end we should be ready to test our model!
Testing the trained model
As you can see in the Jupyter notebook as well as in the image below, we are going to test the Incident classification with a static text string, describing an IT Incident issue.
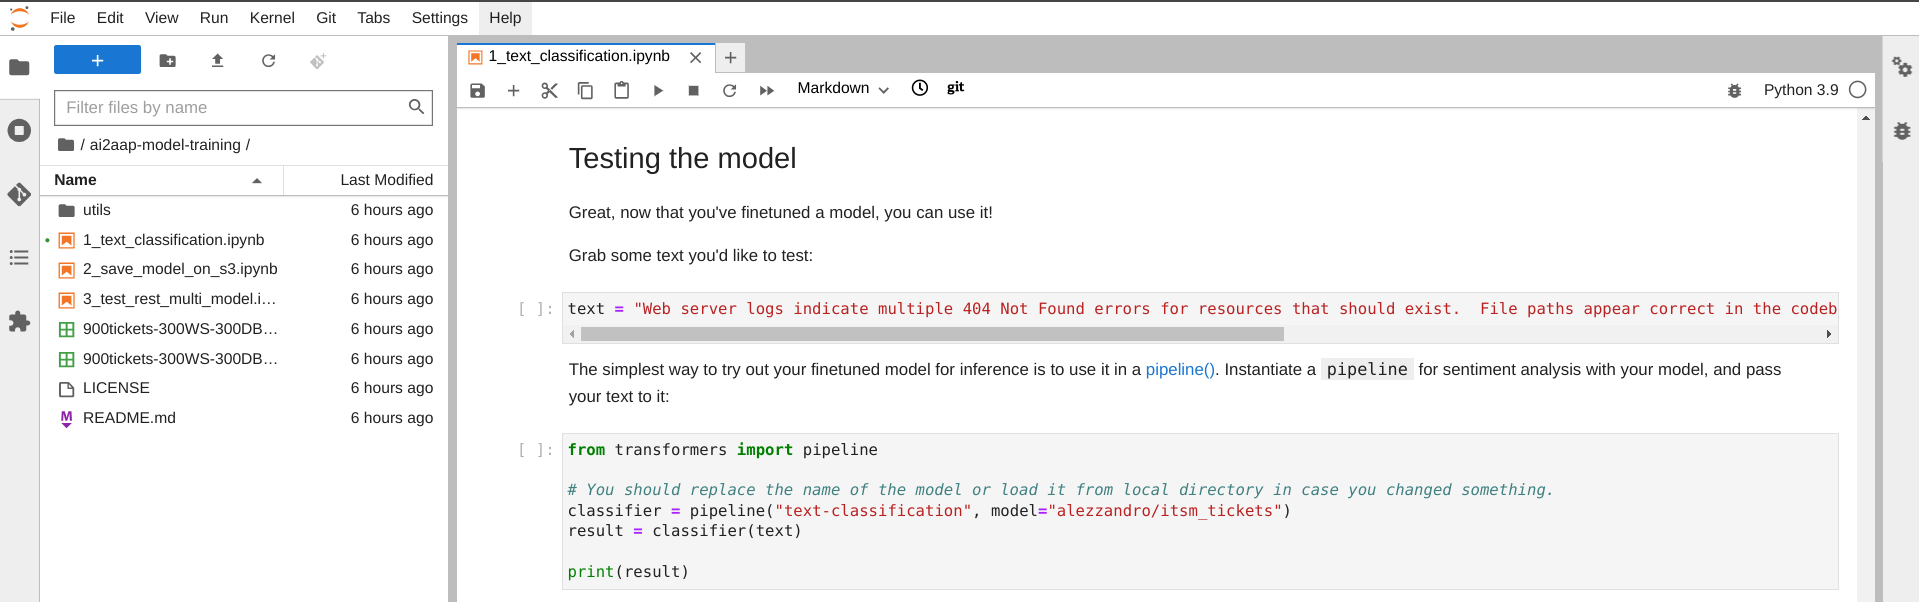
The lines of code create a text classification pipeline using the pre-trained model named "alezzandro/itsm_tickets". This is the model that we trained on a dataset of IT Service Management (ITSM) tickets that can be used to classify new tickets into different categories.
As you can see in the image below the static text has been correctly classified as a "Filesystem" incident.

Converting the model in OpenVINO format
The last steps of the Jupyter notebook are needed to convert the model in a format that the OpenVINO multi-model server, pre-integrated in OpenShift AI, could run as a service. There are just few lines of code, as shown in the following image, and the process should be really fast.

Uploading the model on S3 Storage
Once created and converted the trained model, we are now ready to upload it on S3 storage, thanks to this our OpenVINO multi-model server could serve it as a service. Again there are only few lines of code and our model should be uploaded on S3. You will find the steps in the notebook named "2_save_model_on_s3.ipynb".
Deploy the model on OpenVINO multi-model server
OpenVINO Multi-Model Server (OVMS) is a high-performance solution for deploying and serving multiple machine learning models simultaneously. It excels at:
- Efficiency: Host various AI models within the same environment.
- Flexibility: Support for multiple model formats and dynamic configuration.
- Performance: Leverages OpenVINO's optimizations for Intel hardware.
- Ease of Use: Standard APIs and compatibility with existing tools.
OVMS simplifies model deployment, handles versioning, and offers additional features like model reshaping and pipeline serving. It's ideal for developers, enterprises, and anyone needing to run multiple models efficiently.
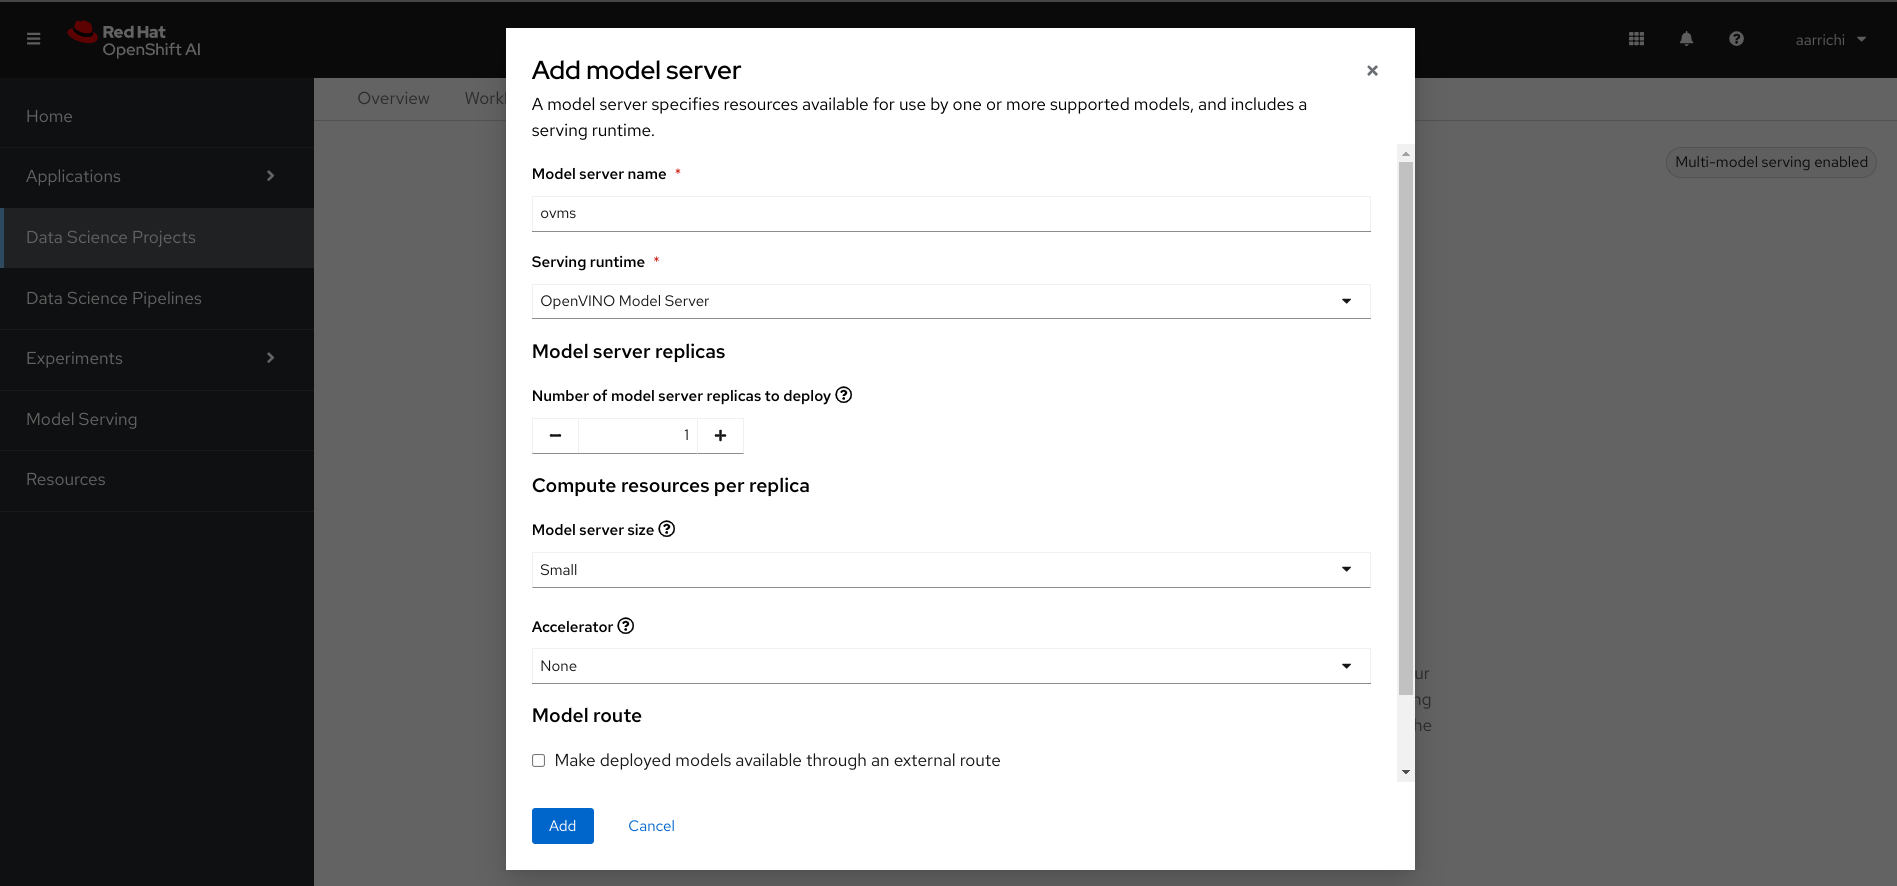
Let's go back in the OpenShift AI console and start creating a new multi-model server if it's missing, as shown in the following image.
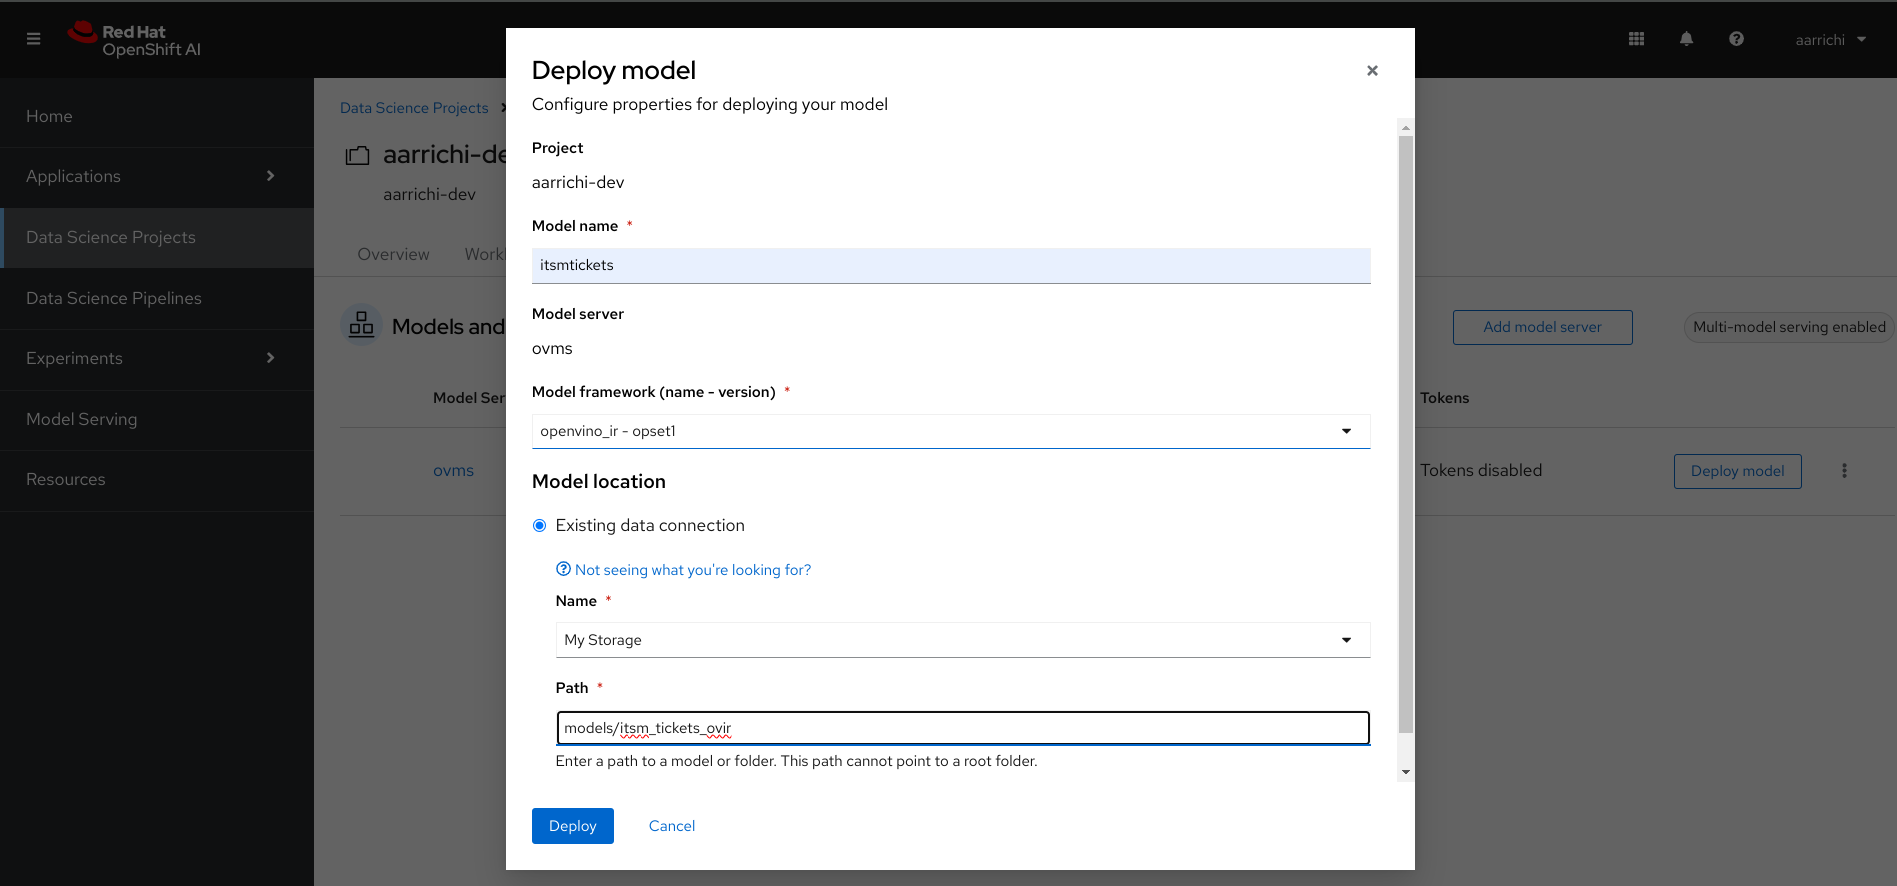
After that we are ready to deploy our trained model that we converted in OpenVINO format and then uploaded on the S3 storage. You should click the "Deploy model" button and then fill the required inputs. Pay attention to insert the correct name for the model's path in the "Model location" section, you should define the path with something like "models/itsm_tickets_ovir" as shown in the following image.
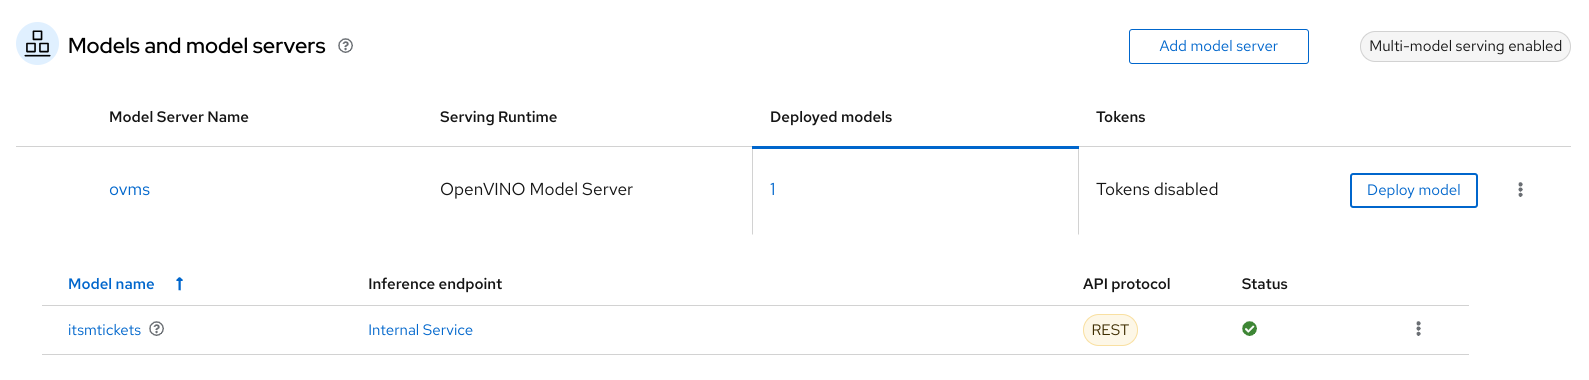
Once the deployment will complete you should notice a green check mark under OpenVINO server's tab, as shown in the following image.
Testing the model on OpenVINO multi-model server
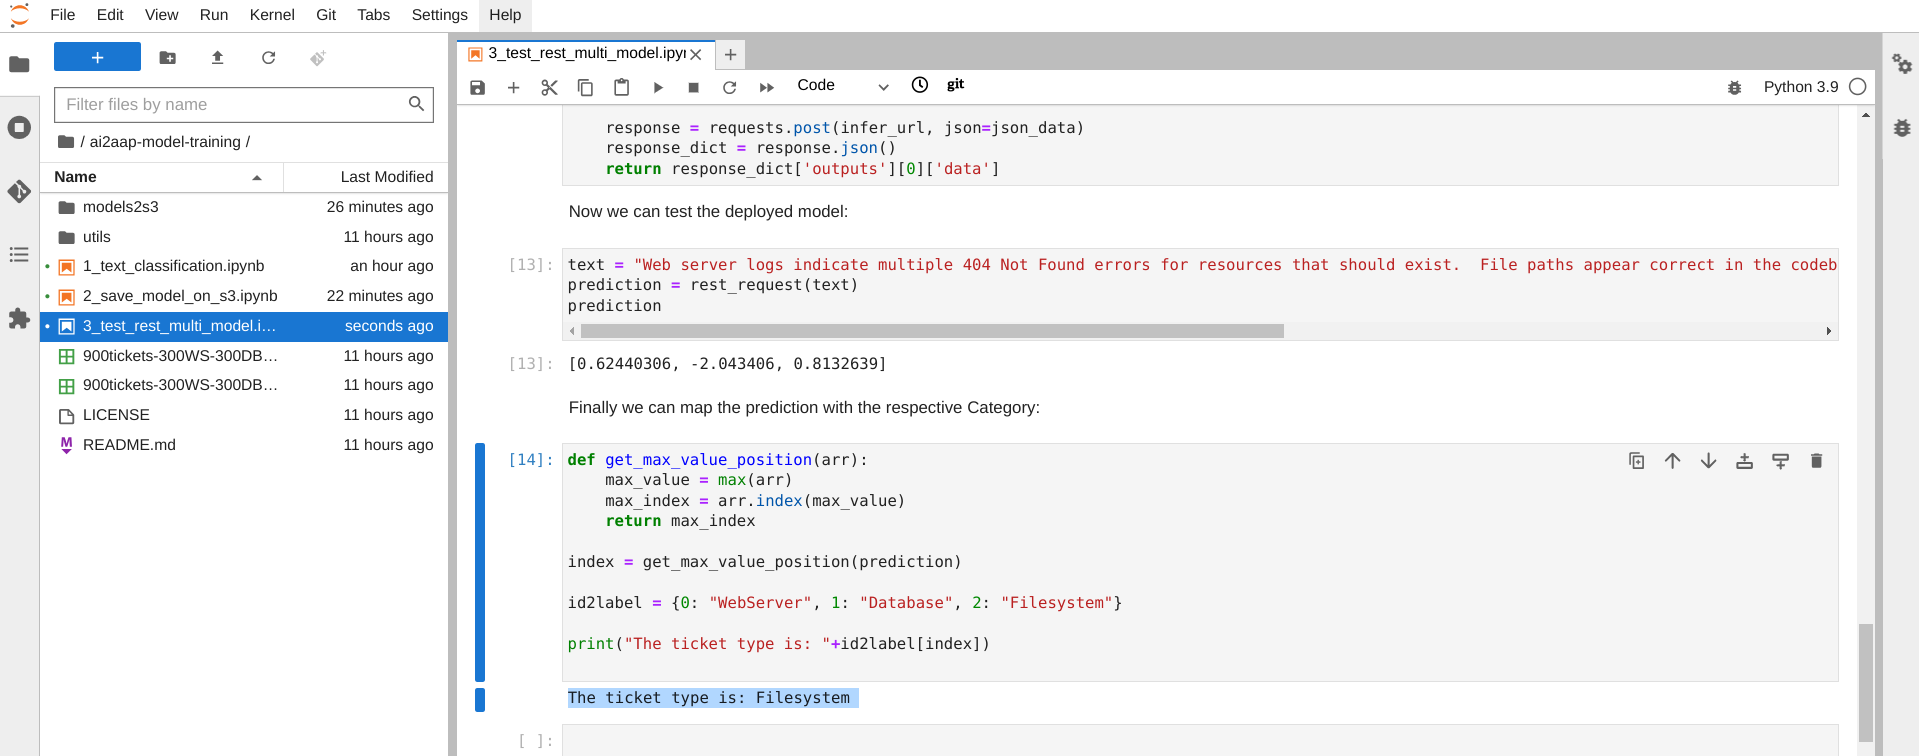
Finally we are ready to test the just deployed model on OpenVINO server, I've created a third Jupyter Notebook that contains all the libraries and the code needed for interacting with it.
As you can see in the notebook's code, I've defined a function to create a REST request for the OpenVINO server passing all the required parameters. After that, once got the response, we will use another function to match the right label predicted by the model, as described also in the following image.
Conclusion
In this blog post, we've only scratched the surface of what's possible when combining OpenShift AI, BERT models, and the extensive ecosystem of tools available. The pre-integrated JupyterLab environment makes it incredibly easy to start experimenting and fine-tuning these powerful models. With OpenVINO's flexible serving capabilities and the wealth of Hugging Face resources, the path to deploying sophisticated NLP solutions is clearer than ever. As these technologies continue to evolve, we can expect even more exciting breakthroughs in natural language understanding and application.
If you want to take a look to the complete demo, you will find below the various Github repositories for every demo's component:
- JupyterHub notebooks' main repository with: https://github.com/alezzandro/ai2aap-model-training
- Python microservice that mediates request to the model's REST API: https://github.com/alezzandro/ai2aap-predict-text-ws
- Python microservice that bridge ServiceNow Incidents, the Prediction microservice and start Automation Workflows on Ansible Automation Platform: https://github.com/alezzandro/ai2aap-snow-incidents-resolution
- Ansible Playbooks main repository for incidents resolution: https://github.com/alezzandro/ai2aap-ansible-playbooks
