In part one of this series about MongoDB and Quarkus, you will learn how to write a simple Quarkus application from scratch that persists movie data into MongoDB and exposes a few REST endpoints that allows HTTP clients to interact with the persisted data.
You'll also experience how easy it is to containerize your application and deploy it to Kubernetes, specifically the Developer Sandbox for Red Hat OpenShift, which is available to you completely free of charge for 30 days. As you work your way through this article's example application, you will get to know several useful Quarkus extensions that greatly simplify the application development and deployment process.
Quarkus project setup
To get started with Quarkus quickly by scaffolding a sample project, you can use one of the following two options:
-
Go to https://code.quarkus.io, where you can specify a number of project related configuration settings together with Quarkus extensions you might want to include right away—you will add all the necessary extensions for this article's sample application one-by-one at a later stage. Finally, click Generate your application, then Download the zip to download an archive containing your scaffolded Quarkus project skeleton with starter code. See Figure 1.
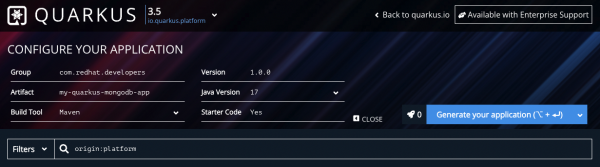
Figure 1: Quarkus.io web UI to scaffold a new project. -
Install and use the Quarkus CLI to scaffold your Quarkus project skeleton locally by running the following command. It's recommended to have the Quarkus CLI available because it allows for simpler, more concise commands compared to the equivalent Maven (Wrapper) commands.
quarkus create app com.redhat.developers:my-quarkus-mongodb-app:1.0.0
Open the Quarkus project—either the one created by the CLI or the one resulting from unzipping the downloaded archive—in the Java integrated development environment (IDE) of your choice. Next, launch a new terminal and make sure you are in the root folder of this Quarkus project. From within that folder, start the Quarkus application in the so-called development mode, by using either the Maven Wrapper ./mvnw quarkus:dev command or the Quarkus CLI quarkus dev command (Figure 2).

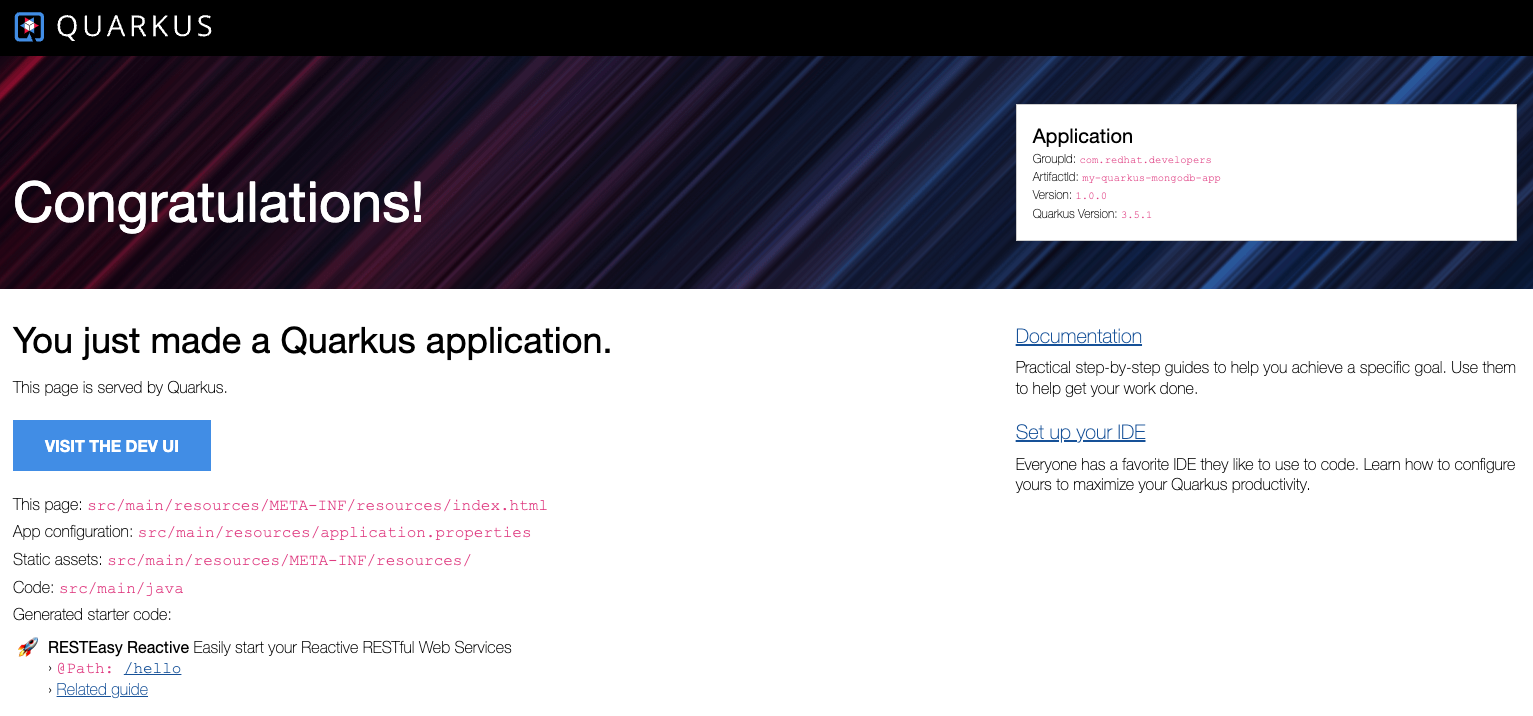
Once the app has been started in dev mode, press w in the terminal session to reach the default index page of the auto-generated application, as shown in Figure 3.
If you press d instead in the terminal session of dev mode, you are directly brought to the Dev UI (Figure 4) to get more detailed insights into application-related aspects such as Extension Overview, Configuration, Continuous Testing, Dev Services, and Build Metrics.

Let the coding begin
The basic sample application we'll create in this article's tutorial will persist data about movies, and it will expose basic REST endpoints to serve that movie data to HTTP clients. The GitHub repository accompanying this article can be found here. In addition to the final state of the source code for this sample application, it also provides separate tags (step1 ... step5) that point to different revisions that represent every milestone of the development described below.
Add MongoDB extension
The first step is to add a Quarkus-specific extension named quarkus-mongodb-panache, which is a convenient ORM (Object Relational Mapper) —or, more precisely, an ODM (Object Document Mapper) —which wraps the plain MongoDB client extension and the Java driver:
- Maven Wrapper command:
./mvnw quarkus:add-extension -Dextensions='quarkus-mongodb-panache' - Quarkus CLI command:
quarkus ext add quarkus-mongodb-panache
Besides adding the necessary project dependency, what also happens when running this during dev mode is that Quarkus' dev services kick in and automatically launch a containerized MongoDB instance in the background. Quarkus does that because at this point, you haven't explicitly configured any database server connection so far. Depending on whether you are using Podman or Docker, you should see a MongoDB container when checking for locally running containers using, for example, podman ps or docker ps:
CONTAINER ID   IMAGE                       COMMAND                  CREATED          STATUS          PORTS                      NAMES

7ac784f55aa1   mongo:4.4                   "docker-entrypoint.s…"   48 seconds ago   Up 47 seconds   0.0.0.0:58055->27017/tcp   vigilant_matsumoto
3f3e550f952c   testcontainers/ryuk:0.5.1   "/bin/ryuk"              48 seconds ago   Up 48 seconds   0.0.0.0:58053->8080/tcp    testcontainers-ryuk-6acbdd91-f869-40a9-b13d-bed21ecc86f4
Optional: Change default container image
By default, the configured container image for MongoDB is still based on version 4.4, which is why you might want to switch to a more recent MongoDB container image, e.g., MongoDB 7.0 with UBI 8 as base image. You can achieve this by adding the configuration setting shown below to your src/main/resources/application.properties file:
quarkus.mongodb.devservices.image-name=mongodb/mongodb-community-server:7.0.3-ubi8
As soon as you have done that, go back into the terminal session where Quarkus dev mode is running and press the s key to force a reload after changing the container image. This can take a few moments if the container image is not in your local image cache and needs to be pulled from the respective registry.
...

2023-11-13 10:32:44,187 INFO  [io.qua.dep.dev.RuntimeUpdatesProcessor] (Aesh InputStream Reader) Restarting quarkus due to changes in application.properties.
2023-11-13 10:32:46,282 INFO  [tc.mon.0.3-ubi8] (docker-java-stream--1940634529) Starting to pull image
2023-11-13 10:32:46,305 INFO  [tc.mon.0.3-ubi8] (docker-java-stream--1940634529) Pulling image layers:  0 pending,  0 downloaded,  0 extracted, (0 bytes/0 bytes)
2023-11-13 10:32:47,632 INFO  [tc.mon.0.3-ubi8] (docker-java-stream--1940634529) Pulling image layers:  9 pending,  1 downloaded,  0 extracted, (525 KB/? MB)
2023-11-13 10:32:49,308 INFO  [tc.mon.0.3-ubi8] (docker-java-stream--1940634529) Pulling image layers:  8 pending,  2 downloaded,  0 extracted, (7 MB/? MB)
2023-11-13 10:32:54,835 INFO  [tc.mon.0.3-ubi8] (docker-java-stream--1940634529) Pulling image layers:  7 pending,  3 downloaded,  0 extracted, (28 MB/? MB)
2023-11-13 10:32:55,705 INFO  [tc.mon.0.3-ubi8] (docker-java-stream--1940634529) Pulling image layers:  6 pending,  4 downloaded,  0 extracted, (31 MB/? MB)
2023-11-13 10:32:56,719 INFO  [tc.mon.0.3-ubi8] (docker-java-stream--1940634529) Pulling image layers:  5 pending,  5 downloaded,  0 extracted, (35 MB/? MB)
2023-11-13 10:32:57,806 INFO  [tc.mon.0.3-ubi8] (docker-java-stream--1940634529)

...

2023-11-13 10:34:20,330 INFO  [tc.mon.0.3-ubi8] (docker-java-stream--1940634529) Pulling image layers:  0 pending, 10 downloaded,  7 extracted, (382 MB/382 MB)
2023-11-13 10:34:20,333 INFO  [tc.mon.0.3-ubi8] (docker-java-stream--1940634529) Pulling image layers:  0 pending, 10 downloaded,  8 extracted, (382 MB/382 MB)
2023-11-13 10:34:20,341 INFO  [tc.mon.0.3-ubi8] (docker-java-stream--1940634529) Pulling image layers:  0 pending, 10 downloaded,  9 extracted, (382 MB/382 MB)
2023-11-13 10:34:20,352 INFO  [tc.mon.0.3-ubi8] (docker-java-stream--1940634529) Pulling image layers:  0 pending, 10 downloaded, 10 extracted, (382 MB/382 MB)
2023-11-13 10:34:20,370 INFO  [tc.mon.0.3-ubi8] (docker-java-stream--1940634529) Pull complete. 10 layers, pulled in 94s (downloaded 382 MB at 4 MB/s)
Once this new container image has been pulled successfully , dev services will stop the previously started container and launch a new one instead. Checking for locally running containers should reveal that the container image you specified in application.properties is now in use:
CONTAINER ID   IMAGE                                         COMMAND                  CREATED              STATUS              PORTS                      NAMES

c0dfde5a4989   mongodb/mongodb-community-server:7.0.3-ubi8   "python3 /usr/local/…"   About a minute ago   Up About a minute   0.0.0.0:58492->27017/tcp   frosty_cray
3f3e550f952c   testcontainers/ryuk:0.5.1                     "/bin/ryuk"              20 minutes ago       Up 20 minutes       0.0.0.0:58053->8080/tcp    testcontainers-ryuk-6acbdd91-f869-40a9-b13d-bed21ecc86f4
Note: You can get to the state of this sample application up to this point by cloning the GitHub repo and checking out the tag step1.
Add entity class
The plain Java class to represent data about one specific movie is pretty straightforward and looks as follows:
public class Movie {
    public String title;
    public List<String> genre;
    public Integer duration;
    public Boolean released;
    public Integer year;
}
Create a new file named Movie.java inside the com.redhat.developers package of your Quarkus project and copy the following code snippet into it to make this Java class an entity that can be used according to the active record pattern. This class inherits from PanacheMongoEntity and the @MongoEntity annotation is used to specify the MongoDB collection name, which is movies in this case.
package com.redhat.developers;

import java.util.List;

import io.quarkus.mongodb.panache.PanacheMongoEntity;
import io.quarkus.mongodb.panache.common.MongoEntity;

@MongoEntity(collection = "movies")
public class Movie extends PanacheMongoEntity {
    public String title;
    public List<String> genre;
    public Integer duration;
    public Boolean released;
    public Integer year;
}
Note that if you prefer a different data access paradigm, namely the repository pattern, the MongoDB with Panache extension has got you covered, too. We'll explore this further in one of the upcoming parts in this article series.
The database name to use can be defined in the application.properties file by adding this configuration setting:
quarkus.mongodb.database=my_movie_db
Note: You can get to the state of this sample application up to this point by cloning the GitHub repo and then checking out the tag step2.
Add REST endpoints
Before working with your MongoDB movie entities and the active record pattern, create a new file named MovieResource.java inside the com.redhat.developers package of your Quarkus project and copy the following code snippet into it. This class provides three basic REST endpoints to retrieve all movies, fetch a specific movie by its ID, and add a new movie.
package com.redhat.developers;

import java.net.URI;
import java.util.List;

import org.bson.types.ObjectId;

import jakarta.ws.rs.Consumes;
import jakarta.ws.rs.GET;
import jakarta.ws.rs.POST;
import jakarta.ws.rs.Path;
import jakarta.ws.rs.PathParam;
import jakarta.ws.rs.Produces;
import jakarta.ws.rs.core.MediaType;
import jakarta.ws.rs.core.Response;

@Path("api/movie")
@Consumes(MediaType.APPLICATION_JSON)
@Produces(MediaType.APPLICATION_JSON)
public class MovieResource {

    @GET
    public List<Movie> allMovies() {
        return Movie.listAll();
    }

    @GET
    @Path("{id}")
    public Response getMovie(@PathParam("id") String id) {
        var movie = Movie.findById(new ObjectId(id));
        return movie != null
            ? Response.ok(movie).build()
            : Response.status(Response.Status.NOT_FOUND).build();
    }

    @POST
    public Response addMovie(Movie movie) {
        movie.persist();
        return Response.created(URI.create("/api/movies"+movie.id)).entity(movie).build();
    }

}
Note: If you don't want to write any such (boilerplate) code for basic REST resources like this, feel free to check out the following Quarkus guide, which explains how to generate Jakarta REST resources on top of Panache. We'll also cover this in one of the next parts in this article series.
Before you try out this REST resource, it's important to make sure to add one more Quarkus extension, namely the RESTeasy Reactive Jackson extension. This will enable you to properly de/serialize movie objects from/to JSON.
- Maven Wrapper command:
./mvnw quarkus:add-extension -Dextensions='quarkus-resteasy-reactive-jackson' - Quarkus CLI command:
quarkus ext add quarkus-resteasy-reactive-jackson
Call REST endpoints
Use any IDE or CLI/UI tool of your choice to try out the three REST endpoints handled by the movie resources of your Quarkus application. Below are the requests and corresponding responses when using cURL.
Retrieve all movies (currently no movies stored)
-
Request:
curl localhost:8080/api/movie -
Response:
[]
Add first new movie
-
Request:
curl localhost:8080/api/movie \ --header 'Content-Type: application/json' \ --data '{ "title": "The Matrix", "genre": ["Action, SciFi"], "duration": 123, "released": true, "year": 1999 }' -
Response:
{
  "id": "6552052e3121513432e56460",
  "title": "The Matrix",
  "genre": [
    "Action, SciFi"
  ],
  "duration": 123,
  "released": true,
  "year": 1999
}
Retrieve existing movie by ID
-
Request:
curl localhost:8080/api/movie/6552052e3121513432e56460 -
Response:
{
  "id": "6552052e3121513432e56460",
  "title": "The Matrix",
  "genre": [
    "Action, SciFi"
  ],
  "duration": 123,
  "released": true,
  "year": 1999
}
Retrieve all movies (currently one movie stored)
-
Request:
curl localhost:8080/api/movie -
Response:
[
  {
    "id": "6552052e3121513432e56460",
    "title": "The Matrix",
    "genre": [
      "Action, SciFi"
    ],
    "duration": 123,
    "released": true,
    "year": 1999
  }
]
Note: You can get to the state of this sample application up to this point by cloning the GitHub repo and then checking out the tag step3.
Preload sample data
During development, it's often convenient to have a flexible way to load sample data during application bootstrap. One way to do this when using MongoDB and Quarkus is to rely on Liquibase, for which there is also a turn-key ready extension available. You can add this as follows:
- Maven Wrapper command:
./mvnw quarkus:add-extension -Dextensions='quarkus-liquibase-mongodb' - Quarkus CLI command:
quarkus ext add quarkus-liquibase-mongodb
With this extension in place, create a new file named src/main/resources/mongo/import.xml and copy the XML snippet below into it:
<?xml version="1.1" encoding="UTF-8" standalone="no"?>
<databaseChangeLog
xmlns="http://www.liquibase.org/xml/ns/dbchangelog"
xmlns:xsi="http://www.w3.org/2001/XMLSchema-instance"
xmlns:ext="http://www.liquibase.org/xml/ns/dbchangelog-ext"
xsi:schemaLocation="http://www.liquibase.org/xml/ns/dbchangelog https://www.liquibase.org/xml/ns/dbchangelog/dbchangelog-latest.xsd
http://www.liquibase.org/xml/ns/dbchangelog-ext https://www.liquibase.org/xml/ns/dbchangelog/dbchangelog-ext.xsd">
<changeSet id="1" author="quarkus-liquibase-mongodb">
<ext:createCollection collectionName="movies"/>
<ext:insertMany collectionName="movies">
<ext:documents>
[
{
"title": "Grown Ups",
"genre": [
"Comedies"
],
"duration": 103,
"released": true,
"year": 2010
},
{
"title": "Dark Skies",
"genre": [
"Horror Movies",
"Sci-Fi & Fantasy"
],
"duration": 97,
"released": true,
"year": 2013
},
{
"title": "Paranoia",
"genre": [
"Thrillers"
],
"duration": 106,
"released": true,
"year": 2013
},
{
"title": "Ankahi Kahaniya",
"genre": [
"Dramas",
"Independent Movies",
"International Movies"
],
"duration": 111,
"released": true,
"year": 2021
},
{
"title": "The Father Who Moves Mountains",
"genre": [
"Dramas",
"International Movies",
"Thrillers"
],
"duration": 110,
"released": true,
"year": 2021
}
]
</ext:documents>
</ext:insertMany>
</changeSet>
</databaseChangeLog>
This instructs the Liquibase extension to take action during the bootstrapping phase of your Quarkus application and apply the defined change set. In this example, a collection named movies is created and five movies are inserted based on the contained JSON array in the import.xml file.
The final step to have this sample data automatically preloaded at application startup is to add these two settings in your application.properties file:
quarkus.liquibase-mongodb.change-log=mongo/import.xml
quarkus.liquibase-mongodb.migrate-at-start=true
Now, if you call the REST endpoint to retrieve all movies, Quarkus dev mode will reload the application due to these changes and the Liquibase extension performs the loading of this sample data. The HTTP response body you are expected to see is a JSON array that contains the five movies as specified by the Liquibase change set in import.xml.
Note: You can get to the state of this sample application up to this point by cloning the GitHub repo and then checking out the tag step4.
Let the deployment begin
There are various ways to build Quarkus applications, create container images, and deploy them as containers to Kubernetes. In this section, you will use two convenient Quarkus extensions that considerably remove friction when it comes to deploying containerized Quarkus apps on top of Kubernetes.
Add Jib extension
First, add the Jib Quarkus extension, which allows you to build a container image without explicitly creating or touching a Containerfile.
- Maven Wrapper command:
./mvnw quarkus:add-extension -Dextensions='quarkus-container-image-jib' - Quarkus CLI command:
quarkus ext add quarkus-container-image-jib
With this extension added, specify the fully qualified image name in your application.properties file by adding:
quarkus.container-image.image=quay.io/<YOUR_USER_HERE>/my-quarkus-mongodb-app:1.0.0
Note: Replace <YOUR_USER_HERE> with your actual username on the container registry used on quay.io. If you prefer to work with other registries such as the Docker Hub, feel free to do that and adapt the image name accordingly.
It's important to remember that when you run a Quarkus application in a container, you run the application in production mode; hence, there are no dev services in place. This means that you have to specify a MongoDB connection string either directly in your application.properties file or as an environment variable when running the container in question. Anticipating a basic MongoDB single container deployment on Kubernetes, you can define the connection string in its most puristic form. Note that using the %prod prefix for this property allows you to keep using the MongoDB dev services during development:
%prod.quarkus.mongodb.connection-string=mongodb://mongodb:27017
Building a container image for this Quarkus application is then only a matter of running either the Maven Wrapper command ./mvnw install -Dquarkus.container-image.build=true -DskipTests or the equivalent Quarkus CLI command quarkus image build jib --no-tests. Both result in a new container image being built and stored in your local image cache/repository using the fully qualified image name you specified above.
If you plan to run this container image on Kubernetes, push the freshly generated container image to the chosen registry so it can be resolved and pulled to the Kubernetes from there when it gets deployed. There are a different ways to push the image. Make sure that you are successfully authenticated against the registry in use. From there, you can run the podman | docker push <fully_qualified_image_name_here> command, for example. Also, there is a corresponding Quarkus CLI command quarkus image push, as well as a Maven Wrapper command ./mvnw install -Dquarkus.container-image.push=true -DskipTests to push locally built container images to the registry.
Add Kubernetes extension
Next, we'll add the Kubernetes Quarkus extension to ease the process of deploying your containerized application to a Kubernetes cluster.
- Maven Wrapper command:
./mvnw quarkus:add-extension -Dextensions='quarkus-kubernetes' - Quarkus CLI command:
quarkus ext add quarkus-kubernetes
With this Kubernetes extension added, a (re)build of the Quarkus application will now also create the necessary YAML manifests for a Kubernetes deployment. You can find what has been automatically generated in the target/kubernetes/kubernetes.yml. If you inspect that file, you should find a Deployment, Service, ServiceAccount, Role, RoleBinding, plus a Job–all for the Quarkus application itself. What's missing, though, are any database-specific Kubernetes resources.
That said, a really nice feature of this extension is its capability to pick up any custom, additionally provided YAML manifests and merge them with the auto-generated one into a final YAML file that can be used to deploy everything together in one go. In order for your custom YAML file to get picked up by the Kubernetes extension, you follow the convention and create your custom manifest file named kubernetes.yml within the src/main/kubernetes/ folder of your Quarkus project.
At the bare minimum, what you need to provide to run an ephemeral, single-pod MongoDB instance on Kubernetes is a Deployment plus a Service. You can copy and paste the YAML snippet below into src/main/kubernetes/kubernetes.yml:
apiVersion: v1
kind: Service
metadata:
  name: mongodb
  labels:
    app: mongodb
spec:
  ports:
    - port: 27017
  selector:
    app: mongodb
  type: ClusterIP
---
apiVersion: apps/v1
kind: Deployment
metadata:
  name: mongodb
  labels:
    app: mongodb
    app.openshift.io/runtime: mongodb
spec:
  selector:
    matchLabels:
      app: mongodb
  strategy:
    type: RollingUpdate
  template:
    metadata:
      labels:
        app: mongodb
    spec:
      containers:
        - name: mongodb
          image: mongodb/mongodb-community-server:7.0.3-ubi8
          args: ["--port", "27017", "--bind_ip_all"]
          ports:
            - name: mongodb
              containerPort: 27017
          volumeMounts:
            - name: mongo-config-dir
              mountPath: /data/configdb
            - name: mongo-data-dir
              mountPath: /data/db
      volumes:
        - name: mongo-config-dir
          emptyDir: {}
        - name: mongo-data-dir
          emptyDir: {}
With the custom MongoDB-related YAML manifests in place, all you need to do is rebuild the application which will result in a merged YAML file that contains all necessary Kubernetes resources to deploy the Quarkus application together with the MongoDB database it depends on.
Note: You can get to the state of this sample application up to this point by cloning the GitHub repo and then checking out the tag step5.
Before proceeding, make sure you have access to your Developer Sandbox for Red Hat OpenShift:
- You can claim your personal instance here https://developers.redhat.com/developer-sandbox by clicking the Start your sandbox for free button and following the instructions.
- Once it is running and you can access the OpenShift web console, make sure that you are logged in / authenticated against this instance via kubectl.
From the project's root folder, either run kubectl apply -f target/kubernetes/kubernetes.yaml or go with the more concise Quarkus CLI command quarkus deploy. After a few moments, you should be able to inspect a successful deployment in the Topology view of your user's project/namespace in your Developer Sandbox environment (Figure 5).

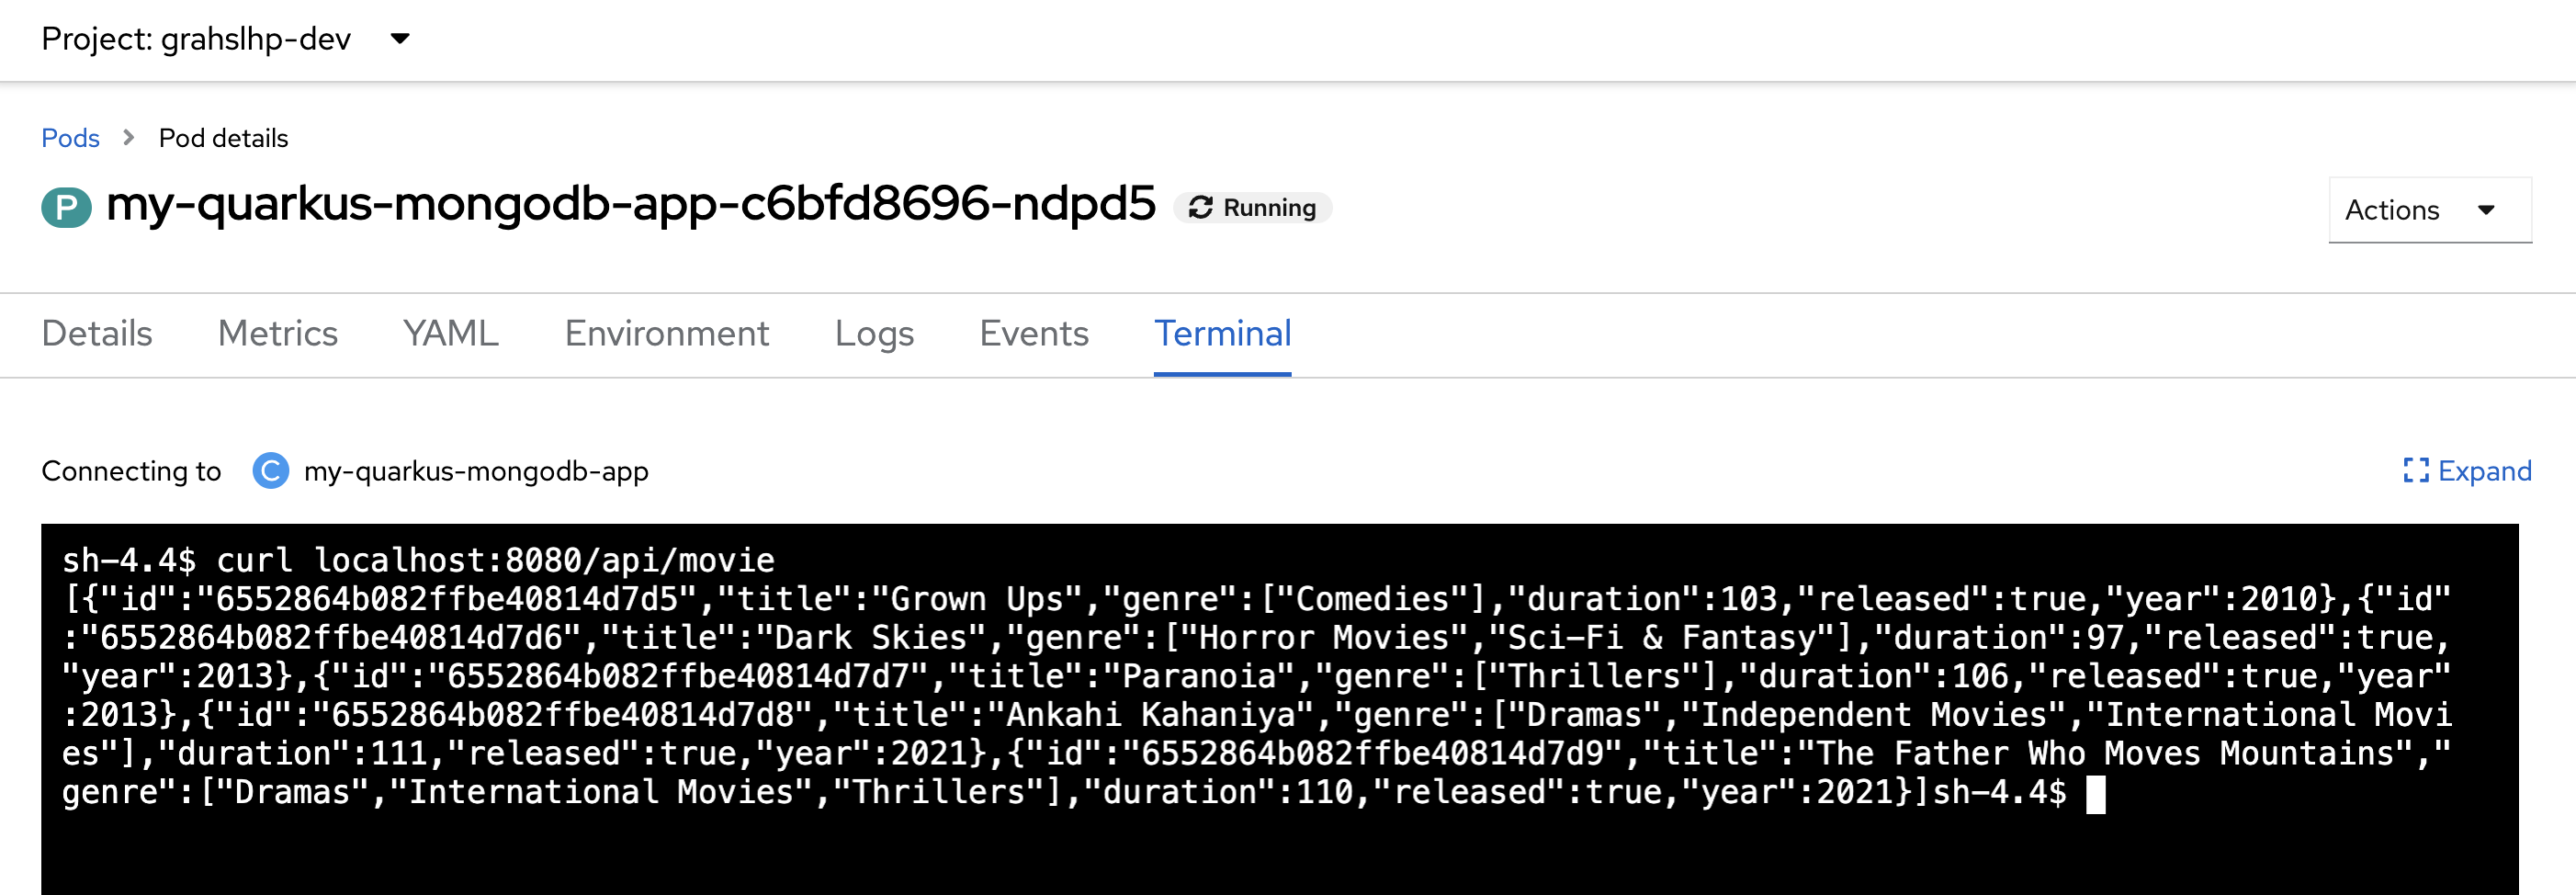
At this point, the Quarkus application deployment is not exposed outside of the cluster. So in order to try it, go to the Topology view and click on the deployment. Then click on the one running pod in the right-side pane (Figure 6) to get to the pod view.

In the pod details view, select the Terminal tab, which will launch a terminal session inside the running container (Figure 7). Execute curl localhost:8080/api/movie to perform an HTTP request against the REST endpoint of your Quarkus application. This should give you a JSON array with the five preloaded movie entities as response body.
Summary
In this article, you learned how to leverage MongoDB from within your cloud-native applications written in Quarkus. While developing a sample application from scratch, you've been introduced to a few selected Quarkus extensions that speed up the development process and remove friction when it comes to deploying the containerized application to Kubernetes.
We'll continue to iterate on this example application in Part 2: Getting started with MongoDB and Quarkus: Beyond the basics
Happy coding!
Last updated: April 4, 2024