MongoDB offers different operator types to utilize MongoDB with Red Hat OpenShift. MongoDB provides two certified operator products, MongoDB Enterprise Operator and MongoDB Atlas Operator. This article will cover how to set up and configure MongoDB Atlas on OpenShift.
Prerequisites
- Read the overview to help you get started with Atlas.
- Create an Atlas account.
- Add your IP address to your account to ensure the OpenShift cluster will have connectivity with Atlas.
How to install MongoDB Atlas on OpenShift
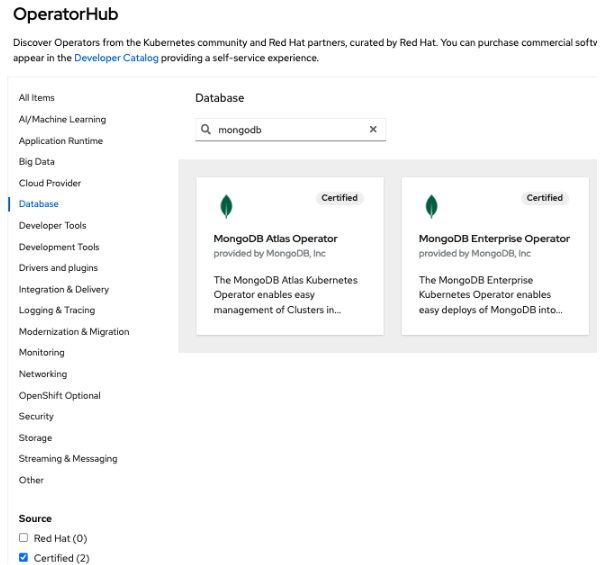
- To install the operators in your OpenShift cluster, access your OperatorHub.
- Filter by MongoDB in the field selector.
- Select Certified as Source.
- Select the MongoDB Atlas Operator, as shown in Figure 1.
- Click Install. By default, it will install the Operator in the project openshift-operators (Figure 2). It will install the operator at the cluster level.
- You can access it from any project. Otherwise, you can select your project to install the Operator.

- Wait for a few minutes to verify your Operator is installed, indicated by the Succeeded status.
How to configure MongoDB Atlas
- Create secret credentials to allow your operator to interact with the Atlas API. Gather the information needed from your atlas. Copy the following command:
oc create secret generic mongodb-atlas-operator-api-key \ --from-literal='orgId=<the_atlas_organization_id>' \ --from-literal='publicApiKey=<the_atlas_api_public_key>' \ --from-literal='privateApiKey=<the_atlas_api_private_key>' - Find your Organization ID and replace it on your create secret command (Figure 3).
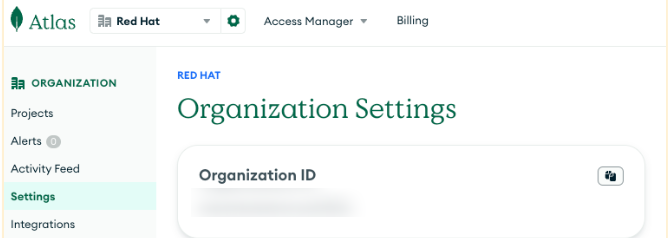
- Look for Organization
- Access Manager
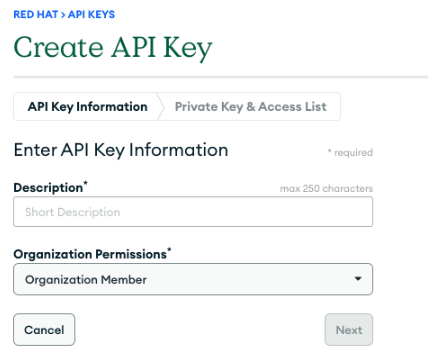
- More information about creating the API Key.
Note: Select Organization owner and Organization Member, as shown in Figure 4.
- Create your secret with your Atlas private information on the same namespace as you installed the operator. Replace with your information on the
ocsecret command.
Output: secret/mongodb-atlas-operator-api-key created
- Add a label to your secret (on the same namespace):
oc label secret mongodb-atlas-operator-api-key atlas.mongodb.com/type=credentials
Output: secret/mongodb-atlas-operator-api-key labeled
Note: If the label is not included, you will get this error: "AtlasCredentialsNotProvided: can't read Atlas API credentials from the Secret openshift-operators/mongodb-atlas-operator-api-key: Secret "mongodb-atlas-operator-api-key" not found"
- Create a new Atlas project. The following command is a Kubernetes Custom Resource. This resource will create a new project on your Atlas instance. If your IP host is not added to the white-list, your cluster cannot access it, resulting in a timeout connection.
- Include your Host External IP address from your OpenShift cluster. You can test connectivity from your local computer if your external IP address is added.
cat <<EOF | oc create -f - apiVersion: atlas.mongodb.com/v1 kind: AtlasProject metadata: name: my-project spec: name: Test Atlas Operator Project projectIpAccessList: - ipAddress: "3.139.123.215" comment: "External Host IP address" EOF - Another option is to go inside the Operator → All instances → Create new → Atlas project.
- Check the object details to verify that they are not issues. All the conditions should be in True status.
- Verify that the project was created, and the IPs were included as part of the access. Projects → Network access and each IP address status shows as Active.
- Create an AtlasDeployment. This will create a new Atlas deployment in your Atlas.
Note: Verify you changed the project name and any desired configuration.
The example below is a minimal configuration to create an M0 Atlas deployment in the AWS US East region. For a complete list of properties, check atlasdeployments.atlas.mongodb.com CRDs specification from your cluster:
cat <<EOF | oc create -f -

apiVersion: atlas.mongodb.com/v1

kind: AtlasDeployment

metadata:

  name: my-atlas-deployment

spec:

  projectRef:

    name: my-project

  deploymentSpec:

    name: test-deployment

    providerSettings:

      instanceSizeName: M0

      providerName: AWS

      regionName: US_EAST_1

EOF
Output: atlasdeployment.atlas.mongodb.com/my-atlas-deployment created
- Verify all the conditions are met by checking the current status of the newly created deployment CR in your OpenShift Cluster.
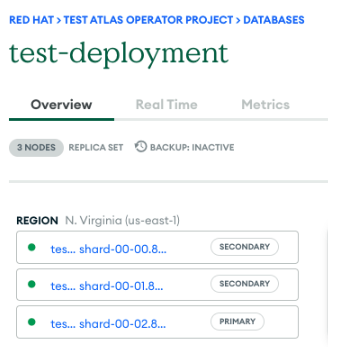
Figure 5 shows your Atlas.
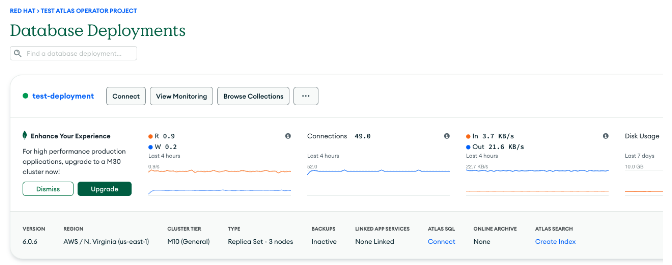
Note: By default, it creates a replica with 3 nodes, as shown in Figure 6.
Connect your application to the database
Follow these steps to create your credentials for your application to be connected to the database:
- Create the password credentials on your secret. Replace the secret name and password values.
oc create secret generic the-user-password --from-literal='password=P@@sword%'
Output: secret/the-user-password created
Do not forget to add the label:
oc label secret the-user-password atlas.mongodb.com/type=credentials
Output: secret/the-user-password labeled
- Create the user for your application.
cat <<EOF | oc create -f -

apiVersion: atlas.mongodb.com/v1

kind: AtlasDatabaseUser

metadata:

  name: my-database-user

spec:

  roles:

    - roleName: "readWriteAnyDatabase"

      databaseName: "admin"

  projectRef:

    name: my-project

  username: theuser

  passwordSecretRef:

    name: the-user-password

EOF
Note: that the name will be your user. ProjectRef needs to match with the previously created project.
The passwordSecretRef will be the same name as your previously created secret.
- Verify the user was created correctly with this command:
oc get atlasdatabaseusers my-database-user -o=jsonpath='{.status.conditions[?(@.type=="Ready")].status}'

True
- Additionally, you can check on the installed operators -> Atlas Database User.
- Verify the user was created on your atlas instance under Security -> Database Access -> Database Users.
Connect your application to the Atlas deployment
- To connect to this database from your application, modify your deployment object and include the connection string. This connection string will be read from your OpenShift secret.
- The Atlas Operator will create a Kubernetes Secret with the information necessary to connect to the Atlas Deployment created in the previous step. The secret name will be composed of our project name and user, following this example:
test-atlas-operator-project-test-cluster-theuser. An application in the same Kubernetes Cluster can mount and use the following secret:containers: - name: test-app env: - name: "CONNECTION_STRING" valueFrom: secretKeyRef: name: test-atlas-operator-project-test-cluster-theuser key: connectionStringStandardSrv
Find more information about MongoDB
This article demonstrated how to set up and configure MongoDB Atlas on Red Hat OpenShift. You can refer to connecting Quarkus with MongoDB for more information. If you have questions, please comment below. We welcome your feedback.
Last updated: September 19, 2023