RStudio Server is a powerful open source integrated development environment (IDE) that offers a graphical interface for the R programming language, significantly enhancing data analysis and visualization capabilities. With the rise of data-driven decision-making, having a robust tool like RStudio Server becomes crucial for data scientists and analysts. This guide will walk you through the process of setting up RStudio Server on Red Hat OpenShift AI and getting started with its extensive features.
Setting Up RStudio Server on OpenShift AI
The integration of RStudio Server with OpenShift AI provides a scalable and secure environment for data analysis.
Here’s a step-by-step guide to get you started.
Log in to the cluster. First, access your OpenShift cluster by logging in through the terminal. Ensure that you have installed the OpenShift CLI (oc) if you prefer using the terminal for this procedure; however, all these steps can also be accomplished through the OpenShift UI.
$ oc login --token=<sha256~token> --server=<cluster API address>Create a secret for subscription manager credentials. To build the RStudio Server workbench, you must create a secret containing the subscription manager credentials. These are usually your Red Hat Customer Portal username and password. Guidance on acquiring these credentials for the subscription manager is detailed in the following article: How to use Subscription Manager on Red Hat Enterprise Linux. Additionally, you can refer to this Registration Assistant.
$ oc create secret generic rhel-subscription-secret --from-literal=USERNAME=<username> --from-literal=PASSWORD=<password> -n redhat-ods-applicationsThe secret must be named
rhel-subscription-secret, and itsUSERNAMEandPASSWORDkeys must be in capital letters.Build RStudio Server. Ensure your cluster has at least 1 CPU available for the RStudio server and 1.5 CPUs for the CUDA-enabled RStudio server. To start the build process, use the following command:
a. To start the lightweight RStudio Server BuildConfig:
$ oc start-build rstudio-server-rhel9 -n redhat-ods-applications --followAlternatively, you can navigate to the Builds menu in the OpenShift UI, locate the
rstudio-server-rhel9flavor under BuildConfigs, and simply initiate the build process by clicking the Start Build button in the Actions drop-down, as shown in Figure 1.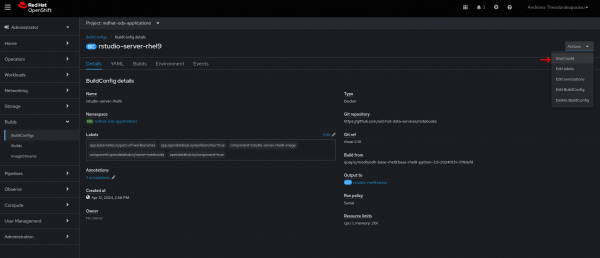
Figure 1: Illustrates the BuildConfig within the OpenShift console Figure 1: BuildConfig within the OpenShift console. b. Accordingly, to start the CUDA-enabled RStudio Server build, trigger the
cuda-rhel9BuildConfig:oc start-build cuda-rhel9 -n redhat-ods-applications --follow
Note
You don't need to manually trigger cuda-rstudio-rhel9 as it will be initiated automatically.
Check the build status with:
$ oc get builds -n redhat-ods-applicationsExpected output: NAME TYPE FROM STATUS STARTED DURATION rstudio-server-rhel9-1 Docker Git@f7976fb Complete 25 minutes ago 9m1sThe build process should take approximately 7 minutes for RStudio Server and 25 minutes for the CUDA-enabled version.
Label the ImageStreams. Once the build has been completed, it's necessary to apply
opendatahub.io/notebook-image: 'true'label on the ImageStreams to enable the workbench in the OpenShift AI UI.To apply the label, run the following commands on your terminal:
$oc label imagestream rstudio-rhel9 opendatahub.io/notebook-image='true' -n redhat-ods-applicationsFor CUDA-enabled version:
$ oc label imagestream cuda-rstudio-rhel9 opendatahub.io/notebook-image='true' -n redhat-ods-applicationsAlternatively, you can always do the same through OpenShift UI, you will need to add this label to the labels section. See Figure 2.
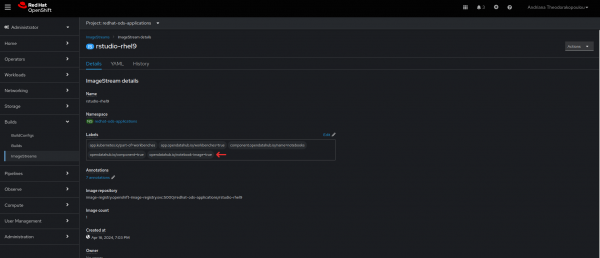
Access the RStudio Server workbench. You can now access RStudio Server workbenches on Applications → Enabled menu in the Red Hat OpenShift AI dashboard.
Or, in the Data Science Projects → Workbenches → Create workbench → Notebook image → Image selection dropdown list.
Getting started with RStudio Server
With RStudio Server successfully set up, it’s time to dive into its features and how to use them effectively.
Launch RStudio Server
There are two methods to launch RStudio Server:
- Via Workbench Spawner Page: Navigate to Applications → Enabled, click on Launch next to the JupyterHub card, and select RStudio Server Workbench, as shown in Figure 3.
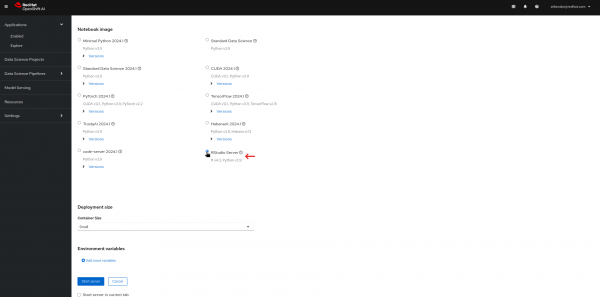
Via Data Science Projects:Create data science project, select RStudio Server Workbench from the drop-down, and click Create Workbench, as shown in Figure 4.
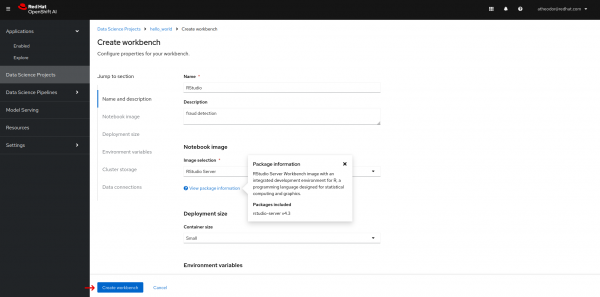
Figure 4: View from Data Science Projects page within OpenShift AI dashboard Figure 4: View from Data Science Projects page within OpenShift AI dashboard.
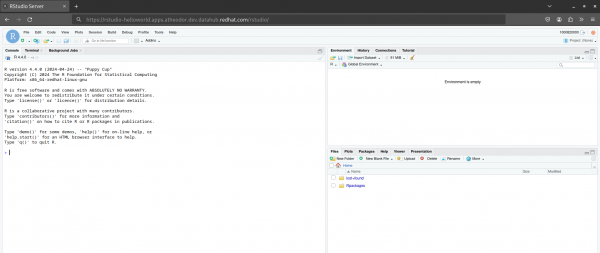
Figure 5 shows the RStudio Server interface that appears.
Explore the RStudio interface
RStudio Server provides a user-friendly interface that integrates text with code, similar to Jupyter notebooks. Key areas include:
- Console: Execute R commands, install packages, and perform mathematical operations.
- Environment: View variables and their values within the workspace.
- Terminal, History, Files, Plots, Packages: Manage terminal commands, track operation history, navigate files, view plots, and manage packages.
Perform data analysis
- Write R scripts: Navigate to File → New File → R Script to create reusable and reproducible scripts.
- Installing R packages: Use the
install.packages("package_name")command in the console for package installation andlibrary()to load them into the R environment.
By following these instructions, you can effectively integrate and utilize RStudio Server within your OpenShift AI environment, unlocking a world of possibilities for data analysis and visualization. Whether you're conducting basic analyses or developing complex models, RStudio Server on OpenShift AI offers a robust, scalable platform to meet your data science needs!
