Redhat Developers  Logo
  • Products

    Featured

    • Red Hat Enterprise Linux
      Red Hat Enterprise Linux Icon
    • Red Hat OpenShift AI
      Red Hat OpenShift AI
    • Red Hat Enterprise Linux AI
      Linux icon inside of a brain
    • Image mode for Red Hat Enterprise Linux
      RHEL image mode
    • Red Hat OpenShift
      Openshift icon
    • Red Hat Ansible Automation Platform
      Ansible icon
    • Red Hat Developer Hub
      Developer Hub
    • View All Red Hat Products
    • Linux

      • Red Hat Enterprise Linux
      • Image mode for Red Hat Enterprise Linux
      • Red Hat Universal Base Images (UBI)
    • Java runtimes & frameworks

      • JBoss Enterprise Application Platform
      • Red Hat build of OpenJDK
    • Kubernetes

      • Red Hat OpenShift
      • Microsoft Azure Red Hat OpenShift
      • Red Hat OpenShift Virtualization
      • Red Hat OpenShift Lightspeed
    • Integration & App Connectivity

      • Red Hat Build of Apache Camel
      • Red Hat Service Interconnect
      • Red Hat Connectivity Link
    • AI/ML

      • Red Hat OpenShift AI
      • Red Hat Enterprise Linux AI
    • Automation

      • Red Hat Ansible Automation Platform
      • Red Hat Ansible Lightspeed
    • Developer tools

      • Red Hat Trusted Software Supply Chain
      • Podman Desktop
      • Red Hat OpenShift Dev Spaces
    • Developer Sandbox

      Developer Sandbox
      Try Red Hat products and technologies without setup or configuration fees for 30 days with this shared Openshift and Kubernetes cluster.
    • Try at no cost
  • Technologies

    Featured

    • AI/ML
      AI/ML Icon
    • Linux
      Linux Icon
    • Kubernetes
      Cloud icon
    • Automation
      Automation Icon showing arrows moving in a circle around a gear
    • View All Technologies
    • Programming Languages & Frameworks

      • Java
      • Python
      • JavaScript
    • System Design & Architecture

      • Red Hat architecture and design patterns
      • Microservices
      • Event-Driven Architecture
      • Databases
    • Developer Productivity

      • Developer productivity
      • Developer Tools
      • GitOps
    • Secure Development & Architectures

      • Security
      • Secure coding
    • Platform Engineering

      • DevOps
      • DevSecOps
      • Ansible automation for applications and services
    • Automated Data Processing

      • AI/ML
      • Data Science
      • Apache Kafka on Kubernetes
      • View All Technologies
    • Start exploring in the Developer Sandbox for free

      sandbox graphic
      Try Red Hat's products and technologies without setup or configuration.
    • Try at no cost
  • Learn

    Featured

    • Kubernetes & Cloud Native
      Openshift icon
    • Linux
      Rhel icon
    • Automation
      Ansible cloud icon
    • Java
      Java icon
    • AI/ML
      AI/ML Icon
    • View All Learning Resources

    E-Books

    • GitOps Cookbook
    • Podman in Action
    • Kubernetes Operators
    • The Path to GitOps
    • View All E-books

    Cheat Sheets

    • Linux Commands
    • Bash Commands
    • Git
    • systemd Commands
    • View All Cheat Sheets

    Documentation

    • API Catalog
    • Product Documentation
    • Legacy Documentation
    • Red Hat Learning

      Learning image
      Boost your technical skills to expert-level with the help of interactive lessons offered by various Red Hat Learning programs.
    • Explore Red Hat Learning
  • Developer Sandbox

    Developer Sandbox

    • Access Red Hat’s products and technologies without setup or configuration, and start developing quicker than ever before with our new, no-cost sandbox environments.
    • Explore Developer Sandbox

    Featured Developer Sandbox activities

    • Get started with your Developer Sandbox
    • OpenShift virtualization and application modernization using the Developer Sandbox
    • Explore all Developer Sandbox activities

    Ready to start developing apps?

    • Try at no cost
  • Blog
  • Events
  • Videos

Create an OpenShift AI environment with Snorkel

April 26, 2024
Kaitlyn Abdo Nicholas Schuetz
Related topics:
Artificial intelligenceContainersKubernetesPython
Related products:
Red Hat OpenShift AI

Share:

    Red Hat OpenShift AI combines the scalability and flexibility of containerization with the capabilities of machine learning and data analytics. With Red Hat OpenShift AI, data scientists and developers can efficiently collaborate, deploy, and manage their models and applications in a secure and streamlined environment. Snorkel is an open source Python library for programmatically building training datasets without manual labeling. It was created in 2017 to support reproducibility of early research papers on programmatic labeling and weak supervision.  

    In this tutorial, you will learn how to create an OpenShift AI environment and walk through 2 Snorkel tutorials provided by the Snorkel open source library, one for data labeling and for information extraction. This tutorial uses the Snorkel open source Python library. This is different from—though related to—Snorkel AI. The team that developed the Snorkel open source project founded Snorkel AI to continue building on their core ideas. They have since built the Snorkel Flow AI data development platform, which is neither free nor open source. For information on the Snorkel project, visit snorkel.org. For information on Snorkel AI the company, visit snorkel.ai.

    Prerequisites

    For this tutorial you will need Red Hat OpenShift 4.14 with OpenShift AI and access to the open source Snorkel library.

    Install OpenShift AI

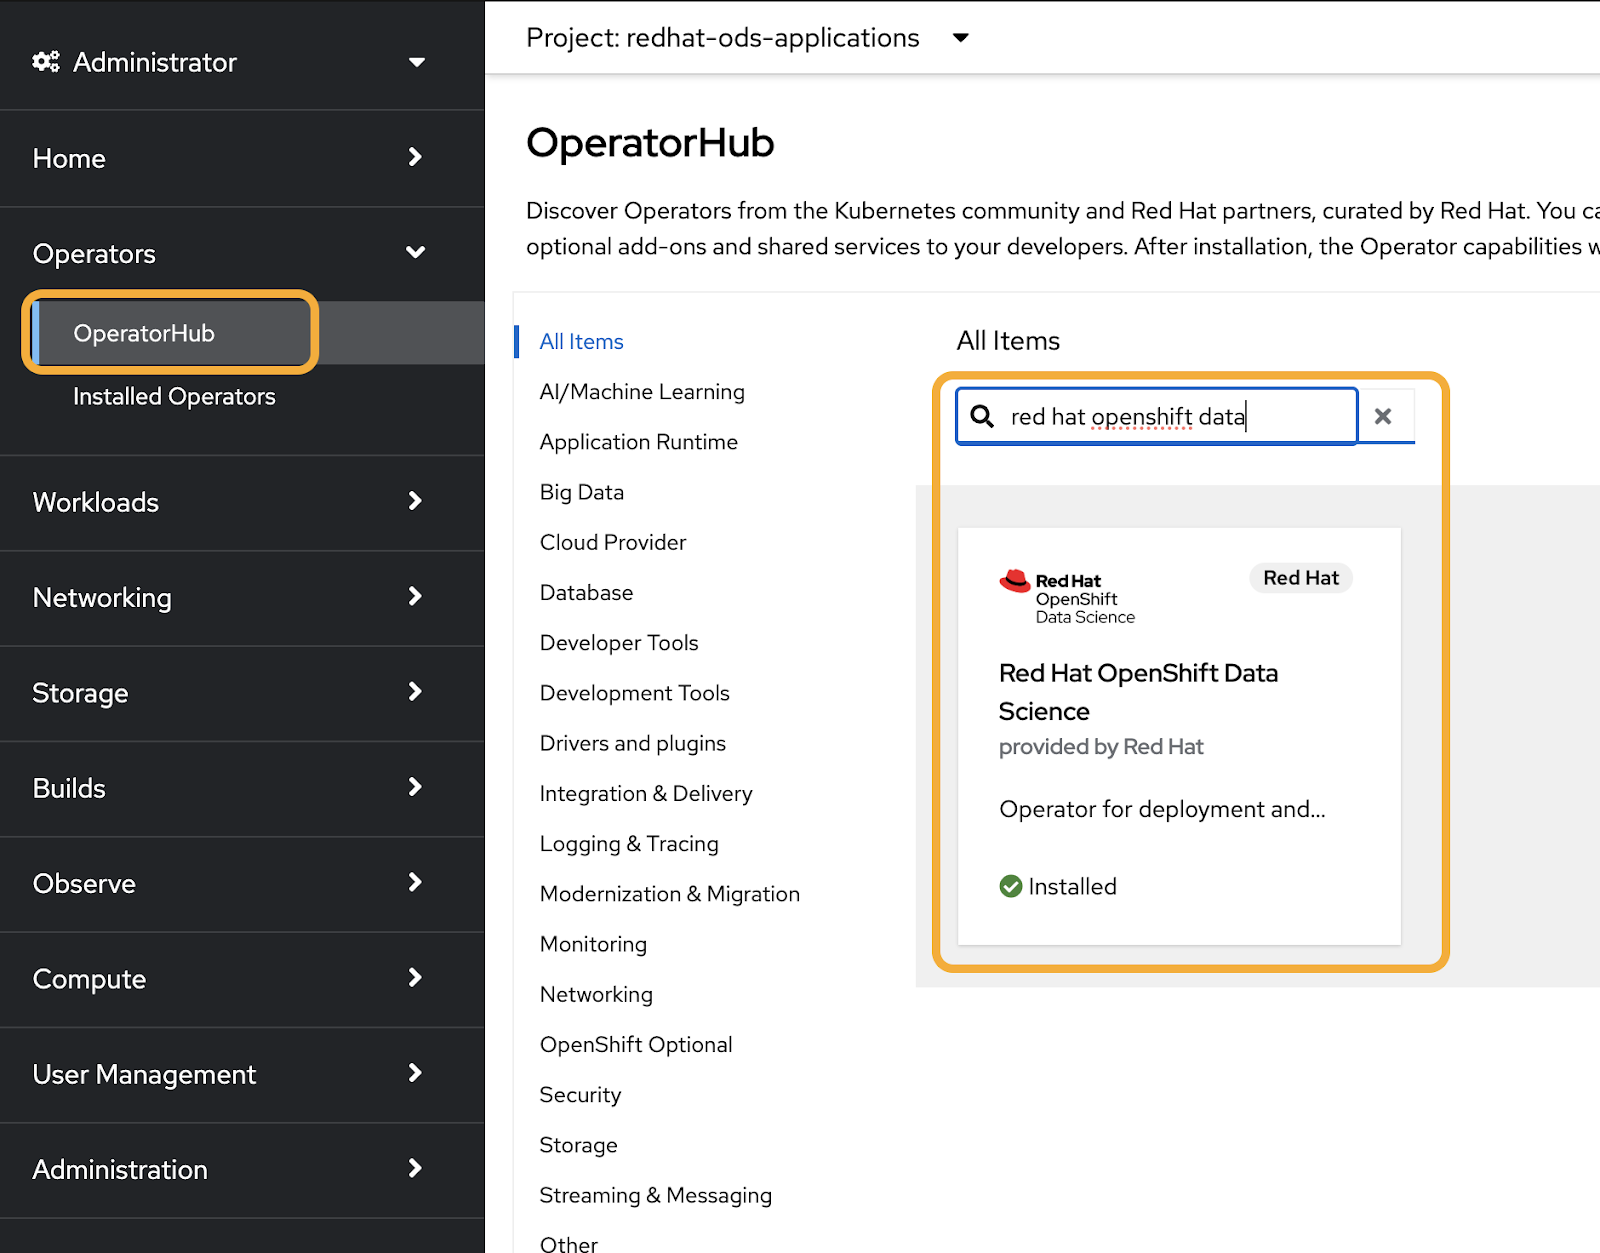
    OpenShift AI can be installed from the OpenShift web console. Navigate to the Operators tab and select OperatorHub. In the text box, type red hat openshift data science, select the Red Hat OpenShift Data Science operator, and click Install (Figure 1).

    Searching for the Red Hat OpenShift Data Science operator in OperatorHub.
    Figure 1:
    Figure 1: Searching for the Red Hat OpenShift Data Science operator in OperatorHub.

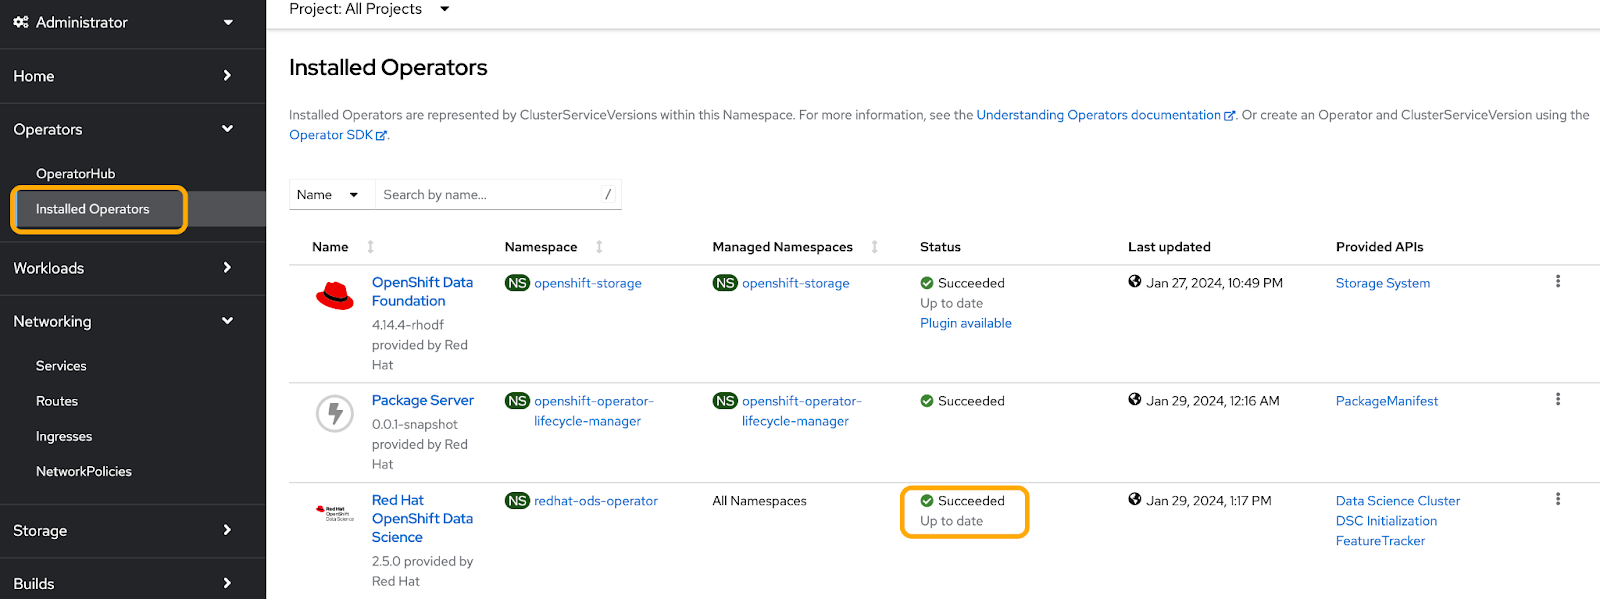
    To start the installation, click the blue Install button again. You can check to see if our operator successfully deployed under the Operators tab and select Installed Operators (Figure 2).

    Locate the Red Hat OpenShift Data Science operator in the Installed Operators tab.
    Figure 2:
    Figure 2: Locate the Red Hat OpenShift Data Science operator in the Installed Operators tab.

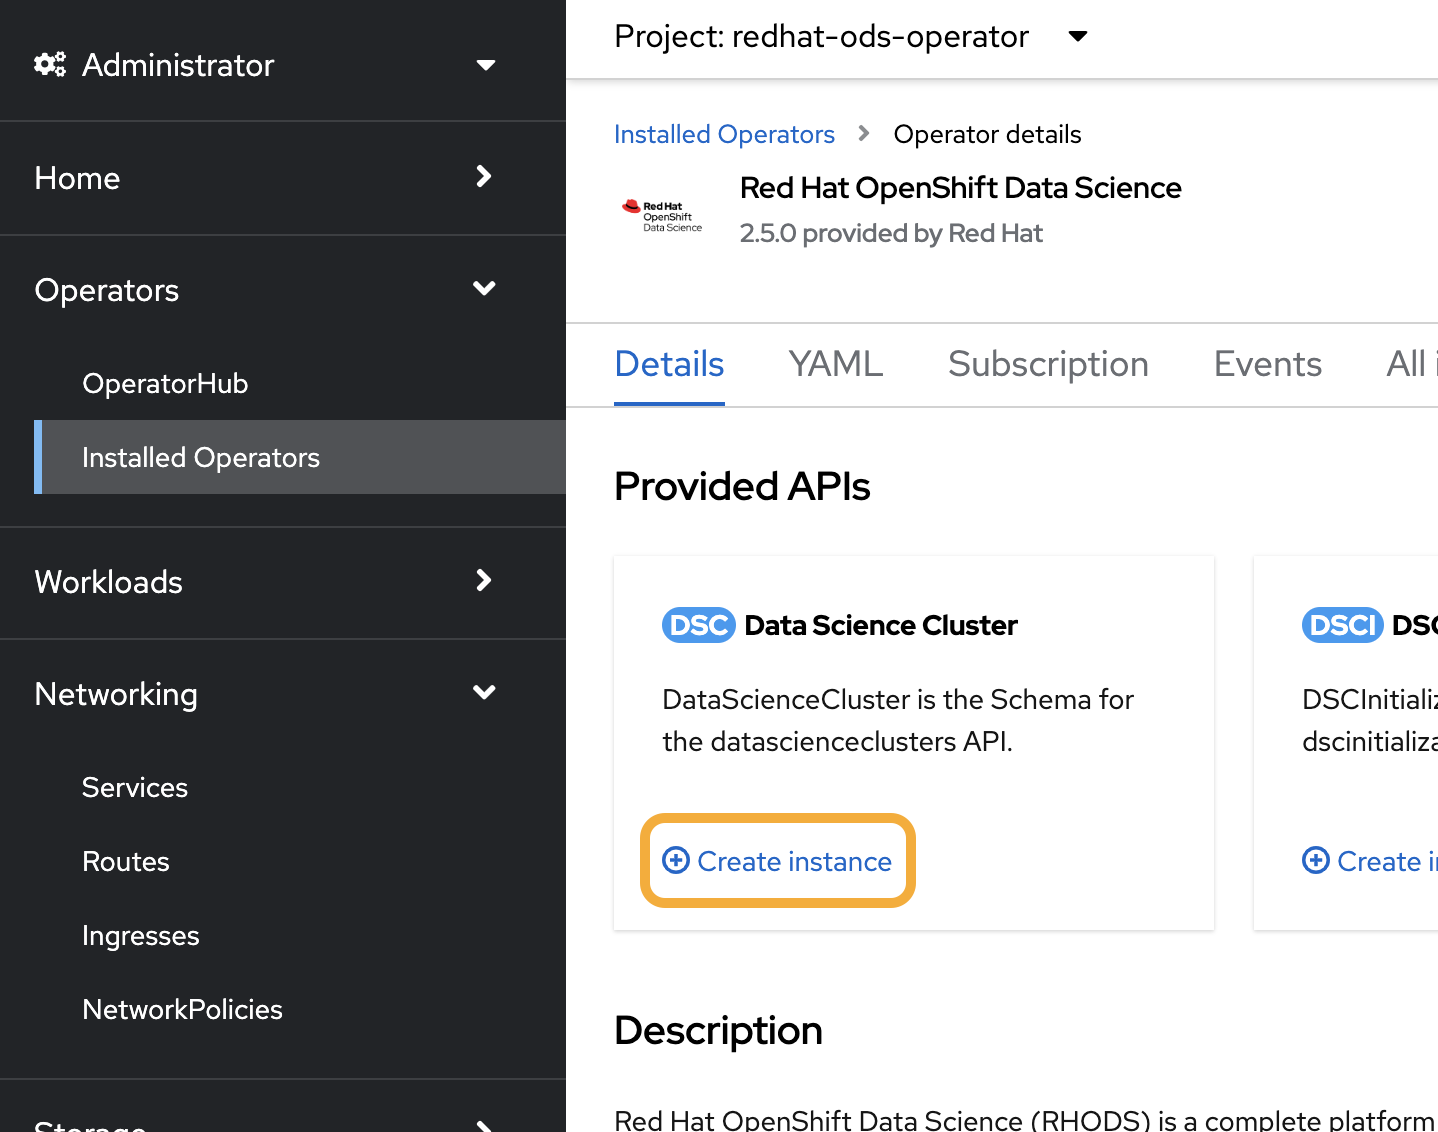
    Now that our operator has successfully deployed, click it and create a new Data Science Cluster instance (Figure 3). 

    Create a new data science cluster instance.
    Figure 3:
    Figure 3:Create a new data science cluster instance.

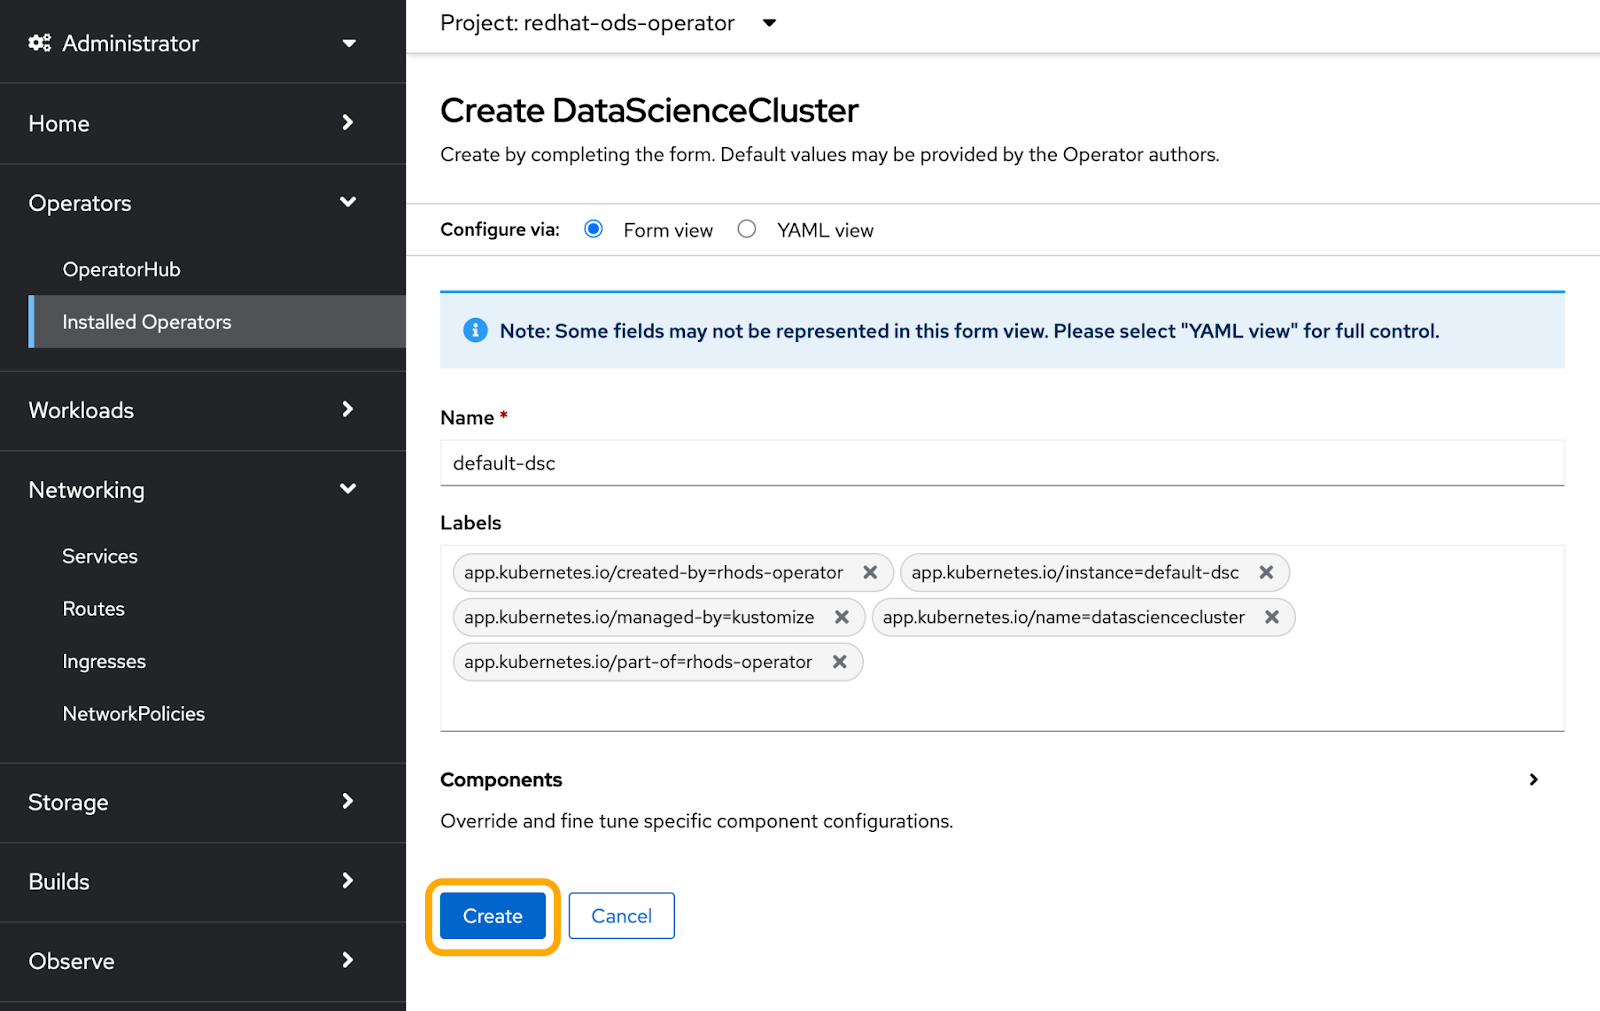
    We don't need to make any changes to the default settings, so we'll just click Create. If you would like to use an accelerator, it’s recommended to prepare that before accessing the OpenShift AI dashboard (Figure 4).  

    Click Create to deploy the cluster.
    Figure 4:
    Figure 4: Click Create to deploy the cluster.

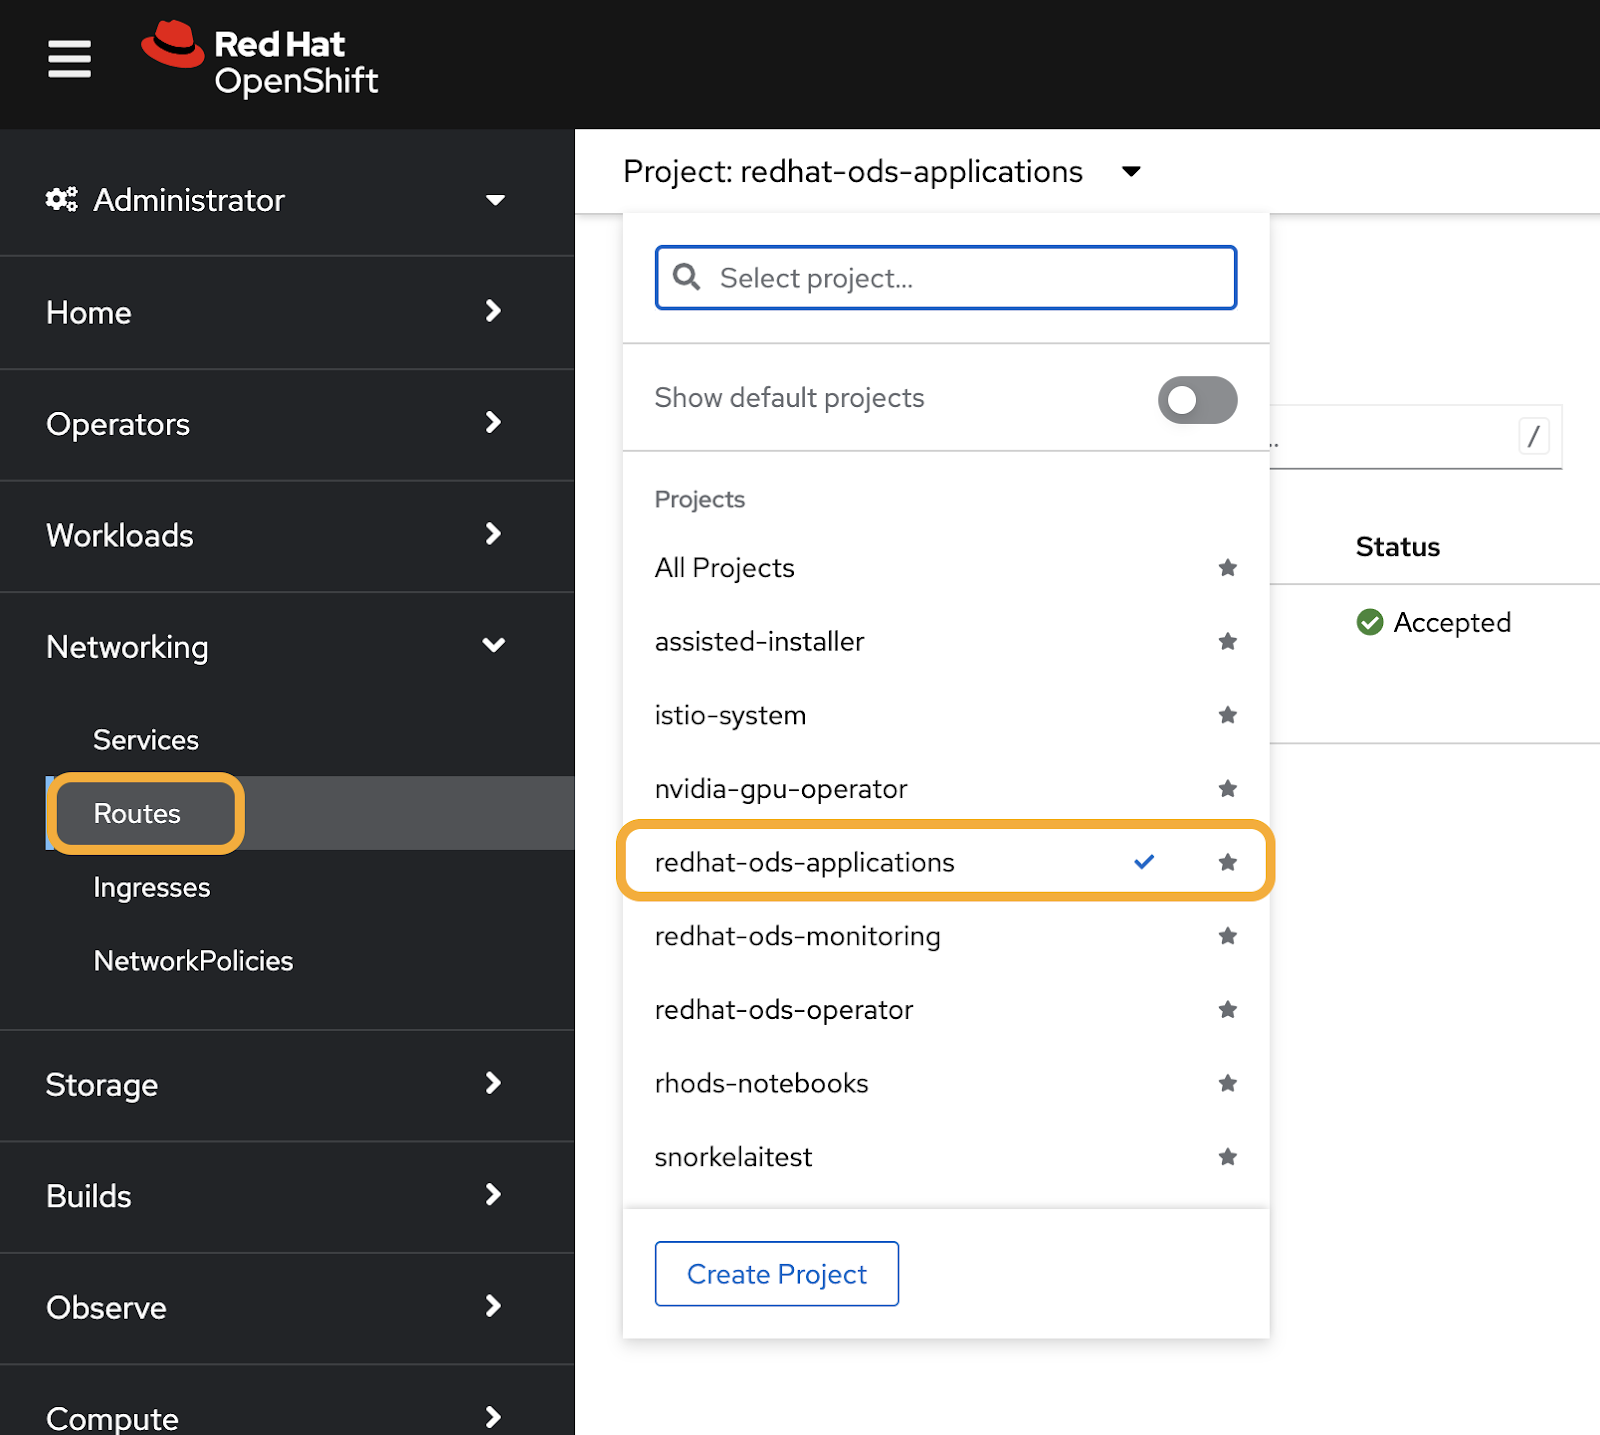
    Once this has successfully deployed, we'll now access our OpenShift AI dashboard. On the administrator menu, head to Networking and click Routes. In Routes, we're going to change the project to redhat-ods-application, which is where we can access the address to our OpenShift AI application (Figure 5).

    Under Routes, change the project to redhat-ods-application.
    Figure 5:
    Figure 5: Change the project to redhat-ods-application.

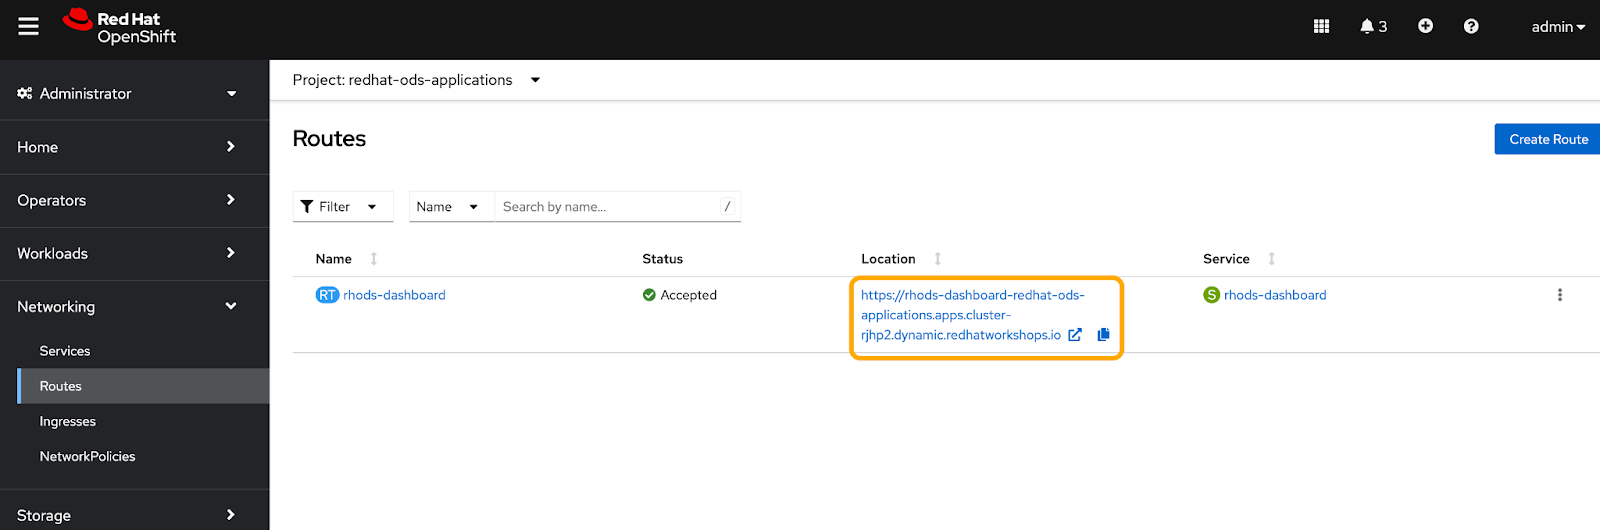
    There should only be one route available, so go ahead and click the address to take you to the OpenShift AI dashboard (Figure 6).

    Click the route address on the Routes page.
    Figure 6:
    Figure 6: Click the route address on the Routes page.

    Create a new data science project

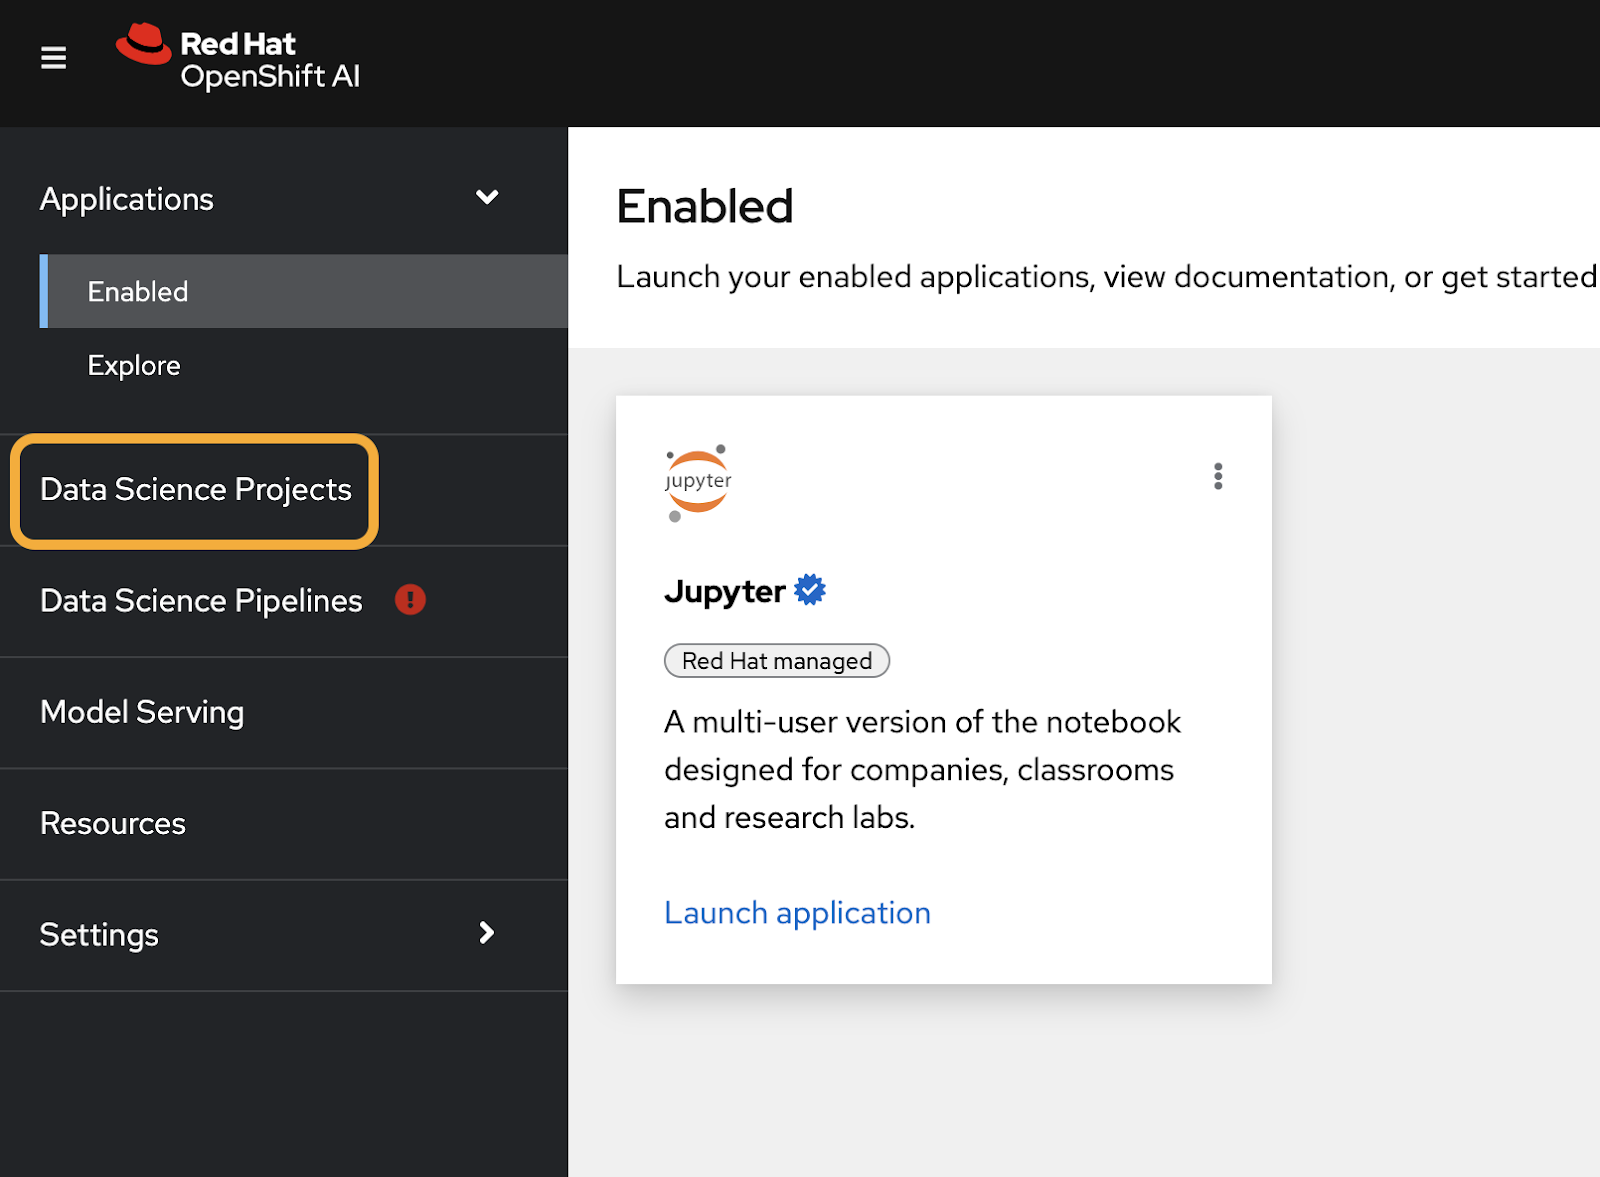
    Now we're going to set up our Jupyter environment so we can run the Snorkel tutorials by creating a new data science project. In the left side menu, navigate to the Data Science Projects tab (Figure 7). 

    Click Data Science Projects in the left side menu.
    Figure 7:
    Figure 7: Click Data Science Projects in the left side menu.

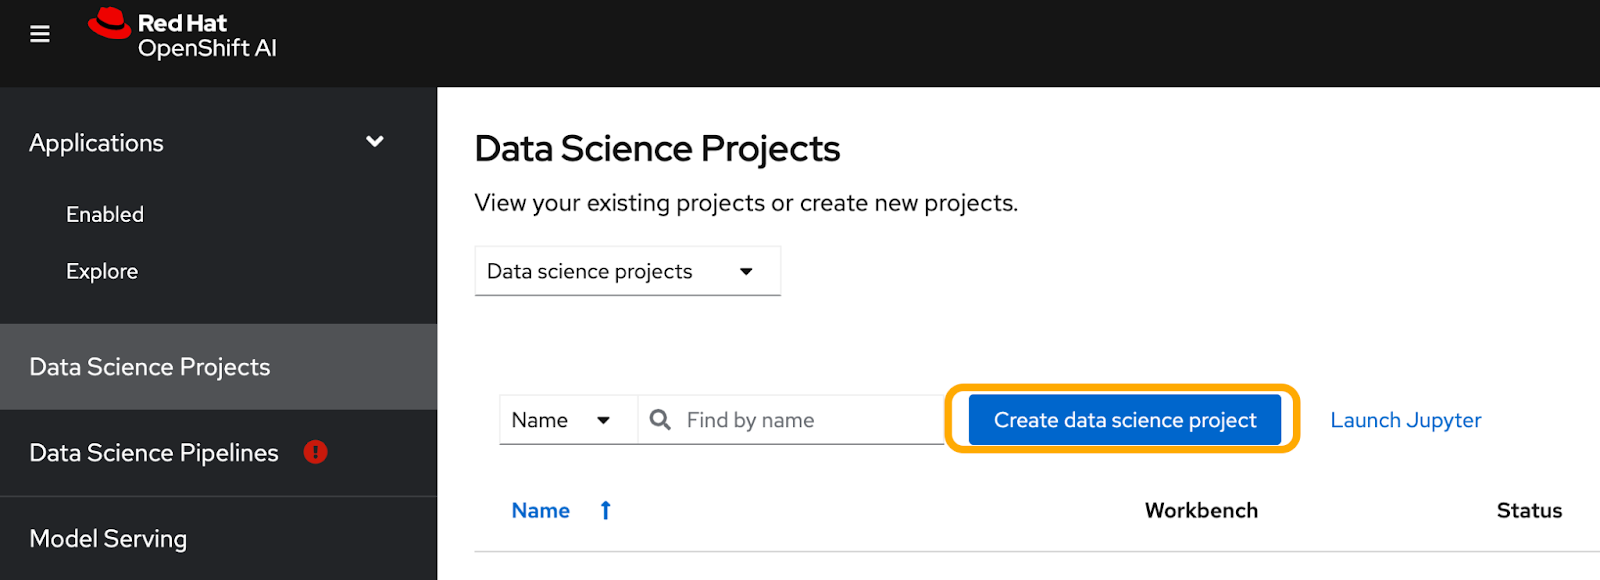
    Next, click Create data science project. Type your preferred project name (in our case, snorkel) and click Create. This is the namespace where all the resources tailored to this demo will be deployed (Figure 8). 

    alt text
    Figure 8:
    Figure 8: Click Create a data science project to create the new project.

    Create workbench

    Inside our project, select Create workbench. This will guide us to the workbench configuration page. Complete the fields to match the following:

    • Name: snorkel (or insert your preferred name)
    • Image selection: PyTorch
    • Version selection: 2023.1
    • Container size: Small
    • Check the Create new persistent storage box.
    • Name: snorkel (or insert your preferred name)
    • Persistent storage size: 20 GiB    

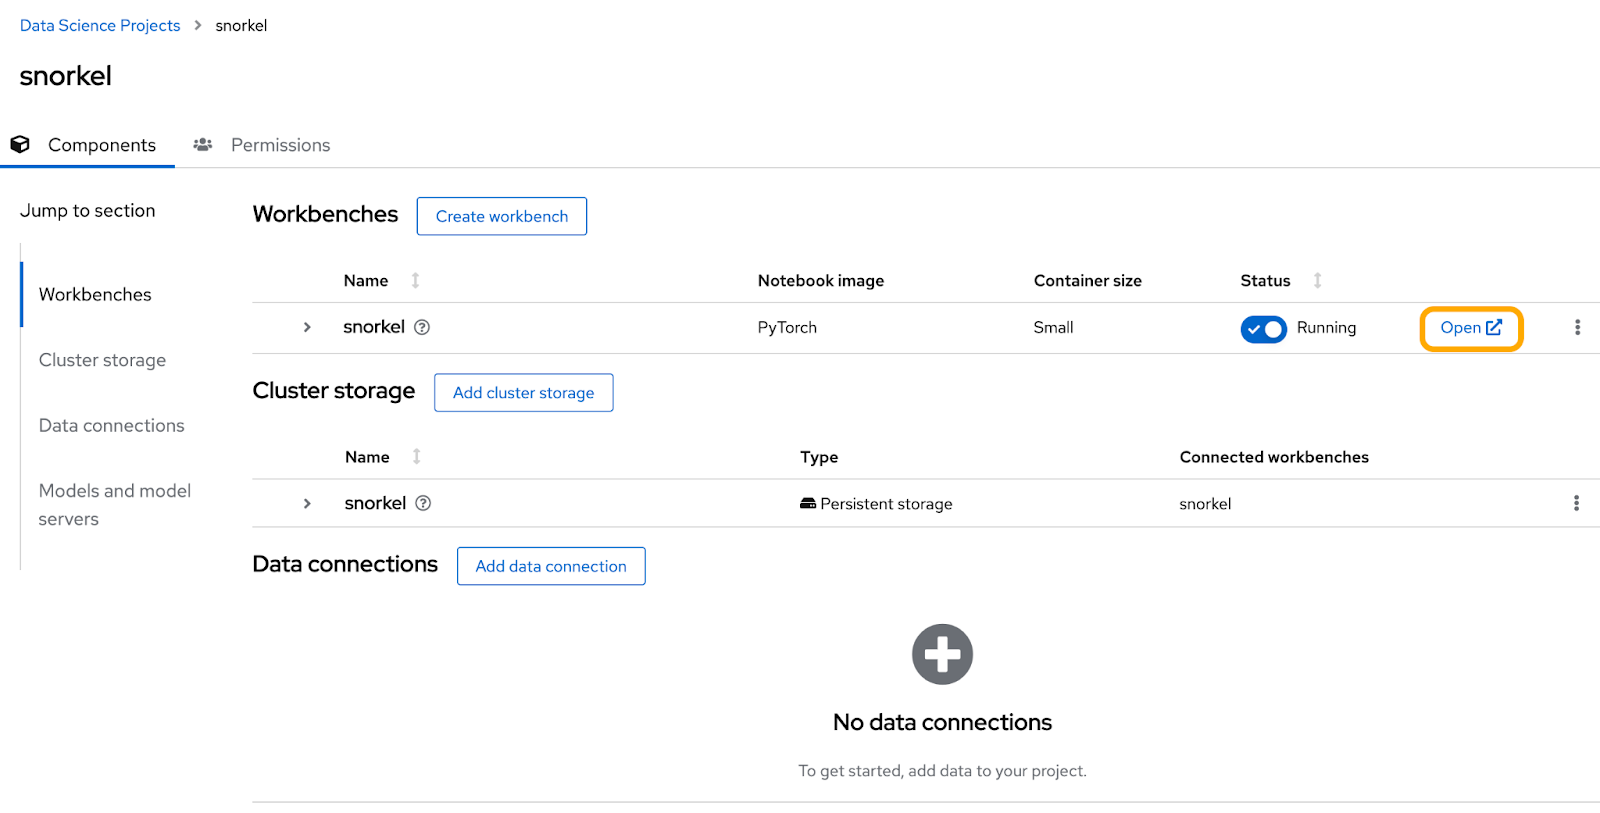
    Once you've completed the form, click Create workbench. You should be taken to the project home page. Once the workbench has finished provisioning, click Open to access the workbench. Log in with your OpenShift credentials and allow the selected permissions (Figure 9).

    alt text
    Figure 9:
    Figure 9: Click Open to access the newly created workbench.

    Snorkel open source tutorials

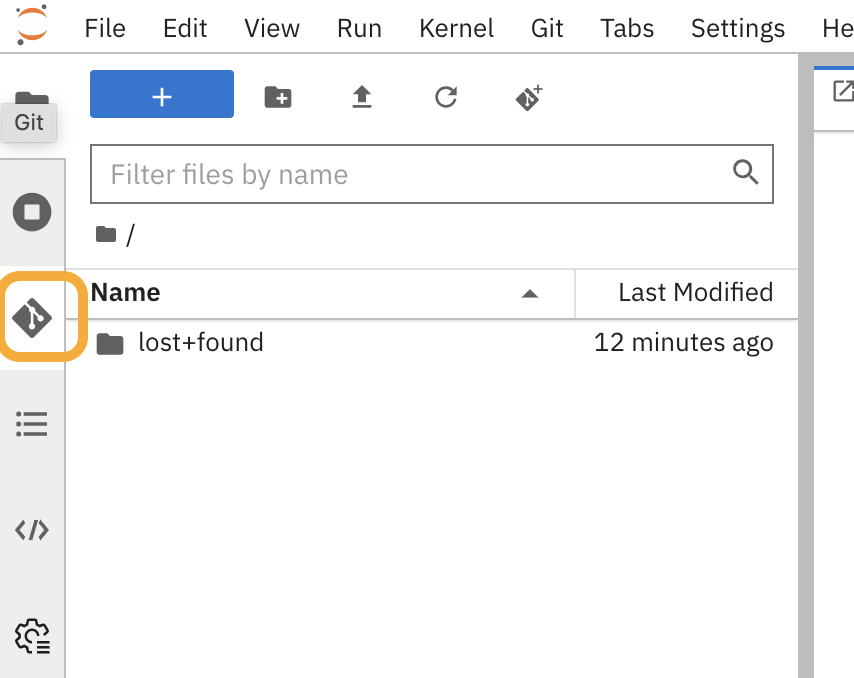
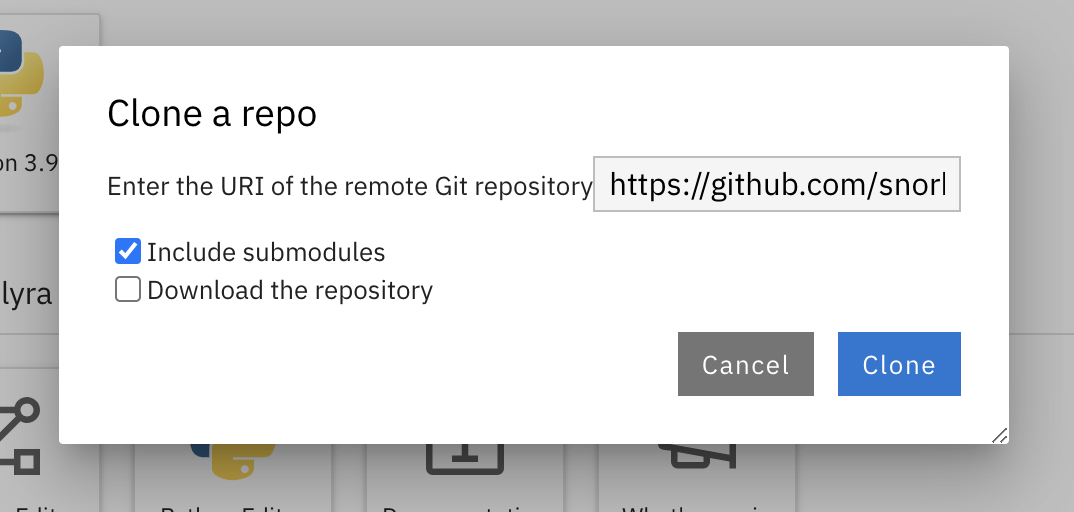
    Now that we're in our Jupyter environment, let's clone the Snorkel repository. On the left, select the Git logo and click Clone a repository and paste the repository URL:

    https://github.com/snorkel-team/snorkel-tutorials.git

    See Figure 10 for the Git logo icon and Figure 11 for the field to input the repository URL.

    alt text
    Figure 10:
    Figure 10: In your Jupyter environment, click the Git logo.
    alt text
    Figure 11:
    Figure 11: Enter the Git repository URL and click Clone.

    Now that we've cloned the repository, we're going to try out the spam and spouse tutorials (which you can find in the directories with the corresponding name). Both notebooks are incredibly detailed, as they walk you through and explain at length each step. These tutorials can serve as a reference point when using Snorkel API  in the future. 

    The spam tutorial is a data labeling exercise that shows you how to build a training set for classifying YouTube comments as spam or not spam. To access it, enter the spam directory and begin with 01_spam_tutorial.ipynb. This is the first of 3 notebook files to walk through data labeling, augmentation, and slicing. It's an introductory tutorial and it is one avenue you could perform data labeling within OpenShift AI utilizing Snorkel. 

    The spouse tutorial is a little more complex, it walks through how to utilize Snorkel for information extraction by using keywords and distant supervision. In this tutorial, you will learn how to identify and classify someone's spouse utilizing labeling functions and models to do so. To begin this tutorial, enter the spouse directory and open spouse_demo.ipynb. This exercise is to demonstrate how simple it is to integrate Snorkel's libraries and tools with your OpenShift AI environment. 

    Conclusion

    Now that you’ve walked through the tutorial, the Snorkel open source library is now available on your OpenShift AI environment. For more information on Snorkel, you can visit their websites to learn more about the Snorkel project and their AI services.  

    If you would like to try out OpenShift, you can with our Developer Sandbox using a no-cost trial. Learn more about OpenShift and our AI initiatives.

    Last updated: April 29, 2024

    Related Posts

    • How to integrate Quarkus applications with OpenShift AI

    • How to use LLMs in Java with LangChain4j and Quarkus

    • Uncover interesting test cases with AI/ML and Bunsen

    • Empower conversational AI at scale with KServe

    • Implement MLOps with Kubeflow Pipelines

    • AI/ML pipelines using Open Data Hub and Kubeflow on Red Hat OpenShift

    Recent Posts

    • More Essential AI tutorials for Node.js Developers

    • How to run a fraud detection AI model on RHEL CVMs

    • How we use software provenance at Red Hat

    • Alternatives to creating bootc images from scratch

    • How to update OpenStack Services on OpenShift

    What’s up next?

    Learn how to create a natural language processing (NLP) application using Red Hat OpenShift AI in this hands-on learning path.

    Start the activity
    Red Hat Developers logo LinkedIn YouTube Twitter Facebook

    Products

    • Red Hat Enterprise Linux
    • Red Hat OpenShift
    • Red Hat Ansible Automation Platform

    Build

    • Developer Sandbox
    • Developer Tools
    • Interactive Tutorials
    • API Catalog

    Quicklinks

    • Learning Resources
    • E-books
    • Cheat Sheets
    • Blog
    • Events
    • Newsletter

    Communicate

    • About us
    • Contact sales
    • Find a partner
    • Report a website issue
    • Site Status Dashboard
    • Report a security problem

    RED HAT DEVELOPER

    Build here. Go anywhere.

    We serve the builders. The problem solvers who create careers with code.

    Join us if you’re a developer, software engineer, web designer, front-end designer, UX designer, computer scientist, architect, tester, product manager, project manager or team lead.

    Sign me up

    Red Hat legal and privacy links

    • About Red Hat
    • Jobs
    • Events
    • Locations
    • Contact Red Hat
    • Red Hat Blog
    • Inclusion at Red Hat
    • Cool Stuff Store
    • Red Hat Summit

    Red Hat legal and privacy links

    • Privacy statement
    • Terms of use
    • All policies and guidelines
    • Digital accessibility

    Report a website issue