Quarkus is a Kubernetes-native Java framework made for Java virtual machines (JVMs) and native compilation, optimizing Java for containers. Java 17, the latest long-term support release of standard Java, became generally available on September 14, 2021. If you'd like to experiment to see how Quarkus works with the new language features that have rolled out since Java 11, this article offers a technical preview to help you get started.
Set up your development environment
In order to try the examples in this article, you will need:
- An IDE.
- JDK 17+ installed with
JAVA_HOMEconfigured appropriately. -
Apache Maven 3.8.1+.
To create a native executable, you will also need:
-
GraalVM version 21.3.0 installed and configured appropriately. Be sure to install support for Java 17.
-
A working container runtime, such as Podman or any other OCI-compliant tool.
All the code for this sample project is available on GitHub.
Bootstrap the Quarkus project
To understand how several new Java features work with Quarkus, you will implement sample-app. This simple application exposes its own REST API based on data consumed from the Bored API, a public-facing service that suggests hobby activities you can pursue.
The easiest way to create this new Quarkus project is to open a terminal and run the following command:
mvn "io.quarkus:quarkus-maven-plugin:create" \
  -DprojectGroupId="com.redhat.developers" \
  -DprojectArtifactId="sample-app" \
  -DprojectVersion="1.0-SNAPSHOT" \
  -DclassName="HobbyResource" \
  -Dpath="actions"
If you are a Windows user, simply inline the command as follows:
mvn "io.quarkus:quarkus-maven-plugin:create" -DprojectGroupId="com.redhat.developers" -DprojectArtifactId="sample-app" -DprojectVersion="1.0-SNAPSHOT" -DclassName="HobbyResource" -Dpath="actions"
The generated project contains an endpoint, HobbyResource. To finish the setup, go inside the sample-app directory. Let's add some Quarkus extensions by running:
mvn quarkus:add-extension -Dextensions="quarkus-resteasy-jsonb, quarkus-container-image-jib, quarkus-rest-client,quarkus-smallrye-fault-tolerance, quarkus-smallrye-openapi"
The project is now using the following Quarkus extensions:
quarkus-resteasy-jsonbto create JSON REST services using JSON-B serialization.quarkus-smallrye-openapito document the exposed API.quarkus-rest-clientto consume REST services exposed via the Bored API.quarkus-smallrye-fault-toleranceto make the application resilient.quarkus-container-image-jibto generate container images.
Use sealed classes for API models
Sometimes, you want to retain only certain details from data consumed from an external API before exposing those further to end users. It's useful in such cases to tailor a data model as a class hierarchy and serve only what is necessary for further consumption. sample-app does this with a class hierarchy that handles the details of activities consumed from the Bored API, as illustrated in Figure 1.
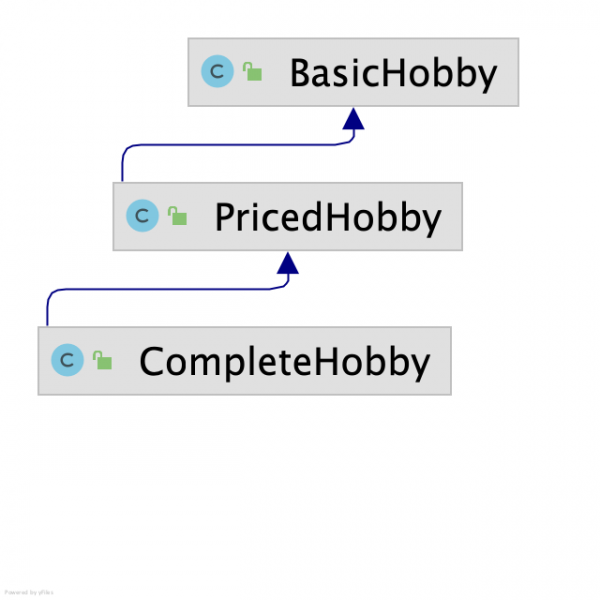
The BasicHobby class contains fundamental details about an activity and restricts inheritance only to the PricedHobby class. BasicHobby can therefore be declared as a sealed class that permits inheritance to PricedHobby:
public sealed class BasicHobby permits PricedHobby {

    public String key;
    public String activity;
    public String type;
    public int participants;

    @JsonbCreator
    public static BasicHobby empty() {
        return new BasicHobby();
    }
}
Furthermore, PricedHobby should also be a sealed class, as it contains all the basic details about an activity and its price, but with inheritance restricted to CompleteHobby:
public sealed class PricedHobby extends BasicHobby permits CompleteHobby {
    public String randomId = UUID.randomUUID()
            .toString().substring(0, 4);
    public double price;

    @JsonbCreator
    public static PricedHobby empty() {
        return new PricedHobby();
    }
}
If CompleteHobby should not allow any further inheritance, the final keyword should precede it. For the moment, because CompleteHobby does not have any subclasses but the API model can evolve, you can use the non-sealed keyword:
public non-sealed class CompleteHobby extends PricedHobby {
    public String link;
    public double accessibility;
}
With this model now in place, you can create the com.redhat.developers.ActivityService interface used to consume data from the Bored API. This interface should be annotated with @RegisterRestClient and contain only the last part of the path:
@RegisterRestClient
@Path("/api/activity")
public interface ActivityService {

    @GET
    @Produces(MediaType.APPLICATION_JSON)
    BasicHobby getActivityByType(@QueryParam("type") String type);

    @GET
    @Produces(MediaType.APPLICATION_JSON)
    PricedHobby getActivity();


    @GET
    @Produces(MediaType.APPLICATION_JSON)
    CompleteHobby getActivityByAccessibility(@QueryParam("minaccessibility") double minaccessibility, @QueryParam("maxaccessibility") double maxaccessibility);

}
Configure the URL in src/main/resources/application.properties:
com.redhat.developers.ActivityService/mp-rest/url=https://www.boredapi.com
Control API response using yield in switch expressions
Occasionally, API endpoint implementations can return different response codes based on the parameters received. For instance, consider a scenario where the sample-app API does not support searching for an activity by type, except recreational and drawing activities. However, the drawing activity type has no content in the Bored API. In case the consumed API supports other activity types, the response should be 501 Not Implemented status, or else it will return that the service is not available.
This scenario can be handled in a method implementation by using a switch expression that evaluates activity type:
@Path("actions")
public class HobbyResource {

    private static final Logger LOGGER = LoggerFactory.getLogger(HobbyResource.class);


    @RestClient
    @Inject
    ActivityService service;


    @GET
    @Path("{type}")
    @Produces(MediaType.APPLICATION_JSON)
    public Response getHobbyByType(@PathParam("type") String type) {
       return switch(type){
           case "recreational" -> Response.status(OK)
                        .entity(service.getActivityByType(type)).build();
           case "drawing" -> Response.status(NO_CONTENT)
                       .entity(BasicHobby.empty()).build();
           default -> {
               BasicHobby hobby = service.getActivityByType(type);
               yield ((hobby.participants > 0) ? Response.status(NOT_IMPLEMENTED).build()
                       : invokeServiceUnavailable(type));
           }
        };
    }


    private Response invokeServiceUnavailable(String type) {
        LOGGER.debug(String.format("Type specified is not supported %s", type));
        return Response.status(SERVICE_UNAVAILABLE).entity(BasicHobby.empty()).build();
    }
}
For drawing and recreational cases we know the target type, so a single expression is used to the right of the case ->. As the default scenario requires a block of code, a yield statement is used to yield a value, which becomes the value of the enclosing switch expression. Since Java 13, it's been possible to use a yield statement in place of a break statement with a value.
Using records when implementing fault tolerance
When you're consuming an external API, it's always good to have an alternative solution to avoid implementing a single point of failure. To see how this can work, introduce an error in the example implementation by adding an s to the end of the URL for the consumed service in src/main/resources/application.properties:
com.redhat.developers.ActivityService/mp-rest/url=https://www.boredapis.com
If you were to invoke any of the endpoints after making this change, they would throw an UnknownHostException, as nothing is currently hosted at boredapis.com. In order to prevent continuous invocation of a failed endpoint, you must annotate the endpoints with @CircuitBreaker, @Timeout, and/or @Retry:
@RegisterRestClient
@Path("/api/activity")
public interface ActivityService {

    @GET
    @Produces(MediaType.APPLICATION_JSON)
    @CircuitBreaker(failureRatio=0.75, delay = 1000 )
    @Timeout(150)
    @Retry(maxRetries = 4, delay = 100)
    BasicHobby getActivityByType(@QueryParam("type") String type);
}
The failure can be handled further using the @Fallback annotation. You could even offer a response while the API is unavailable by implementing a custom handler class:
@RegisterRestClient
@Path("/api/activity")
public interface ActivityService {

    @GET
    @Produces(MediaType.APPLICATION_JSON)
    @CircuitBreaker(failureRatio=0.75, delay = 1000 )
    @Timeout(150)
    @Retry(maxRetries = 4, delay = 100)
    @Fallback(DefaultBasicHobby.class)
    BasicHobby getActivityByType(@QueryParam("type") String type);

}
If you were using Java 8 or 11, DefaultBasicHobby would have been a public static class or an inner class of the ActivityService interface. But with Java 17, we can use records to implement DefaultBasicHobby inside ActivityService:
   record DefaultBasicHobby() implements FallbackHandler<BasicHobby> {
        @Override
        public BasicHobby handle(ExecutionContext executionContext) {
            return BasicHobby.empty();
        }
    }
Generate container images using Jib
When you created the sample-app project using the Maven plugin, Dockerfiles were also generated in src/main/docker. However, those were tailored to create container images that include JDK 11. The easiest way to generate a container image that includes JDK 17 without rewriting the Dockerfiles is by using quarkus-container-image-jib. This extension builds container images and is powered by Jib.
If you wanted to generate a container image build and push it to an image registry, you could try the following configuration:
quarkus.container-image.builder=jib

#base image to be used when a container image is being produced
#for the jar build
quarkus.jib.base-jvm-image=openjdk:17-jdk-alpine


#registry and image details
quarkus.container-image.registry=quay.io
quarkus.container-image.group=anasandbox
quarkus.container-image.tag=jvm-1.0

#automatically pushes the image when packaging the app
quarkus.container-image.push=true
Packaging the application would produce the container image and push it to the registry:
./mvnw clean package
But Quarkus is a Kubernetes-native Java framework, so you can also compile to native and build a native image. The native executable for our application will contain the application code, all required libraries, Java APIs, and a reduced version of a VM.
For the native image build, replace the quarkus.jib.base-jvm-image configuration with quarkus.jib.base-native-image:
quarkus.container-image.builder=jib

#base image to be used when a container image is being produced
#for the native build
quarkus.jib.base-native-image=registry.access.redhat.com/ubi8/ubi-minimal:8.5


#registry and image details
quarkus.container-image.registry=quay.io
quarkus.container-image.group=anasandbox
quarkus.container-image.tag=native-1.0

#automatically pushes the image when packaging the app
quarkus.container-image.push=true
If your operating system is not based on Linux, when packaging to native you should also specify the docker image to use for the local build:
./mvnw package -Pnative \
-Dquarkus.native.container-build=true \
-Dquarkus.native.builder-image=quay.io/quarkus/ubi-quarkus-native-image:21.3-java17
This step is necessary to produce a build for a Linux binary. Without it, you'll get the following error when packaging or running the container:
The native binary produced by the build is not a Linux binary and therefore cannot be used in a Linux container image.
Conclusion
Upgrading an application to JDK 17 is just the beginning. You can speed up your integration checks when upgrading by using Quarkus Dev Services to automatically provision services in development and test mode. Moreover, when you develop with Quarkus Continuous Testing enabled, you will be able to work while tests run immediately after code changes have been saved.
The best way to try Quarkus with Java 17 is by using them together in different scenarios. If you are interested in Quarkus examples with other Java 11+ language features or learning how to tailor smaller container images, please leave a comment below.
Last updated: October 6, 2022