In my previous article, How to migrate your Java applications to Red Hat OpenShift, you learned about the steps involved with building and deploying Red Hat JBoss Enterprise Application Platform applications to OpenShift. This article will extend that scenario by introducing Red Hat OpenShift Pipelines to manage the artifact build process and enable integration with GitHub repositories and other external source control tools. This article will demonstrate that:
- OpenShift Pipelines provide powerful, simple-to-use tools to manage Maven builds.
- OpenShift Pipelines can be integrated with the JBoss EAP Source-to-Image (S2I) process, preserving the functionality provided by that tooling.
- Implementing event triggers enables integration with external systems.
You can find the source code for both articles in my GitHub repository.
The purpose of OpenShift Pipelines
OpenShift Pipelines are a cloud-native CI/CD solution based on Tekton resources. OpenShift Pipelines provide the ability to define complex CI/CD pipelines utilizing multiple tasks. If you're deploying Java applications to JBoss EAP, OpenShift Pipelines can manage the entire artifact build process, allowing for more automation and control.
Use the Red Hat OpenShift Pipelines Operator to install OpenShift Pipelines. Then provision the pipelines using the following custom resource definition:
apiVersion: tekton.dev/v1beta1
kind: Pipeline
As we discussed in the previous article, OpenShift provides valuable and powerful tools to build and deploy Java applications on JBoss EAP on the OpenShift Container Platform. For example, the JBoss EAP S2I tools provide capabilities to inject modules and drivers into a JBoss EAP deployment and enable a chained build process to deploy a runtime image containing only the libraries and artifacts required to run the JBoss EAP application.
In this article, we will continue to use the functionality provided by S2I but delegate the artifact-building process to the OpenShift Pipeline.
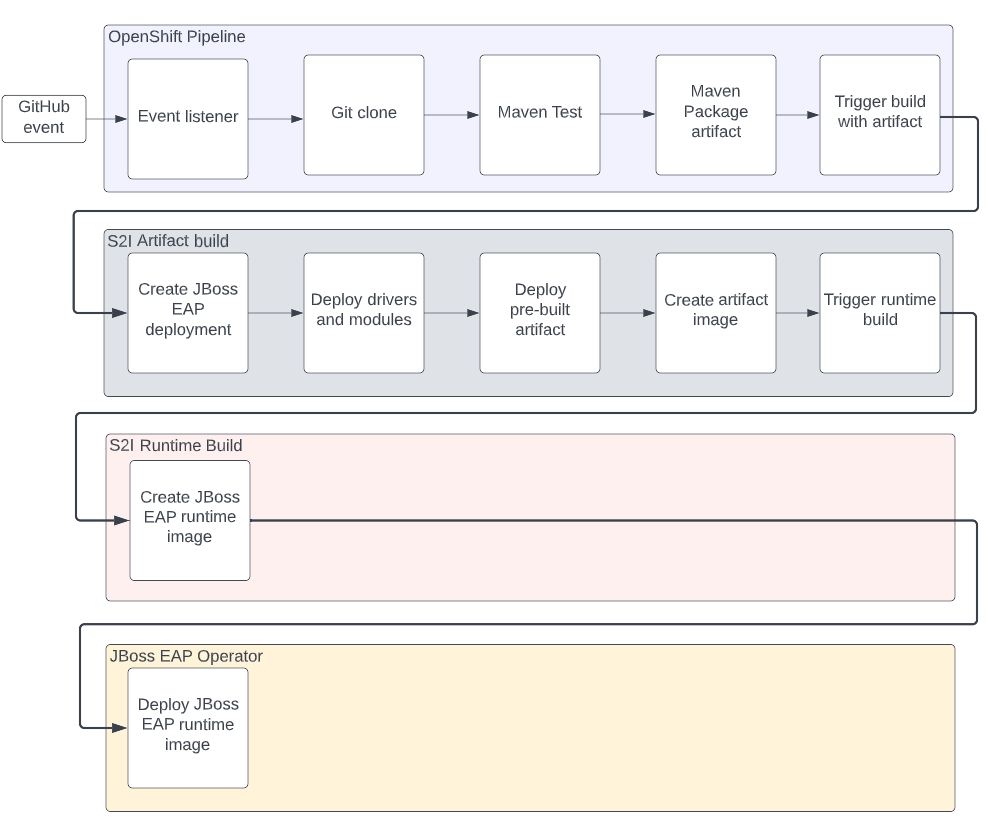
Figure 1 shows the responsibilities of the components used in this scenario:
- The OpenShift Pipeline will be responsible for receiving an event from GitHub, pulling down the code, performing Maven test and package tasks, and generating a binary artifact.
- The S2I artifact build is triggered using the generated artifact as a source for a binary build.
- The S2I runtime image build takes the output from the artifact build and produces a trimmed down runtime image.
- The JBoss EAP Operator deploys the image produced by the S2I runtime image build.
How to implement a pipeline to deploy a JBoss EAP application
In the previous article, we used Helm to create the build configs and the JBoss EAP Operator to deploy the image created by the build. We created these two build configs:
eap74-build-artifactseap74
A Red Hat OpenShift 4.9+ cluster is required to run the code examples included in this article.
Follow these five steps to deploy JBoss EAP applications with OpenShift Pipelines:
Step 1: Prerequisites set up
The pipeline created will start the eap74-build-artifacts build process, and the existing S2I/Operator deployment process will continue from that point.
Before we deploy the pipeline, we need to ensure that these build configs are in the correct namespace—in this case, eap. There should also be a JBoss EAP application deployed by the Operator using the image eap74:latest created by the eap74 build process. If you don't have these objects in your namespace, refer to the instructions from the previous article.
Step 2: Create the pipeline
1. Install the OpenShift Pipelines Operator
To deploy the OpenShift Pipelines Operator, switch to the Administrator perspective and install the Operator from the Operator Hub, or run the following YAML as cluster-admin:
apiVersion: operators.coreos.com/v1alpha1
kind: Subscription
metadata:
  name: pipelines
  namespace: openshift-operators
spec:
  channel: pipelines-1.8
  installPlanApproval: Automatic
  name: openshift-pipelines-operator-rh
  source:  redhat-operators
  sourceNamespace: openshift-marketplace
If you have cloned the Git repo, you can run the following command:
oc apply -f pipelines-operator.yml
2. Add Tekton modules
Once you have installed the OpenShift Pipelines Operator, add these Tekton modules that our pipeline will use:
To install these modules, run the following commands:
oc apply -f https://raw.githubusercontent.com/tektoncd/catalog/main/task/maven/0.2/maven.yaml

oc apply -f https://raw.githubusercontent.com/tektoncd/catalog/main/task/git-clone/0.8/git-clone.yaml

oc apply -f https://raw.githubusercontent.com/tektoncd/catalog/main/task/openshift-client/0.2/openshift-client.yaml
3. Create the maven pipeline
With these modules installed, we can now deploy the pipeline and create the maven-pipeline with the following Pipeline custom resource:
apiVersion: tekton.dev/v1beta1
kind: Pipeline
metadata:
  name: maven-pipeline
spec:
  workspaces:
    - name: shared-workspace
    - name: maven-settings
    - name: kubeconfig-dir
      optional: true
  params:
    - name: repo-url
    - name: revision
    - name: context-path
  tasks:
    - name: fetch-repo
      taskRef:
        name: git-clone
      workspaces:
        - name: output
          workspace: shared-workspace
      params:
        - name: url
          value: "$(params.repo-url)"
        - name: subdirectory
          value: ""
        - name: deleteExisting
          value: "true"
        - name: revision
          value: $(params.revision)
    - name: mvn-build
      taskRef:
        name: maven
      runAfter:
        - fetch-repo
      workspaces:
        - name: source
          workspace: shared-workspace
        - name: maven-settings
          workspace: maven-settings
      params:
        - name: CONTEXT_DIR
          value: "$(params.context-path)"
        - name: GOALS
          value: ["-DskipTests", "clean", "compile"]
    - name: mvn-tests
      taskRef:
        name: maven
      runAfter:
        - mvn-build
      workspaces:
        - name: source
          workspace: shared-workspace
        - name: maven-settings
          workspace: maven-settings
      params:
        - name: CONTEXT_DIR
          value: "$(params.context-path)"
        - name: GOALS
          value: ["test"]
    - name: mvn-package
      taskRef:
        name: maven
      runAfter:
        - mvn-tests
      workspaces:
        - name: source
          workspace: shared-workspace
        - name: maven-settings
          workspace: maven-settings
      params:
        - name: CONTEXT_DIR
          value: "$(params.context-path)"
        - name: GOALS
          value: ["package"]
    - name: create-image-and-deploy
      taskRef:
        name: openshift-client
      runAfter:
        - mvn-package
      workspaces:
        - name: manifest-dir
          workspace: shared-workspace
        - name: kubeconfig-dir
          workspace: kubeconfig-dir
      params:
        - name: SCRIPT
          value: |
            cd "$(params.context-path)"
            cd ..
            mkdir -p ./artifacts/kitchensink/deployments && cp ./kitchensink/target/kitchensink.war ./artifacts/kitchensink/deployments/ROOT.war
            mkdir -p ./artifacts/kitchensink/extensions && cp -r  ./kitchensink/extensions/* ./artifacts/kitchensink/extensions
            mkdir -p ./artifacts/kitchensink/modules && cp -r  ./kitchensink/modules/* ./artifacts/kitchensink/modules
            oc project eap
            oc start-build eap74-build-artifacts --from-dir=artifacts/ --follow
If you have cloned the Git repo, you can run the following command:
oc apply -f pipeline.yml
The key things to notice in this pipeline definition are:
- We are using the
git-clonemodule to pull down the application code from therepo-urlparameter. This parameter will be provided when the pipeline executes. - We use the
mavenmodule to perform the following tasks:- Clean and compile.
- Run tests.
- Create package.
- We use the
openshift-clientmodule to perform the following tasks:- Make an
artifactsfolder. - Copy the artifact to
/artifacts/kitchensink/deployments, renaming it toROOT.war. As a result, the application deploys as the root context (i.e.,/). - Copy extensions and modules—drivers for MySQL, in this example—to the
artifacts/kitchensinkfolder. - Start the
eap74-build-artifactsbuild, specifying theartifactsfolder as the source.
- Make an
4. Create a pipeline run
Once you create the pipeline, you can create a pipeline run, which will start the pipeline and allow us to test the results. A pipeline run is very simple. It references the pipeline's name, provides runtime parameters, and defines a persistent volume claim for the shared workspace.
We create a pipeline run with a PipelineRun object as follows:
apiVersion: tekton.dev/v1beta1
kind: PipelineRun
metadata:
  generateName: build-deploy-manual-run
spec:
  params:
    - name: repo-url
      value: 'https://github.com/deewhyweb/eap-quickstarts.git'
    - name: revision
      value: 7.4.x
    - name: context-path
      value: kitchensink
  pipelineRef:
    name: maven-pipeline
  serviceAccountName: pipeline
  timeout: 1h0m0s
  workspaces:
    - name: shared-workspace
      volumeClaimTemplate:
        spec:
          accessModes:
            - ReadWriteOnce
          resources:
            requests:
              storage: 1000Mi
    - emptyDir: {}
      name: maven-settings
If you have cloned the Git repo, you can run the following command:
oc create -f pipelineRun.yml
Creating this PipelineRun object will trigger the pipeline.
5. Check for an active pipeline
In the developer UI, navigate to the Pipelines page and click maven-pipeline. You should see an active pipeline running.
Click on the pipeline run to view the pipeline's progress (Figure 2).
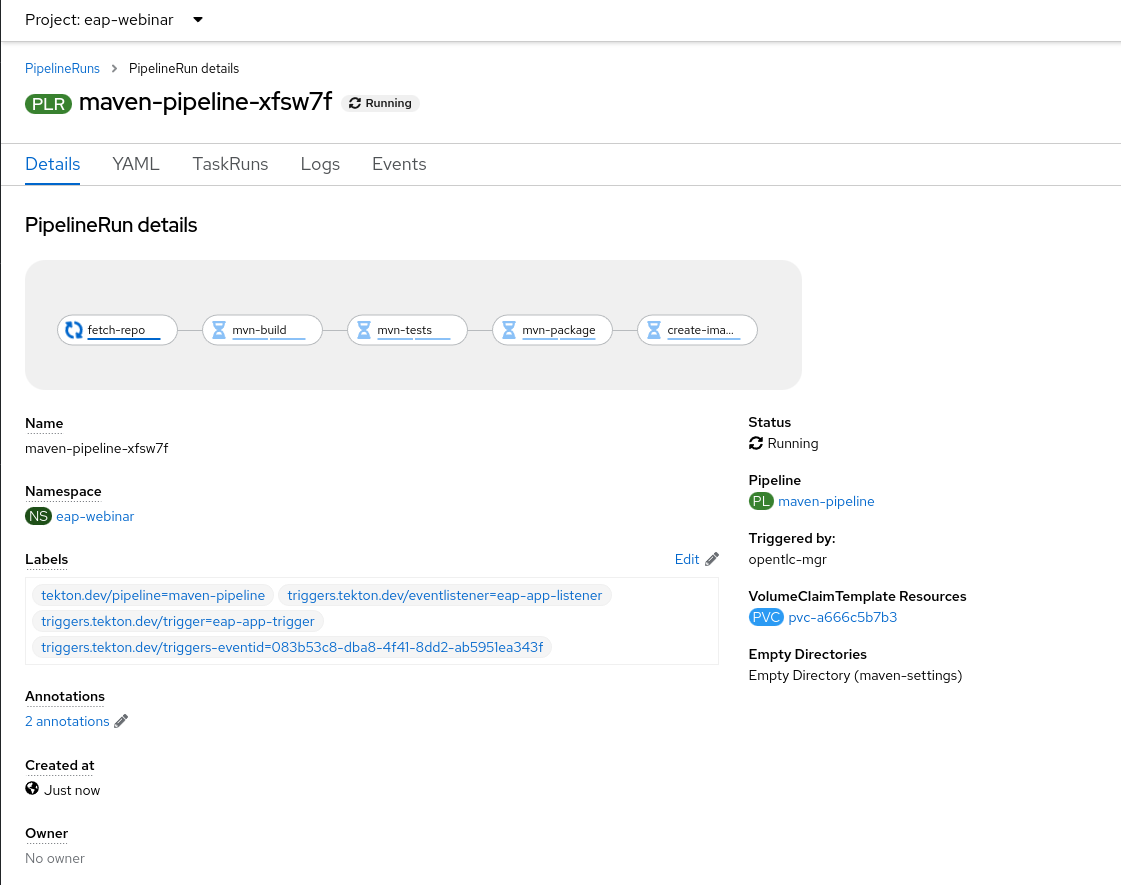
When the pipeline is complete, the JBoss EAP Operator will deploy a new version of the kitchensink app.
Step 3: Create a pipeline trigger
Now that we have a working pipeline, we can deploy a trigger and event listener to enable the creation of pipeline runs from GitHub pushes or other external events. The OpenShift Pipelines Operator includes all the custom resource definitions needed to create these objects.
Create 3 objects: TriggerTemplate, trigger, and event listener
1. Create the TriggerTemplate
The first object we will create is the TriggerTemplate, which is responsible for accepting parameters and creating a pipeline run using those parameters. Notice that the PipelineRun definition under resourceTemplates is similar to the PipelineRun, created manually in the last section.
apiVersion: triggers.tekton.dev/v1beta1
kind: TriggerTemplate
metadata:
  name: eap-app-template
spec:
  params:
  - name: git-repo-url
    description: The git repository url
  - name: git-revision
    description: The git revision
  - name: git-repo-name
    description: The name of the deployment to be created / patched
  resourcetemplates:
  - apiVersion: tekton.dev/v1beta1
    kind: PipelineRun
    metadata:
      generateName: build-deploy-$(tt.params.git-repo-name)-
    spec:
      params:
        - name: repo-url
          value: $(tt.params.git-repo-url)
        - name: revision
          value: $(tt.params.git-revision)
        - name: context-path
          value: kitchensink
      pipelineRef:
        name: maven-pipeline
      serviceAccountName: pipeline
      timeout: 1h0m0s
      workspaces:
        - name: shared-workspace
          volumeClaimTemplate:
            spec:
              accessModes:
                - ReadWriteOnce
              resources:
                requests:
                  storage: 1000Mi
        - emptyDir: {}
          name: maven-settings
If you have cloned the Git repo, you can run the following command:
oc apply -f triggerTemplate.yml
2. Create a Trigger object
Next, create a Trigger object. The event listener calls this object when an event occurs.
apiVersion: triggers.tekton.dev/v1beta1
kind: Trigger
metadata:
  name: eap-app-trigger
spec:
  serviceAccountName: pipeline
  bindings:
    - ref: eap-app-binding
  template:
    ref: eap-app-template
If you have cloned the Git repo, you can run the following command:
oc apply -f trigger.yml
Notice the template we created in the previous step is listed under template. We also reference an eap-app-binding under bindings. We will create that next:
apiVersion: triggers.tekton.dev/v1beta1
kind: TriggerBinding
metadata:
  name: eap-app-binding
spec:
  params:
  - name: git-repo-url
    value: $(body.repository.url)
  - name: git-repo-name
    value: $(body.repository.name)
  - name: git-revision
    value: $(body.head_commit.id)
If you have cloned the Git repo, you can run the following command:
oc apply -f triggerBinding.yml
This binding is responsible for binding the incoming parameters in the event to the parameters required by the template:
body.repository.url->git-repo-urlbody.repository.name->git-repo-namebody.head_commit.id->git-revision
This binding allows us to abstract the parameters required by the template from those generated by the event generator—GitHub, in this case.
3. Create the event listener
The final object we will create is the event listener:
apiVersion: triggers.tekton.dev/v1beta1
kind: EventListener
metadata:
  name: eap-app-listener
spec:
  serviceAccountName: pipeline
  triggers:
    - triggerRef: eap-app-trigger
If you have cloned the Git repo, you can run the following command:
oc apply -f eventListener.yml
You can see the reference to the trigger we created. The deployment of this event listener creates a service called the el-eap-app-listener.
To enable access to this event listener service, we can create an external route:
oc expose svc el-eap-app-listener
Step 4: Test the event listener
We can use curl to test our event listener. But first, we need to identify the route URL. To do this, run the following command to store the route URL in an eventhost variable:
export eventhost=$(oc get route el-eap-app-listener -o custom-columns=host:spec.host --no-headers)
Test the event listener and trigger with the following curl command:
curl -X POST http://$eventhost -H 'Content-Type: application/json' -d '{ "commit_sha": "atestshaforuseasanexample", "repository": {"url": "https://github.com/deewhyweb/eap-quickstarts.git", "name": "eap-quickstart"},"head_commit":{ "id":"dummy-commit"}}'
Recheck the developer UI pipelines page. You should see a new instance of the pipeline running as a result of this command.
Step 5: Trigger the pipeline from GitHub
Finally, you will trigger the pipeline from GitHub:
1. Fork the eap-quickstarts repo to your own GitHub account.
2. Go to the Settings tab of your repo and click Webhooks.
3. Fill out the form as shown in Figure 3 and enter your event listener route in the Payload URL field:

4. Push the updated code to your forked repo. The pipeline should start, and the webhook call deploys a new application version.
OpenShift Pipelines automate the build pipeline
This article demonstrated a pipeline implemented using OpenShift Pipelines to test and package a JBoss EAP application. Then, we triggered the JBoss EAP S2I process to take this binary artifact and deploy it to an instance of JBoss EAP. The S2I process also configures the JBoss EAP instance with MySQL drivers and modules. Finally, the JBoss EAP Operator deployed the image.
Using OpenShift Pipelines allows us to automate our build pipeline, providing more control over the stages of the build process. Maintaining the S2I process enables us to benefit from the tooling provided by S2I to configure and optimize JBoss EAP application images.
Last updated: October 31, 2023