Page
Work with databases in the OpenShift web console
In this lesson, you will learn how to use a web console and create a database instance in the Developer Sandbox. You will also learn how to create a Node.js instance from source code and bind it with the database running in OpenShift.
What you need to know
In order to get full benefit from this lesson, you need to:
- Understand how Kubernetes is the foundational technology for OpenShift.
- Know how to access the Developer Sandbox via web browser.
- Know how to use the web console to add applications and components to OpenShift.
- Understand how environment variables provide information to an application at runtime.
What you will learn
In this lesson, you will:
- Install a MongoDB ephemeral database template at the command line, making it available to the web console.
- Create an instance of a database in Developer Sandbox using the web console.
- Create an instance of a Node.js application from source code stored in GitHub using the web console.
- Bind the Node.js application to the database running in OpenShift.
Understand the demonstration scenario
The objective of this lesson is to demonstrate installing and running a Node.js application that is bound to a database that you will also install. Both the Node.js application and the database will run in the Developer Sandbox.
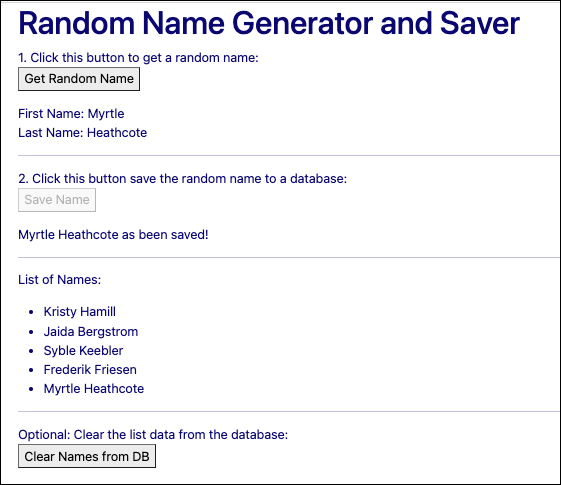
The Node.js application publishes a web page that allows users to choose a name at random then store that random name in a database to which the application is bound. Also, the application web page displays a list of names stored in the database (Figure 1).
The demonstration scenario uses a MongoDB database which you’ll install using the web console. Also, you’ll install the Node.js application in OpenShift using the install from source code feature available in the web console.
The Node.js application has a server-side API that stores and retrieves data stored in the MongoDB database. Also, the Node.js application publishes a web page that is bound to the server-side API. Users interact with the web page and the web page, in turn, interacts with the server-side API (Figure 2).
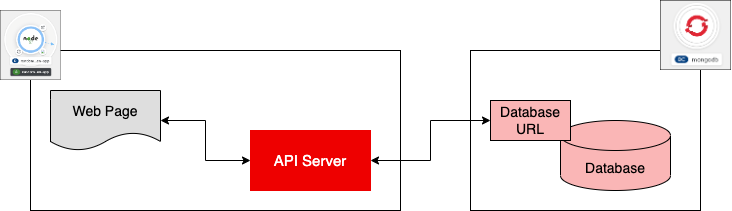
The way that Node.js binds to the MongoDB database is by way of a connection URL that’s created by OpenShift during the database installation process. The URL will contain the username and password information. You’ll declare the username and password information when you install the MongoDB database.
The Node.js application references the MongoDB connection URL to create a connection to the database. The way that the Node.js application knows the connection URL is by way of an environment variable that’s created as part of the process of installing the Node.js application in the Developer Sandbox.
The sections that follow demonstrate how to install the MongoDB database and the Node.js application along with the steps necessary to expose and consume the MongoDB connection URL.
Install the MongoDB ephemeral database template at the command line
Log in to your cluster at the command line. If you’re unsure how to do this, you can find instructions here: Access your Developer Sandbox from the command line.
Run the following two commands to create the MongoDB ephemeral database template:
oc create -f https://raw.githubusercontent.com/openshift-labs/starter-guides/ocp-4.8/mongodb-template.yamloc import-image mongodb:3.6 --from=registry.access.redhat.com/rhscl/mongodb-36-rhel7 --confirmAccess the OpenShift web console using the Developer Sandbox
Take the following steps to access the OpenShift web console in the Developer Sandbox. You’ll do the work of installing and configuring the MongoDB and Node.js instances using the web console.
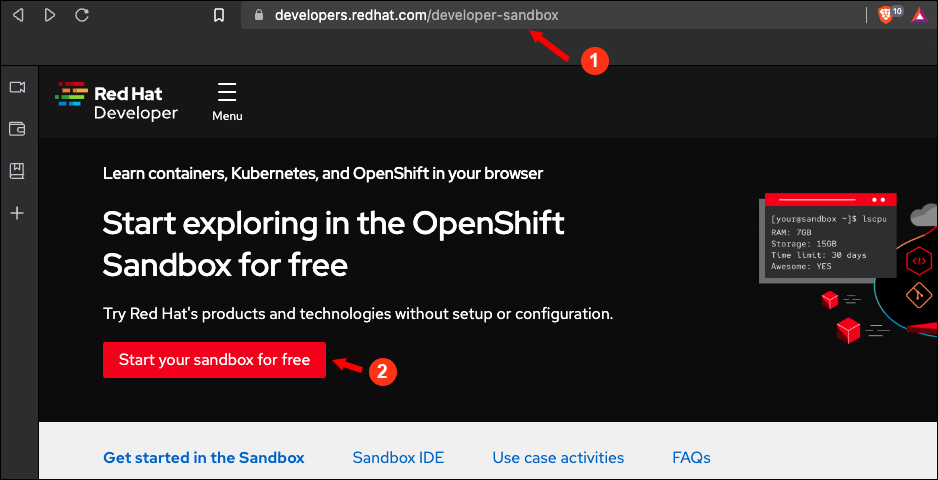
Using your web browser, navigate here and select Start your sandbox for free (Figure 3).

Figure 3: The entry point for access to the OpenShift Developer Sandbox for Red Hat OpenShift Figure 3: The entry point for access to the OpenShift Developer Sandbox. Provide the username and password for your Red Hat account (Figure 4).

Figure 4: Log into the OpenShift web console with the username and password associate with your account on Red Hat.

Install a database using the OpenShift web console
This demonstration scenario requires that you install a MongoDB database in the Developer Sandbox. You will install the database by using a template listed in the web console’s Developer Catalog:
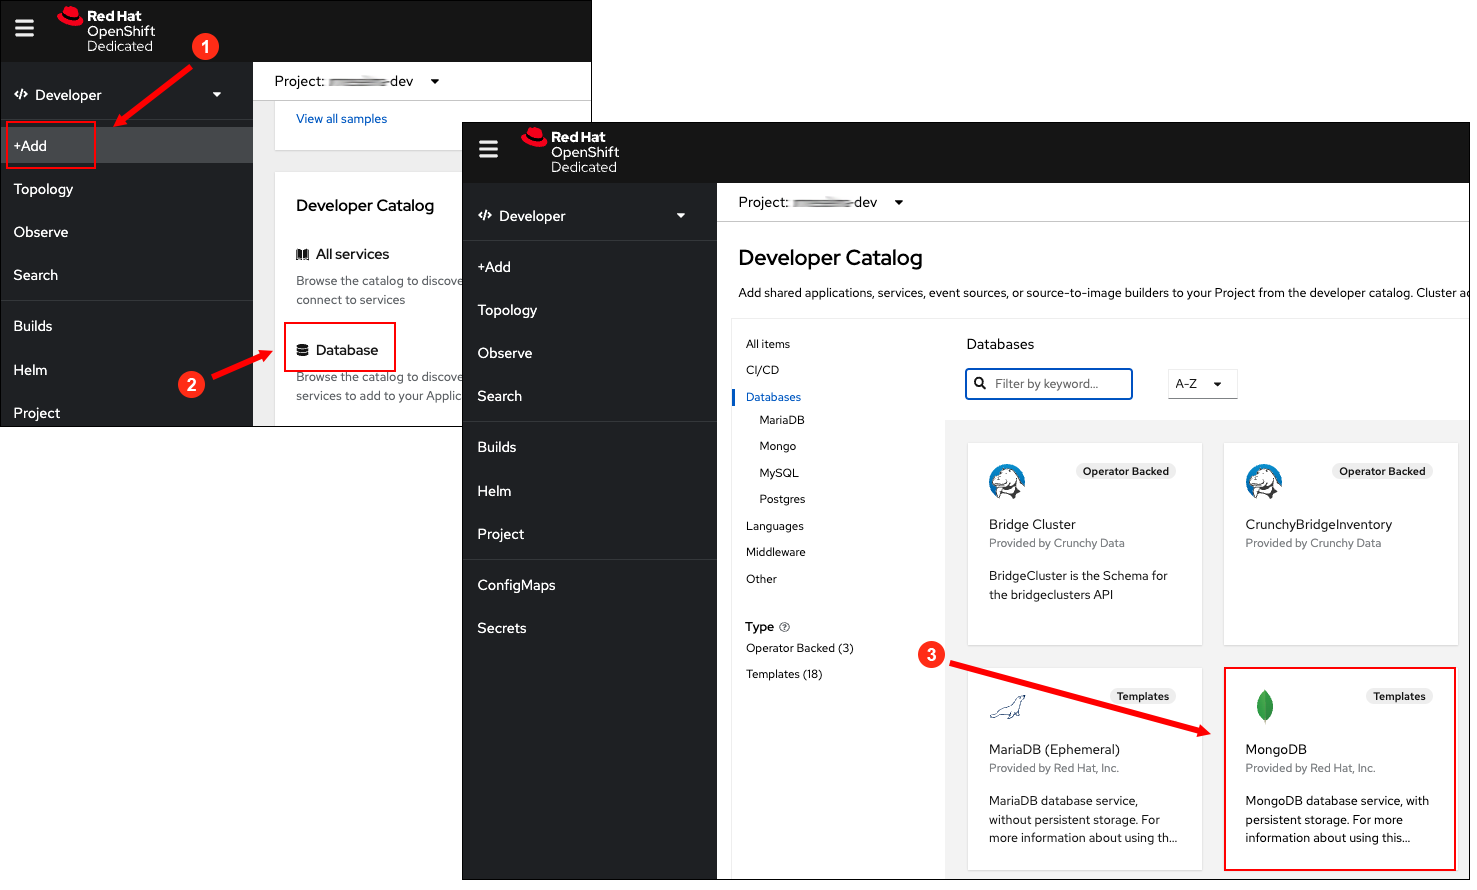
- Click +Add on the left side of the web console (Figure 5, Callout 1).
- The Developer Catalog page will appear. Click Database (Figure 5, Callout 2).
The web page with database text blocks will appear. Click MongoDB (Figure 5, Callout 3).

Figure 5: The web console’s Developer Catalog lists database templates available for installation. - The MongoDB template page will appear. Click Instantiate Template to expose the web page where you will enter configuration information for the MongoDB database.
- Make note of (and copy) the Namespace in which the DB instance will be created (Figure 6, Callout 1). Enter this value as the Namespace where the template will look for the image (Figure 6, Callout 2).
- Enter
genuserin the MongoDB Connection Username text box (Figure 6, Callout 3). - Enter
passwordin the MongoDB Connection Password text box (Figure 6, Callout 4). - Enter
namegenin the MongoDB Database Name text box (Figure 6, Callout 5). - Enter
passwordin the MongoDB Admin Password text box (Figure 6, Callout 6). Click the Create button to begin the deployment.
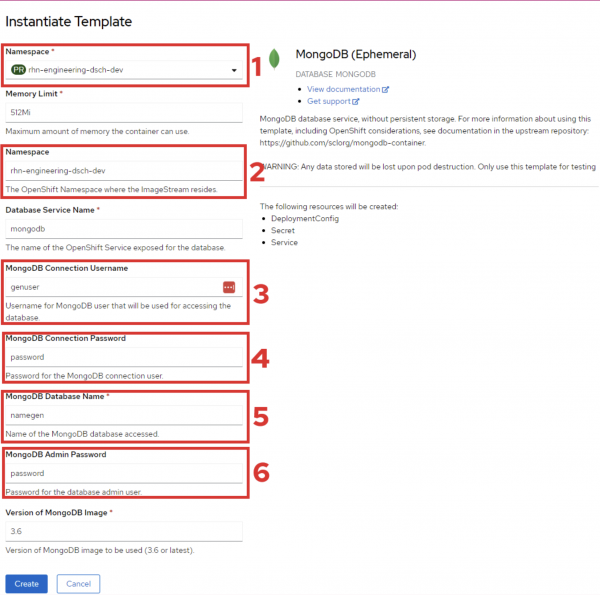
Figure 6: Enter configuration information for the MongoDB instance in the the Instantiate Template web page. Executing the steps shown above will create an instance of MongoDB in the Developer Sandbox. OpenShift will automatically implement the following connection URL:
mongodb://genuser:password@mongodbThe connection URL is constructed according to the following naming pattern:
mongodb://<username>:<connection_password>@<service_name>

About the parameters:
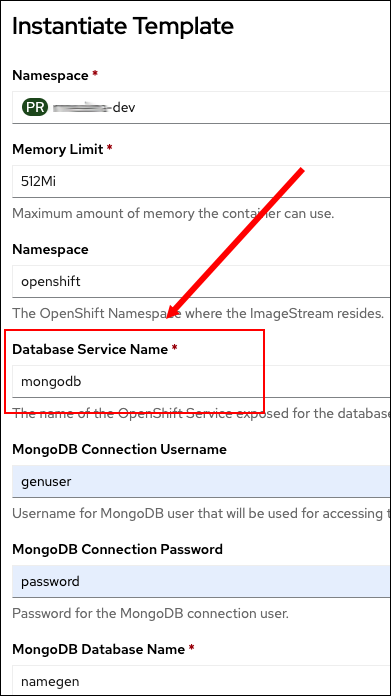
usernameis the username you defined earlier when you configured the MongoDB template.connection passwordis the password you defined earlier when you configured the MongoDB template.service nameis the underlying Kubernetes service that is created as part of the database installation process. In this case, the service name is "mongodb", which was provided by default in the MongoDB Template configuration page (Figure 7).
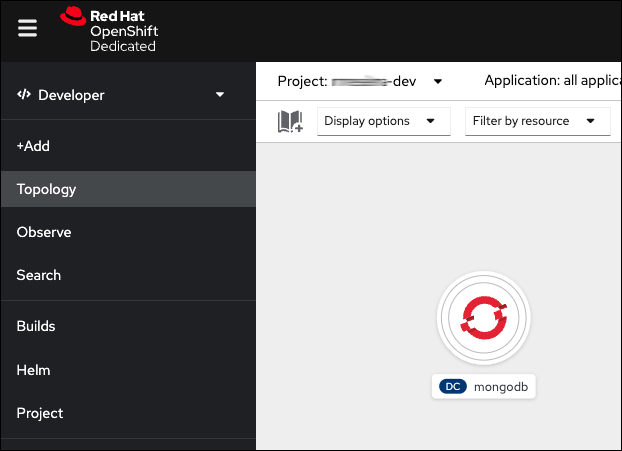
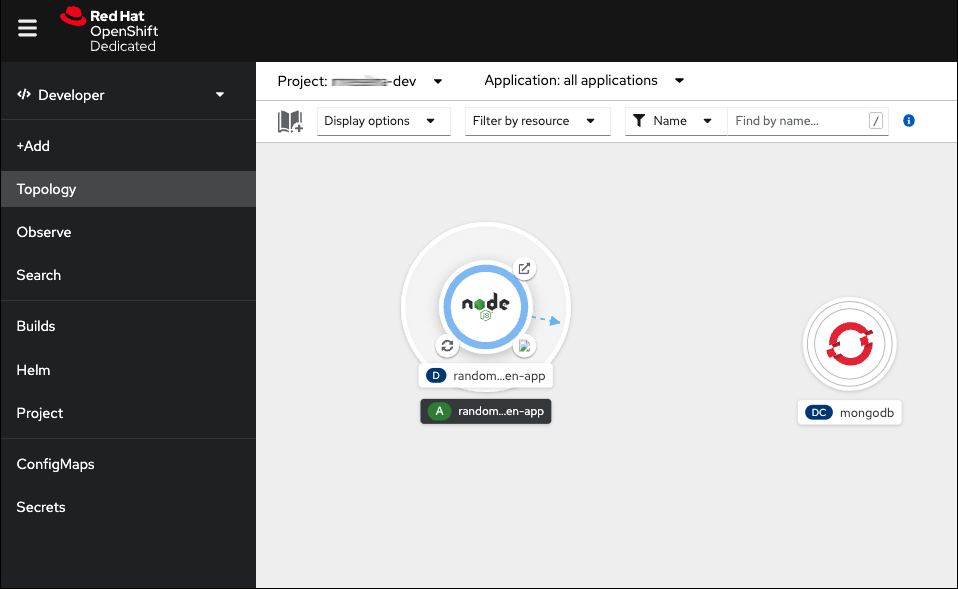
After you create the MongoDB instance, it will appear in the Topology view (Figure 8).
Once the MongoDB database is installed and the connection URL is known, you’re ready to install the Node.js application.
Install a Node.js application from GitHub using the web console
The following describes the steps required to install the Node.js application into the Developer Console. You will install the application using the OpenShift Install from Git feature.
- Select +Add on the left side of the web console (Figure 9, Callout 1).
The Developer Catalog page will appear. Select the Import from Git text block (Figure 9, Callout 2).
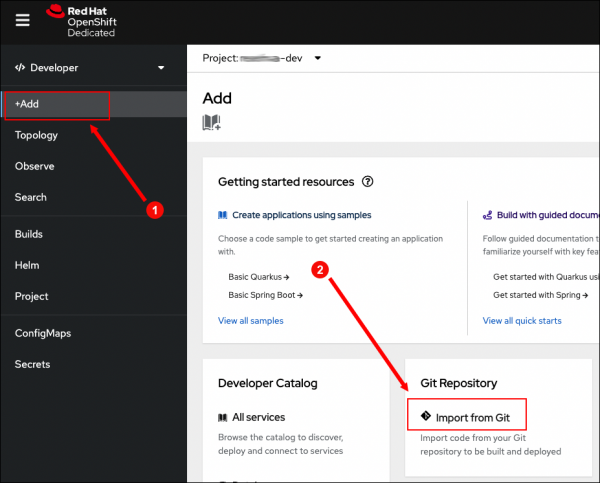
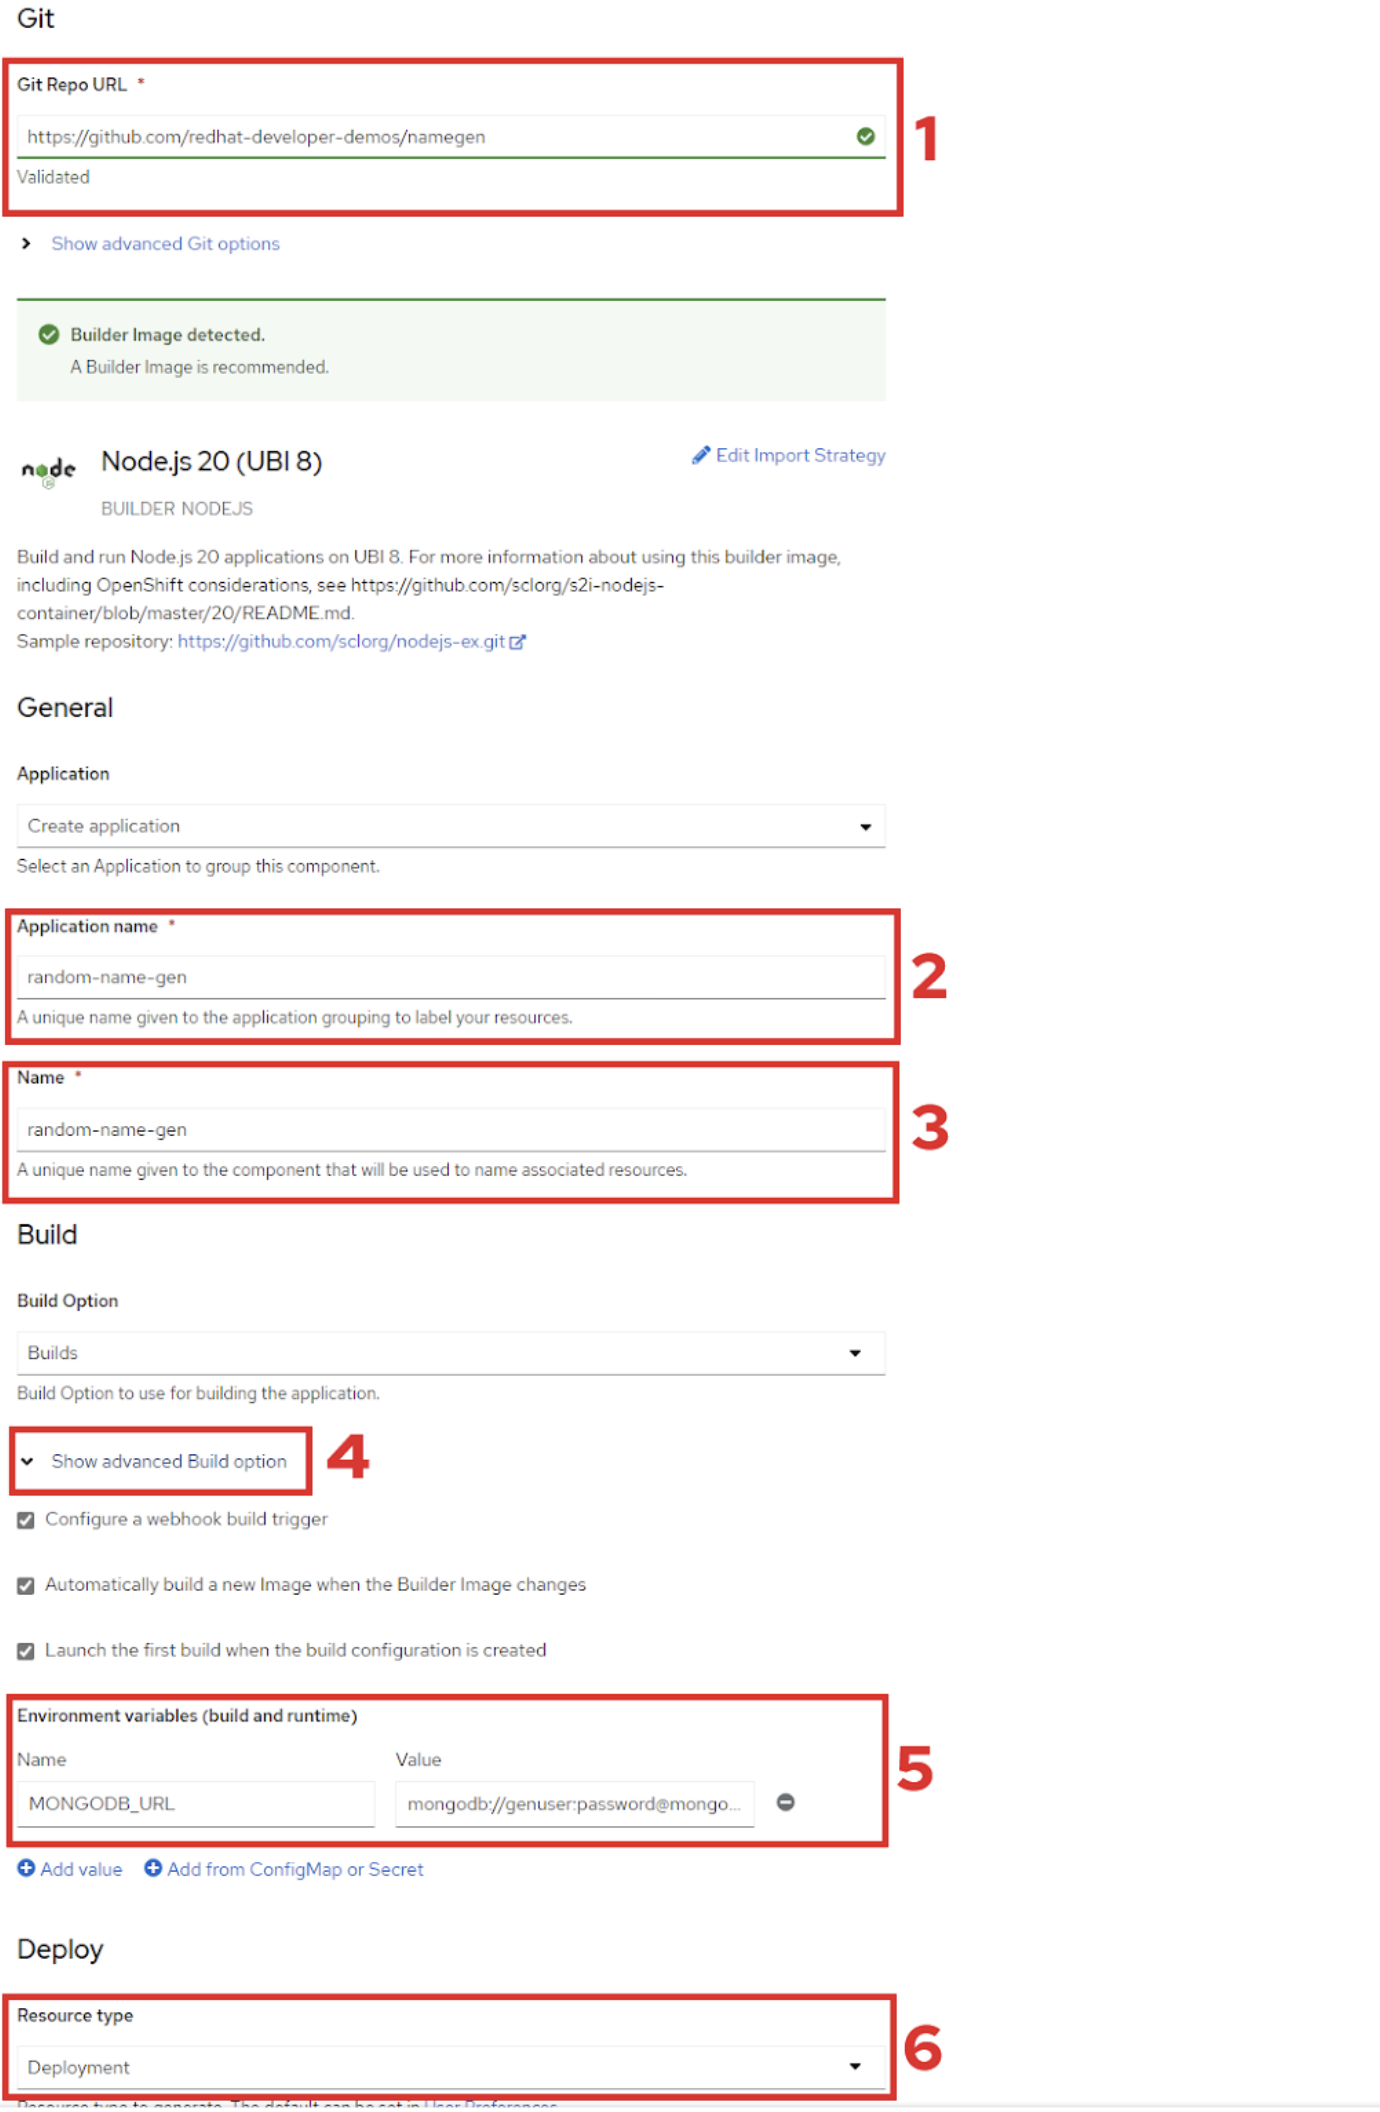
Figure 9: You can install an application in the Developer Sandbox from source code stored in a Git repository Figure 9: You can install an application in the Developer Sandbox from source code stored in a Git repository. An Import from Git web page will appear when you click the text block (Figure 10, Callout 1). Enter the following URL into the Git Repository URL text box:
https://github.com/redhat-developer-demos/namegenScroll down the page until you come to the Application name text box (Figure 10, Callout 2) and enter the following text:
random-name-genEnter the following text (Figure 10, Callout 3) in the Name text box:
random-name-gen- Copy snippet.
- Scroll further down the Import from Git web page to the section above the Create button. You will see an option called Build configuration. Select this option.
The web page will expand to display a section titled Build configuration (Figure 10, Callout 4). Enter the following text in the Name text box of the section labeled Environmental variable (build and runtime):
MONGODB_URLEnter the following text (Figure 10, Callout 5) in the Value field:
mongodb://genuser:password@mongodb- Notice that the value of the environment variable is the connection URL to the MongoDB instance you installed previously. The environment variable is the mechanism that provides the Node.js application with the information it needs to connect to the MongoDB database.
- Select Deployment as the Resource type (Figure 10, Callout 6).
Select Create. This will start the process of installing the Node.js application from source code.
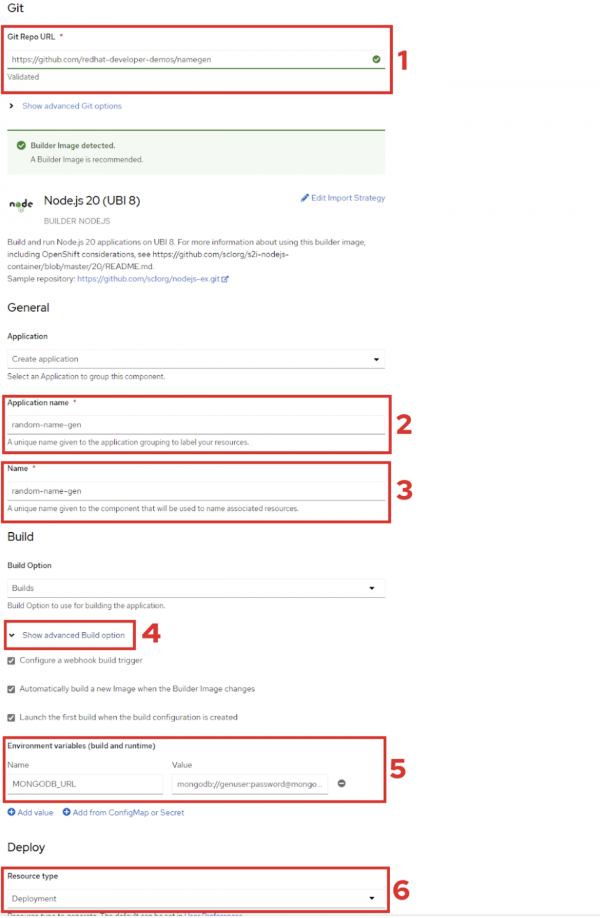
Figure 10: Carefully specifying the appropriate values gives you the unique application you desire. - Behind the scenes, OpenShift will automatically do the work of converting the source code into a Linux container that gets added to a Kubernetes pod that OpenShift also created. That pod represents the application in the Developer Sandbox. Also, OpenShift will create the Kubernetes service and route that will make the application accessible on the Internet.
The Node.js application will appear in the Topology view as a graphic with a light blue circle. The light blue circle means that the application is building (Figure 11).

Figure 12: An application that is building will display a light blue circle in its graphic in Topology view. Figure 11: An application that is building will display a light blue circle in its graphic in Topology view. When the application’s build process is complete, the circle in the Node.js application graphic in Topology view will turn dark blue (Figure 12).
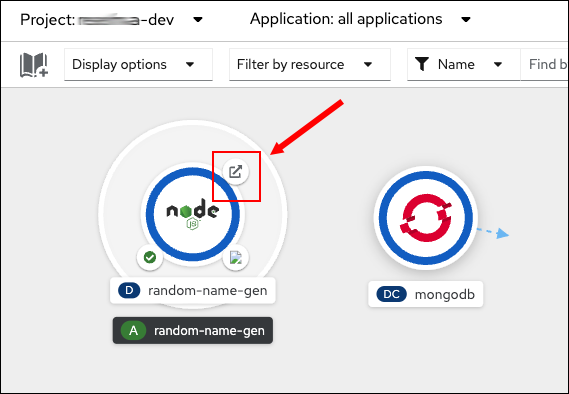
Figure 13: A built application will display a dark blue circle which means the application is up and running and accessible on the Internet by clicking the icon on the upper right of the graphic. Figure 12: A built application will display a dark blue circle which means the application is up and running and accessible on the Internet by clicking the icon on the upper right of the graphic.

View the web application in a browser
Once the circle in the Topology view Node.js graphic turns dark blue, click the icon on the upper right corner of the Node.js graphic. Clicking the icon will open up a window in your browser that displays the Node.js application’s web page (Figure 13).
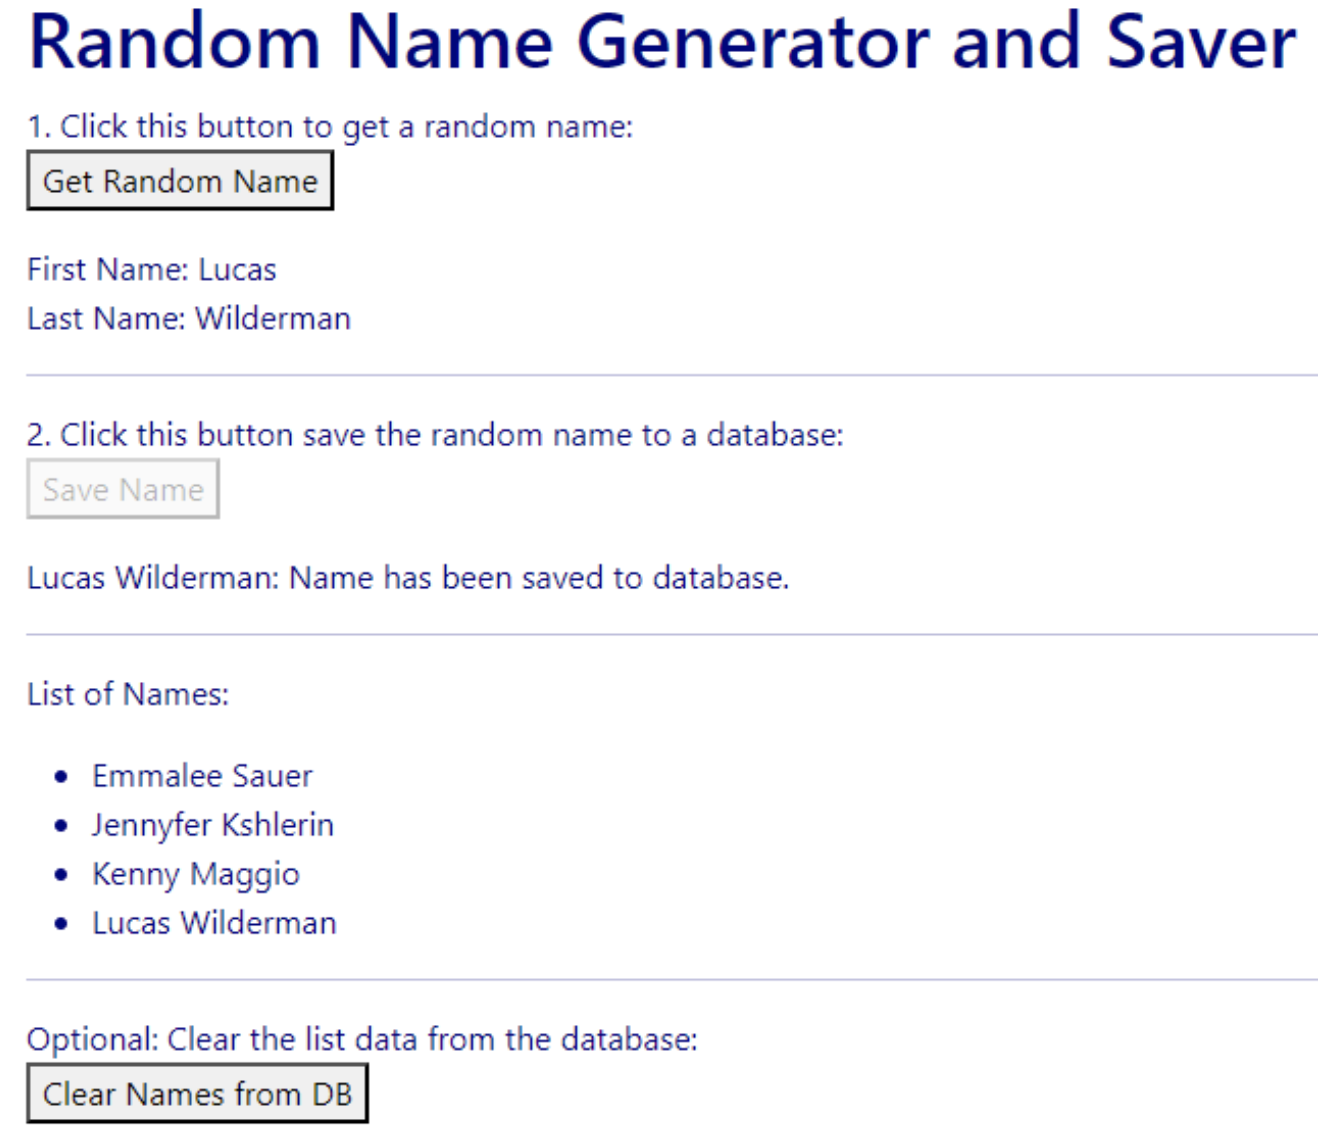
The application is now up and running. You can exercise the application by selecting Get Random Name. An automatically generated random name will appear.
Also, the button labeled Save Name will be enabled. Click the Save Name button to add the newly created random name to List of Names.
Summary
In this lesson, you learned how to install an instance of MongoDB template in the OpenShift Catalog using the web console. You learned how to declare a database user, password, and default database during the installation process.
In addition, you learned how to use the Developer Sandbox web console to install an instance of a custom application from source code in GitHub. Also, you learned how to configure the application to bind to the MongoDB database by assigning a connection URL for the MongoDB instance to an environment variable that you declared during the installation process of the custom application.
Finally, after installing the MongoDB instance and custom application in the Developer Sandbox, you exercised the custom application from a browser window via its web interface.
Next
In the next lesson, you’ll learn how to view performance information using the OpenShift web console.