Page
Install an application from a Linux container image using the oc CLI tool
In this lesson, you will learn how to use the oc CLI tool on a local machine to install and run an application on a remote OpenShift cluster from a Linux container image that is stored on a container image repository.
What you need to know
In order to get full benefit from taking this lesson, you need to:
- Understand the relationship between OpenShift and Kubernetes.
- Understand what a Linux container image is and the purpose it serves.
- Understand the nature and use of a Linux container image repository such as quay.io
- Know how to log in to a remote OpenShift cluster using the
ocCLI tool running on a local computer.
What you will learn
In this lesson you will learn:
- How to log into the remote instance of the Developer Sandbox using the
ocCLI tool. - How to use the
ocCLI tool running on a local computer to import a Linux container image from a container image repository and run it on a remote OpenShift cluster. - How to exercise the application you installed on the Developer Sandbox using the
ocCLI tool.
Get login credentials for the OpenShift web console
In order to use the oc CLI tool to access a remote instance of the Developer Sandbox, you need to get a special set of login credentials that are available from within the OpenShift web console. The following steps describe how to get the necessary credentials:
- Go to the web console in the Developer Sandbox.
- Click the question mark in the upper right of the web console (Figure 1, Callout 1).
- Select Command Line tools from the drop-down that appears. The page appears (Figure 1, Callout 2).
Select Copy command login (Figure 1, Callout 3).
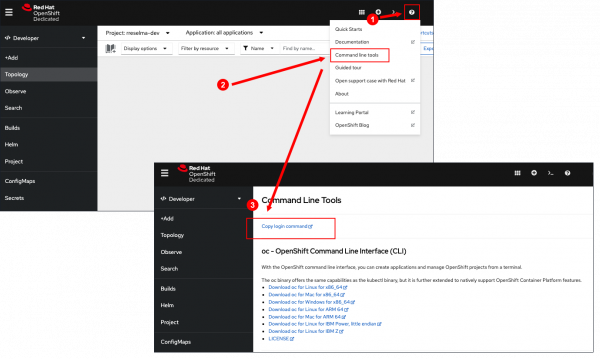
Figure 1: You access Command Line Tools by clicking the question mark in the upper right of the OpenShift web console. - A Display Token field appears. Select Display Token (Figure 2, Callout 1).
Copy the content from the Log in with this token field (Figure 2, Callout 2).
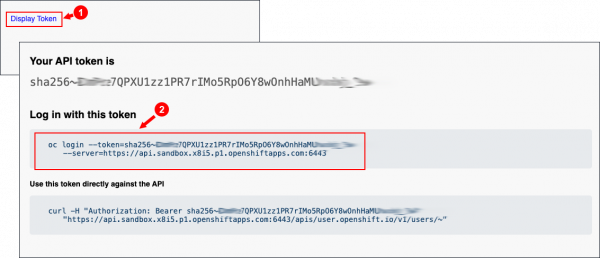
Figure 2: Clicking Display Token displays another page that shows a variety of login credentials. - Go to a terminal running on your local machine. Paste the text you copied from the Log in with this token field.
Select Enter (Figure 3).

Figure 3: Once you have a login token, you can use the oc CLI tool to access the Developer Sandbox for Red Hat OpenShift from your local machine. Figure 3: Once you have a login token, you can use the oc CLI tool to access the Developer Sandbox from your local machine.
Now that you're logged in, you can do work in the remote Developer Sandbox using the oc CLI tool.
Install an application from a container image using oc new-app
Installing an application in the Developer Sandbox using a container image involves using the oc new app command along with declaring the full path to a container image hosted in a container image repository. To do this:
Go to the local computer on which you installed the oc CLI tool and enter the following command in a terminal window:
oc new-app quay.io/rhdevelopers/greeterYou will receive output similar to the following:
--> Found container image 1ea546d (3 years old) from quay.io for "quay.io/rhdevelopers/greeter"

    * An image stream tag will be created as "greeter:latest" that will track this image

--> Creating resources ...

    imagestream.image.openshift.io "greeter" created

    deployment.apps "greeter" created

    service "greeter" created

--> Success

    Application is not exposed. You can expose services to the outside world by executing one or more of the commands below:

     'oc expose service/greeter'

    Run 'oc status' to view your app.
Expose and view the application via a URL
Once the application is installed, it needs to be exposed to the internet. Here are the steps to this process:
Run the following command in the terminal window on your local machine:
oc expose service/greeterYou will see a response similar to the following:
route.route.openshift.io/greeter exposedGo to the Topology view in the OpenShift web console of the Developer Sandbox (Figure 4).
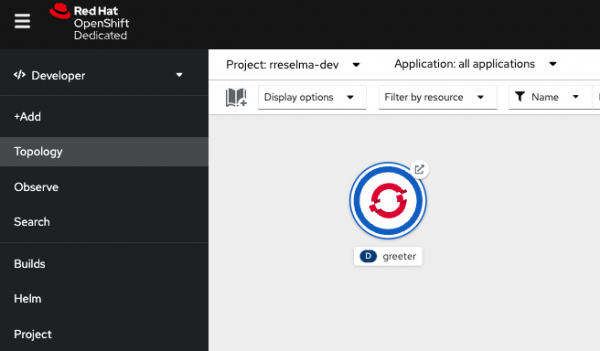
Figure 4: Applications installed using the oc CLI tool will appear in the Topology page of the Developer Sandbox for Red Hat OpenShift. Figure 4: Applications installed using the oc CLI tool will appear in the Topology page of the Developer Sandbox. - Click the icon in the upper right corner of the circular graphic to access the installed web application in a web browser (Figure 5, Callout 1).
A new browser window will open which contains the contents of the Greeter web application (Figure 5, Callout 2). Note that you may need to change the URL scheme to “http”.
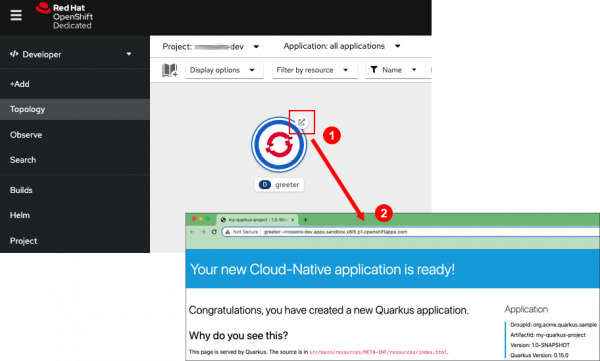
Figure 5: Click the icon in upper right of the circular graphic representing the application to access it via a web browser.
Delete the application using the oc CLI tool
You can delete an installed application using the oc CLI tool. You’ll use the oc delete all command to delete all of the underlying Kubernetes resources that are associated with the given application.
A resource is associated with a Kubernetes label that OpenShift assigns to the given resource. For example, in terms of the demonstration Greeter application you just installed, all Kubernetes resources associated with the application will be assigned the label=value pair, app=greeter.
The syntax mechanism for declaring the label of interest is the -1 option in the oc delete all command, where -1 indicates your level of interest.
Get the application’s Kubernetes label
To get a list of labels associated with the deployment representing the application you installed, run the following command in the terminal window:
oc get deployment --show-labelsYou will receive output similar to the following:
NAME                        READY   UP-TO-DATE   AVAILABLE   AGE    LABELS
greeter                     1/1     1            1           142m   app.kubernetes.io/component=greeter,app.kubernetes.io/instance=greeter,app=greeter
workspace1e8db31dd59c43ef   0/0     0            0           4d2h   controller.devfile.io/creator=2410eac3-b011-4d21-9fa8-633be16e60f8,controller.devfile.io/devworkspace_id=workspace1e8db31dd59c43ef,controller.devfile.io/devworkspace_name=terminal-om80si
Note: One of the labels is app=greeter. This is the label you will use to identify the Kubernetes resources you want to remove from the OpenShift cluster.
Delete the application
Run the following command in the terminal window of your local computer to remove the greeter demonstration application from the Developer Sandbox:
oc delete all -l app=greeterYou will receive output similar to the following:
NAME              TYPE        CLUSTER-IP       EXTERNAL-IP   PORT(S)    AGE

service/greeter   ClusterIP   172.30.204.238   <none>        8080/TCP   142m


NAME                      READY   UP-TO-DATE   AVAILABLE   AGE

deployment.apps/greeter   1/1     1            1           142m


NAME                                     IMAGE REPOSITORY                                                                                     TAGS     UPDATED

imagestream.image.openshift.io/greeter   default-route-openshift-image-registry.apps.sandbox.x8i5.p1.openshiftapps.com/rreselma-dev/greeter   latest   2 hours ago


NAME                               HOST/PORT                                                     PATH   SERVICES   PORT       TERMINATION   WILDCARD

route.route.openshift.io/greeter   greeter-rreselma-dev.apps.sandbox.x8i5.p1.openshiftapps.com          greeter    8080-tcp                 None
All the Kubernetes resources–service, deployment, imagestream, and route–have been removed.
Go to your instance of the Developer Sandbox and navigate to Topology (Figure 6).
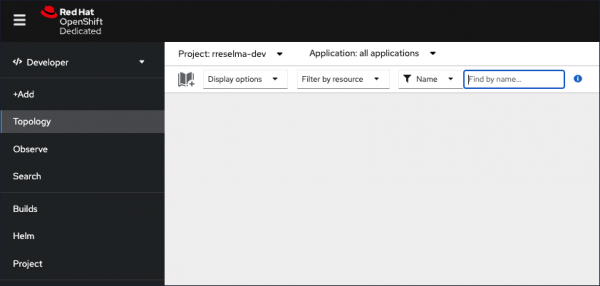
Figure 6: When an application is deleted using the oc CLI tool, it will no longer appear as a circular graphic is the Topology page of the OpenShift WebConsole.
Note: The Greeter application you installed earlier and deleted using the oc delete all command is no longer visible.
Summary
In this lesson, you learned to install and then delete a web application in your instance of the Developer Sandbox. Also, you learned how to expose the installed application to the internet. Once exposed, you learned how to view the application using the application graphic presented in the Topology page.
Next
The next lesson will show you how to install an application in the Developer Sandbox from a source code using the oc CLI tool.
