Page
Scale applications using the oc CLI tool
In this lesson, you will learn how to use the oc CLI tool to scale up and down the number of OpenShift pods.
What you need to know
In order to get the full benefit from taking this lesson, you need to:
- Understand the relationship between OpenShift and Kubernetes.
- Have a clear understanding of the nature and use of the Kubernetes pod resource.
- Understand the nature and use of a Kubernetes deployment resource to support multiple pods for a given application.
- Know how to access your dedicated instance of the Developer Sandbox.
What you will learn
In this lesson, you will:
- Review the concept of how Kubernetes uses a pod.
- Log in to the remote Developer Sandbox from your local computer using the
ocCLI tool. - Install a web application in the Developer Sandbox using the
ocCLI tool. - Use the
ocCLI tool to scale-increase the number of pods associated with the web application you installed. - Use the
ocCLI tool to scale-decrease the number of pods associated with the web application you installed.
How does scaling apply the number of Kubernetes pods in an application?
Applications running in OpenShift are made up of a variety of Kubernetes components. The component that has an application’s logic is a Kubernetes pod.
A pod is a logical unit for organizing a set of one or more Linux containers running in a Kubernetes cluster. These Linux containers house the application’s logic. For example, if you have an application that inspects a .png file to see if the file displays an image of a cat, the logic that does the analysis lives in a container, and that container is in a pod in a Kubernetes cluster.
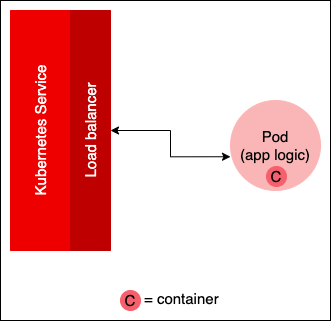
Access to the pod is facilitated by a Kubernetes service that forwards requests to and from the pod. In a production environment, the service is backed by a load balancer that has the intelligence to move traffic to a pod that has the capacity to process the request.
Figure 1 below shows the service/pod architecture for a single pod. The load balancer doesn't have a lot to do, since there is only one pod in play.
Typically, an OpenShift application is intended to run code at web scale. This means that an application may be processing hundreds, if not thousands, of requests a minute. In this scenario, it’s not practical to expect one pod to handle such a workload. The better solution is to add more pods that have identical logic to the cluster (Figure 2).
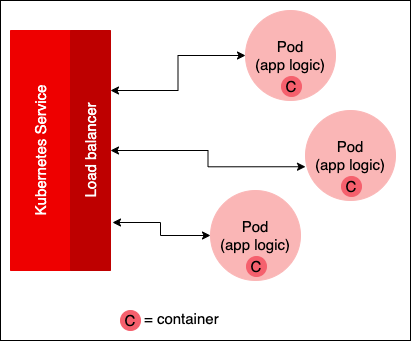
Once you add more pods, the load balancer will route a request to the pod that has the capacity to process the given request. Scaling an application down means reducing the number of pods associated with the application.
OpenShift allows you to use the web console to scale up and down the number of pods dedicated to a particular OpenShift application. The following sections describe how to work with the OpenShift web console to scale the number of pods in an application up and down.
First you will use the OpenShift web console to install an application from a container image that’s hosted in the quay.io container repository. Then you will use the web console to scale the application’s pod up and down.
Get login credentials for the OpenShift web console
In order to use the oc CLI tool to access a remote instance of the Developer Sandbox, you need to get a special set of login credentials that are available from within the OpenShift web console.
Here are the steps:
- Go to the web console in the Developer Sandbox.
- Click the question mark in the upper right of the web console, and select Command line tools (Figure 3, Callout 1).
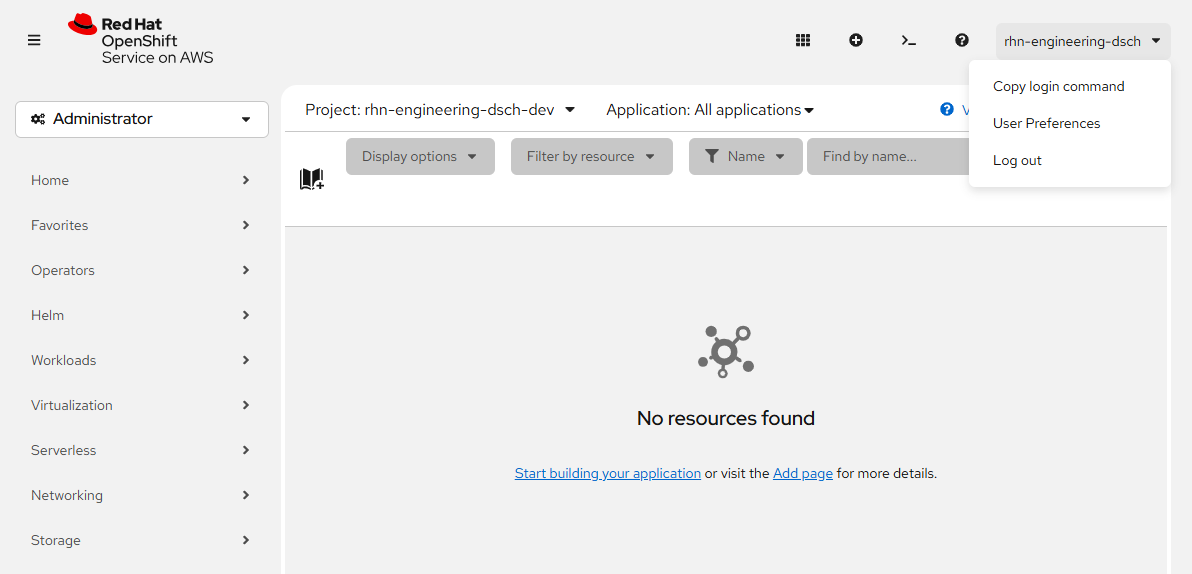
Go to the web console in the Developer Sandbox. Click the user name upper right corner and select the Copy login command option. (Figure 3).
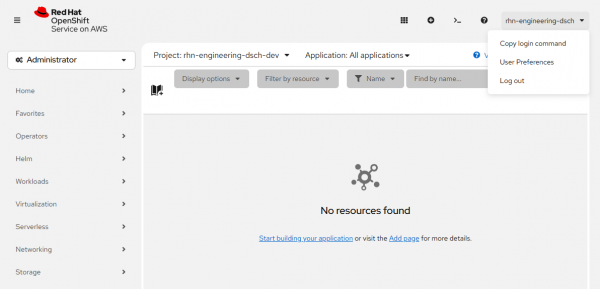
Figure 3: You access Command Line Tools by clicking the question mark in the upper right of the OpenShift web console. - Select Display Token (Figure 4, Callout 1).
A page with various login credentials will appear. Paste the command login into the Log in with this token field (Figure 4, Callout 2).
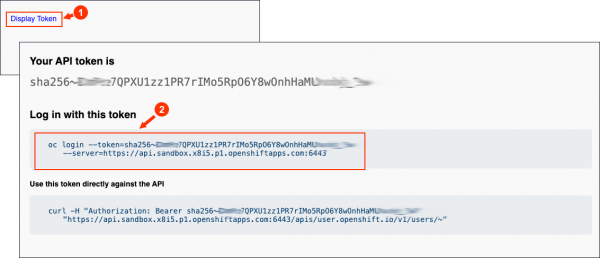
Figure 4: Clicking Display Token displays another page that shows a variety of login credentials. Go to a terminal running on your local machine and paste the login text you just copied. Select Enter to log in (Figure 5).

Figure 5: Once you have a login token, you can use the oc CLI tool to access the remote Developer Sandbox from your local machine.


Once you have logged in, you can work in the Developer Sandbox using the oc CLI tool.
Install an application from source code using oc new-app
The following steps describe how to install an application from source code stored in a GitHub repository on the remote Developer Sandbox:
Go to the local computer in which you have installed the oc CLI tool and enter the following command in a terminal window:
oc new-app quay.io/openshiftroadshow/parksmapYou will receive output similar to the following:
--> Found container image 0c2f55f (19 months old) from quay.io for "quay.io/openshiftroadshow/parksmap"

    * An image stream tag will be created as "parksmap:latest" that will track this image

--> Creating resources ...

    imagestream.image.openshift.io "parksmap" created

    deployment.apps "parksmap" created

    service "parksmap" created

--> Success

    Application is not exposed. You can expose services to the outside world by executing one or more of the commands below:

     'oc expose service/parksmap'

    Run 'oc status' to view your app.
Now, run the following command in a terminal window on your local machine to expose the application to the Internet:
oc expose service/parksmapYou see output similar to the following:
route.route.openshift.io/parksmap exposedThe application named parksmap is now installed and exposed. The next set of steps will teach you how to scale the number of pods associated with the application up and down. In order to fully understand the technique, you need to understand how to work with the Kubernetes deployment resource.
Work with a Kubernetes deployment
In order to scale an application running in OpenShift up or down, you need to work with a Kubernetes deployment.
A deployment is a Kubernetes resource that represents a collection of identical pods running in the Kubernetes cluster. A deployment is configured to have a particular number of pods (also known as replicas). The deployment guarantees that the number of replicas declared for the given deployment will always be running. Should one of the pods in the deployment fail, Kubernetes will notice the failure and create another pod to replace the pod that failed.
The number of replicas running under a particular deployment can be changed at runtime. Changing the number of replicas for a given deployment is how you scale the pods associated with a given OpenShift application up or down.
The following steps show you how to use the oc CLI tool to determine the deployments running in the default namespace of the OpenShift cluster.
Run the following command in your local machine's terminal window to determine the number of pods running under the parksmap deployment:
oc get deploymentYou will receive output similar to the following:
NAME                        READY   UP-TO-DATE   AVAILABLE   AGE
parksmap                    1/1     1            1           34m
workspace1e8db31dd59c43ef 0/0 0 0 8dNote: The deployment named parksmap has one pod associated with the deployment. That single pod is up and running as is shown in the 1/1 entry in the READY column, because you installed the parksmap application at the beginning of this lesson.
You are now going to scale the parksmap application up, then scale it down.
Scale up an OpenShift application using the oc CLI tool
Run the following command in your local machine's terminal window to scale the parksmap deployment to three pods. Note the use of the –replicas option to declare the number of pods that the deployment needs created:
oc scale deployment parksmap --replicas=3You will get output similar to the following:
deployment.apps/parksmap scaledRun the following command in the terminal window of your local computer to determine the number of pods running under the parksmap deployment:
oc get deployment -l app=parksmapYou’ll get output similar to the following:
NAME       READY   UP-TO-DATE   AVAILABLE   AGE
parksmap   3/3     3            3           43m
The deployment now has three pods running. You have successfully scaled up the parksmap application.
Scale down an OpenShift application using the oc CLI tool
Run the following command in your local machine's terminal window to scale parksmap deployment to one pod:
oc scale deployment parksmap --replicas=1You will receive output similar to the following:
deployment.apps/parksmap scaledThen, run the following command in your local machine's terminal window to determine the number of pods running under the parksmap deployment:
oc get deployment -l app=parksmapYou’ll get output similar to the following:
NAME       READY   UP-TO-DATE   AVAILABLE   AGE
parksmap   1/1     1            1           43m
The deployment now has one pod running. You have successfully scaled down the parksmap application.
Summary
In this lesson, you used the oc CLI tool to install a web application named parksmap on your instance of the Developer Sandbox, then installed the application from a container image hosted on quay.io
You then learned how to manipulate the number of replicas associated with the application’s deployment by using the oc CLI command and the oc scale deployment. Finally, you learned how to increase the number of pods in the deployment to scale up the application, and how to decrease the number of pods in the deployment to scale down the application.
Next
In the next lesson, you will learn how to install and work with a database in the Developer Sandbox that gets used by a separate application also running in the sandbox.