A critical topic in cloud-native applications is the deployment strategy. We are no longer dealing with one monolithic application. We have several applications that have dependencies on each other and other dependencies like brokers or databases. Applications have their own life cycle, so we should be able to execute independent blue/green deployment. All the applications and dependencies will not change their version at the same time.
Another important topic in cloud native is continuous delivery. If we have several applications doing blue/green deployment independently, we have to automate it. We will use Helm, Red Hat OpenShift Pipelines, Red Hat OpenShift GitOps, and of course Red Hat OpenShift to help us.
In this article, we will demonstrate an example of how to install, deploy, and manage the life cycle of cloud-native applications doing blue/green deployment. Let's start with theory, and then a hands-on example.
Blue/green deployment
Blue/green deployment is an application release model that transfers user traffic from a previous version of an app or microservice to a nearly identical new release, both running in production.
For instance, the old version can be called the blue environment while the new version can be known as the green environment. Once production traffic is transferred from blue to green, blue can stand by in case of rollback or pulled from production and updated to become the template upon which the next update is made.
Advantages:
- Minimize downtime
- Rapid rollback
- Smoke testing
Disadvantages:
- Doubling of total resources
- Backward compatibility
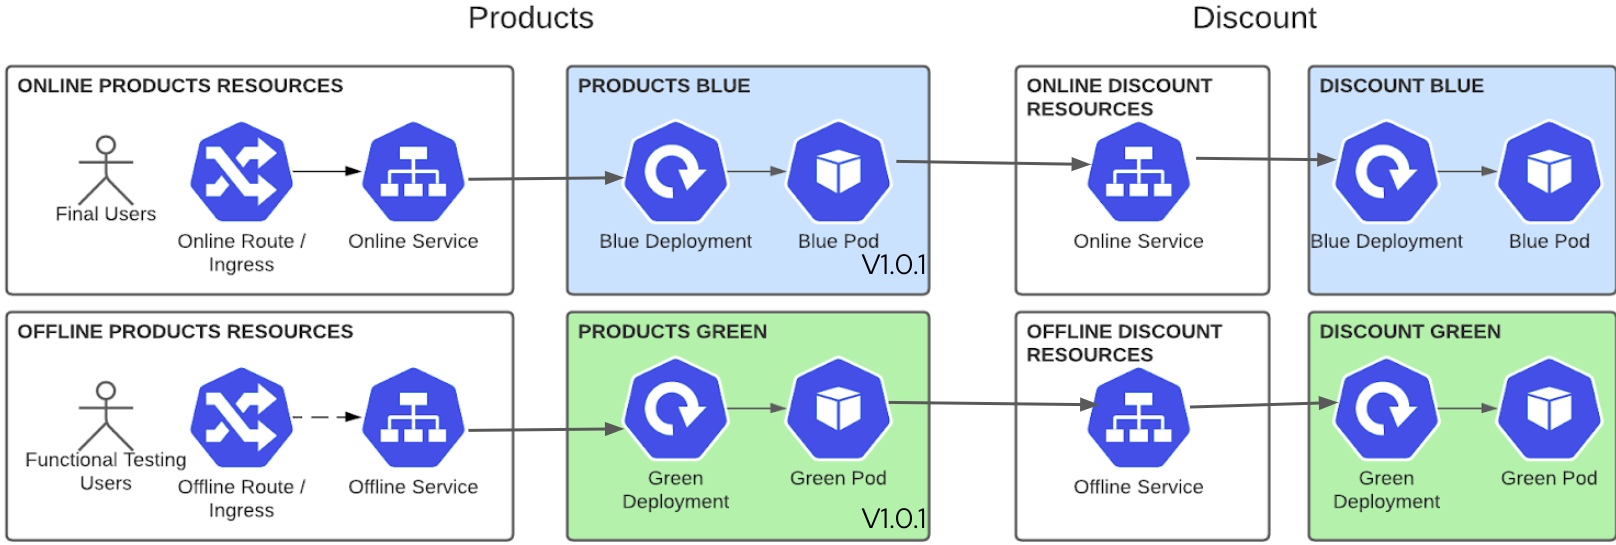
Figure 1 shows a blue/green example.
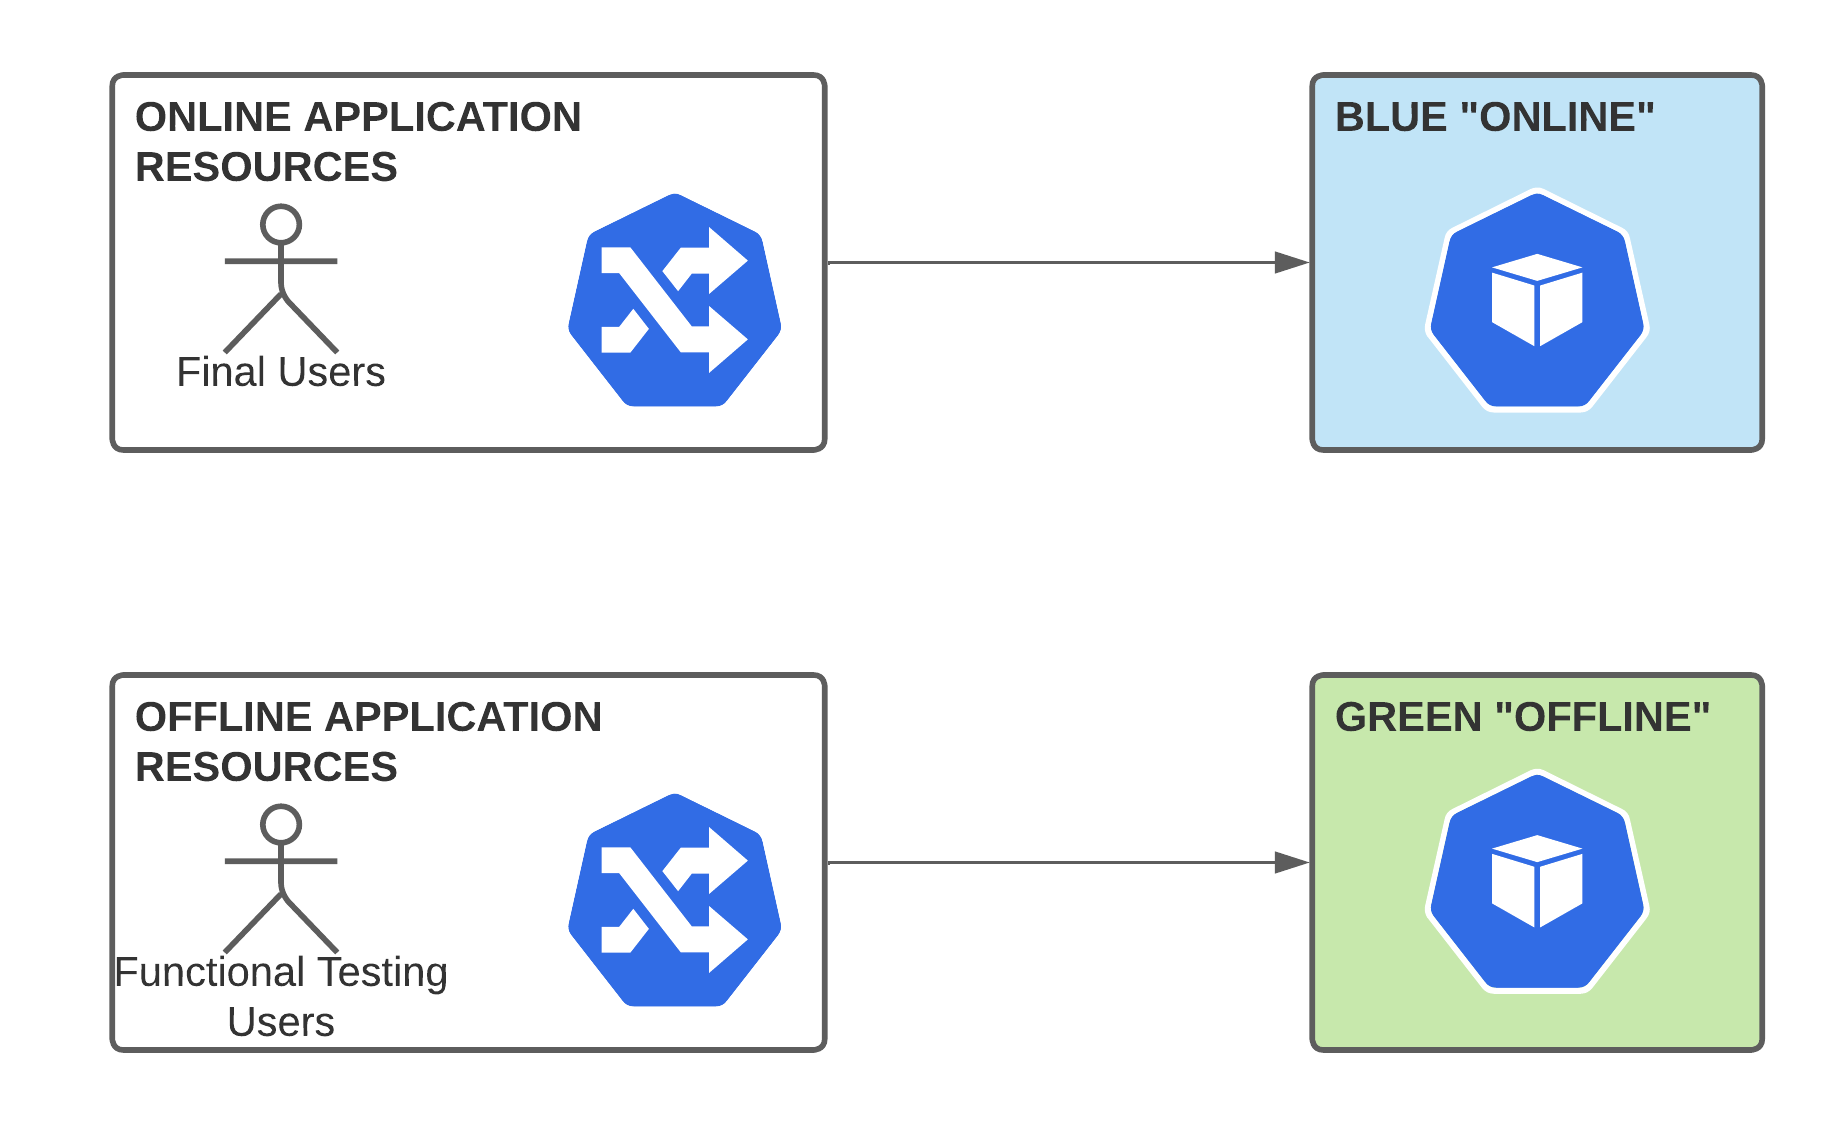
We have two versions up and running in production, online and offline. The routers and services never change. They are always online or offline. Because we have an offline version, we can do the smoke test before switching to online. When a new version is ready to be used by the final users, we only change the deployment that the online service is using. Figure 2 shows blue/green switch.
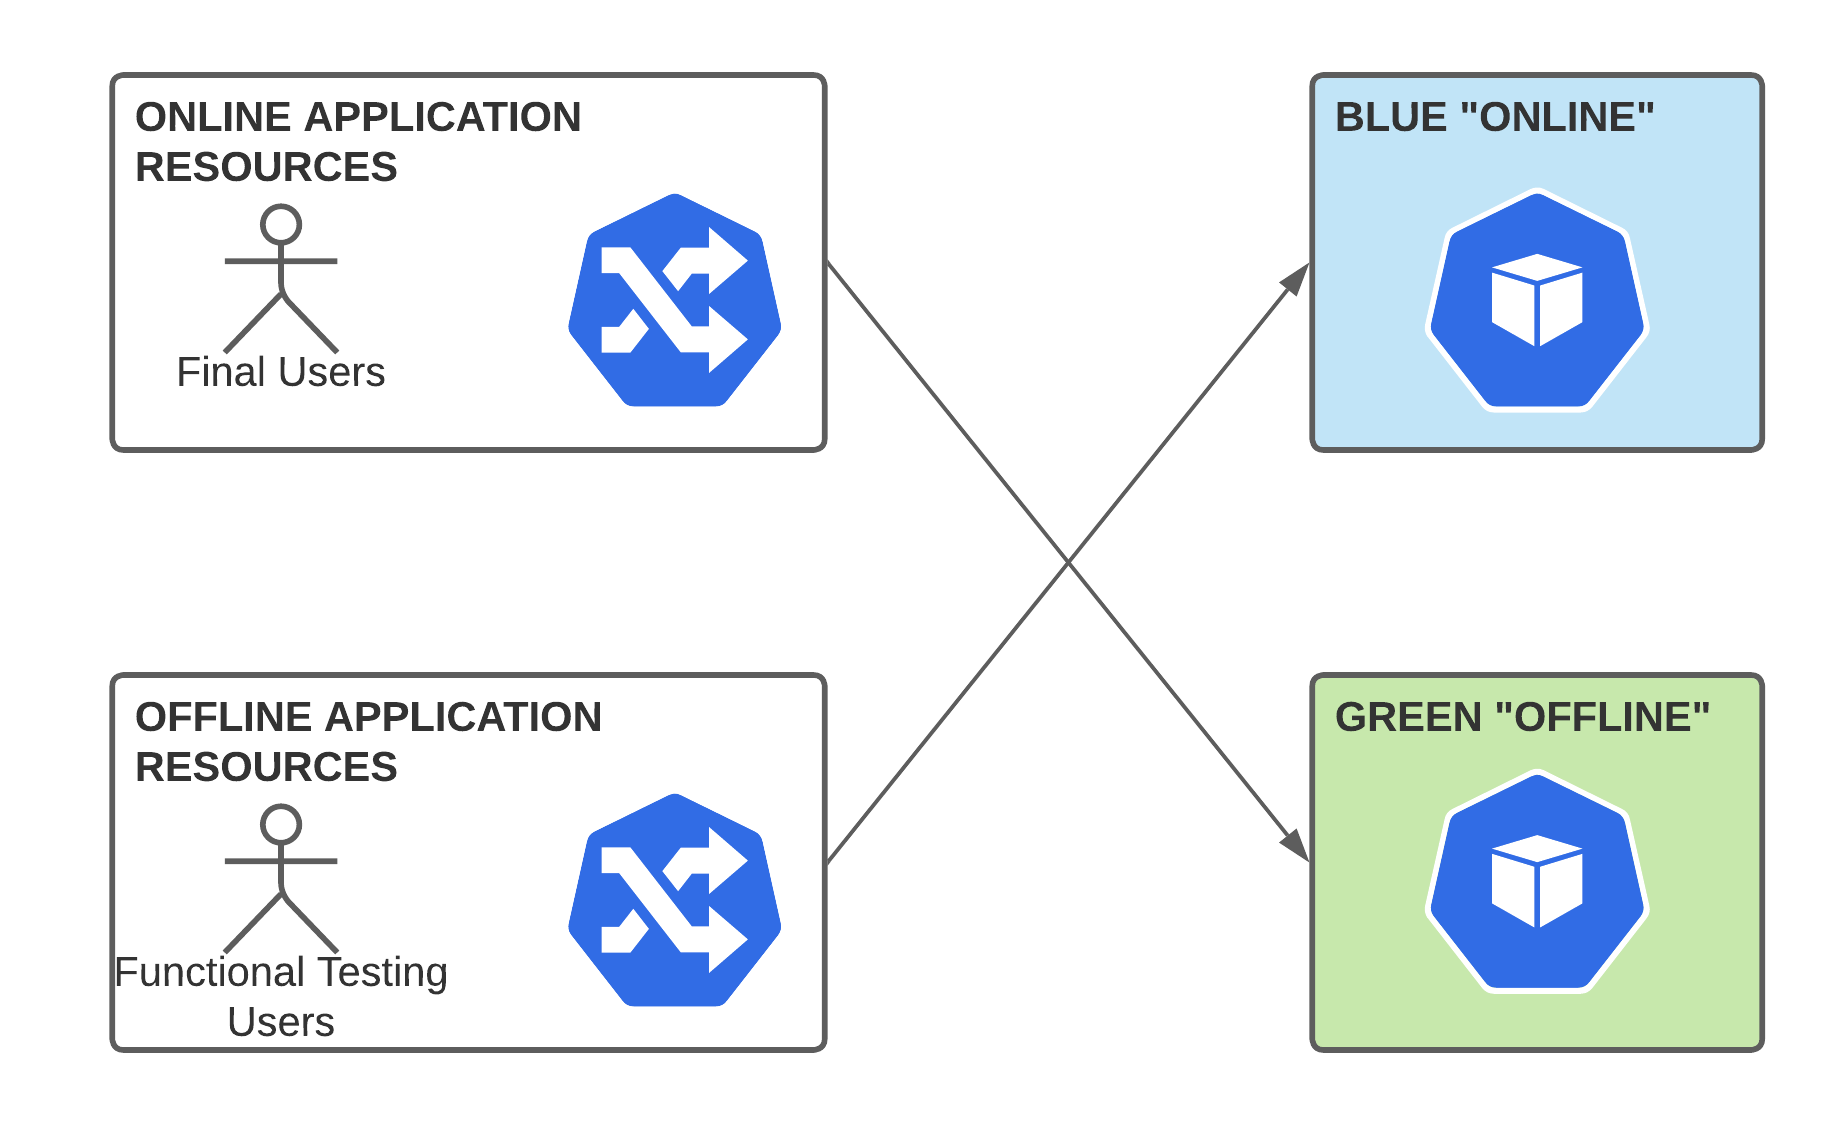
There is minimal downtime and we can do a rapid rollback just by undoing the changes in the services. Meanwhile, we validate the new version with real users, and we have to be ready to do a rapid rollback. We need the doubling or total resources (we will see how to minimize this). It is also very important to keep backward compatibility. Without it, we can not do independent blue/green deployments.
Shop application
We are going to use very simple applications to test blue/green deployment. We have created two Quarkus applications, Products and Discounts. Figure 3 shows the Shop applications.
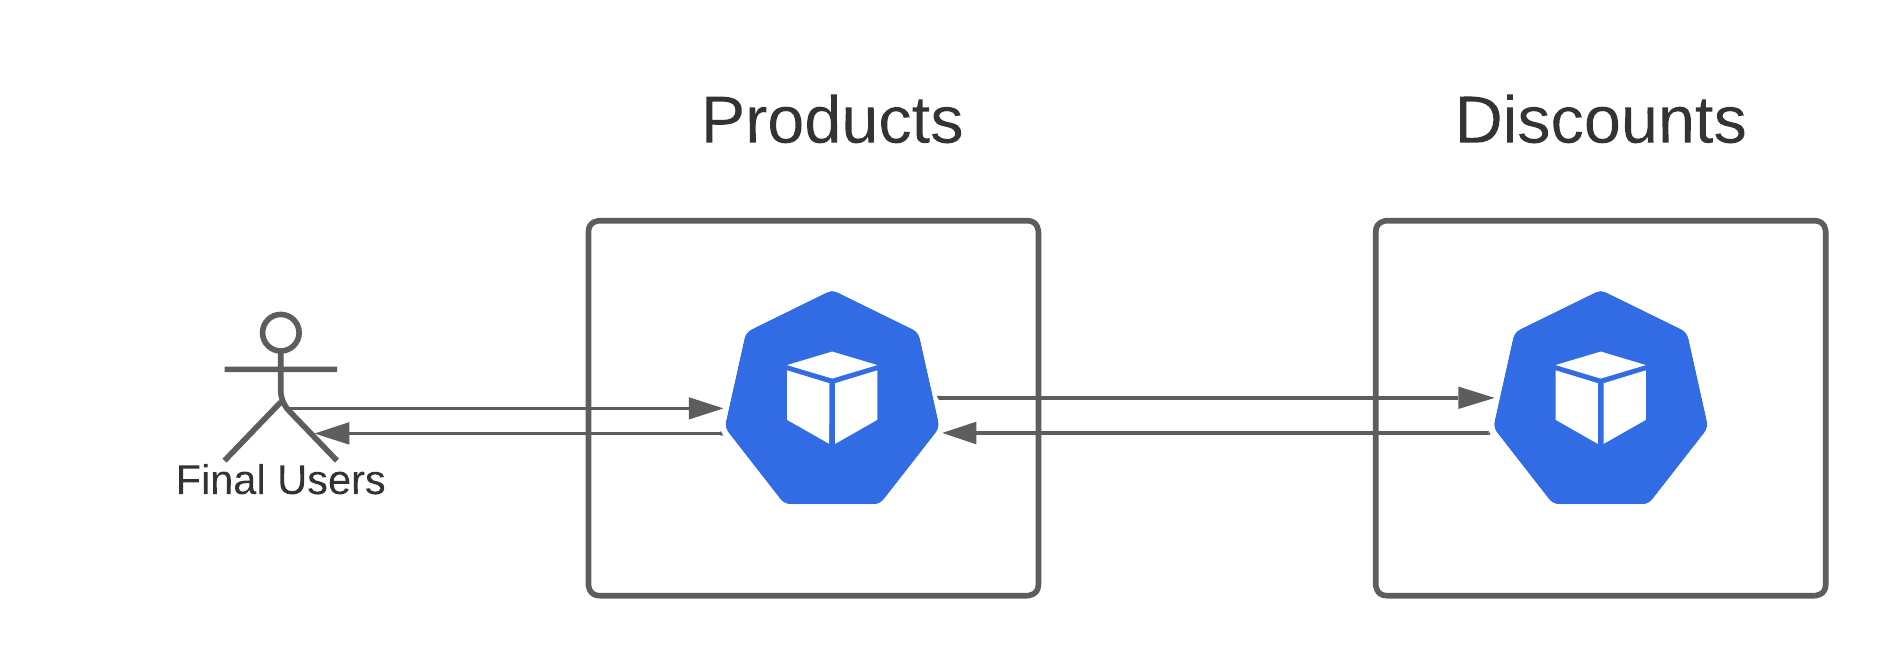
Products call Discounts to get the product's discount and expose an API with a list of products with its discounts.
Shop blue/green
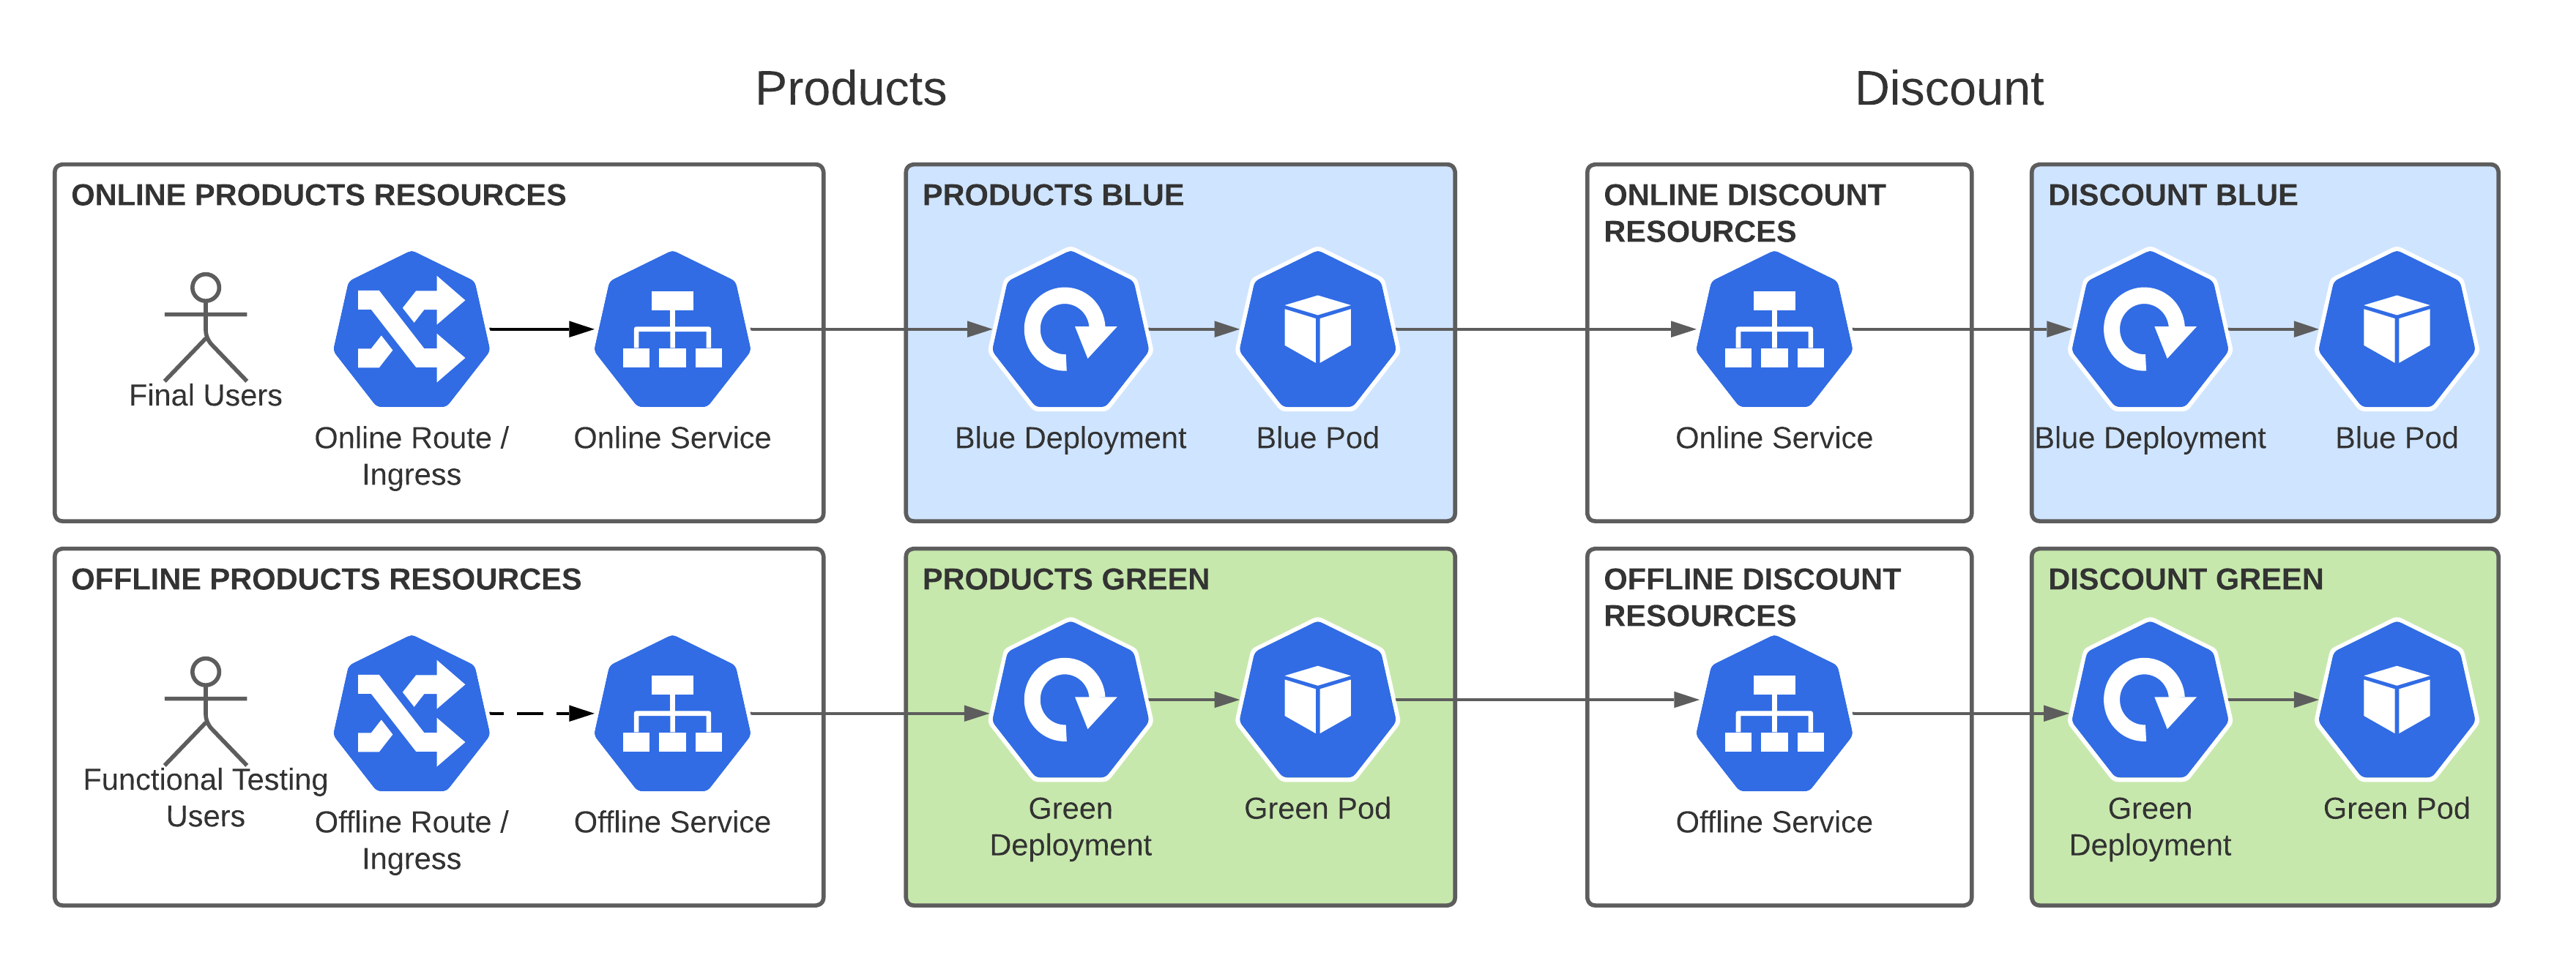
We have designed this architecture to achieve blue/green deployment with cloud-native applications, as shown in Figure 4.
OpenShift Components - Online
- Routes and Services declared with the suffix
-online. - Routes mapped only to the online services.
- Services mapped to the deployment with the color flag (green or orange).
OpenShift Components - Offline
- Routes and Services declared with the suffix
-offline. - Routes mapped only to the offline services.
- Services mapped to the deployment with the color flag (green or orange).
Notice that the routers and services do not have color. This is because they never change, and they are always online or offline. However, deployments and pods will change their version.
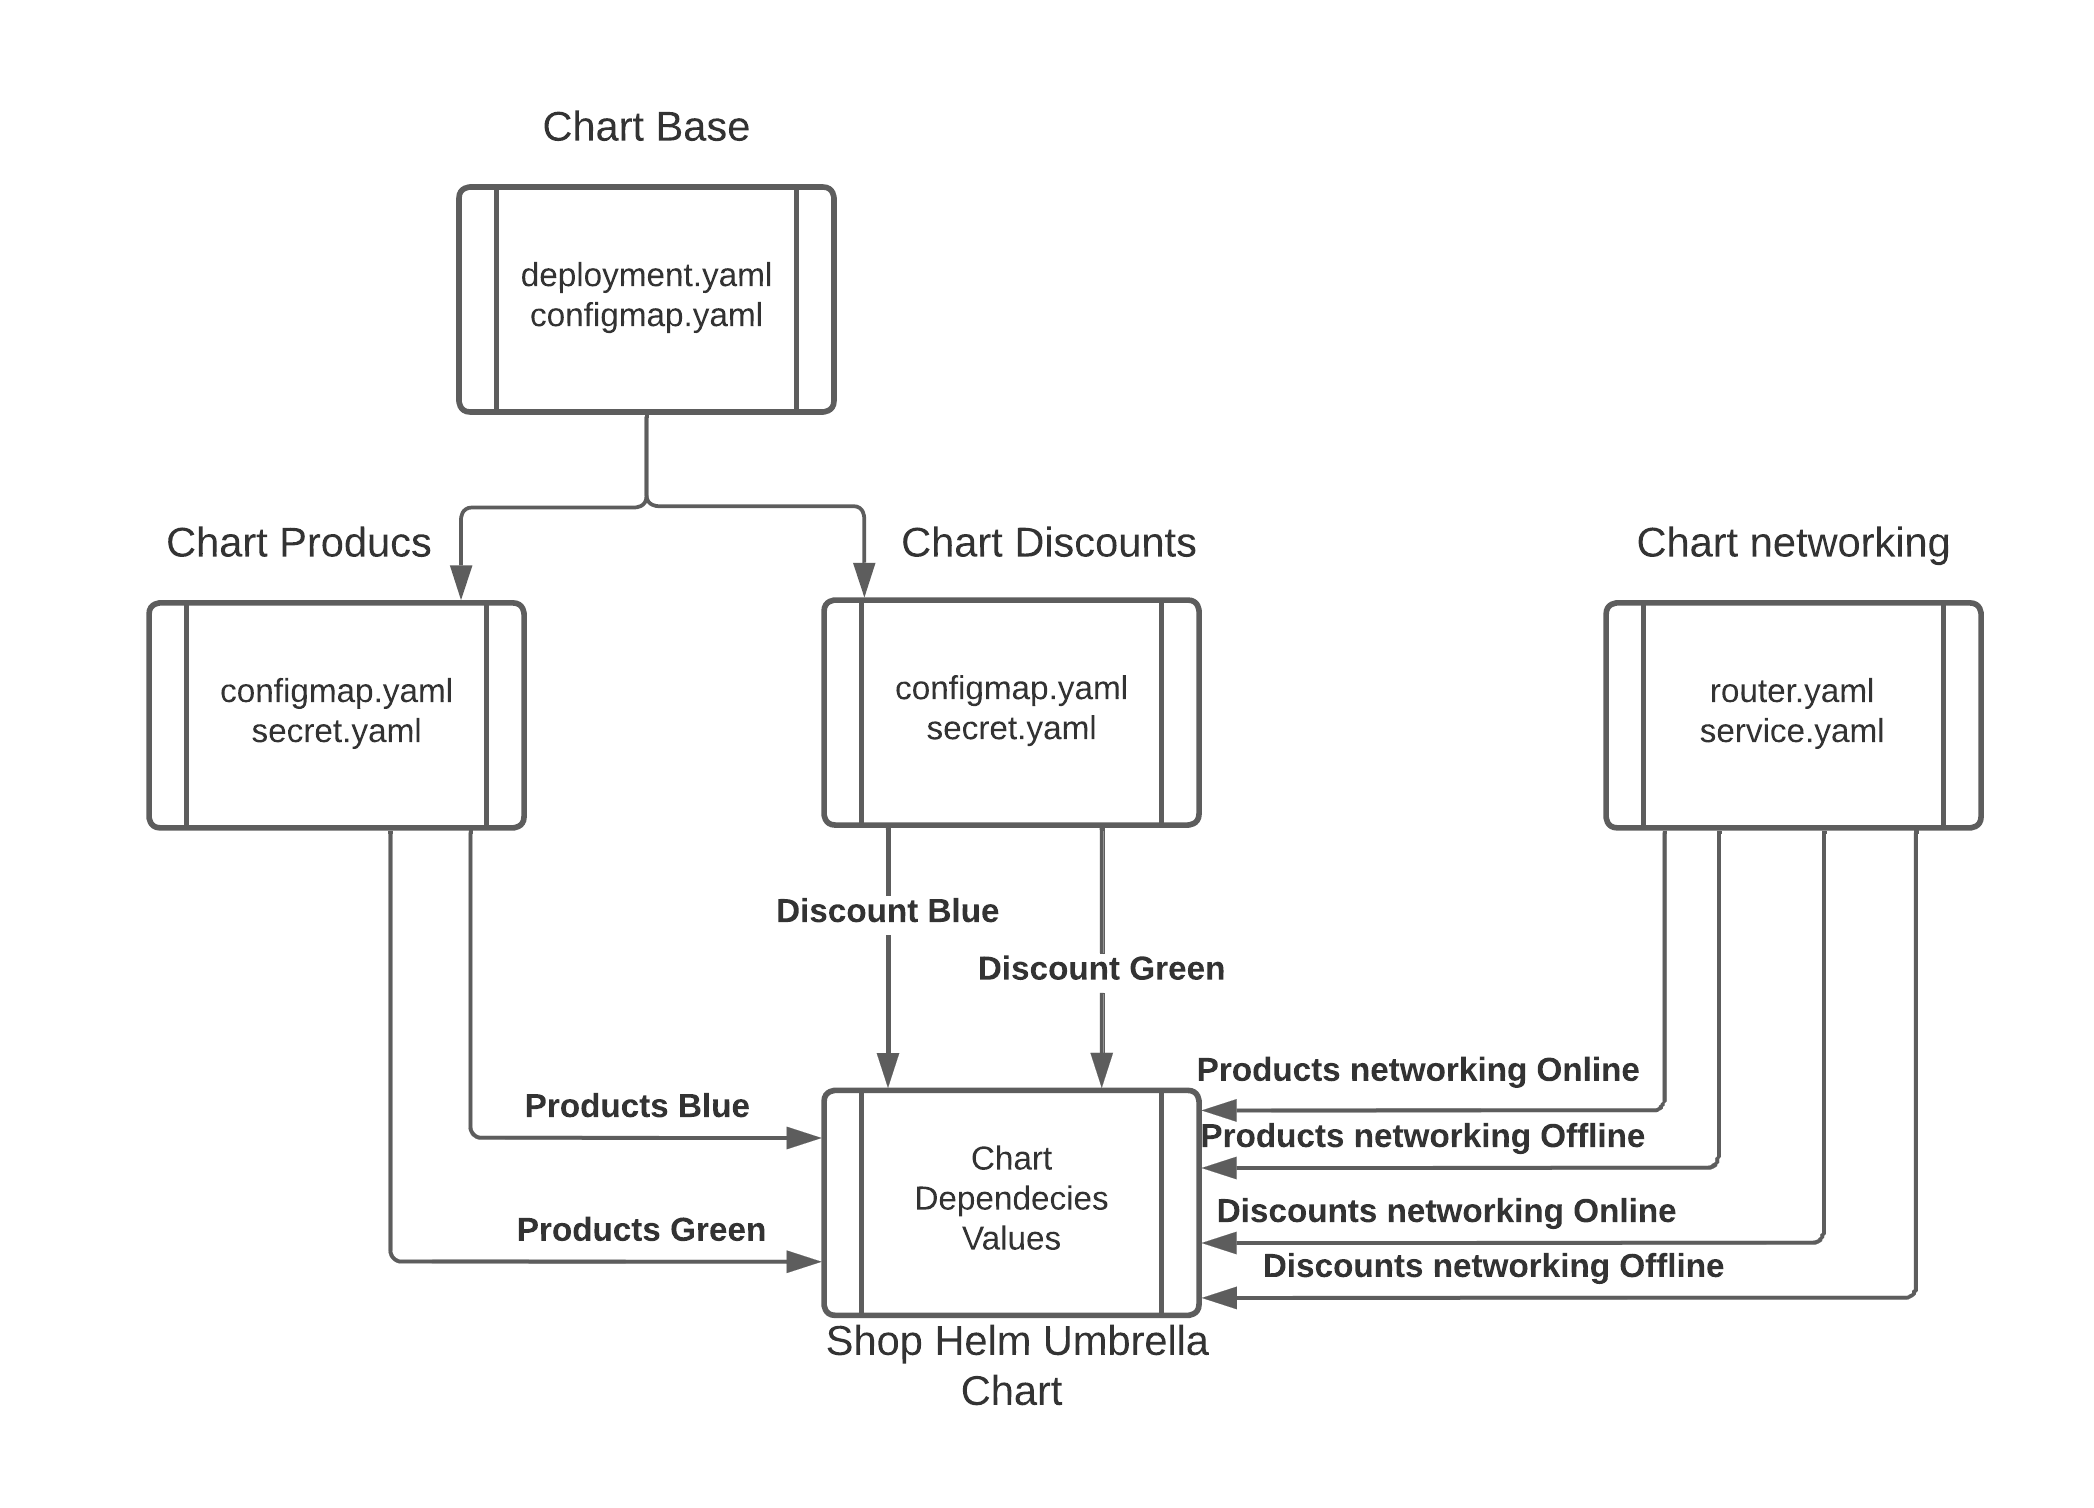
Shop umbrella Helm Chart
One of the best ways to package cloud native applications is Helm. In blue/green deployment, it makes even more sense. We have created a chart for each application that does not know anything about blue/green. Then we pack everything together in an umbrella Helm chart (Figure 5).
Demo prerequisites
- Red Hat OpenShift 4.13 with admin rights
- You can download Red Hat OpenShift Local for OCP 4.13.
- Getting started guide
- Git
- GitHub account
- oc 4.13 command-line interface (CLI)
We have a GitHub repository for this demo. As part of the demo, you will have to make changes and commits. So it is important that you fork the repository and clone it in your local.
git clone https://github.com/your_user/cloud-native-deployment-strategiesIf we want to have a cloud native deployment, we cannot forget CI/CD. Red Hat OpenShift GitOps and Red Hat OpenShift Pipelines will help us.
Install OpenShift GitOps
Go to the folder where you cloned your forked repository and create a new blue-green branch.
cd cloud-native-deployment-strategies

git checkout -b blue-green

git push origin blue-green
Log into OpenShift as a cluster admin and install the OpenShift GitOps operator with the following command. This may take several minutes.
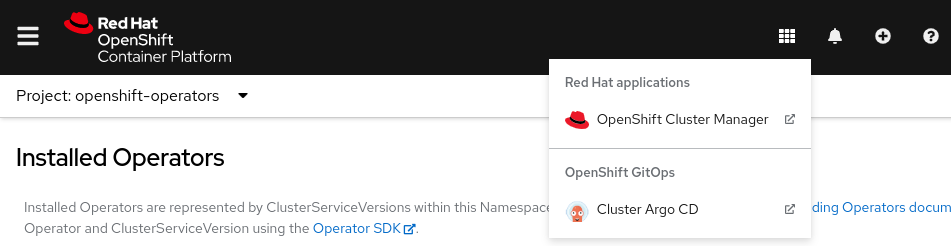
oc apply -f gitops/gitops-operator.yamlOnce OpenShift GitOps is installed, an instance of Argo CD is automatically installed on the cluster in the openshift-gitops namespace, and a link to this instance is added to the application launcher in OpenShift web console, as shown in Figure 6.
Log in to Argo CD dashboard
Upon installation, Argo CD generates an initial admin password stored in a Kubernetes secret. To retrieve this password, run the following command to decrypt the admin password:
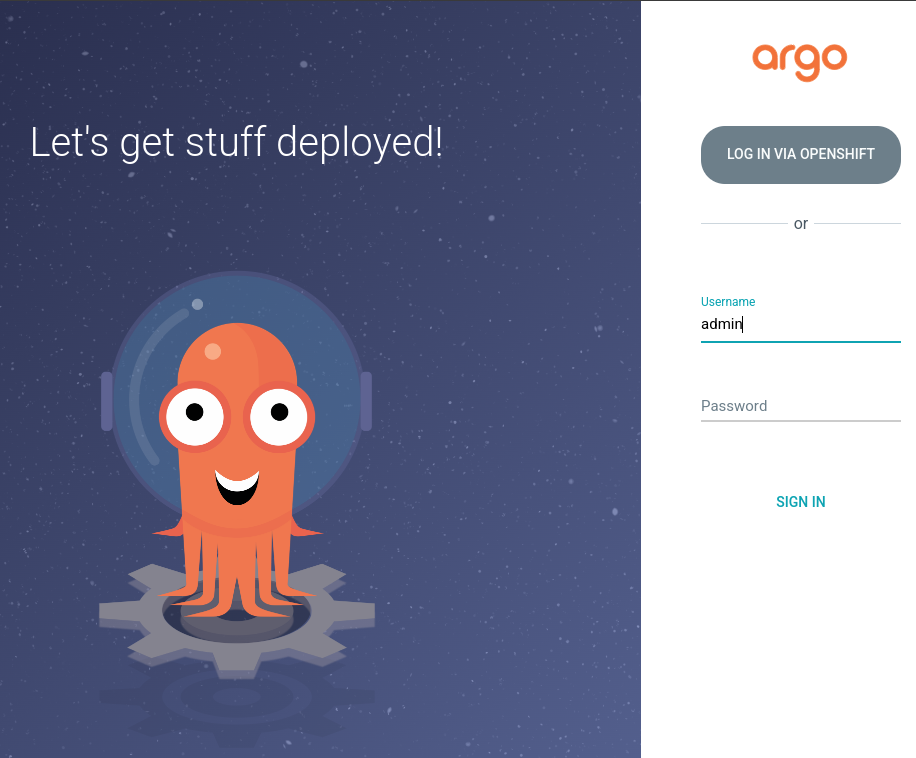
oc extract secret/openshift-gitops-cluster -n openshift-gitops --to=-Click on Argo CD from the OpenShift web console application launcher.
Then log into Argo CD with the admin username and password retrieved from the previous step, as shown in Figure 7.
Configure OpenShift with Argo CD
We are going to follow, as much as we can, a GitOps methodology in this demo. So we will have everything in our Git repository and use Argo CD to deploy it in the cluster.
In the current Git repository, the gitops/cluster-config directory contains the OpenShift cluster configurations, such as:
- GitOps namespaces
- OpenShift Pipelines operator
- Cluster role tekton-admin-view
- Role binding for Argo CD and pipelines to the GitOps namespace
- The pipelines-blue-green that we will see later for blue/green deployment
- Tekton cluster role
- Tekton tasks for Git and OpenShift clients
Let's configure Argo CD to recursively sync the content of the gitops/cluster-config directory into the OpenShift cluster.
But first, we have to set your GitHub credentials. Edit the file blue-green-pipeline/application-cluster-config.yaml.
apiVersion: argoproj.io/v1alpha1
kind: Application
metadata:
name: cluster-configuration
namespace: openshift-gitops
spec:
destination:
name: ''
namespace: openshift-gitops
server: 'https://kubernetes.default.svc'
source:
path: gitops/cluster-config
repoURL: 'https://github.com/davidseve/cloud-native-deployment-strategies.git'
targetRevision: HEAD
helm:
parameters:
- name: "bluegreen.enabled"
value: "true"
- name: "github.token"
value: "changeme_token"
- name: "github.user"
value: "changeme_user"
- name: "github.mail"
value: "changeme_mail"
- name: "github.repository"
value: "changeme_repository"
project: default
syncPolicy:
automated:
prune: true
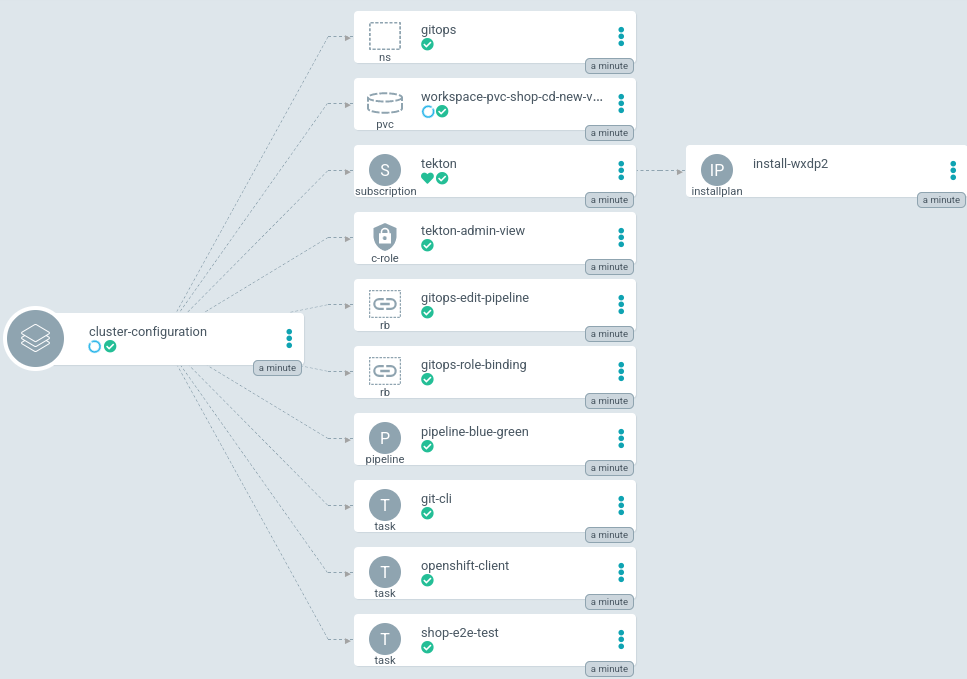
selfHeal: trueExecute the following command to add a new Argo CD application that syncs a Git repository containing cluster configurations with the OpenShift cluster.
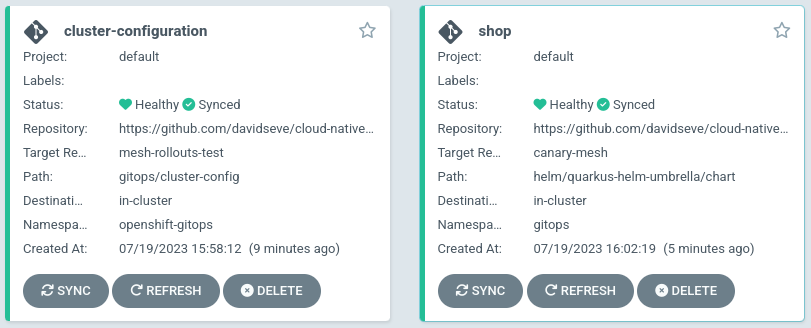
oc apply -f blue-green-pipeline/application-cluster-config.yamlYou will notice on the Argo CD dashboard that an application has been created.
You can click on the cluster configuration application to check the details of sync resources and their status on the cluster, as shown in Figure 8.
Create shop application
We will create the application shop to test blue/green deployment. Because we will make changes in the application's GitHub repository, we have to use the repository that we forked. Edit the blue-green-pipeline/application-shop-blue-green.yaml file and set your own GitHub repository in the reportURL.
apiVersion: argoproj.io/v1alpha1
kind: Application
metadata:
  name: shop
  namespace: openshift-gitops
spec:
  destination:
    name: ''
    namespace: gitops
    server: 'https://kubernetes.default.svc'
  source:
    path: helm/quarkus-helm-umbrella/chart
    repoURL:  https://github.com/change_me/cloud-native-deployment-strategies.git
    targetRevision: blue-green
    helm:
      valueFiles:
        - values/values.yaml
  project: default
  syncPolicy:
    automated:
      prune: true
      selfHeal: true
oc apply -f blue-green-pipeline/application-shop-blue-green.yamlYou will notice on the Argo CD dashboard that we have a new shop application, as shown in Figure 9.
Test shop application
We have deployed the shop with Argo CD. We can test that it is up and running.
We have to get the online route:
curl -k "$(oc get routes products-umbrella-online -n gitops --template='https://{{.spec.host}}')/products"Get the offline route as follows:
curl -k "$(oc get routes products-umbrella-offline -n gitops --template='https://{{.spec.host}}')/products"Notice that in each microservice response, we have added metadata information to better view the version, color, and mode of each application. This will help us to view the changes during the blue/green deployment. Because right now we have the same version v1.0.1 in both colors, we will have almost the same response, and only the mode will change.
{
  "products":[
     {
        "discountInfo":{
           "discounts":[
              {
                 "name":"BlackFriday",
                 "price":"1350€",
                 "discount":"10%"
              }
           ],
           "metadata":{
              "version":"v1.0.1",
              "colour":"blue",
              "mode":"online" <--
           }
        },
        "name":"TV 4K",
        "price":"1500€"
     }
  ],
  "metadata":{
     "version":"v1.0.1",
     "colour":"blue",
     "mode":"online" <--
  }
}
Products blue/green deployment
We have split a cloud-native blue/green deployment into three steps:
- Deploy the new version.
- Switch the new version to online.
- Rollback.
- Align and scale down offline.
We have already deployed the products version v1.0.1, and we are ready to use a new products version v1.1.1 that has a new description attribute.
Figure 10 shows the current status.
Step 1: Deploy the new version
We will start deploying a new version v1.1.1 in the offline color. But instead of going manually to see which is the offline color and deploying the new version on it, let's let the pipeline find the current offline color and automatically deploy the new version with no manual intervention. We will use the pipelinerun that we already created.
The following main tasks will be executed:
- Set new tag image values in the right color and commit the changes.
- Execute the E2E test to validate the new version.
- Change the application configuration values to use the online services and commit the changes.
- Scale up the offline color and commit the changes.
cd blue-green-pipeline/pipelines/run-products

oc create -f 1-pipelinerun-products-new-version.yaml -n gitops
Figure 11 shows the pipeline.

This pipeline may take more time because we are doing three different commits, so Argo CD has to synchronize them to continue with the pipeline (Figure 12). If you want to make it faster, you can refresh Argo CD manually after each commit step or configure the Argo CD Git webhook.
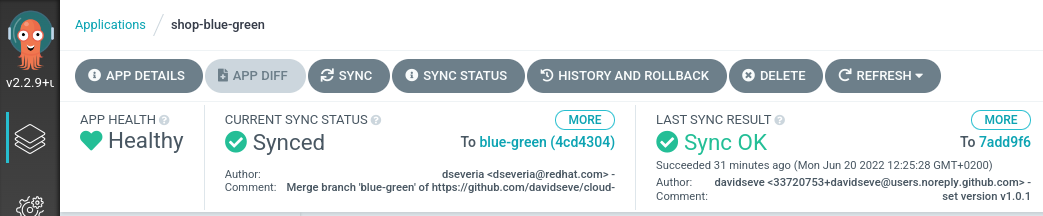
Figure 13 shows the shop status after the pipeline finishes and Argo CD has synchronized the changes.
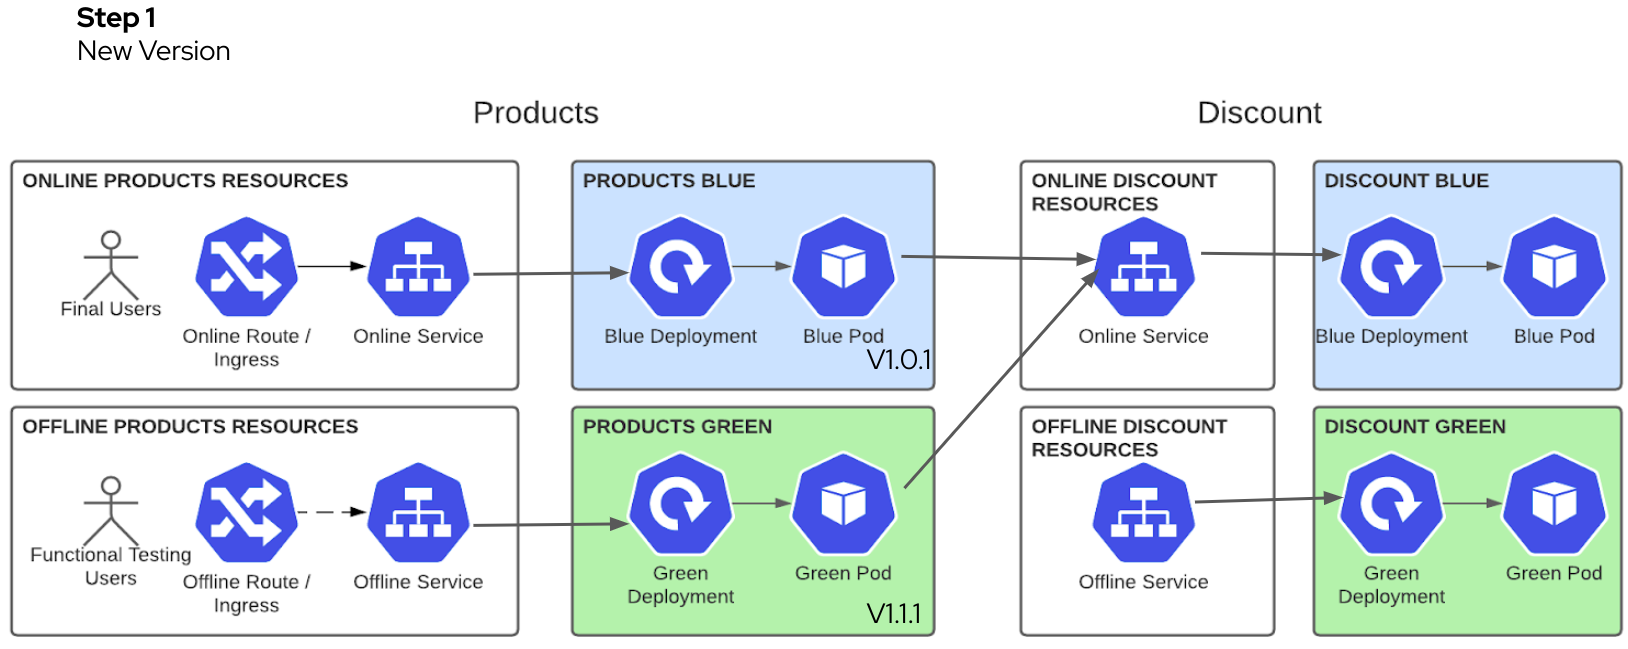
You can see that the offline applications have version v1.1.1 and the new attribute description, but the online has not changed.
The online route:
curl -k "$(oc get routes products-umbrella-online -n gitops --template='https://{{.spec.host}}')/products"The offline route:
curl -k "$(oc get routes products-umbrella-offline -n gitops --template='https://{{.spec.host}}')/products"{
"products":[
{
"discountInfo":{
"discounts":[...],
"metadata":{
"version":"v1.0.1",
"colour":"blue",
"mode":"online" <--
}
},
"name":"TV 4K",
"price":"1500€",
"description":"The best TV" <--
}
],
"metadata":{
"version":"v1.1.1", <--
"colour":"green",
"mode":"online" <--
}
}Functional testing users can execute smoke tests to validate this new v1.1.1 version.
Step 2: Switch new version to online
We are going to open the new version to final users. The pipeline will change the service to use the other color. Again, the pipeline does this automatically without manual intervention. We minimize downtime because it changes the service label.
oc create -f 2-pipelinerun-products-switch.yaml -n gitopsFigure 14 shows the pipeline.

Figure 15 shows the shop status after the pipeline is finished and Argo CD has synchronized the changes.
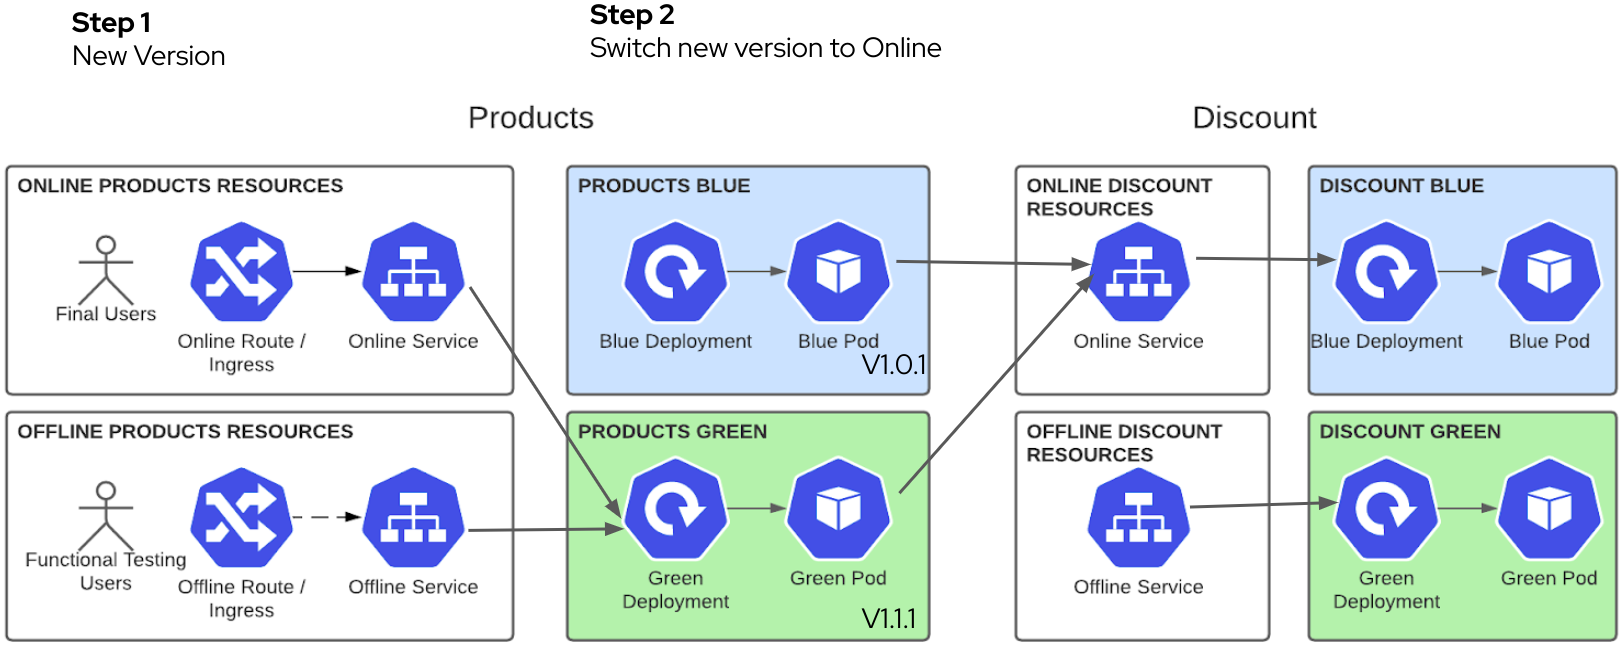
We have in the online environment the new version v1.1.1.
The online route:
curl -k "$(oc get routes products-umbrella-online -n gitops --template='https://{{.spec.host}}')/products"{
"products":[
{
"discountInfo":{...},
"name":"TV 4K",
"price":"1500€",
"description":"The best TV" <--
}
],
"metadata":{
"version":"v1.1.1", <--
"colour":"green",
"mode":"online" <--
}
}Step 3: Rollback
Imagine that something goes wrong, we know that this never happens, but just in case. We can do a very quick rollback just by undoing the change in the products online service. But are we sure that with all the pressure that we will have at this moment, we will find the right service and change the label to the right color? Let's move this pressure to the pipeline. We can have a pipeline for rollback.
oc create -f 2-pipelinerun-products-switch-rollback.yaml -n gitopsFigure 16 shows the pipeline.

Figure 17 shows the shop status after the pipeline is finished and Argo CD has synchronized the changes.
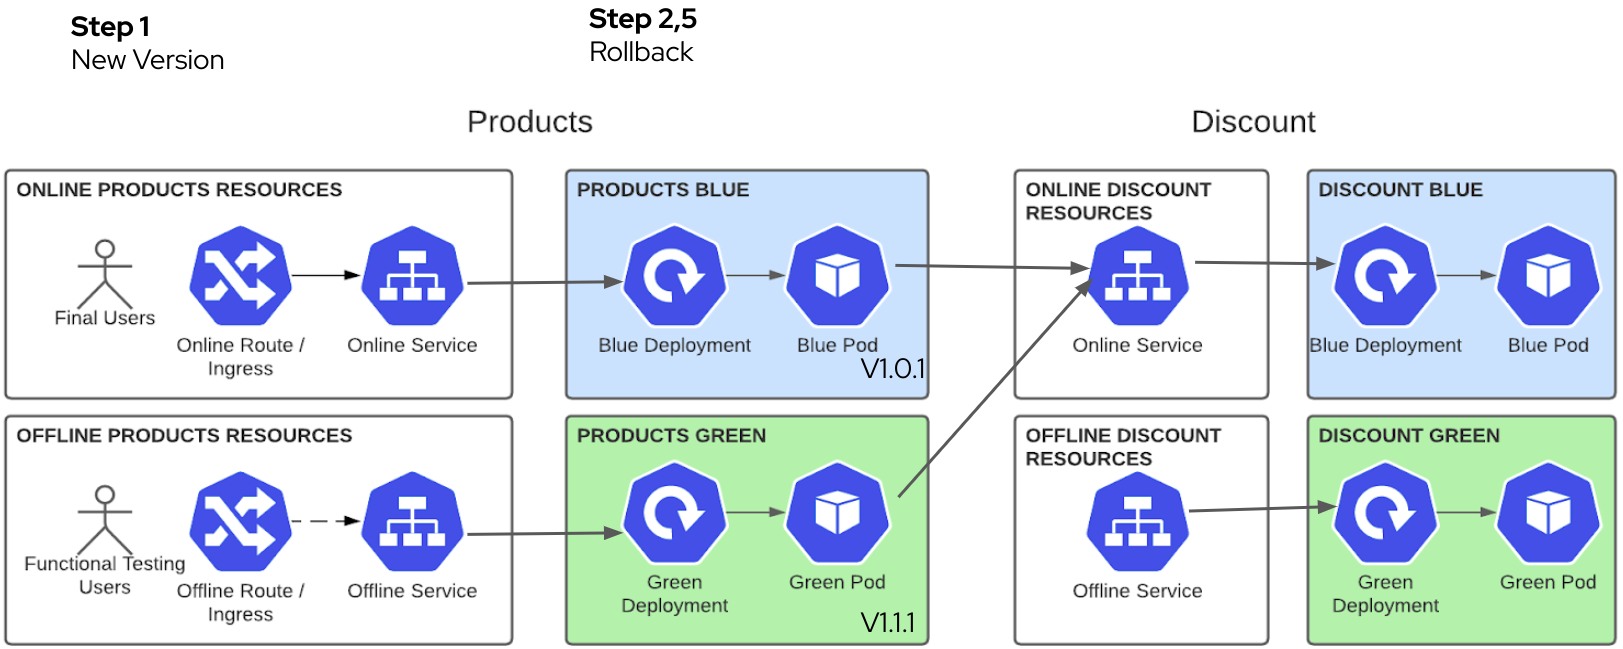
We have version v1.0.1 online again.
The online route:
curl -k "$(oc get routes products-umbrella-online -n gitops --template='https://{{.spec.host}}')/products"{
"products":[
{
"discountInfo":{...},
"name":"TV 4K",
"price":"1500€",
}
],
"metadata":{
"version":"v1.0.1", <--
"colour":"blue",
"mode":"online" <--
}
}After fixing the issue, we can execute the switch step again.
oc create -f 2-pipelinerun-products-switch.yaml -n gitopsFigure 18 shows the shop status after the pipeline is finished and Argo CD has synchronized the changes.

We have the new version v1.1.1 in the online environment again.
The online route:
curl -k "$(oc get routes products-umbrella-online -n gitops --template='https://{{.spec.host}}')/products"{
"products":[
{
"discountInfo":{...},
"name":"TV 4K",
"price":"1500€",
"description":"The best TV" <--
}
],
"metadata":{
"version":"v1.1.1", <--
"colour":"green",
"mode":"online" <--
}
}Step 4: Align and scale down offline
When online is stable, we should align offline with the new version and scale it down. It does not make sense to use the same resources that we have in online.
oc create -f 3-pipelinerun-products-scale-down.yaml -n gitopsFigure 19 shows the pipeline.

Figure 20 shows the shop status after the pipeline is finished and Argo CD has synchronized the changes:
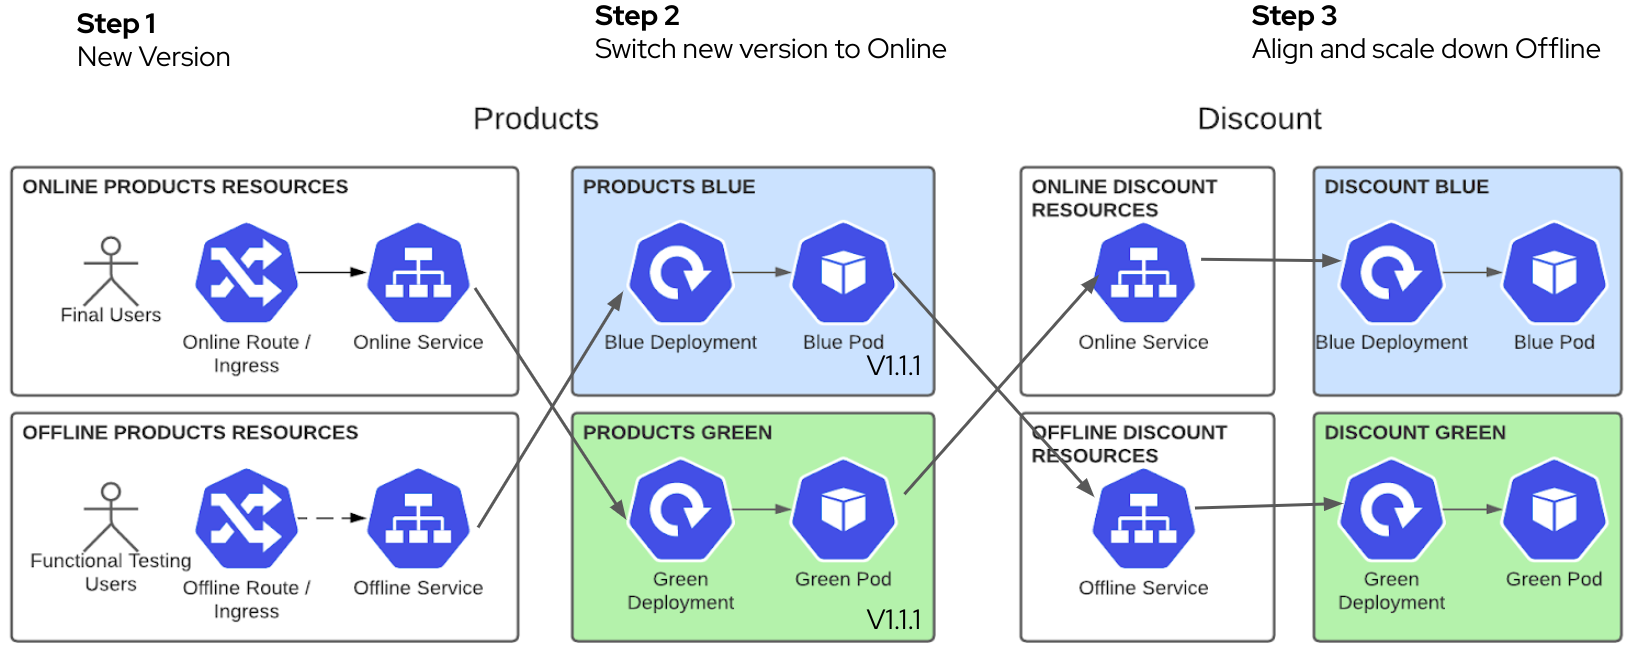
We can see that the offline products is calling offline discounts and has the new version v1.1.1.
The offline route:
curl -k "$(oc get routes products-umbrella-offline -n gitops --template='https://{{.spec.host}}')/products"{
"products":[
{
"discountInfo":{
"discounts":[
{
"name":"BlackFriday",
"price":"1350€",
"discount":"10%",
"description":null
}
],
"metadata":{
"version":"v1.0.1",
"colour":"green",
"mode":"offline" <--
}
},
"name":"TV 4K",
"price":"1500€",
"description":"The best TV"
}
],
"metadata":{
"version":"v1.1.1", <--
"colour":"blue",
"mode":"offline" <--
}
}Delete the environment
To delete all the things that we have done for the demo you have to:
- In GitHub, delete the
blue-greenbranch. - In Argo CD, delete the application cluster-configuration and shop.
- In OpenShift, go to project openshift-operators and delete the installed operators OpenShift GitOps and OpenShift Pipelines.
Summary
This article is about Cloud Native Blue/Green Deployment Strategy using Openshift Pipelines following a GitOps model. It explains the concept of Blue/Green Deployment, its benefits, and drawbacks. Finally, we will have a real Demo.
Last updated: January 15, 2025