Modern software teams are adopting continuous integration (CI) processes to automatically test and build code changes, and continuous delivery (CD) to quickly and reliably deploy changes into development and testing environments. An earlier article showed how to automate CI/CD on pull requests using Argo CD ApplicationSets. By using a Tekton Pipeline to update manifests and create a pull request, the article’s example automatically deployed the code associated with the pull request. Tekton is one of many tools in the CI/CD space. What if you’d like to recreate this solution using different CI/CD tooling?
This article outlines how you can configure a similar workflow using GitHub Actions instead of Tekton for CI. It includes an example solution that is split into two repositories per Argo CD’s best practices: a source code repository, and a separate configuration or manifests repository. As you might expect, the source code repository contains application code, e.g., JavaScript, Java, etc. The manifest repository contains YAML resources that will be synchronized to a Red Hat OpenShift or Kubernetes cluster to deploy the application.
Note: This article assumes that you have access to an OpenShift cluster and have installed Red Hat OpenShift GitOps (based on Argo CD) on the cluster. It also assumes that you have the OpenShift CLI (oc) or the Kubernetes CLI (kubectl) installed and are comfortable running basic shell commands against a cluster.
The desired continuous delivery process
Figure 1 outlines the continuous integration and deployment workflow that you’ll have configured by the time you’re finished reading this article. To summarize:
- Developer makes changes to the application source code repository.
- Developer changes trigger a CI pipeline that:
- Pushes a uniquely tagged container image to a container image registry.
- Opens a pull request (PR) against the config repository that informs it of the new image tag.
- The CD pipeline detects the PR, or the merged changes and redeploys the application.
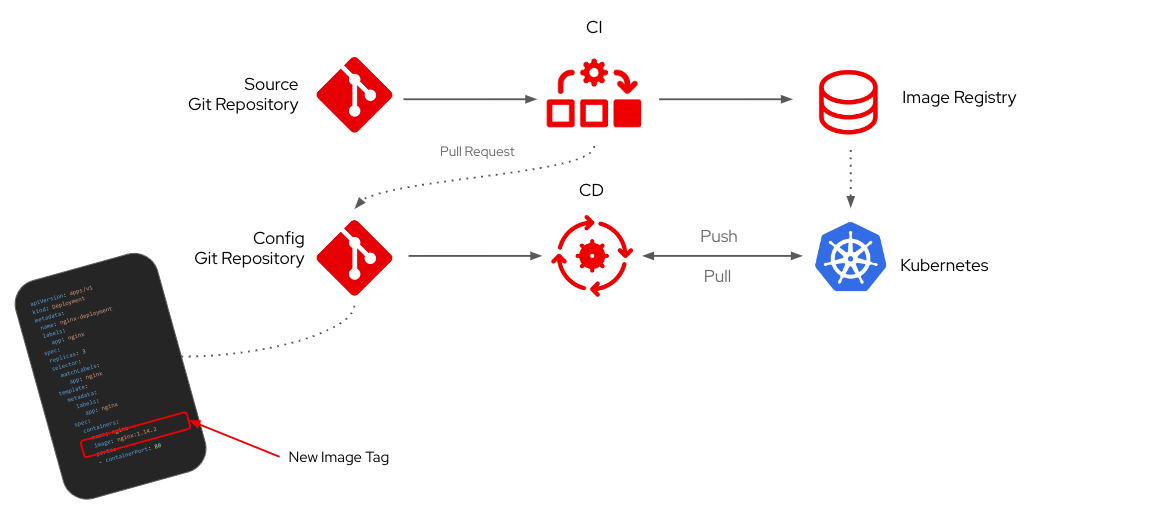
In this specific example, the image registry used is Quay.io, continuous integration is built using GitHub Actions, and continuous delivery is provided by OpenShift GitOps.
Reviewing the GitHub Actions workflows
To enable the continuous delivery process outlined in Figure 1, I’ve configured GitHub Actions Workflows in both the source code and manifest repositories.
The workflow in the manifests repository must be manually invoked by a client issuing a workflow_dispatch call to the GitHub API and providing a URL to a new container image . Once triggered, the workflow will open a PR that changes the container image referenced in the values.yaml file.
The client that invokes the workflow in the manifest repository is the continuous integration workflow in the application source code repository. In other words, the source code repository informs the manifests repository when there’s a new container image available to deploy. This is pretty straightforward to implement using the official actions/github-script action or a cURL:
- name: Trigger update workflow in the manifests repository
  uses: actions/github-script@v6
  with:
    github-token: ${{ secrets.PAT }}
    script: |
      await github.rest.actions.createWorkflowDispatch({
        owner: 'evanshortiss',
        repo: 'gitops-gh-actions-manifests',
        workflow_id: 'update-container-image.yaml',
        ref: 'main',
        inputs: {
          message: '${{ steps.git-message.outputs.message }}',
          image: 'quay.io/evanshortiss/gitops-and-actions:sha-${{ steps.git-sha.outputs.sha }}',
          sha: '${{ steps.git-sha.outputs.sha }}'
        }
      })
You might have noticed that the github-token parameter references a secret named PAT. The PAT is a GitHub personal access token that has the necessary permissions to trigger the workflow that opens a PR in the manifest repository. This is covered in-depth in a subsequent section of this article.
Deploying the solution
Keep reading if you’d like to try this solution out in your own OpenShift or Kubernetes environments. It requires five short steps to get it working.
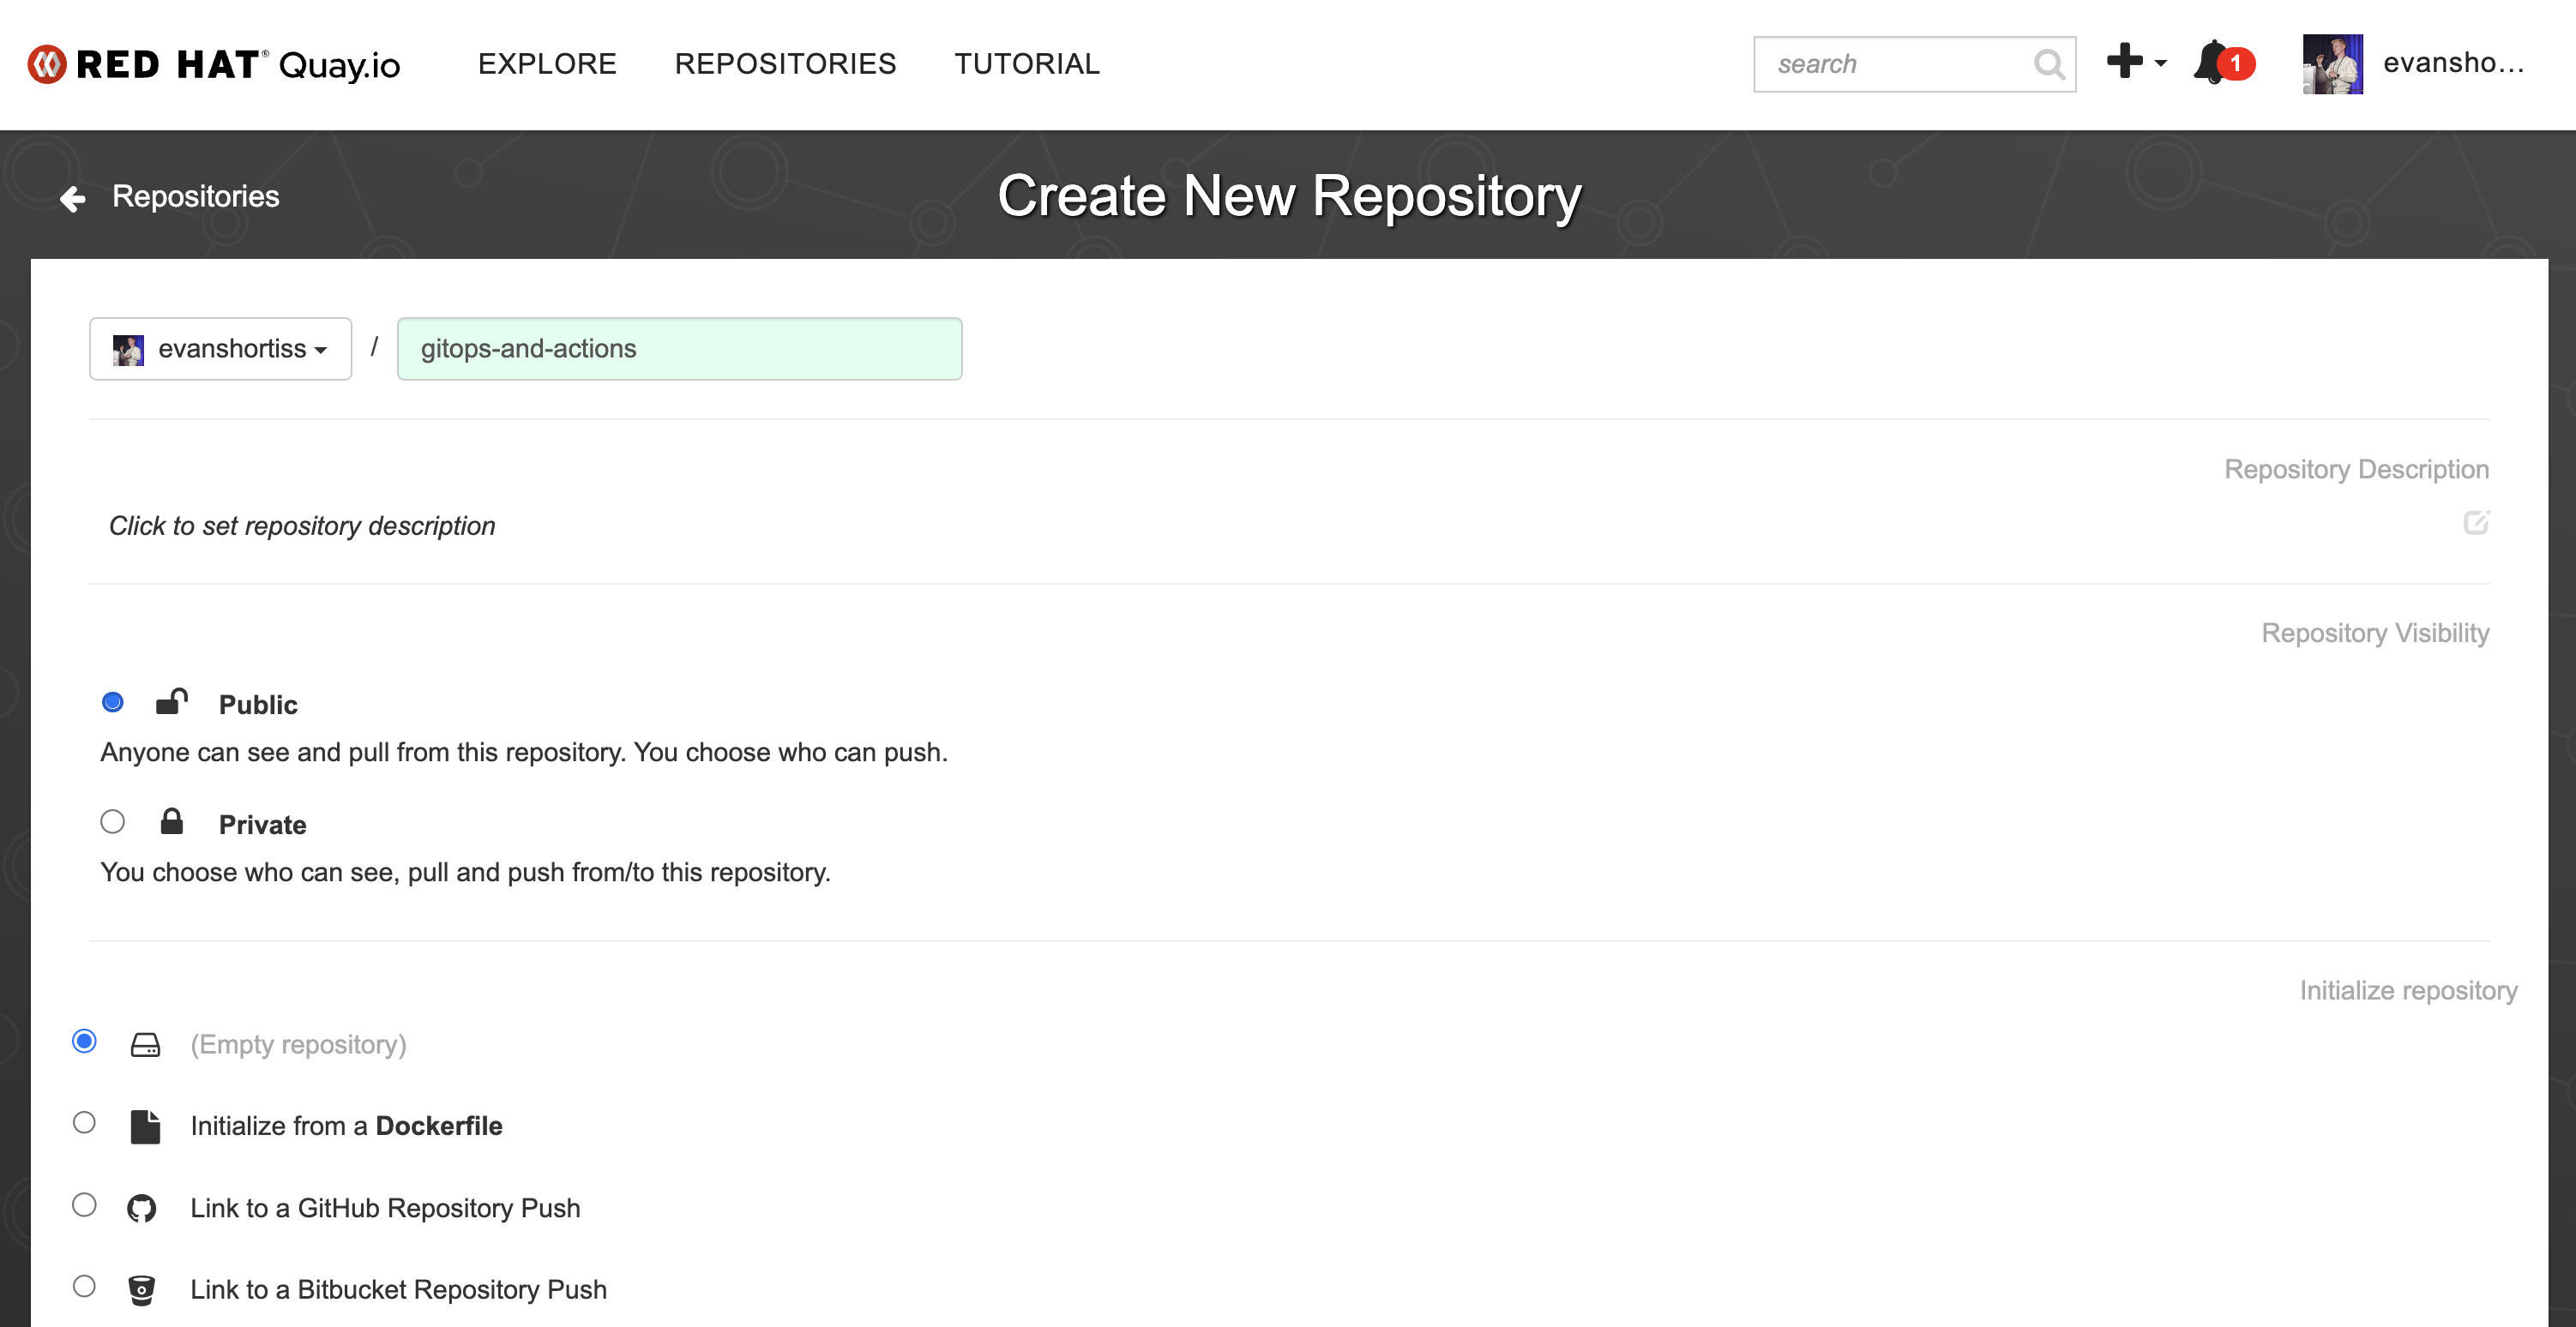
Step 1: Create a repository on Quay.io
Login to quay.io, and create a new repository named gitops-and-actions and set the Repository Visibility to public, as shown in Figure 2. This will store the container images built by the CI process.
Note: You can use an alternate container image registry such as Docker Hub, but for the purposes of this article I assume you’re using Quay.io.
Next you need to create a Robot Account that GitHub Actions will use to authenticate against Quay.io and push your new container image to the repository you created:
- Navigate to Account Settings by clicking on your profile picture on Quay.io.
- Select Robots Accounts from the sidebar.
- Click the Create Robot Account button.
- Enter a name and description for the Robot Account, then click Create robot account.
- Grant Write permissions to the new Robot Account for the
gitops-and-actionsrepository you created previously. This is shown in Figure 3.
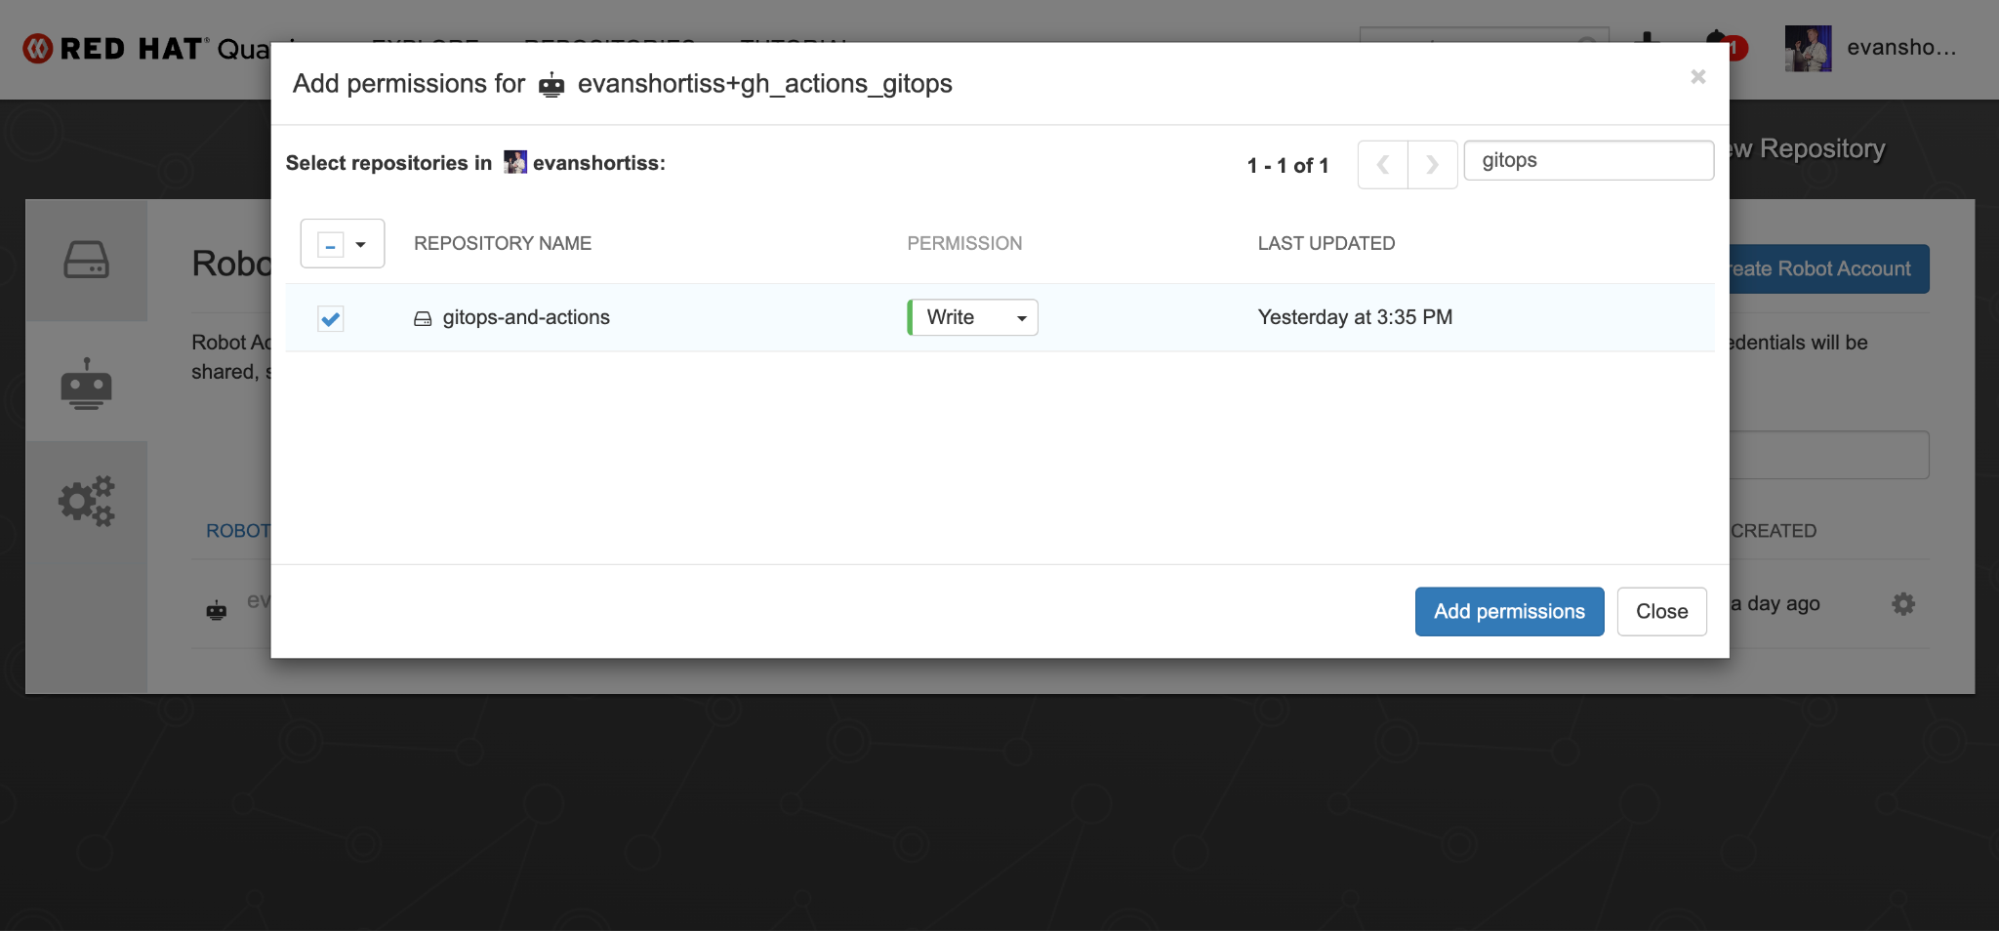
Take note of the Robot Account’s username and password; you’ll need these shortly.
Step 2: Fork and configure the example repositories
You’ll need write access to both Git repositories to try this in your own environment, so fork these example repositories to your GitHub account or organization:
Edit the build-container-image.yaml file in your fork of the source code repository and replace references to quay.io/evanshortiss with your own quay.io username, e.g., quay.io/janedoe. You also need to update the owner reference in the actions/github-script@v6 section to match the username or organization that your fork of the manifest repository belongs to.
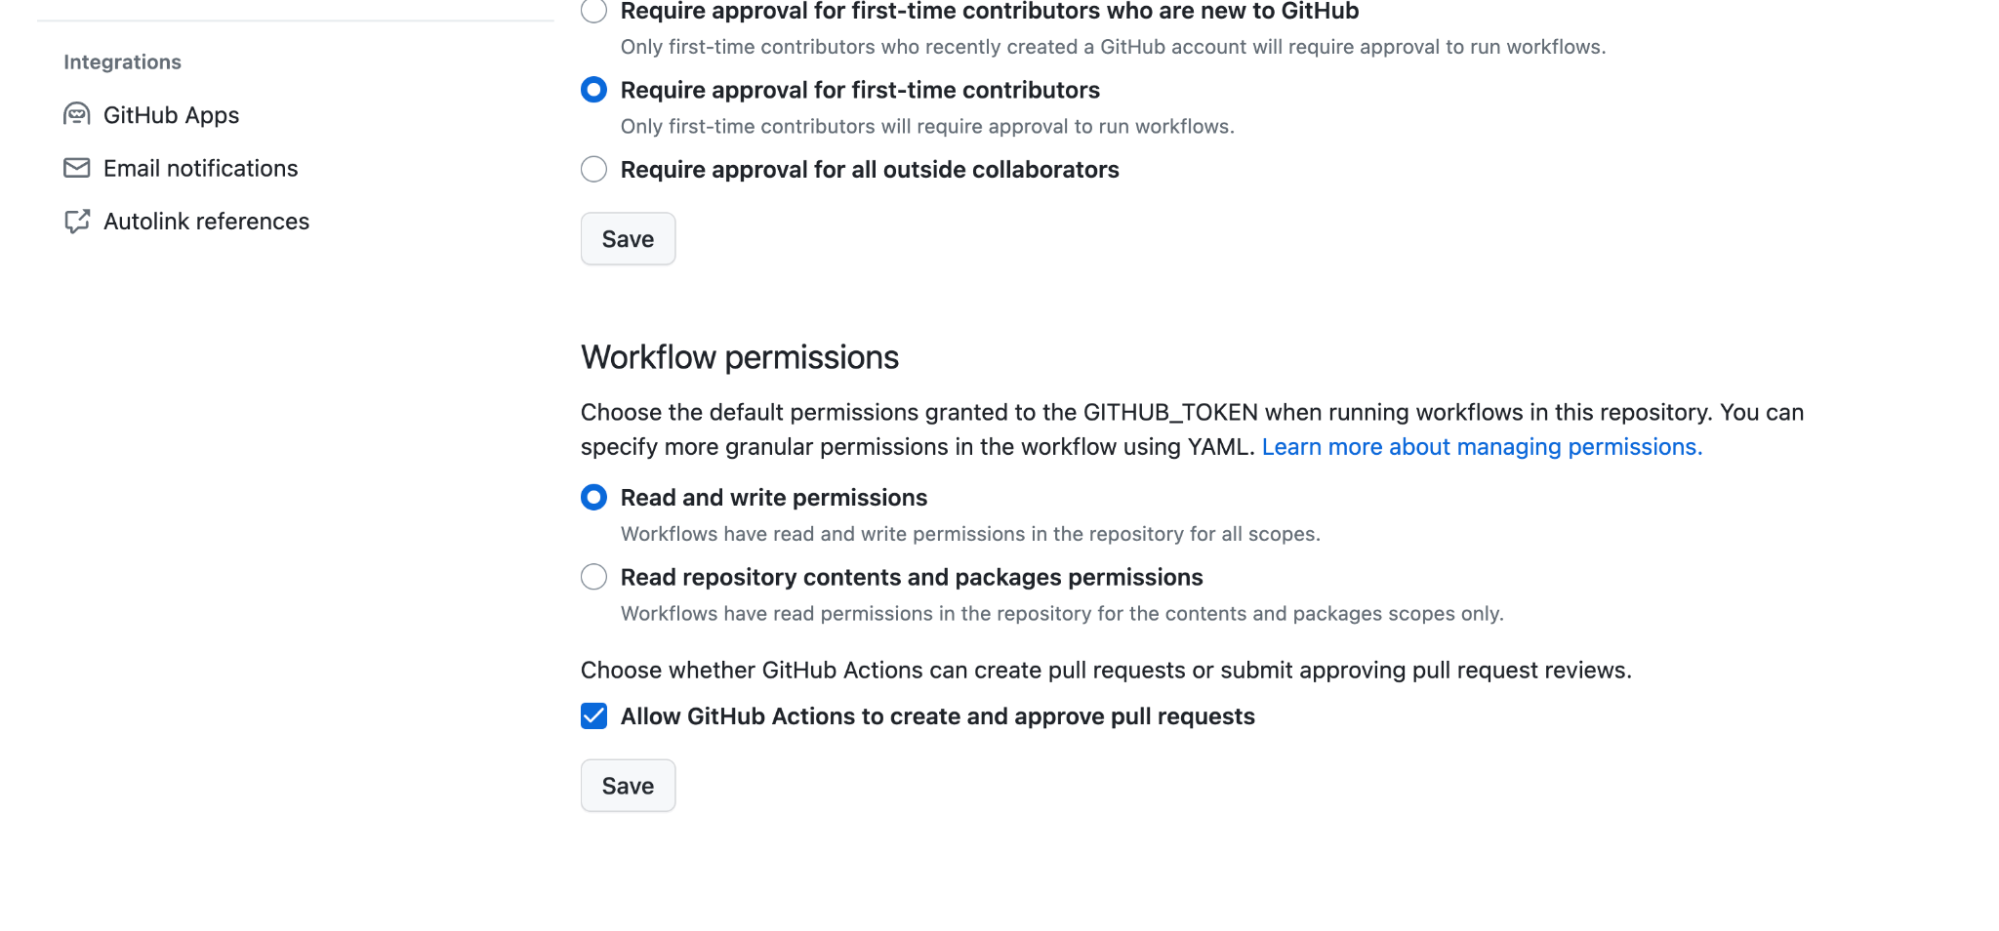
Navigate to the Actions permissions in the Settings page on your fork of the manifests repository and ensure that:
- Actions are not disabled.
- Workflow permissions have read and write permissions and pull request permissions enabled.
Figure 4 shows the required workflow permissions to enable the GitHub Actions workflow in the manifest repository to open a PR against itself.
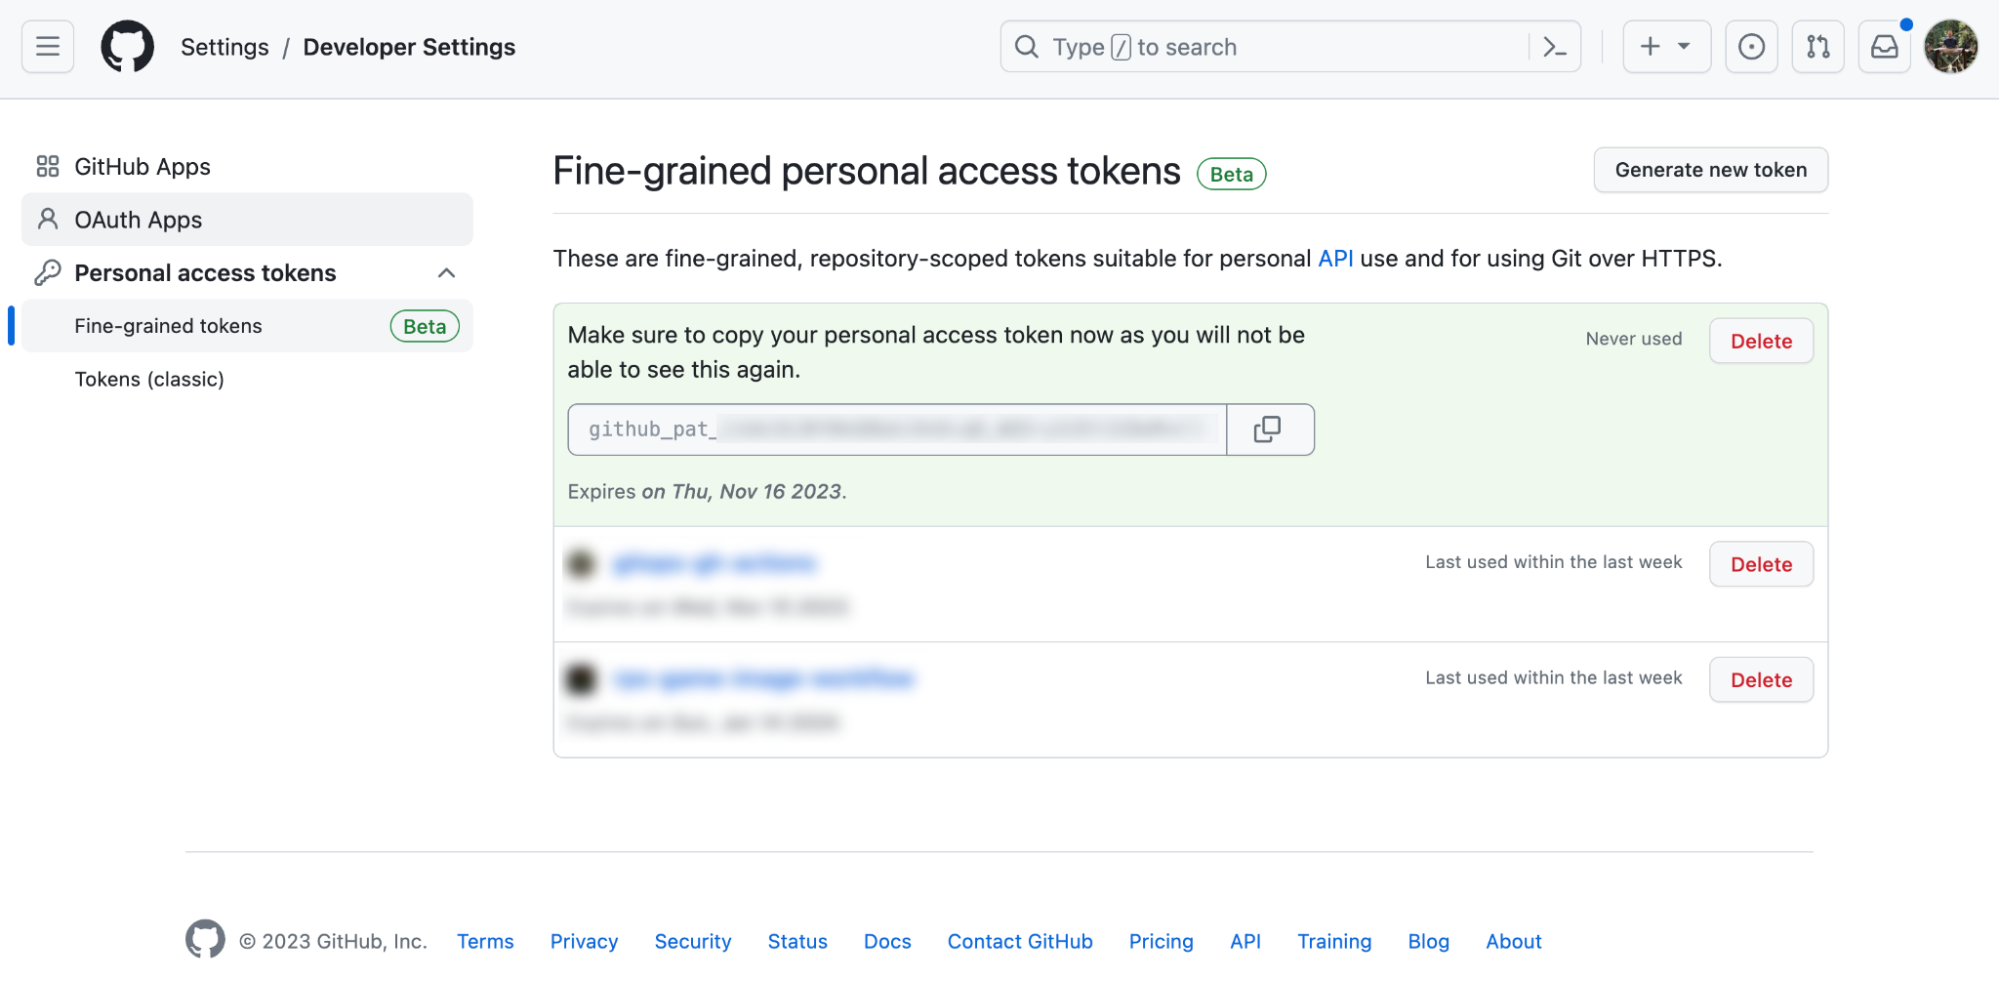
Step 3: Create a GitHub Personal Access Token
As mentioned earlier, a personal access token is required by the build-container-image.yaml workflow in the source repository. Follow these steps to create it:
- Visit the GitHub personal access token page in your GitHub account settings.
- Click Generate new token.
- Enter a name and description for the token, and set an expiration date.
- Choose an appropriate resource owner, i.e you or the organizations you’re working in.
- Under Repository access choose Only select repositories and choose the manifest repository that you forked.
- Under Repository permissions enable Access: Read and write for Actions.
- Scroll down and click the Generate token button.
The token is only displayed once after it’s created, so save it somewhere safe! Figure 5 shows the post token creation screen.
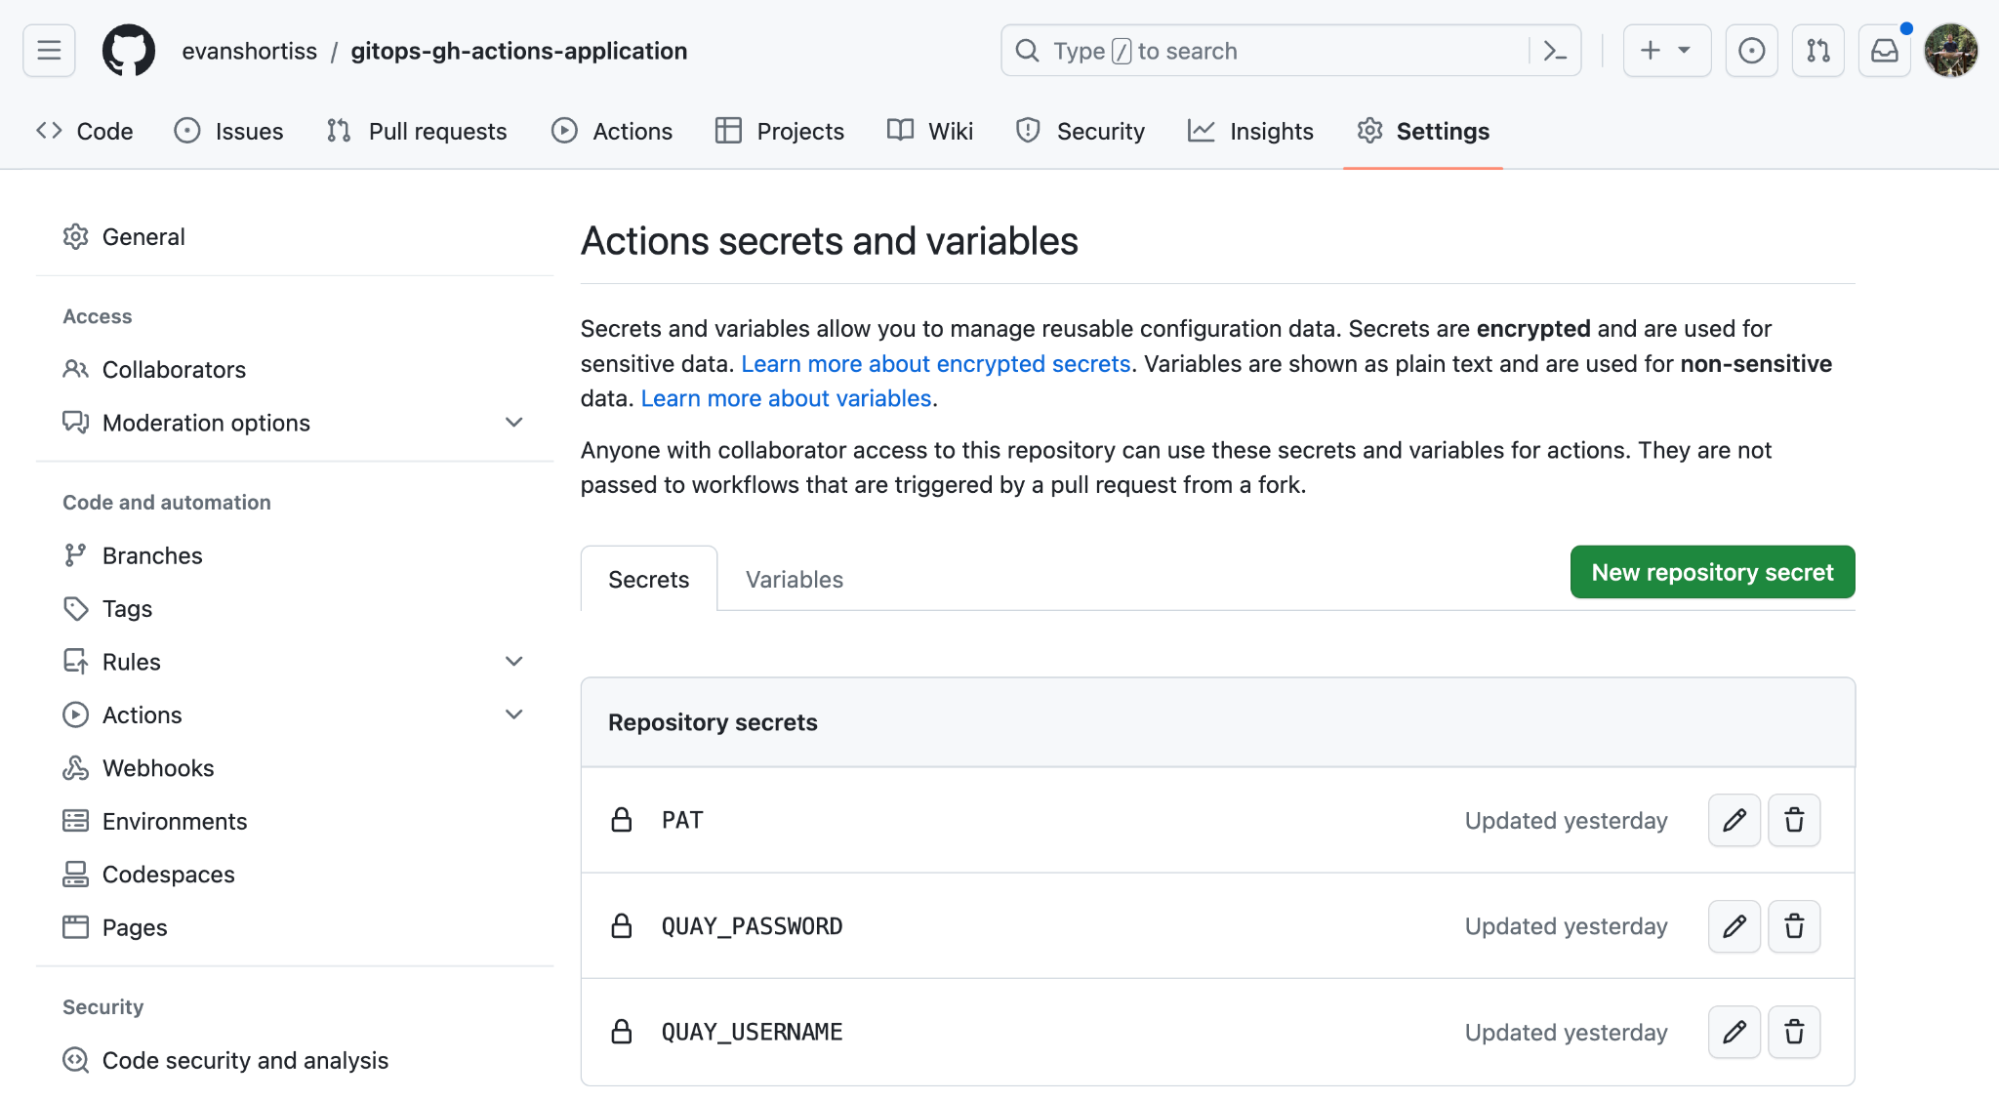
Step 4: Configure GitHub Actions secrets
At this point you have everything necessary to configure and run the CI workflow. Open your fork of the source repository in a web browser. Use the New repository secret button in the Actions section of the Secrets and variables page to create the following secrets:
QUAY_USERNAME: This is the username of your Robot Account for Quay.io.QUAY_PASSWORD: This is the password of your Robot Account for Quay.io.PAT: This is the GitHub personal access token you created in the prior section.
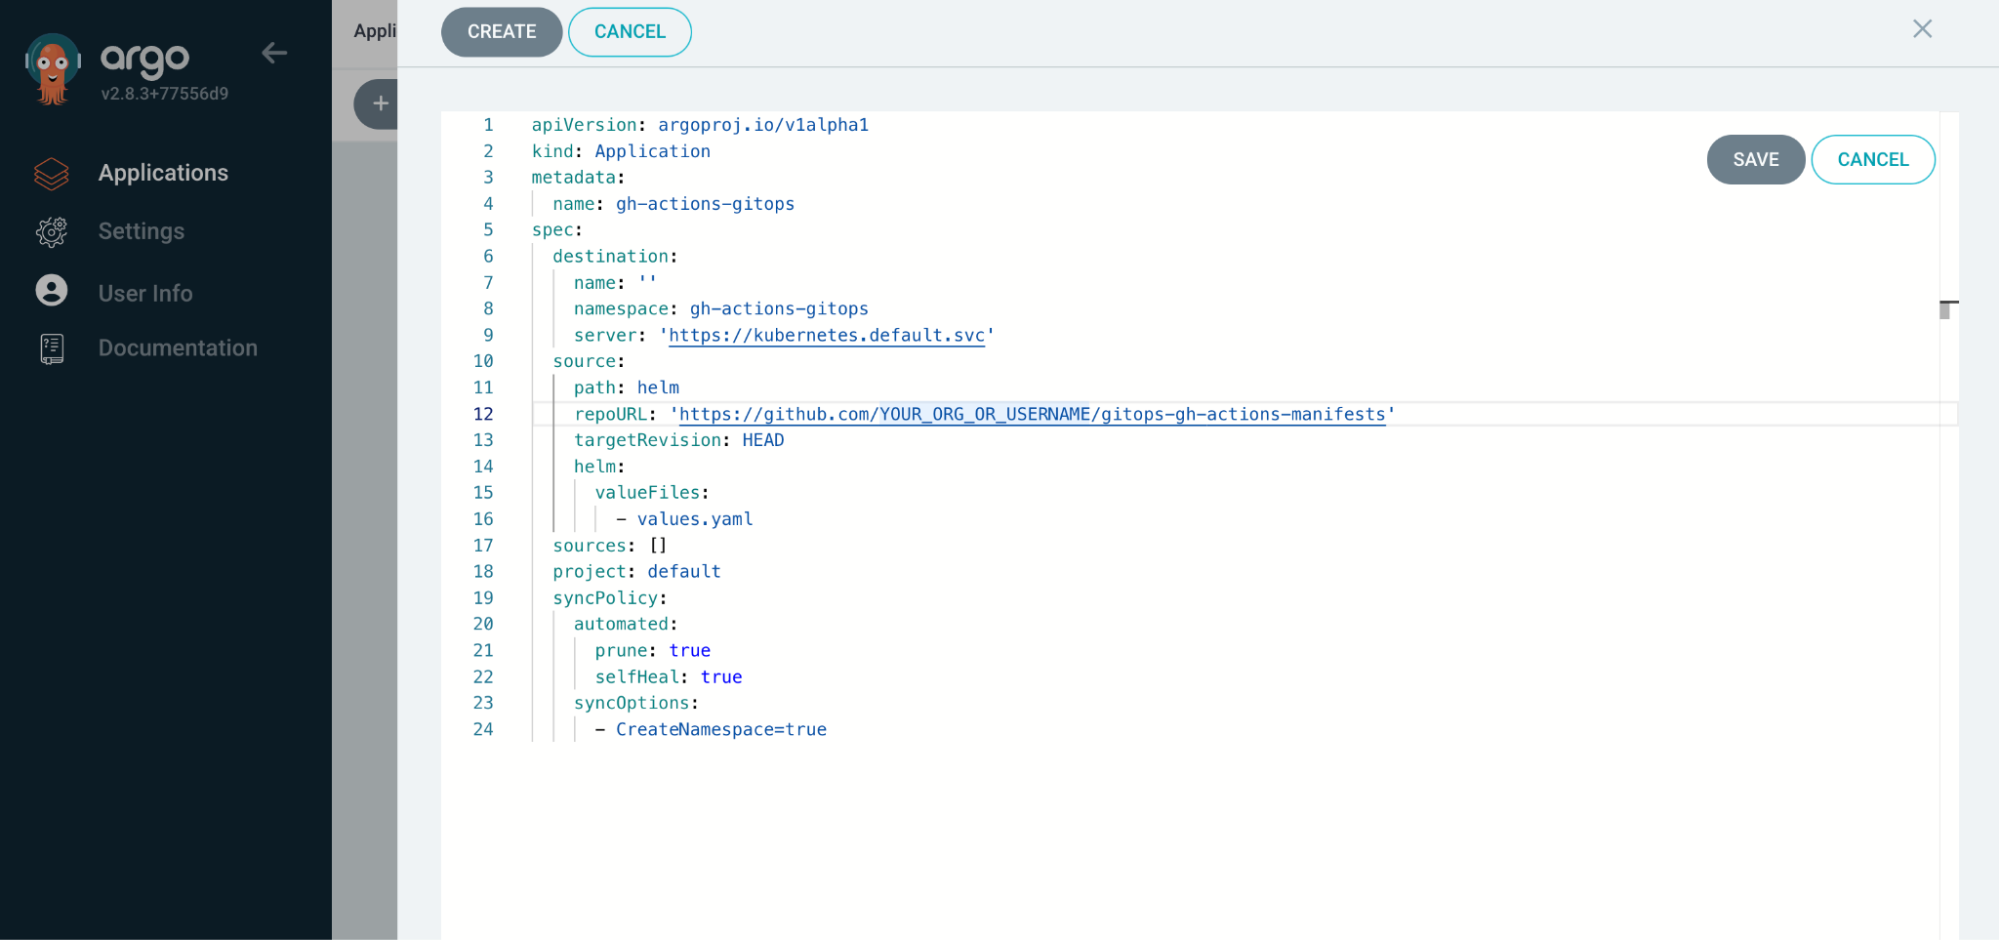
Step 5: Deploy and test
Log in to your Argo CD instance and create an Application using the sample Application CR included in the manifest repository, as shown in Figure 7, being sure to set the repoURL to your fork of the manifest repository.
Depending on how Argo CD is configured, you might need to enable it to manage resources in the target namespace. On OpenShift you can address this by applying a label to the target namespace to enable OpenShift GitOps to manage resources within it:
oc label namespace gh-actions-gitops argocd.argoproj.io/managed-by=openshift-gitops
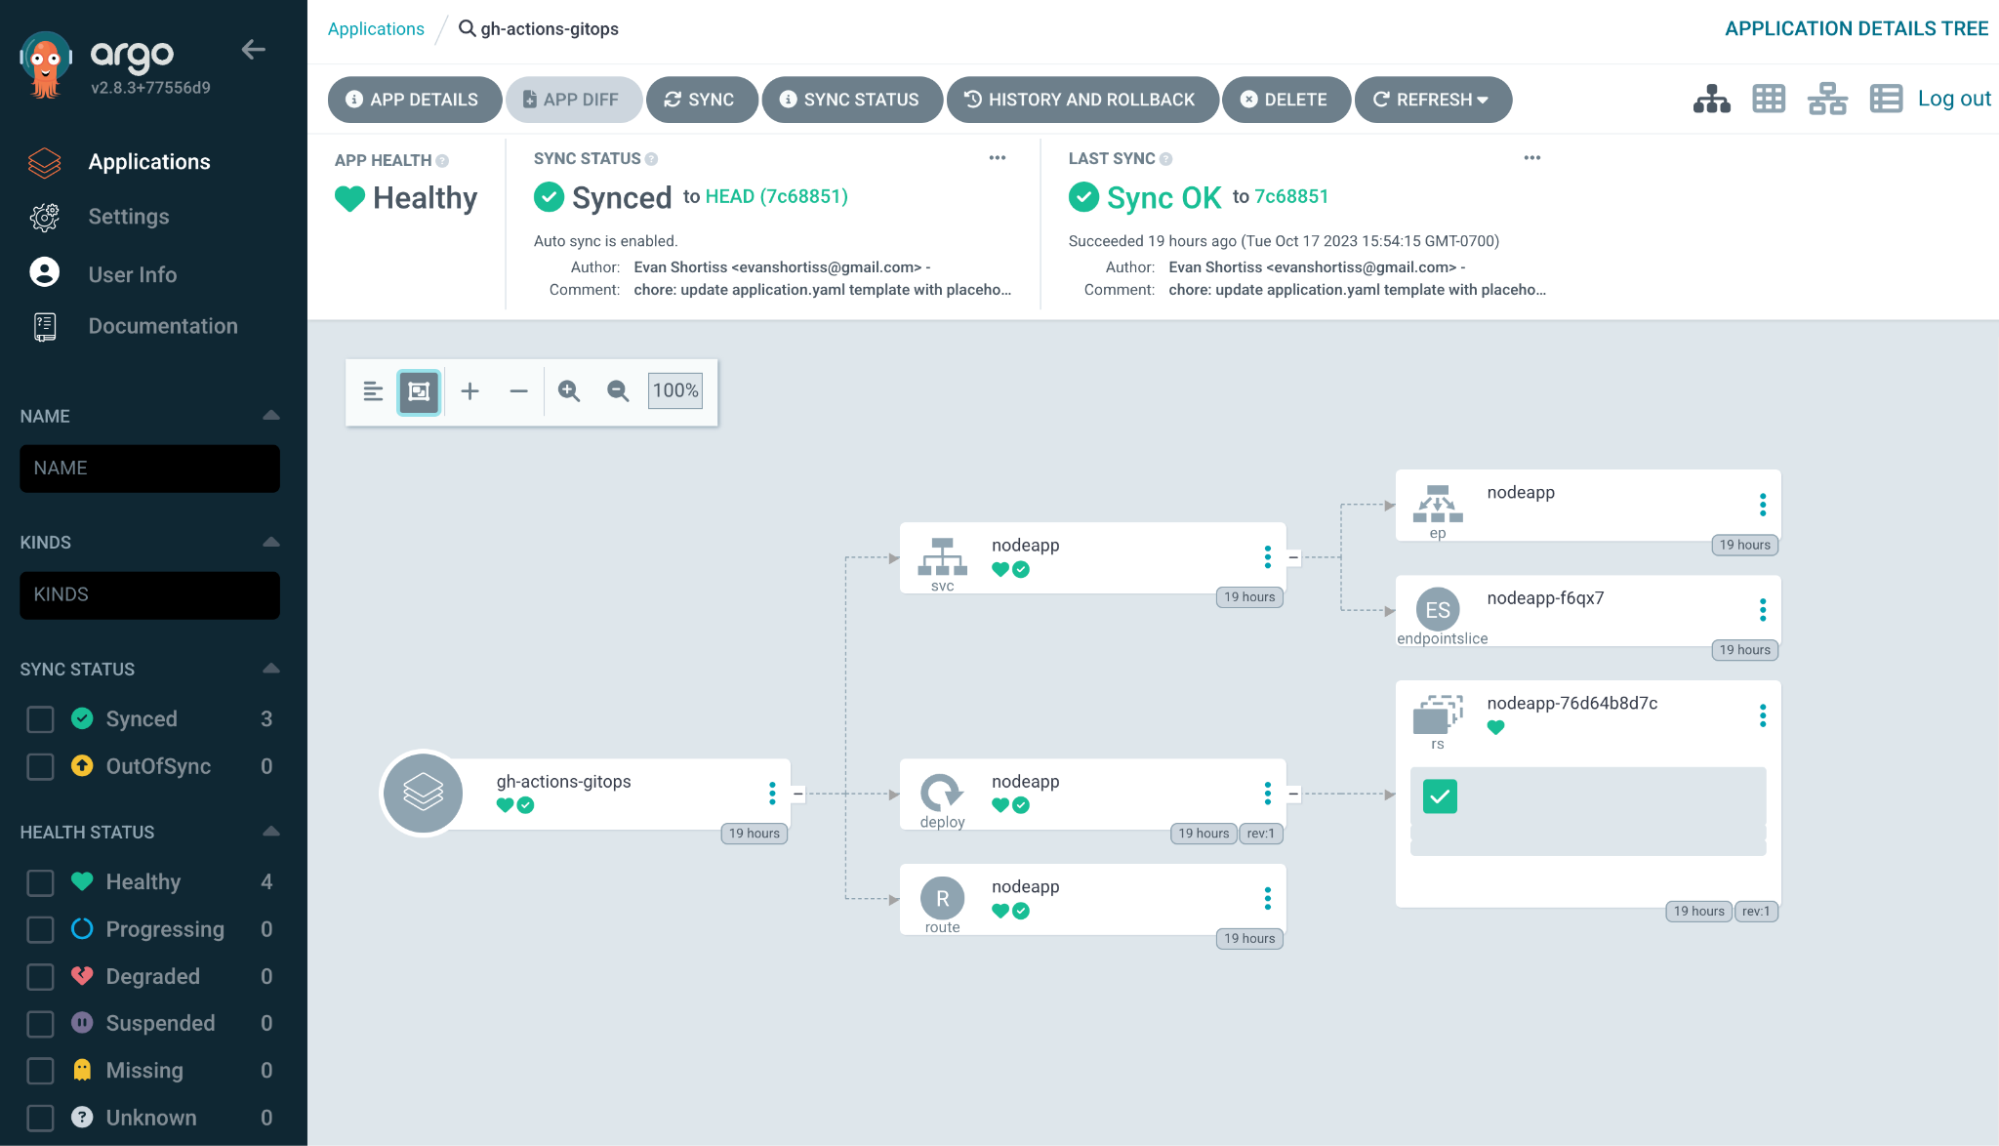
Wait a few seconds and Argo CD will finish deploying the application and report that it’s synced, as shown in Figure 8.
Test the continuous delivery workflow
Now that everything is in place, you can verify that the continuous delivery pipeline is working as expected.
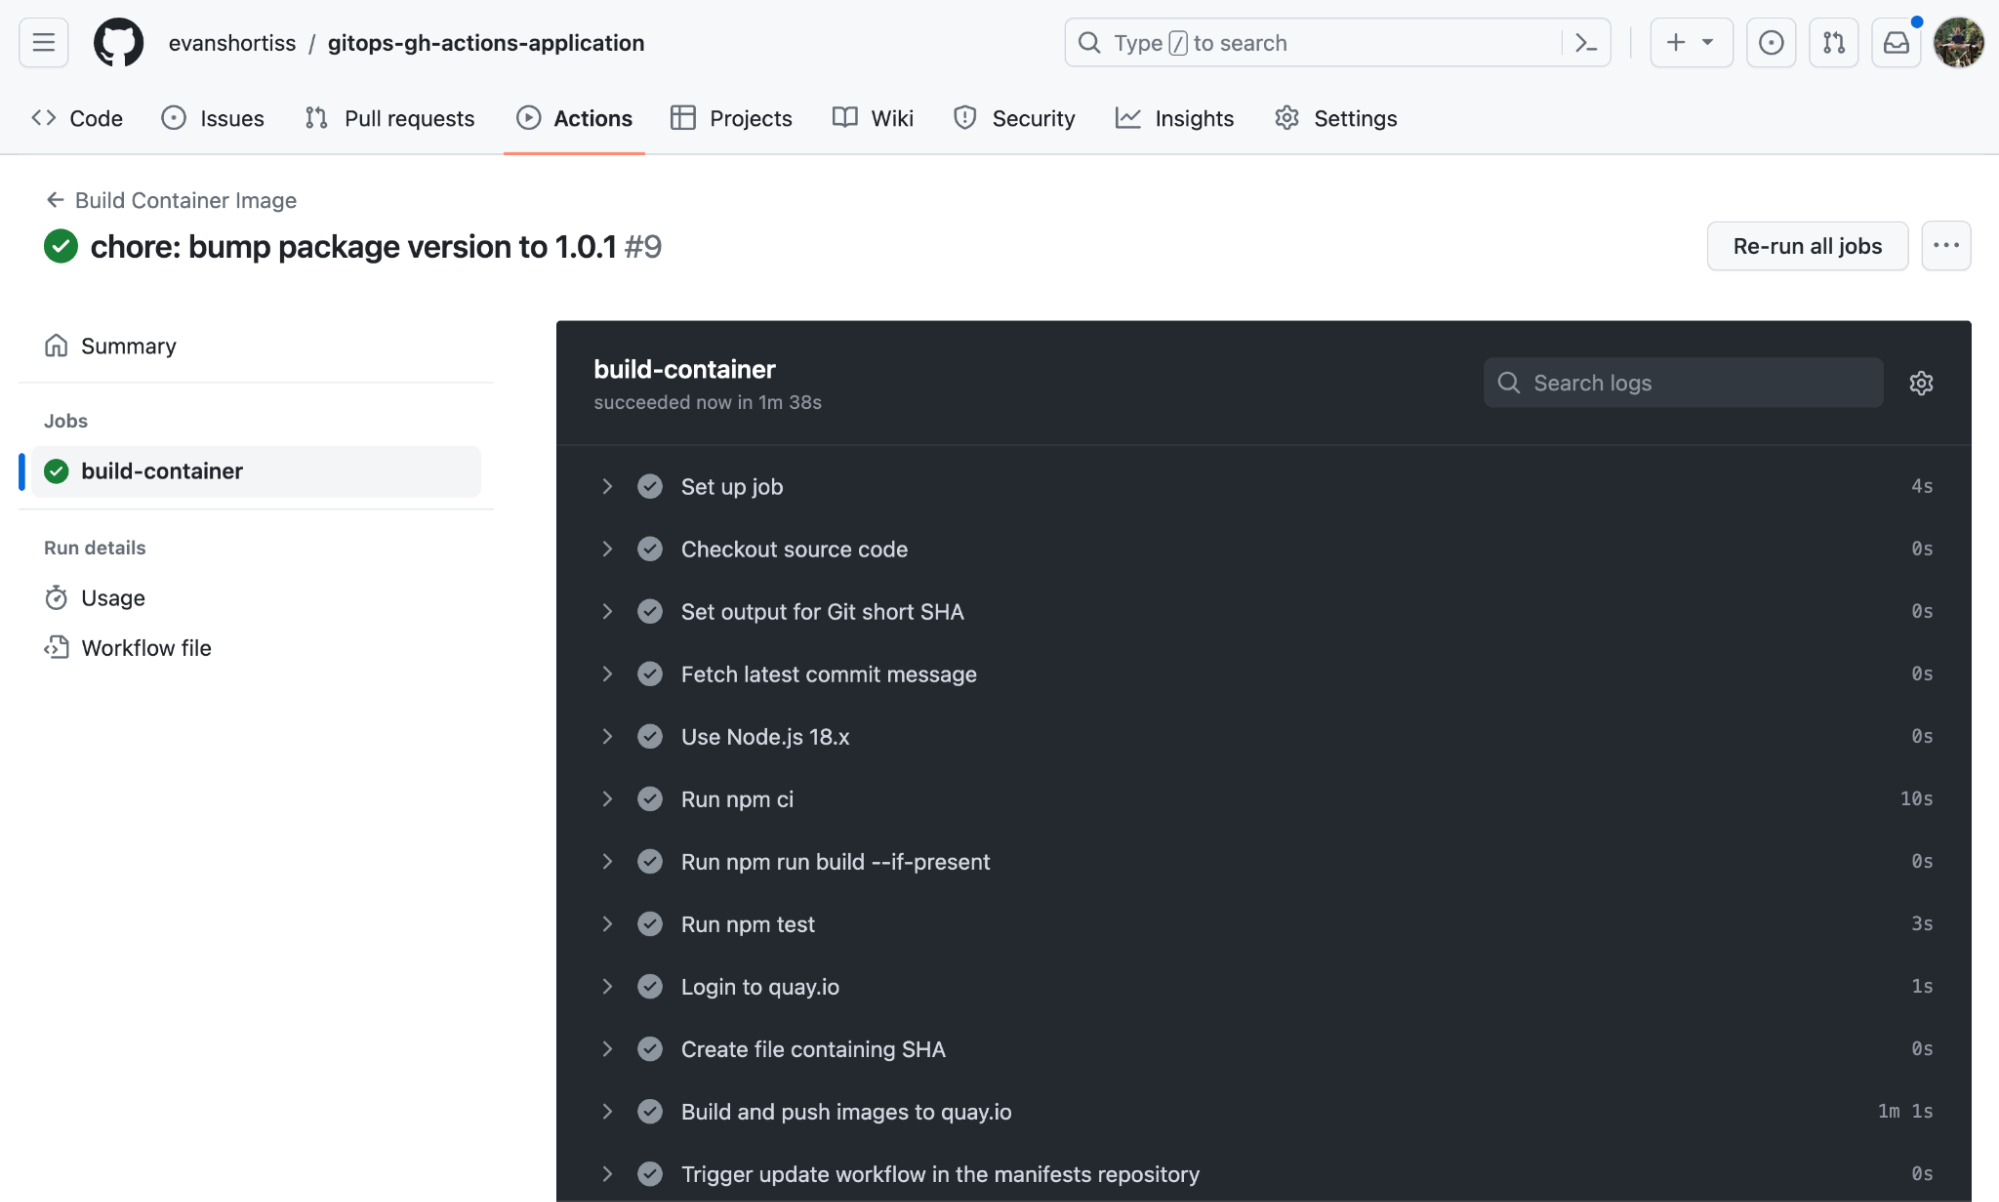
Edit the version field in the package.json file in your fork of the source repository to a valid server string, e.g., 1.1.0. This will trigger the continuous integration process in the source repository and build a new container image, as shown in Figure 9.
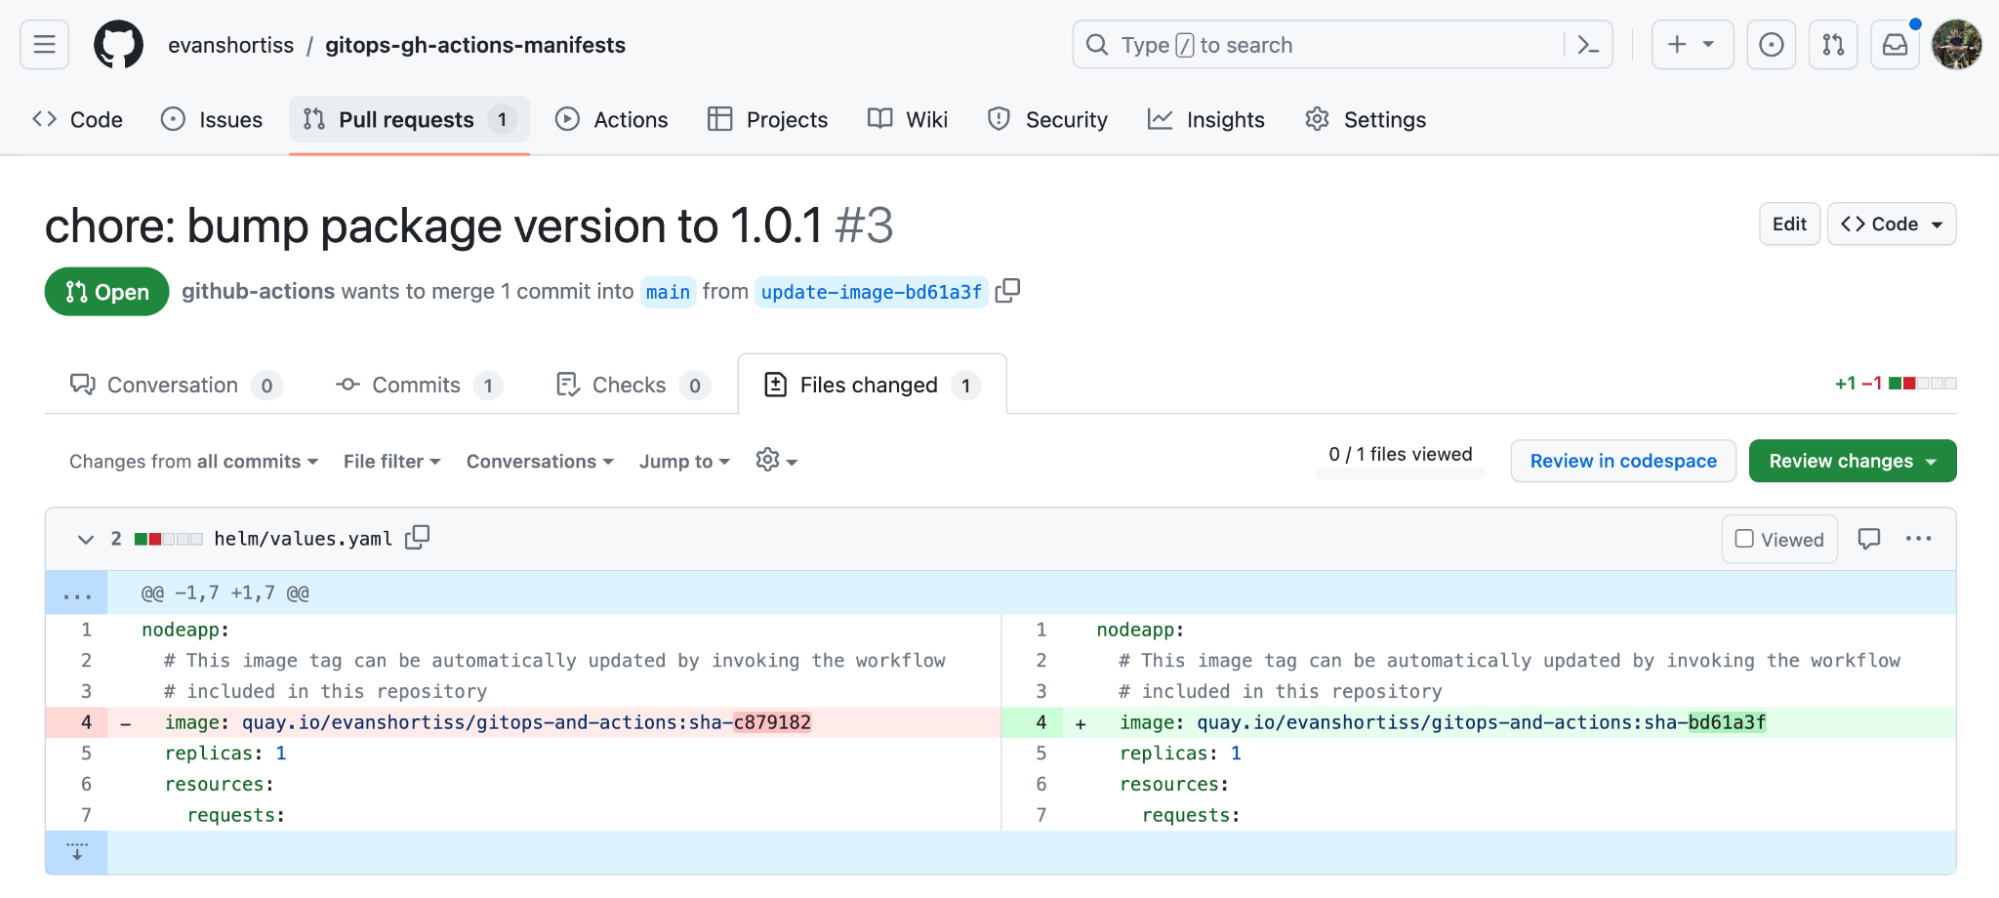
Once the CI process completes, a new pull request is created in the manifests repository, as shown in Figure 10. This pull request updates the manifests to use the newly created container image.
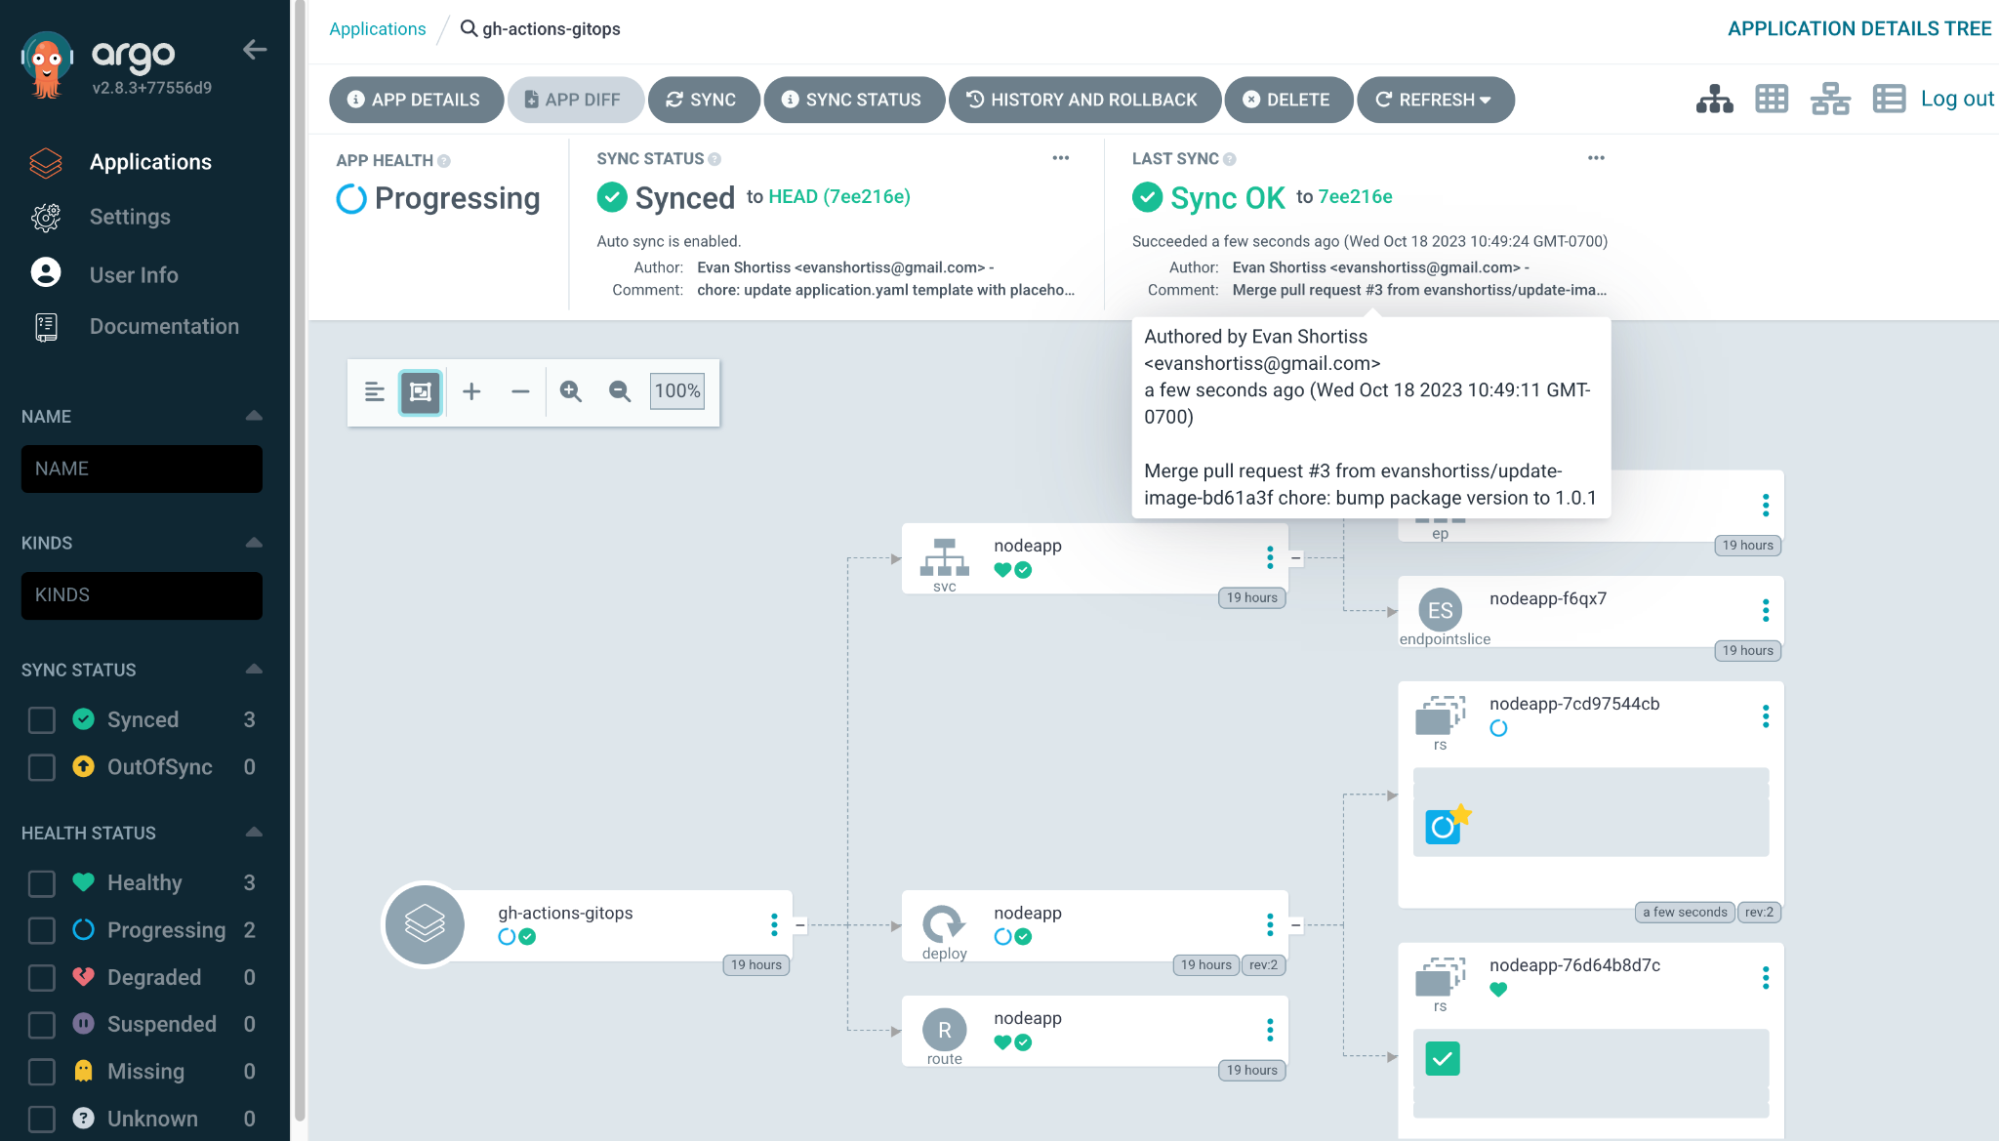
Merge the pull request, then head over to the Argo CD dashboard. Depending on your timing, Argo CD might already have detected the new commit that was merged and be in the process of deploying the new container image as shown in Figure 11.
You can further verify the end-to-end process by opening viewing the deployed application in your web browser. Get the application route using the OpenShift CLI:
oc get route nodeapp -n gh-actions-gitops -o jsonpath='{.spec.host}'
Copy and paste the URL output from the previous command into your web browser, and you should see a web page that displays the latest container image SHA and the version number from the package.json that you modified. Figure 12 shows an example of this.

Summary
This article provides just one example of how you can implement an end-to-end CI/CD pipeline based on GitHub Actions and Argo CD. You can modify this pipeline if you want to implement feature branch testing based on ApplicationSets, as shown in Christian and Natale’s article.
Visit our GitOps topic page to find e-books and interactive tutorials to dive even deeper into the world of OpenShift and Argo CD.