Since the rise of gen AI, many companies have been working to integrate large language models (LLMs) into their business processes to create value. One of the key challenges is providing domain-specific knowledge to LLMs. Many companies have chosen retrieval-augmented generation (RAG), storing internal documents in a vector database and querying the LLM while referencing stored knowledge. Another approach is fine-tuning, which slightly modifies the original model weights to incorporate new knowledge and skills.
In the past, fine-tuning LLMs was not an easy task for many organizations. It required a specialized training cluster and a broad range of technical expertise. However, the open source ecosystem has lowered the barrier to entry. For example, Hugging Face offers a variety of popular tools for training and customizing models, while Kubeflow provides a cloud-native approach to running training jobs across distributed containers.
In this article, we will demonstrate how the Red Hat OpenShift AI Kubeflow Training (KFT) Operator and open source tools enable us to fine-tune LLMs in a distributed environment.
All the resources are stored in this GitHub repository, and the trained model is stored in the Hugging Face repository.
Disclaimer
Fine-tuning LLMs with the Kubeflow Training Operator and SFT Trainer is still a Limited Availability feature in the latest OpenShift AI v2.18. If you need support for this feature, please contact Red Hat to obtain approval.
Prerequisites
We need to ensure that the following tools are available on the Red Hat OpenShift cluster:
- OpenShift AI operator with the KFT Operator.
- NVIDIA GPU Operator and Node Feature Discovery Operator.
StorageClassthat supports the ReadWriteMany (RWX) access mode.
The KFT Operator can be installed through the OpenShift AI Operator. Once the managementState of the DataScienceCluster is set to Managed, the OpenShift AI Controller will install the KFT Operator in the cluster as follows:
    trainingoperator:
      managementState: Managed
Our OpenShift cluster is built on Amazon Web Services (AWS) and includes two g6e.xlarge instances as GPU nodes equipped with an NVIDIA L40S device. We will install the NVIDIA GPU Operator and the Node Feature Discovery Operator to enable these resources on the cluster.
When running training jobs on multiple nodes, training datasets must be accessible simultaneously from multiple nodes. So we will require the RWX access mode for persistent volumes (PVs). In this article, we will use the Red Hat OpenShift Data Foundation CephFS for RWX storage.
Prepare the dataset
The fine-tuning dataset needs to be stored in a PV before training or downloaded from Hugging Face at the beginning of the training.
We will use the GSM8K dataset, which we have pre-stored in an object storage bucket. We will demonstrate how to download it to a PV before starting the fine-tuning.
Begin by creating Persistent Volume Claims (PVCs) as follows:
$ oc new-project fine-tuning
$ git clone https://github.com/JPishikawa/ft-by-sft/
$ oc apply -f ft-by-sft/deploy/storage/pvc.yaml
Create the my-storage Secret which includes the credentials for object storage. Modify the Secret for your environment:
$ oc apply -f ft-by-sft/deploy/storage/secret.yamlCreate the Pod that downloads the dataset from object storage to the PV:
apiVersion: v1
kind: Pod
metadata:
  name: download-dataset
  labels:
    name: download-dataset
spec:
  volumes:
    - name: dataset-volume
      persistentVolumeClaim:
        claimName: dataset-volume
  restartPolicy: Never
  initContainers:
    - name: fix-volume-permissions
      image: quay.io/quay/busybox:latest
      command: ["sh"]
      args: ["-c", "chmod -R 777 /data/input"]
      volumeMounts:
        - mountPath: "/data/input/"
          name: dataset-volume
  containers:
    - name: download-data
      imagePullPolicy: IfNotPresent
      image: quay.io/modh/kserve-storage-initializer:rhoai-2.17
      args:
        - 's3://my-fine-tuning-trial/data/'
        - /data/input
      env:
        - name: STORAGE_CONFIG
          valueFrom:
            secretKeyRef:
              name: storage-config
              key: my-storage
      volumeMounts:
        - mountPath: "/data/input/"
          name: dataset-volume
The object bucket name, my-fine-tuning-trial and the path, /data/, are specified in the container arguments. Once the Pod has completed downloading, the dataset is stored in dataset-volume.
Configuration
The FMS HF Tuning is an open-source Python library that wraps Hugging Face's SFT Trainer and PyTorch FSDP to run LLM fine-tuning jobs. We will use this library and the KFT PyTorchJob to run distributed training jobs.
The configuration parameters of FMS HF Tuning are configured via the following ConfigMap:
kind: ConfigMap
apiVersion: v1
metadata:
  name: training-config
data:
  config.json: |
    {
      "accelerate_launch_args": {
            "main_process_ip": "kfto-demo-master-0",
            "main_process_port": 29500,
            "num_processes": 2,
            "num_machines": 2,
            "machine_rank": 0,
            "mixed_precision": "bf16",
            "use_fsdp": "true",
            "fsdp_sharding_strategy": 4,
            "rdzv_backend": "c10d"
        },
      "model_name_or_path": "Qwen/Qwen2.5-7B-Instruct",
      "training_data_path": "/data/input/train-00000-of-00001.parquet",
      "output_dir": "/data/output/tuning/qwen2.5-tuning",
      "save_model_dir": "/data/output/model",
      "num_train_epochs": 3,
      "per_device_train_batch_size": 4,
      "per_device_eval_batch_size": 4,
      "gradient_accumulation_steps": 16,
      "packing": "True",
      "gradient_checkpointing": "True",
      "save_strategy": "epoch",
      "learning_rate": 2e-05,
      "lr_scheduler_type": "constant",
      "include_tokens_per_second": true,
      "data_formatter_template": "### Question:\n{{question}}\n\n### Answer:\n{{answer}}<|im_end|>",
      "response_template": "### Answer:\n",
      "logging_strategy": "steps",
      "logging_steps": 0.2,
      "neftune_noise_alpha": 5,
      "use_flash_attn": true,
      "use_liger_kernel": "True",
      "peft_method": "lora",
      "r": 16,
      "lora_alpha": 32,
      "lora_dropout": 0.05,
      "bias": "none",
      "target_modules": ["all-linear"],
      "lora_post_process_for_vllm": true,
      "trackers": ["aim"],
      "experiment": "my-first-experiment",
      "aim_remote_server_ip": "aim.aim.svc.cluster.local",
      "aim_remote_server_port": "53800"
    }
In accelerate_launch_args, arguments for accelerate launch and FSDP configuration are passed:
main_process_ip: Headless Service name of the master Pod ofPyTorchJob.num_processes: The total number of GPUs.num_machines: The total number of GPU nodes.fsdp_sharding_strategy: FSDP sharding strategy.4is "HYBRID_SHARD".
Other parameters mostly come from Hugging Face's TrainingArguments:
model_name_or_path: The base model name on Hugging Face Hub.training_data_path: The path to the training dataset stored in the attached PV.per_device_train_batch_sizeandgradient_accumulation_steps: The product of these values should match the Tensor Core requirements.peft_method: Using the Low-Rank Adaptation (LoRA) method to fine-tune the model.use_liger_kernel: Using the Liger Kernel to accelerate training and reduce video RAM (VRAM).trackers: Using the Aim stack for experiment tracking.
If you would like to try full-parameter fine-tuning, remove the LoRA-related configurations. It requires more VRAM to complete the training.
Experiment tracking
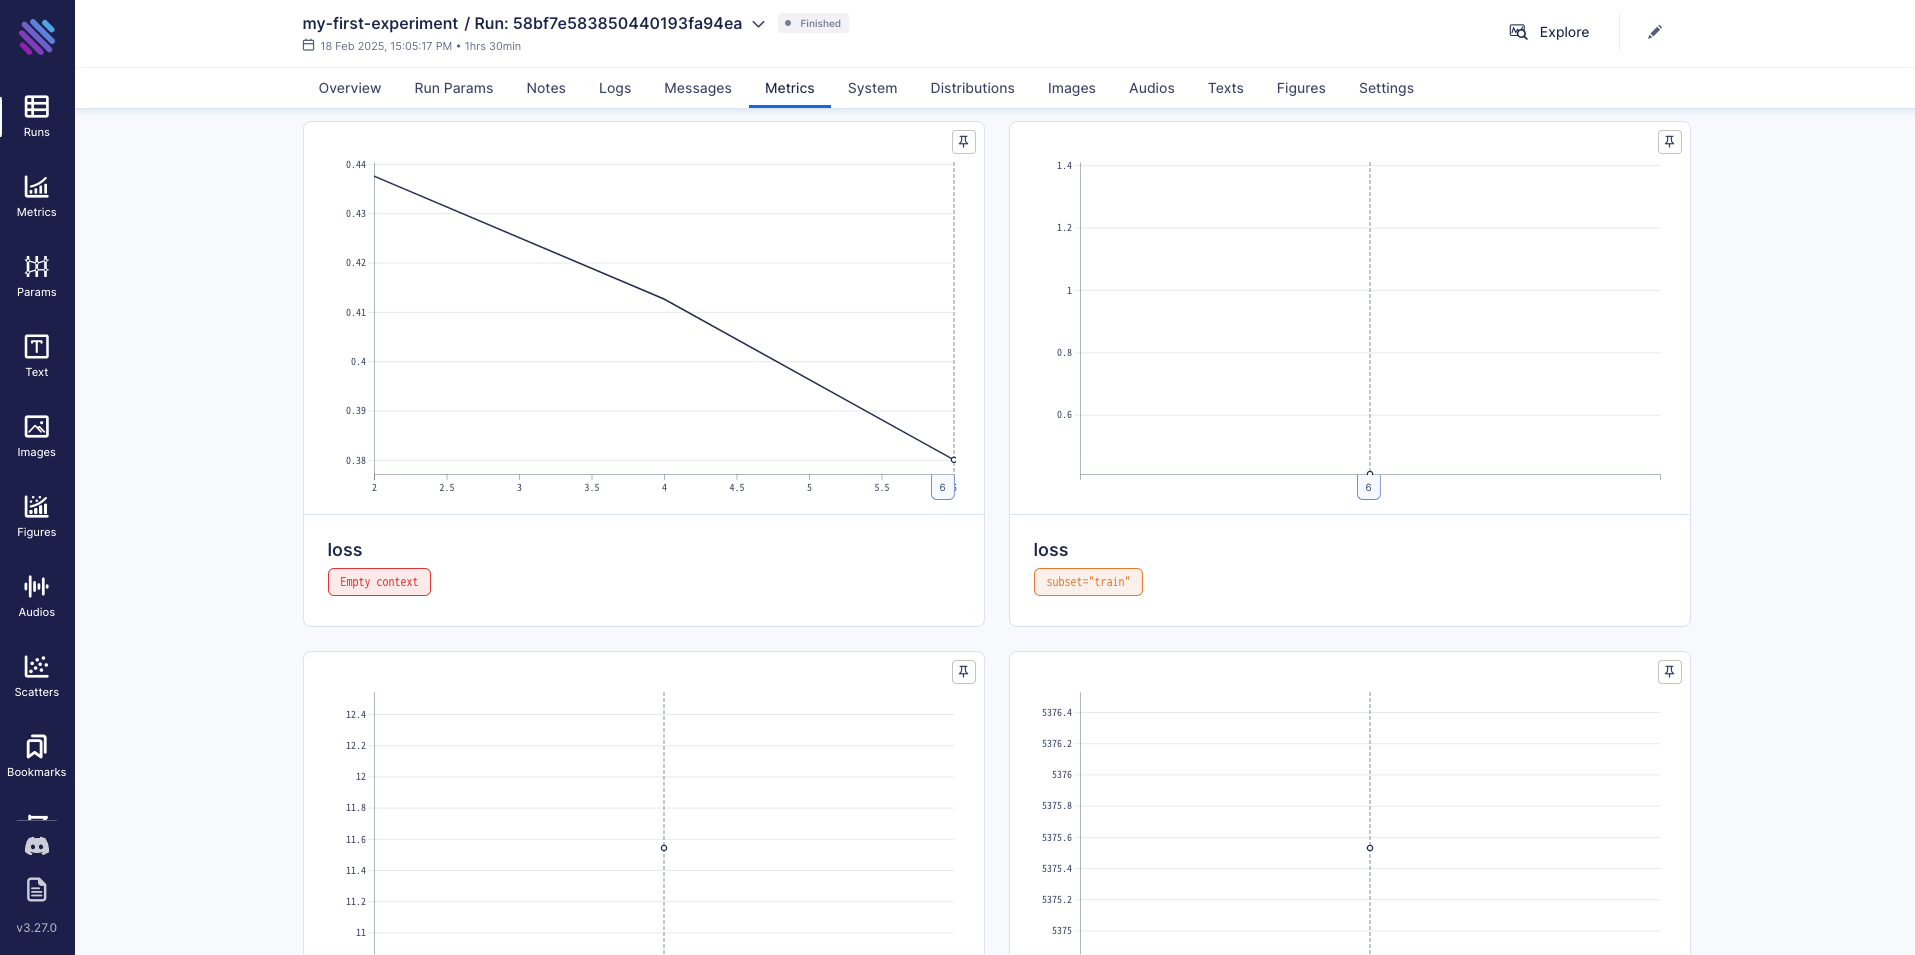
As described in the configuration section, we use the Aim stack for experiment tracking. Aim provides a visualization of key training metrics and is easy to integrate into FMS HF Tuning.
To deploy Aim on OpenShift, run the following commands:
$ cd ~/ft-by-sft/deploy/aim/
$ /bin/bash deploy.sh
This script creates resources in the aim namespace. Once the Aim Pod is running, you can access the Aim graphical user interface (GUI) via a route.
Running a training job
PyTorchJob is one of the custom resources in the KFT Operator. The following PyTorchJob creates a master Pod and a worker Pod for distributed training:
apiVersion: kubeflow.org/v1
kind: PyTorchJob
metadata:
  name: kfto-demo
spec:
  pytorchReplicaSpecs:
    Master:
      replicas: 1
      restartPolicy: Never
      template:
        spec:
          containers:
            - env:
                - name: SFT_TRAINER_CONFIG_JSON_PATH
                  value: /etc/config/config.json
                - name: SET_NUM_PROCESSES_TO_NUM_GPUS
                  value: "false"
                - name: TORCH_NCCL_ASYNC_ERROR_HANDLING
                  value: "1"
                - name: PYTORCH_CUDA_ALLOC_CONF
                  value: "expandable_segments:True"
              image: 'quay.io/jishikaw/fms-hf-tuning:latest'
              imagePullPolicy: IfNotPresent
              name: pytorch
              ports:
                - containerPort: 29500
                  name: pytorchjob-port
              resources:
                limits:
                  nvidia.com/gpu: 1
              volumeMounts:
                - mountPath: /etc/config
                  name: config-volume
                - mountPath: /data/input
                  name: dataset-volume
                - mountPath: /data/output
                  name: model-volume
                - mountPath: /.cache
                  name: cache-volume
                - mountPath: "/dev/shm"
                  name: dshm
          volumes:
            - configMap:
                items:
                  - key: config.json
                    path: config.json
                name: training-config
              name: config-volume
            - persistentVolumeClaim:
                claimName: dataset-volume
              name: dataset-volume
            - name: model-volume
              persistentVolumeClaim:
                claimName: model-volume
            - name: cache-volume
              persistentVolumeClaim:
                claimName: cache-volume
            - name: dshm
              emptyDir:
                medium: Memory
    Worker:
      replicas: 1
      restartPolicy: Never
      template:
        spec:
          containers:
            - env:
                - name: SFT_TRAINER_CONFIG_JSON_PATH
                  value: /etc/config/config.json
                - name: SET_NUM_PROCESSES_TO_NUM_GPUS
                  value: "false"
                - name: TORCH_NCCL_ASYNC_ERROR_HANDLING
                  value: "1"
                - name: PYTORCH_CUDA_ALLOC_CONF
                  value: "expandable_segments:True"
              image: 'quay.io/jishikaw/fms-hf-tuning:latest'
              imagePullPolicy: IfNotPresent
              name: pytorch
              ports:
                - containerPort: 29500
                  name: pytorchjob-port
              resources:
                limits:
                  nvidia.com/gpu: 1
              volumeMounts:
                - mountPath: /etc/config
                  name: config-volume
                - mountPath: /data/input
                  name: dataset-volume
                - mountPath: /data/output
                  name: model-volume
                - mountPath: /.cache
                  name: cache-volume
                - mountPath: "/dev/shm"
                  name: dshm
          volumes:
            - configMap:
                items:
                  - key: config.json
                    path: config.json
                name: training-config
              name: config-volume
            - persistentVolumeClaim:
                claimName: dataset-volume
              name: dataset-volume
            - name: model-volume
              persistentVolumeClaim:
                claimName: model-volume
            - name: cache-volume
              persistentVolumeClaim:
                claimName: cache-volume
            - name: dshm
              emptyDir:
                medium: Memory
  runPolicy:
    suspend: false
Once the training job starts running, the worker's init container tries to connect to the master Pod based on the parameters specified in the ConfigMap.
The init container error may occur when running the job for the first time because it takes a while to pull the container image. In that case, deleting and recreating the PyTorchJob could resolve the error.
If the training fails due to a compute unified device architecture (CUDA) out of memory error, decrease the values of per_device_train_batch_size and gradient_accumulation_steps in the ConfigMap to reduce VRAM consumption.
It takes about one and a half hours to complete the training job. You can monitor training metrics (e.g., loss) on the Aim GUI, as shown in Figure 1.
Serve the fine-tuned model
The trained model is stored in model-volume as a LoRA adapter, which can be served with the base model on OpenShift AI.
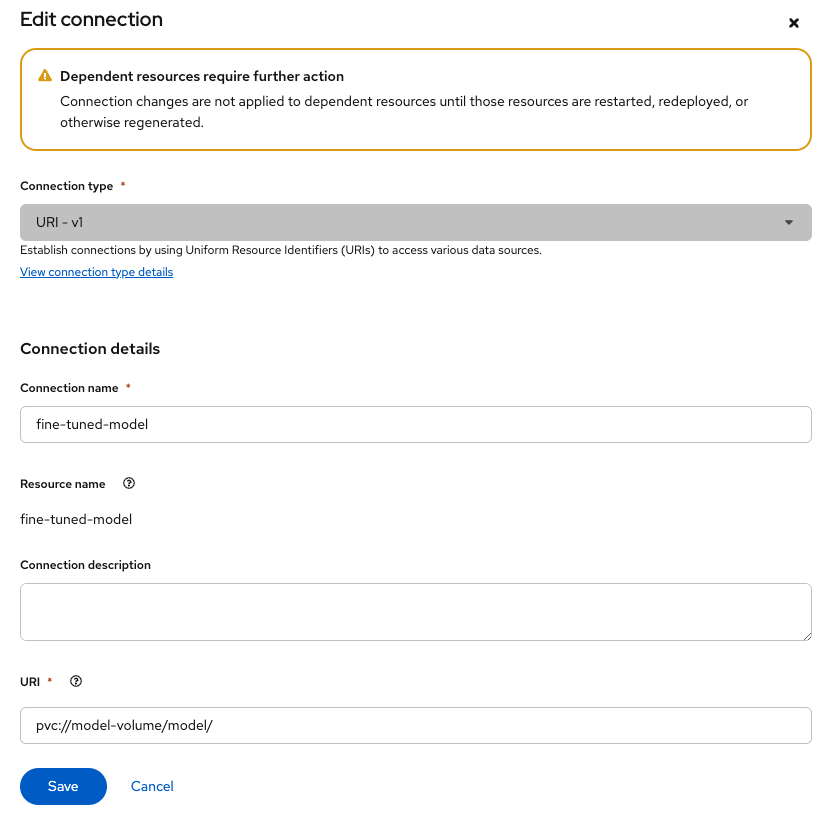
Create a new connection
- Go to the OpenShift AI console and create a new connection.
- Select
URI - v1as the Connection type and setpvc://model-volume/model/as the URI (Figure 2).
Deploy the model
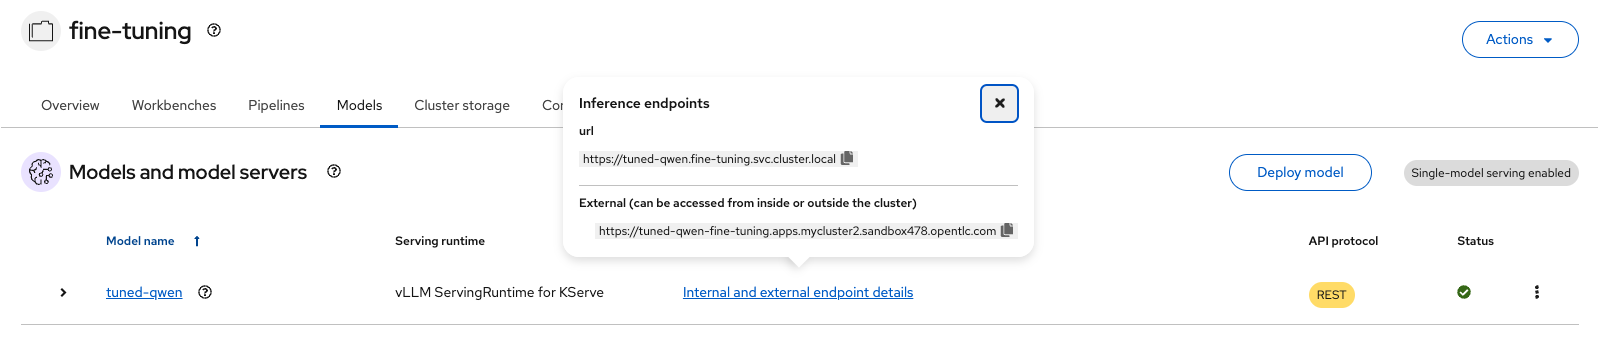
- Switch to the Models tab and deploy the model.
- Select vLLM ServingRuntime for KServe as the serving runtime.
- Select the created connection for the model source.
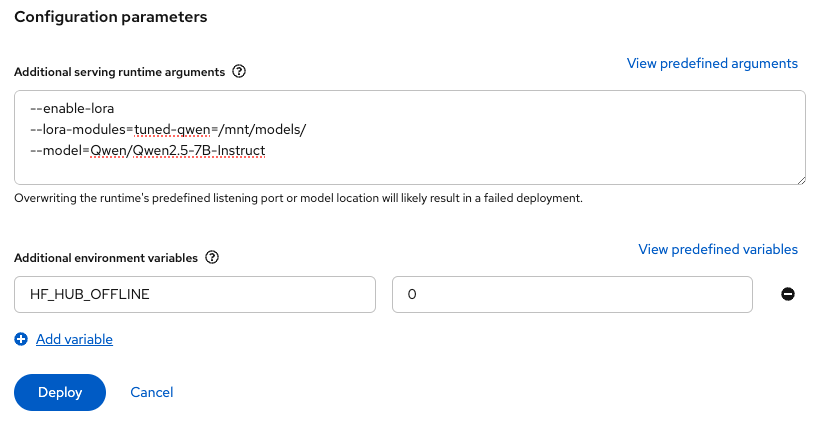
- Add the following arguments and the environment variable (Figure 3):
--enable-lora
--lora-modules=tuned-qwen=/mnt/models/
--model=Qwen/Qwen2.5-7B-Instruct
Set HF_HUB_OFFLINE to 0 as shown in Figure 3. This allows downloading the base model from Hugging Face Hub.
Once the model is deployed, the model API can be called (Figure 4).
Potential improvements
In this article, we demonstrated how to fine-tune an LLM with the KFT Operator on OpenShift AI. Training jobs can be managed via PyTorchJob, and FMS HF Tuning helps run distributed training jobs in a simple way. Additionally, the trained model can be served through OpenShift AI.
There are potential areas for improvement in real use cases:
- Integration with Kueue: OpenShift AI includes Kueue for training job management. It is important to allocate cluster resources fairly to each training job, and Kueue supports this need.
- GPU Direct RDMA: If available, connecting GPUs across different nodes with a high speed network is crucial for training efficiency. InfiniBand and RoCEv2 are popular options for this purpose and can help reduce the overall training time.