CI/CD, or continuous integration and continuous delivery, is an essential part of the modern software development life cycle. Coupled with GitOps, CI/CD allows developers to release high-quality software almost as soon as they commit code to a repository such as GitHub.
Automation is a key factor for implementing effective CI/CD. In this process, developers and release engineers create scripts that have all the instructions needed to test the code in a source code repository before putting it into a production environment. The process is efficient but complex. Fortunately, there are many tools that lessen the burden.
Jenkins is one of the most popular tools used for CI/CD. Jenkins has been around for years and has undergone numerous revisions, adding features all along the way. One of the most transformative features added to Jenkins is the ability to run Jenkins Pipeline jobs driven by an automation script stored in a Jenkinsfile. Developers and release engineers can use Jenkinsfiles to combine the practices of CI/CD and GitOps into a unified deployment process. That's the focus of this article.
We'll start with a brief refresher of what Jenkins is and how it applies to both CI/CD and GitOps. Then, I’ll guide you through how to use a Jenkinsfile to create deployments that combine CI/CD and GitOps.
How Jenkins supports CI/CD
Jenkins is an open source tool for managing deployment processes, which can range from a single task—such as running a unit test against source code—to a complex deployment process embodying many tasks. From its first release, Jenkins allowed companies to standardize their deployment process: Once a job was configured on the Jenkins server, that job could run repeatedly in the same manner according to its configuration. The developer defined the tasks to run and when to run them, and Jenkins did the rest.
Early releases of Jenkins required developers to define their deployment processes manually, using the Jenkins Dashboard. Moreover, each job was specific to the particular Jenkins server. Deployments (aka jobs) were not easy to update or transfer among servers. If developers wanted to update a particular job, they had to go to the server’s Jenkins Dashboard and manually implement the update. And, if developers or sysadmins wanted to move a job to another Jenkins server, they had to get into the file system of the Jenkins server and copy particular directories to other target Jenkins servers. The process was laborious, particularly if the job in question was large and contained many details.
Fortunately, the new Jenkins Pipeline job feature addresses these drawbacks head-on.
Integrating CI/CD and GitOps with Jenkinsfiles
A Jenkinsfile is a text file, written in the Groovy programming language, that defines each step in a Jenkins job. Usually, a Jenkinsfile is created by a developer or system administrator with a detailed understanding of how to deploy the particular component or application.
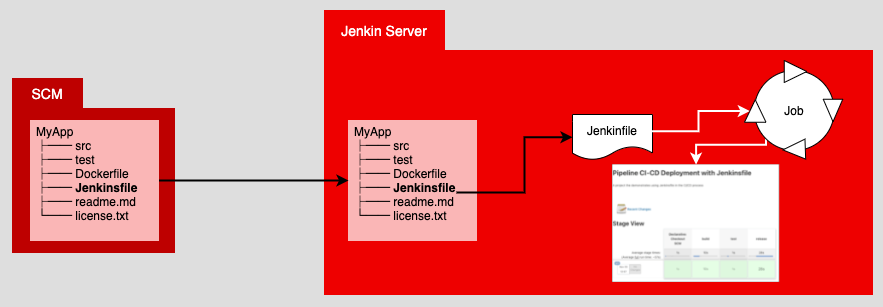
Once a Jenkinsfile is created, it is committed to a repository in the version control system that’s hosting the source code. After the Jenkinsfile is committed, the developer or sysadmin creates a job in Jenkins that declares the location of the Jenkinsfile in the source code repository and instructs Jenkins when to execute the Jenkinsfile. That’s it. There is no extensive twiddling with configuration settings in the user interface (UI). The Jenkinsfile has all the instructions required to run the job. (See Figure 1.)
Using a Jenkinsfile makes transferring jobs between servers much easier. All that’s required is to spin up a new job in Jenkins, bind that job to the Jenkinsfile that’s stored in version control, and then declare when the job is supposed to run. All the details and intelligence about the deployment are defined in the Jenkinsfile.
For all intents and purposes, the Jenkinsfile is the single source of truth (SSOT) about how a deployment executes. And that SSOT is hosted in the version control repository. Putting the SSOT in a version control repository is emblematic of the GitOps way of doing things, so let's talk about that next.
GitOps and the single source of truth
In a GitOps-driven deployment process, all activities emanate from the version-controlled code repository. Some companies drive their GitOps deployment process directly within the particular code repository service, such as GitHub, BitBucket, or Gitlab. Other companies have an external agent such as Jenkins execute the deployment process.
Regardless of the approach you choose, the important thing to understand about GitOps is that the single source of truth for all deployment activity is the code repository. Using a Jenkinsfile that’s hosted in a repository to define a job that runs under Jenkins fits well with the GitOps sensibility.
Now that we’ve covered how Jenkins implements CI/CD, and how it fits into the GitOps way of doing things, let’s move to a concrete example. Over the next few sections, we will implement a CI/CD process by running a Jenkinsfile under a Jenkins Pipeline job.
Note: Are you curious about how Red Hat OpenShift and Jenkins Pipelines work together? We recommend Simply Explained: OpenShift and Jenkins Pipelines.
Deploy a Node.js application using a Jenkinsfile
Recall that a Jenkinsfile is a text file that describes the details of a job that will run under Jenkins. This section presents a job that executes a three-stage deployment to build, test, and release a Node.js application:
- The build stage gets the application source code from GitHub and installs the dependency packages.
- The test stage tests the application.
- The release stage encapsulates the application into a Docker image that is then stored in a local container repository.
The following Jenkinsfile does the work of creating the local container repository. Once the container image is stored in the container repository, the Jenkinsfile runs a Docker container from the stored container image:
node {
  env.NODEJS_HOME = "${tool 'basic_node'}"
  // on linux / mac
  env.PATH="${env.NODEJS_HOME}/bin:${env.PATH}"
  sh 'npm --version'
}

pipeline {
  agent any

  stages {
      stage('build') {
          steps {
              git branch: 'main',
                  url: 'https://github.com/reselbob/secret-agent.git'
              sh "npm install"
          }
      }
      stage('test') {
          steps {
          script {
                  env.SECRET_AGENT_PORT = "3060"
                  echo "SECRET_AGENT_PORT is '${SECRET_AGENT_PORT}'"
              }
              sh "npm test"
          }
      }
      stage('release') {
          steps {
          script {
              env.SECRET_AGENT_PORT = "3050"
              echo "SECRET_AGENT_PORT is '${SECRET_AGENT_PORT}'"
          }
          // If the local registry container does not exists, create it
          sh """ if ! [ \$(docker ps --format '{{.Names}}' ]; then
                   docker run -d --network='host' -p 5000:5000 --restart=always --name registry registry:2;
                 fi;
              """
          // if the secret_agent container is running, delete it in order to create a new one
          sh """ if [ \$(docker ps --format '{{.Names}}' ]; then
                   docker rm -f secret_agent;
                 fi;
              """
          sh "docker build -t secretagent:v1 . "
          sh "docker tag secretagent:v1 localhost:5000/secretagent:v1 "
          sh "docker run -d --network='host' -p 3050:3050 --name secret_agent localhost:5000/secretagent:v1 "
          sh "echo 'Secret Agent up and running on port 3050' "
          }
      }
  }
}
Note that the Jenkinsfile has two root-level sections: node and pipeline. We'll look at these next.
The node section of the Jenkinsfile
The node section is the first step in the deployment process. It establishes a workspace in the Jenkins server under which a deployment runs. The workspace runs a Node.js application.
Note: The word node has two different meanings here. Used by itself in a Jenkinsfile, node describes the workspace. When used in the variable basic_node, it refers to the Node.js runtime environment.
In this example of the node section, the Jenkinsfile adds the location of the Node.js package to the environment’s PATH and then executes npm --version to verify that the Node.js package manager is installed and accessible globally. By implication, a successful npm --version command demonstrates that Node.js is installed.
The npm --version command is executed as a parameter to the sh command. The sh command is used in the Jenkinsfile to execute commands a developer typically runs in a terminal window at the command line.
The pipeline section of the Jenkinsfile
The pipeline section that follows the node section defines the deployment that executes in three stages: build, test, and release. Each stage has a steps subsection that describes the tasks that need to be executed in that stage.
Build, test, and release
The build stage clones the application from a source code repository and installs the Node.js dependency packages that the application requires.
The test stage executes a sh command that, in turn, runs a npm test command that is special to the application. Executing npm test runs the various tests that are defined within the Node.js application’s source code.
The instructions for the release stage are a bit more complicated. The first thing the release stage does is check whether the local container registry is running. If the local registry does not exist, the Jenkinsfile creates it.
Conditional commands
The next set of commands checks whether the container that will be created from the source code is already running. The container’s name is secret_agent. If the container is running, the Jenkinsfile deletes it. This is done so that the Jenkins job can run repeatedly. If a second run of the Jenkins job were to encounter a running instance of the secret_agent container, the job would fail. Thus, any existing secret_agent container needs to be deleted.
Once all the conditional commands have been executed, the Jenkinsfile builds a Docker image for the secret_agent code and pushes the image into the local registry. Then, an instance of the secret_agent container is created using the image stored in the local container registry.
The important thing to note about the deployment process is that all the instructions relevant to running a job under Jenkins are defined in the Jenkinsfile. If you ever need to change any deployment instructions, you don’t need to fiddle around with the Jenkins UI. All you need to do is alter the Jenkinsfile. Isolating this work to the Jenkinsfile makes it easier to manage and audit changes to the deployment process.
Now we've covered the Jenkinsfile and its sections. The last thing you need to do is bind the Jenkinsfile to a Jenkins job. This is done from within the Jenkins UI, as described in the next section.
Binding a Jenkinsfile to a Jenkins Pipeline job
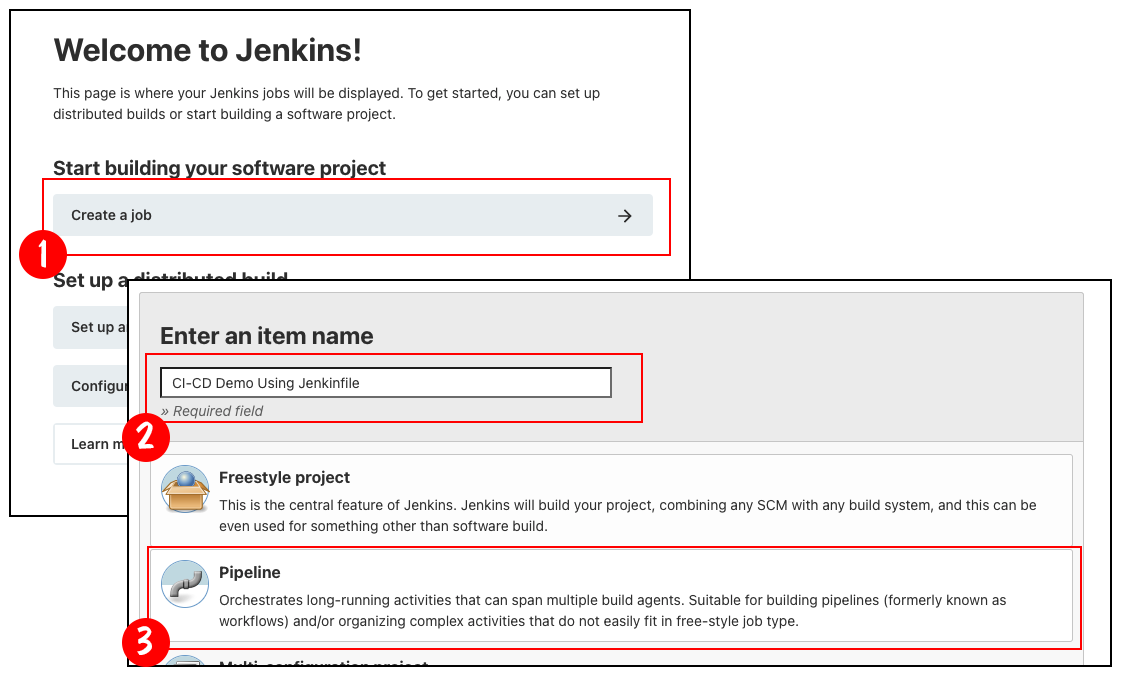
Binding a Jenkinsfile to a Jenkins Pipeline job is straightforward, as shown by the sequence of screens in Figure 2. Here are the steps:
- Create a job in the Jenkins Dashboard.
- Name the job.
- Declare it a Jenkins Pipeline job.
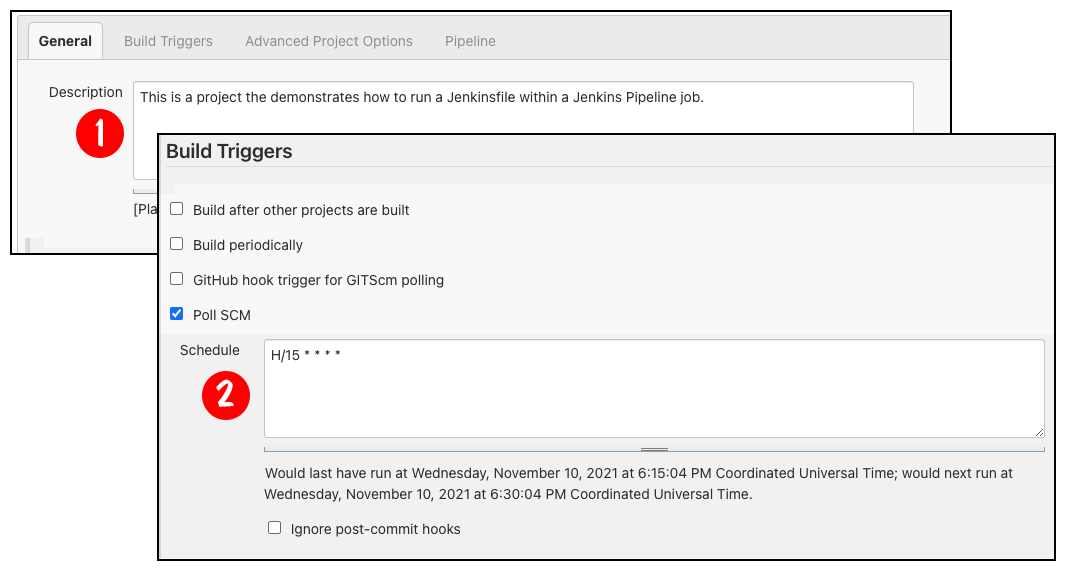
Once the Jenkins Pipeline job is created, it needs to be configured. Figure 3 shows the first two steps in the process:
- Enter a description for the job.
- Declare how often to check the source code repository for changes.
In Figure 3, the job is configured to poll the source code repository every 15 minutes.
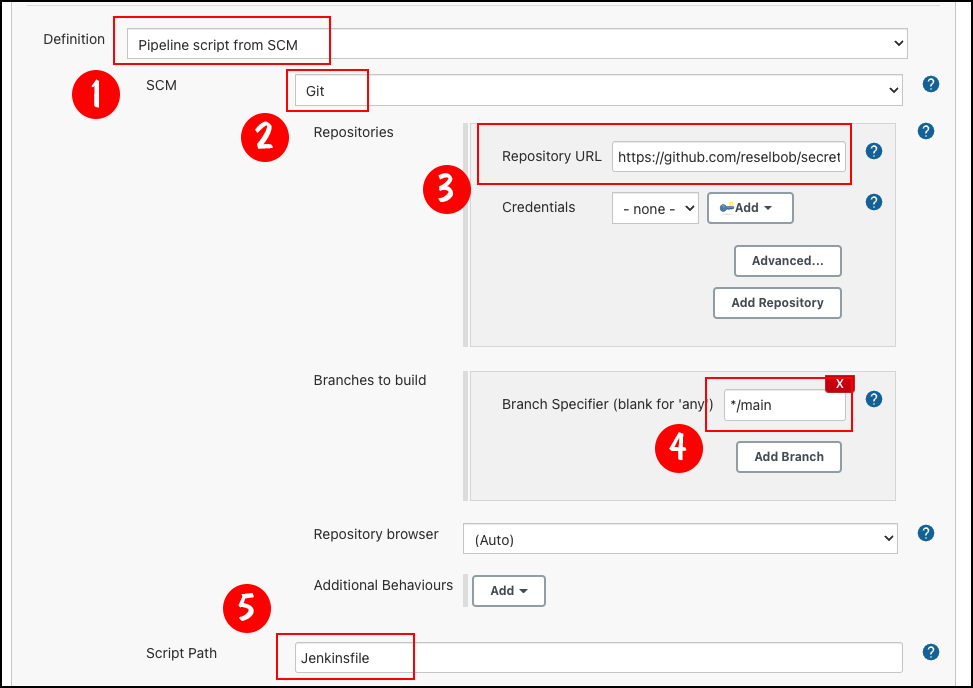
Once the description and polling interval are declared, complete the configuration that binds the Jenkinsfile to the job. The following steps are illustrated in Figure 4:
- Select Pipeline script from SCM from the first dropdown menu.
- Select Git from the next dropdown menu. Doing this reveals an additional set of text boxes where you can do the following:
- Enter the URL of the version code repository that has the Jenkinsfile.
- Enter the branch that has the version of the Jenkinsfile of interest.
- Declare the name of the Jenkinsfile.
Figure 4 uses the default file, simply named Jenkinsfile.
You can have many alternative Jenkinsfiles, with names such as Jenkinsfile_k8s or Jenkinsfile_windows. This means that you can use the same source code repository for a variety of jobs. Each job will execute its own build instructions described by the relevant Jenkinsfile.
Note: The versatility that comes with using many different versions of Jenkinsfiles is particularly useful for working in application environments that have complex provisioning and configuration requirements. For example, Kubernetes and OpenShift configurations support a wide variety of settings—everything from container configuration to security rules. Putting the provisioning and configuration settings in one Jenkinsfile can become a maintenance headache. But, splitting up configurations among many files in a way that is particular to each environment makes deployment management a lot easier. The savings in labor alone can be significant.
Once the Jenkins Pipeline job is configured, you can run it from the Jenkins Dashboard. As shown in Figure 5, select the Jenkins Pipeline job, then click the Build Now menu button to run it. The job runs and the result of each stage is shown in the job’s page on the Jenkins Dashboard.
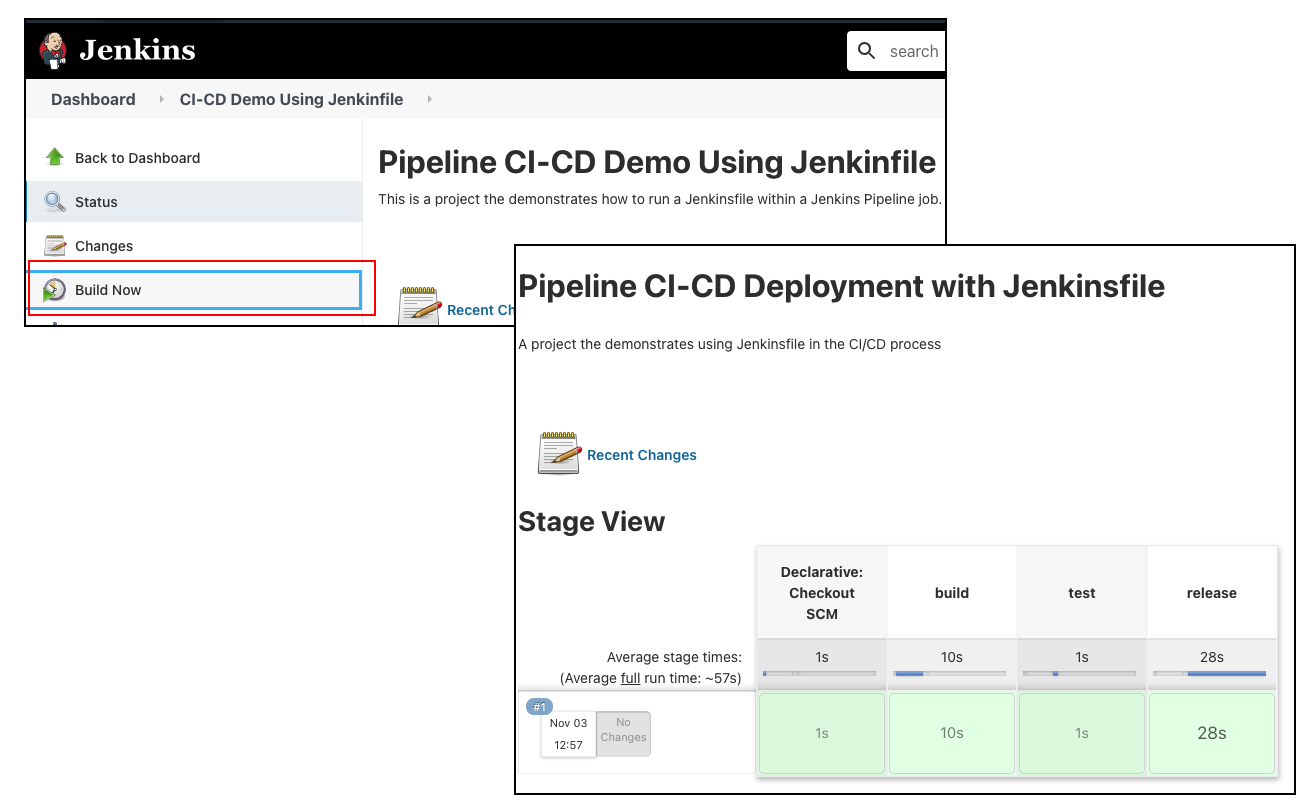
The beauty of it all is that the job's runtime details are described in the associated Jenkinsfile. Should the deployment process need to change, all you need to do is change the Jenkinsfile in the source code repository.
The benefits of using Jenkins Pipelines for GitOps and CI/CD
There are many benefits to using Jenkins Pipeline jobs in conjunction with a version control server such as GitHub, and thus combining CI/CD and GitOps.
First, putting deployment instructions in a central version control repository makes the repository a central location, which can be used as a single source of truth for all deployment activities. Using the repository as a single source of truth provides reliable change management and auditing capabilities. Version control and access security are also built into the service.
Second, declaring the build process in a Jenkinsfile makes it easier to automate deployment. You don’t have to fiddle with a UI to get your programs out; you can just write the code and let the Jenkins Pipeline do the rest.
Finally, Jenkins is a well-known CI/CD tool. It has all the features that are required for implementing a viable GitOps-focused deployment process. For companies already using Jenkins, making the leap to GitOps using a Jenkinsfile is much easier than starting from scratch. And for companies not yet using Jenkins, the learning curve is acceptable. This technology has proven itself over the years, and there are many learning resources and examples developers can use to get up to speed.
Conclusion
GitOps has a lot to offer developers who want to automate their deployment processes using scripts that are stored as a single source of truth in a version control management system. Such control and reliability are compelling reasons to make the move.
You can't adopt GitOps in a day or two. It takes time to get the organizational processes in place. But many developers and their organizations will find that the time required to get GitOps working under a Jenkins Pipeline job, using a Jenkinsfile, is a good investment, especially for the benefits at hand.
Learn more about GitOps and CI/CD on Red Hat Developer
Visit the following articles and resources for more about using GitOps and CI/CD for secure, automated deployments:
Last updated: September 20, 2023