Redhat Developers  Logo
  • Products

    Featured

    • Red Hat Enterprise Linux
      Red Hat Enterprise Linux Icon
    • Red Hat OpenShift AI
      Red Hat OpenShift AI
    • Red Hat Enterprise Linux AI
      Linux icon inside of a brain
    • Image mode for Red Hat Enterprise Linux
      RHEL image mode
    • Red Hat OpenShift
      Openshift icon
    • Red Hat Ansible Automation Platform
      Ansible icon
    • Red Hat Developer Hub
      Developer Hub
    • View All Red Hat Products
    • Linux

      • Red Hat Enterprise Linux
      • Image mode for Red Hat Enterprise Linux
      • Red Hat Universal Base Images (UBI)
    • Java runtimes & frameworks

      • JBoss Enterprise Application Platform
      • Red Hat build of OpenJDK
    • Kubernetes

      • Red Hat OpenShift
      • Microsoft Azure Red Hat OpenShift
      • Red Hat OpenShift Virtualization
      • Red Hat OpenShift Lightspeed
    • Integration & App Connectivity

      • Red Hat Build of Apache Camel
      • Red Hat Service Interconnect
      • Red Hat Connectivity Link
    • AI/ML

      • Red Hat OpenShift AI
      • Red Hat Enterprise Linux AI
    • Automation

      • Red Hat Ansible Automation Platform
      • Red Hat Ansible Lightspeed
    • Developer tools

      • Red Hat Trusted Software Supply Chain
      • Podman Desktop
      • Red Hat OpenShift Dev Spaces
    • Developer Sandbox

      Developer Sandbox
      Try Red Hat products and technologies without setup or configuration fees for 30 days with this shared Openshift and Kubernetes cluster.
    • Try at no cost
  • Technologies

    Featured

    • AI/ML
      AI/ML Icon
    • Linux
      Linux Icon
    • Kubernetes
      Cloud icon
    • Automation
      Automation Icon showing arrows moving in a circle around a gear
    • View All Technologies
    • Programming Languages & Frameworks

      • Java
      • Python
      • JavaScript
    • System Design & Architecture

      • Red Hat architecture and design patterns
      • Microservices
      • Event-Driven Architecture
      • Databases
    • Developer Productivity

      • Developer productivity
      • Developer Tools
      • GitOps
    • Secure Development & Architectures

      • Security
      • Secure coding
    • Platform Engineering

      • DevOps
      • DevSecOps
      • Ansible automation for applications and services
    • Automated Data Processing

      • AI/ML
      • Data Science
      • Apache Kafka on Kubernetes
      • View All Technologies
    • Start exploring in the Developer Sandbox for free

      sandbox graphic
      Try Red Hat's products and technologies without setup or configuration.
    • Try at no cost
  • Learn

    Featured

    • Kubernetes & Cloud Native
      Openshift icon
    • Linux
      Rhel icon
    • Automation
      Ansible cloud icon
    • Java
      Java icon
    • AI/ML
      AI/ML Icon
    • View All Learning Resources

    E-Books

    • GitOps Cookbook
    • Podman in Action
    • Kubernetes Operators
    • The Path to GitOps
    • View All E-books

    Cheat Sheets

    • Linux Commands
    • Bash Commands
    • Git
    • systemd Commands
    • View All Cheat Sheets

    Documentation

    • API Catalog
    • Product Documentation
    • Legacy Documentation
    • Red Hat Learning

      Learning image
      Boost your technical skills to expert-level with the help of interactive lessons offered by various Red Hat Learning programs.
    • Explore Red Hat Learning
  • Developer Sandbox

    Developer Sandbox

    • Access Red Hat’s products and technologies without setup or configuration, and start developing quicker than ever before with our new, no-cost sandbox environments.
    • Explore Developer Sandbox

    Featured Developer Sandbox activities

    • Get started with your Developer Sandbox
    • OpenShift virtualization and application modernization using the Developer Sandbox
    • Explore all Developer Sandbox activities

    Ready to start developing apps?

    • Try at no cost
  • Blog
  • Events
  • Videos

How to create a GCP instance using Ansible Automation

July 12, 2023
Deepankar Jain
Related topics:
Automation and management
Related products:
Red Hat Ansible Automation PlatformRed Hat Ansible Automation Platform via Google Cloud Marketplace

Share:

    This series covers the end-to-end process of creating an instance on GCP using Red Hat Ansible Automation Platform. This 3-part series includes:

    Part 1: How to create an instance on GCP using Ansible CLI

    Part 2: How to create a GCP instance using Ansible Automation

    Part 3: How to create a GCP instance via workflow and Ansible

    In our previous article, we explored how to use the Ansible Automation Platform CLI to create an instance in GCP. This time, we'll take things a step further and leverage the power of the Ansible Automation Platform to automate the process. The Ansible Automation Platform is a powerful tool that enables you to manage your infrastructure more efficiently, with less manual intervention. By using the Ansible Automation Platform, we can create a streamlined process for deploying Instances in GCP, reducing errors and saving time. In this blog post, we'll dive into the details of how to use the Ansible Automation Platform to create Instances in GCP and explore some of the benefits of using this powerful automation tool.

    Prerequisites

    1. The operating system on your local machine must be Red Hat Enterprise Linux (RHEL).

    2. Before you can complete any of the following tasks, you must create a registry service account. To log in to SA, you'll need to use a container runtime such as Podman or Docker. Podman is a powerful and secure open-source tool that can be used as an alternative to Docker, with the added benefits of not requiring a daemon to run containers and having a more lightweight footprint. If you don't have Podman installed, you can use Docker instead, but we recommend using Podman for a more efficient container experience.

    
    podman login registry.redhat.io


    Username: {REGISTRY-SERVICE-ACCOUNT-USERNAME} 


    Password: {REGISTRY-SERVICE-ACCOUNT-PASSWORD}   


    Login Succeeded!

    Once we are successful in logging into SA, we need to create a container image by using a Dockerfile containing the following context:

    
    FROM registry.redhat.io/ansible-automation-platform-22/ee-supported-rhel8:latest


    RUN pip3 install pyOpenSSL


    RUN ansible-galaxy collection install google.cloud

    To build an image using podman.

    
    podman build -t <image-name>.

    The image should be pushed into the container image registry. Log in to the private container image registry using the command 'podman login' before pushing.

    
    podman push <image-name>

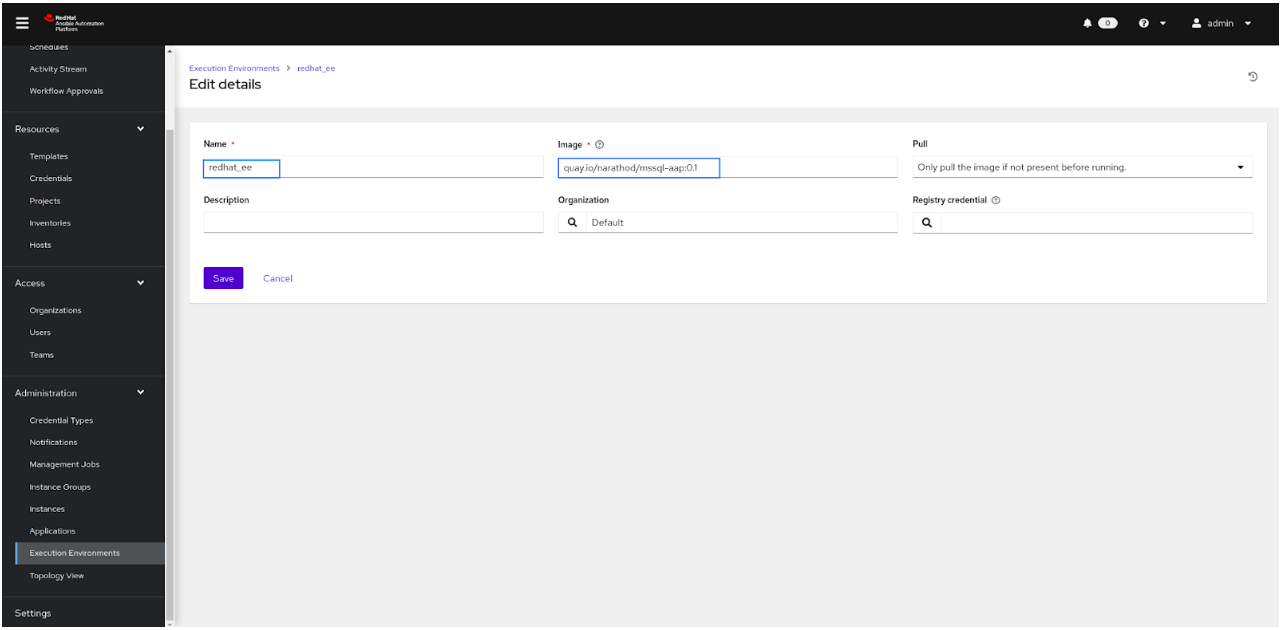
    Add the image name in the execution environment as shown in Figure 1.

    A screenshot of the execution environment page of Ansible Automation Platform.
    Figure 1: The execution environment page of Ansible Automation Platform.

    2. Create a service account in GCP by following the link.

    3. Generate the credentials for service account by following the link

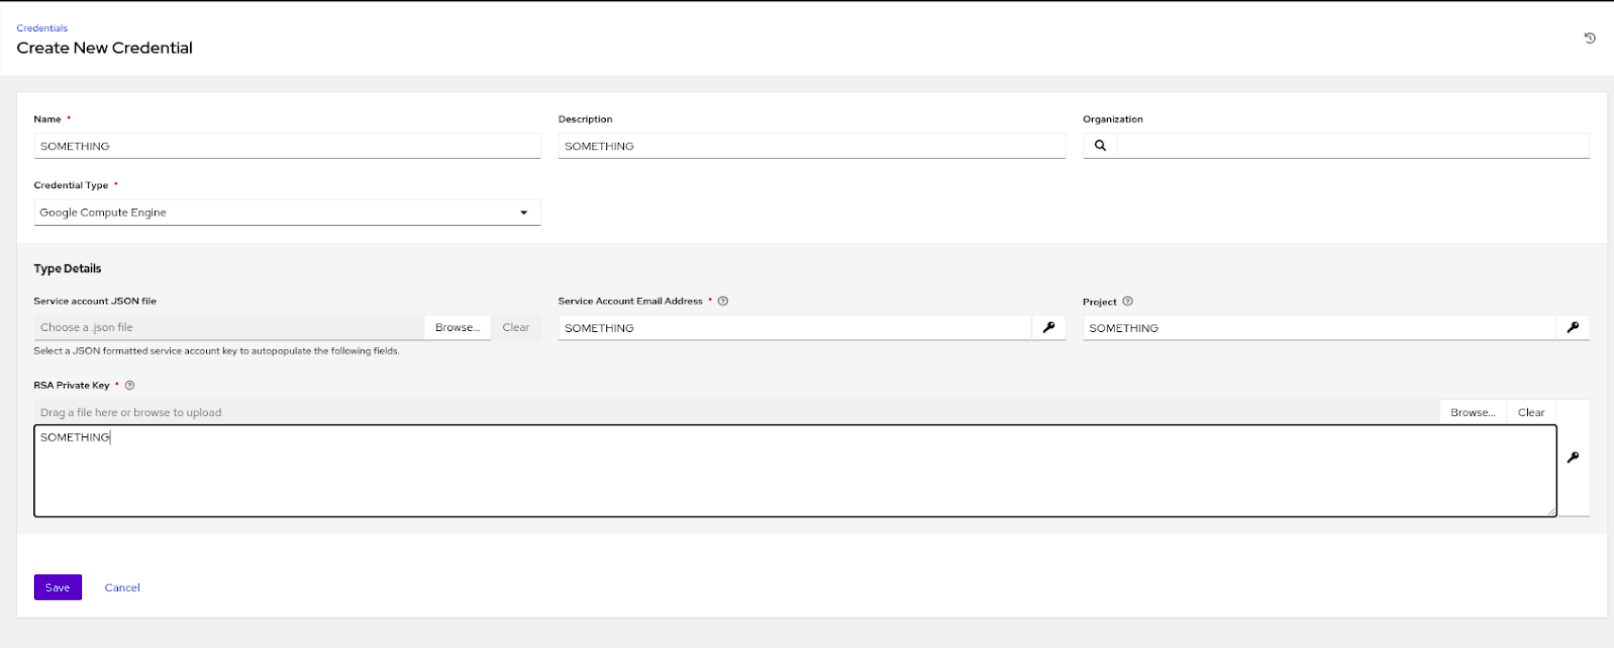
    4. Now, move over to Credentials Tab in Resources, select Google Compute Engine under Credential type and add your credentials.json file. You can also try Ansible Automation Platform Builder as well to create a custom execution environment.

    Figure 2: GCP Credentials
    Figure 2: GCP Credentials

    Executing GCP Instance Deployment with Using Ansible Automation Platform

    1. Creating and Configuring the Project

    • Install the Ansible Automation Platform by following the link and login to the Ansible Automation Platform Portal in Browser
    • Navigate to the "Projects" tab under Resources in the left pane.
    • Click on the "Add" to create a new project.
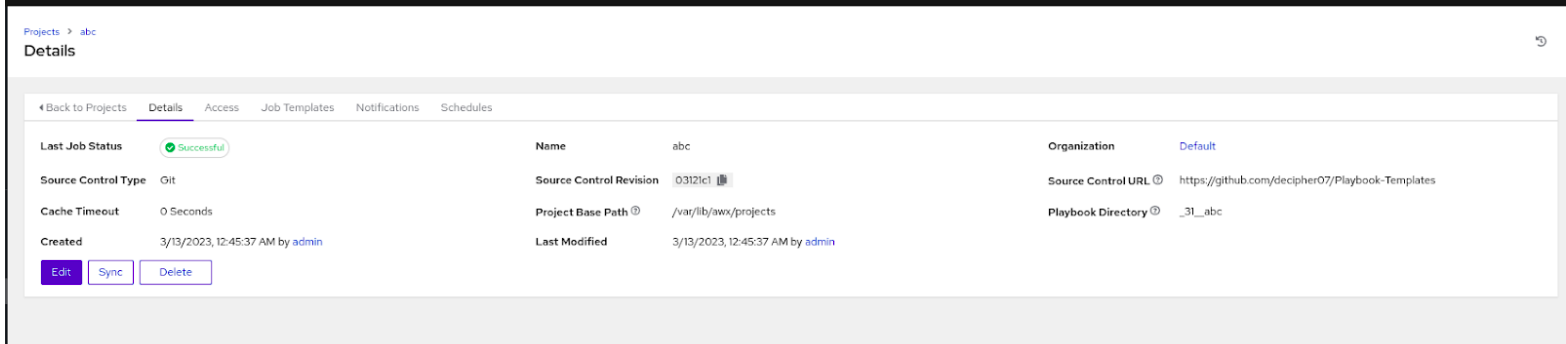
    • Enter a name for the project and choose "Git" as the source control type with URL "https://github.com/redhat-developer-demos/ansible-automation-platform-cloud-solutions" in the Source Control URL field. If you're interested in checking out the playbooks, you can find them on Github here.
    • Save the changes and wait for the operation to complete successfully (Figure 3).
    Configuring the Project source control.
    Figure 3: Configuring the project source control.

    2. Creating and Configuring the Job Template

    • Go to the "Templates" tab under Resources in the left pane and Click on the Add button and Select "Job template" from the options.
    • Enter a name for the job you want to create, select the Demo-Inventory or Default inventory in the "Inventory" section.
    • In the "Project" section, click on the project name you previously created and select the “GCP/create_instance_job_template.yml” file.

    2.2 Configuring the Variables and Execution Environment

    • Click on the "Variables" section and add the variables as follows:
    
    ---


    network_name: "test-ansible-network"


    subnet_name: "test-ansible-subnet"


    ip_name: "test-ansible-ip"


    disk_name: "test-ansible-disk"


    machine_name: "test-ansible"


    region: "asia-south2"


    zone: "asia-south2-a"


    source_image: "projects/ubuntu-os-cloud/global/images/family/ubuntu-1804-lts"


    subnet_cidr: "10.0.1.0/24"


    disk_size: 10


    machine_type: "f1-micro"

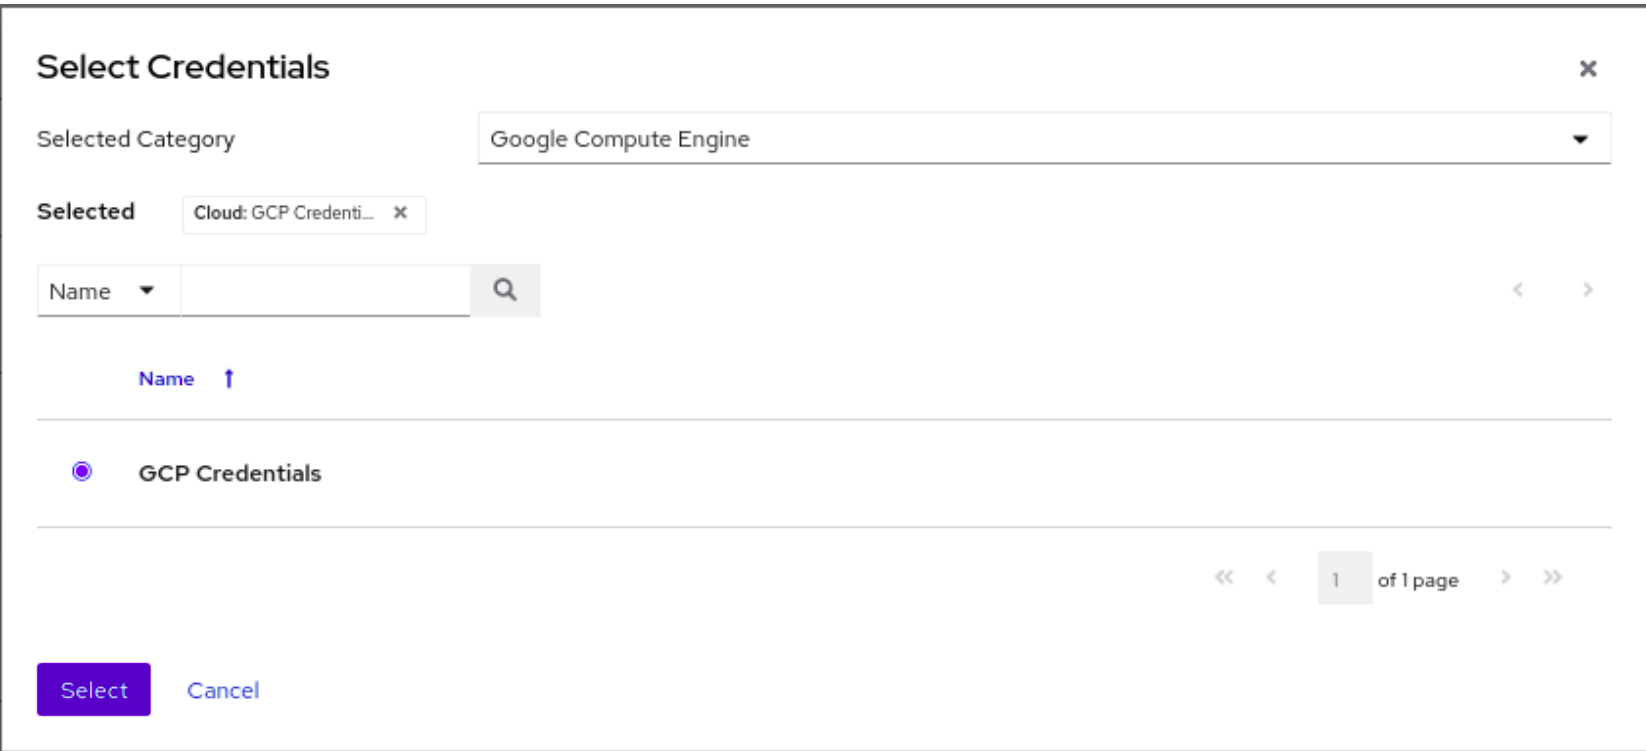
    Select the credentials and execution environment you previously created under the selected category (Figure 4).

    Selecting pre-configured GCP credentials for secure authentication.
    Figure 4: Selecting pre-configured GCP credentials for secure authentication.

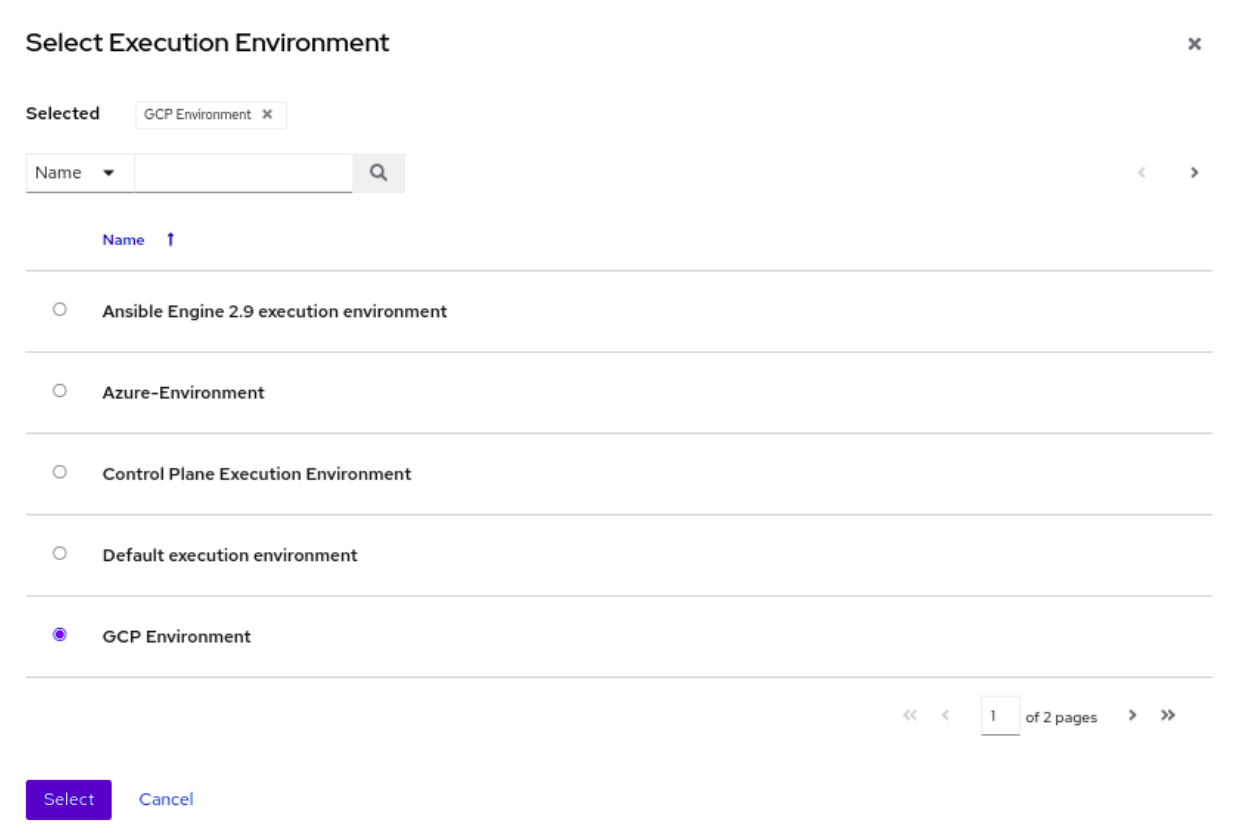
    Select the pre-configured execution environment (Figure 5).

    Selecting pre-configured execution environment.
    Figure 5: Selecting the pre-configured execution environment.

    Save your changes by clicking on the "Save" button. Finally, launch the job by clicking on the "Launch" button.

    Once the job is launched using the Ansible Automation Platform, the system will generate an output that is expected to be similar Figure 6.

    Shows the output from job.
    Figure 6: Shows the output from job.

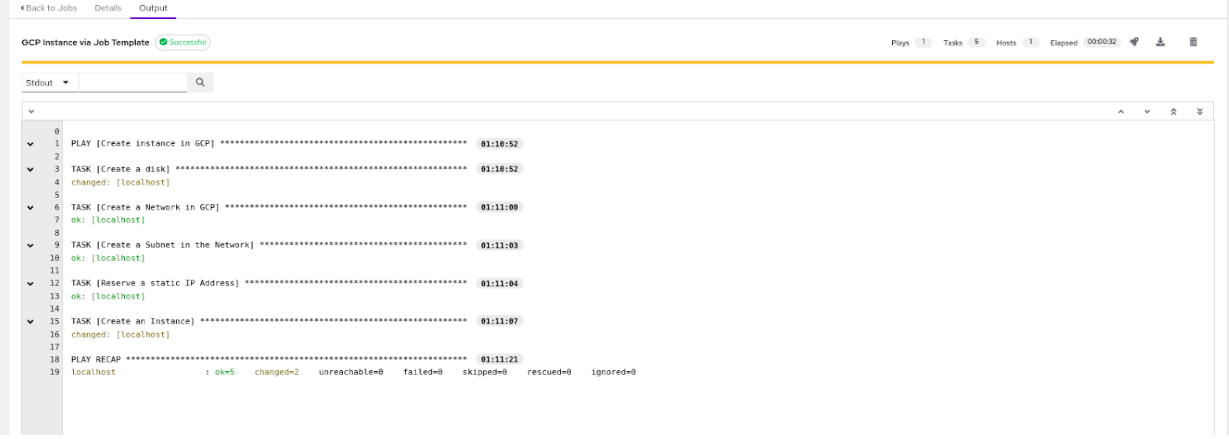
    The output will display the status of the job and the progress of the instance creation process. You can now check your instance by navigating to GCP console.

    What’s next?

    In this article, we explored how to use the Ansible Automation Platform to create an instance in GCP. We demonstrated how the Ansible Automation Platform can streamline the process of deploying instances in GCP, making it more efficient and less error-prone. By using the power of automation, we can save time and free up resources to focus on other important tasks.

    To explore more of what Ansible Automation Platform has to offer, visit the official website to download and get started. Additionally, there are various ebooks available to help you explore the capabilities of Ansible Automation Platform, with Automation at the Edge, Choosing an Automation Tool, and An IT Executive's Guide to Automation. A cheat sheet is also available for WiFi automation with Ansible and SD to provide you with a quick reference for network automation tasks.

    In the next article, we'll take things even further and explore how to simplify the process of creating Instances in GCP by using workflow templates. Workflow templates can help us to standardize the process of creating VMs and reduce the amount of manual intervention required. For our next post, where we'll dive into the details of how to use workflow templates with Ansible Automation Platform to further optimize our infrastructure management.

    Last updated: January 11, 2024

    Related Posts

    • Understanding Ansible Tower Isolated Nodes

    • Example of using Ansible to update Container Native Storage

    • Example of using Ansible to update Container Native Storage

    • Using Ansible to automate Google Cloud Platform

    Recent Posts

    • How to run a fraud detection AI model on RHEL CVMs

    • How we use software provenance at Red Hat

    • Alternatives to creating bootc images from scratch

    • How to update OpenStack Services on OpenShift

    • How to integrate vLLM inference into your macOS and iOS apps

    Red Hat Developers logo LinkedIn YouTube Twitter Facebook

    Products

    • Red Hat Enterprise Linux
    • Red Hat OpenShift
    • Red Hat Ansible Automation Platform

    Build

    • Developer Sandbox
    • Developer Tools
    • Interactive Tutorials
    • API Catalog

    Quicklinks

    • Learning Resources
    • E-books
    • Cheat Sheets
    • Blog
    • Events
    • Newsletter

    Communicate

    • About us
    • Contact sales
    • Find a partner
    • Report a website issue
    • Site Status Dashboard
    • Report a security problem

    RED HAT DEVELOPER

    Build here. Go anywhere.

    We serve the builders. The problem solvers who create careers with code.

    Join us if you’re a developer, software engineer, web designer, front-end designer, UX designer, computer scientist, architect, tester, product manager, project manager or team lead.

    Sign me up

    Red Hat legal and privacy links

    • About Red Hat
    • Jobs
    • Events
    • Locations
    • Contact Red Hat
    • Red Hat Blog
    • Inclusion at Red Hat
    • Cool Stuff Store
    • Red Hat Summit

    Red Hat legal and privacy links

    • Privacy statement
    • Terms of use
    • All policies and guidelines
    • Digital accessibility

    Report a website issue