While businesses emphasize centralized, secure development environments, developers often struggle with the high-end hardware requirements of traditional desktop IDEs. The Red Hat OpenShift Dev Spaces 3.19 release brings the best of both worlds to developers by introducing a local development experience for the following JetBrains IDEs:
- IntelliJ IDEA Ultimate
- WebStorm
- PyCharm
- RubyMine
- CLion
Now users can seamlessly integrate their cloud-native development environments with the local JetBrains IDE experience (Figure 1).

The following video demonstrates how to use your local JetBrains IntelliJ IDE with a hosted cloud development environment provided by OpenShift DevSpaces as outlined in this article.
Technology preview
Currently, this feature is available as a Technology Preview, allowing users to explore and provide feedback for further refinements.
In upcoming releases, we will expand support to include additional JetBrains IDEs:
- GoLand
- PhpStorm
- Rider
This ongoing expansion will provide a broader range of options for developers working on different tech stacks.
How it works: The role of JetBrains Gateway
The integration is made possible through JetBrains Gateway (see Figure 2), a lightweight desktop application designed to bridge cloud development environments (CDEs) with local JetBrains IDEs.

The local development experience differs significantly from the traditional in-browser IDE model used in OpenShift Dev Spaces (e.g., with VS Code). Instead of running entirely within a browser, the JetBrains Gateway approach introduces additional components:
- Remote JetBrains IDE Server: A headless IDE running within the user's containerized tools environment in OpenShift.
- JetBrains Thin Client: The UI-rich, local IDE component that connects to the cloud-hosted environment, appearing like a normal local IDE to the user.
- JetBrains Gateway: Manages the connection between the thin client and the remote IDE Server. It can be used as a standalone application or through a bundled JetBrains IDE plugin.
- OpenShift Dev Spaces Connector plug-in: Extends Gateway's functionality to allow connections to OpenShift, managing CDEs and user authentication.
Comparing in-browser versus Gateway-based development
In-browser IDEs (e.g., VS Code in OpenShift Dev Spaces):
- Splits the IDE into a back end (running in OpenShift) and a front end (the in-browser client).
- Developers interact entirely through the browser.
- Easy to access but lacks full local IDE capabilities.
JetBrains Gateway approach:
- The IDE Server runs in OpenShift, handling all backend tasks (language processing, indexing, etc.).
- The Thin Client runs on the developer's local machine, providing a native IDE experience.
- Brings the power of local JetBrains IDEs with the flexibility of cloud environments.
Try the JetBrains local development integration
You can experience the JetBrains local development integration without needing to install OpenShift Dev Spaces on your machine. Follow these steps to get started.
Prerequisites
Before spinning up a cloud development environment (CDE), ensure you have:
- A Red Hat Developer Sandbox account: Sign up for free.
- OpenShift CLI: Follow the installation guide.
- Authenticated OpenShift login: Use the OpenShift CLI (
oc login). - JetBrains Gateway: Download and install JetBrains Gateway with the OpenShift Dev Spaces connector plug-in.
- Active JetBrains IDE license: This feature requires a paid JetBrains subscription.
Once the prerequisites are met (which you only need to do once), connecting to a remote CDE is simple:
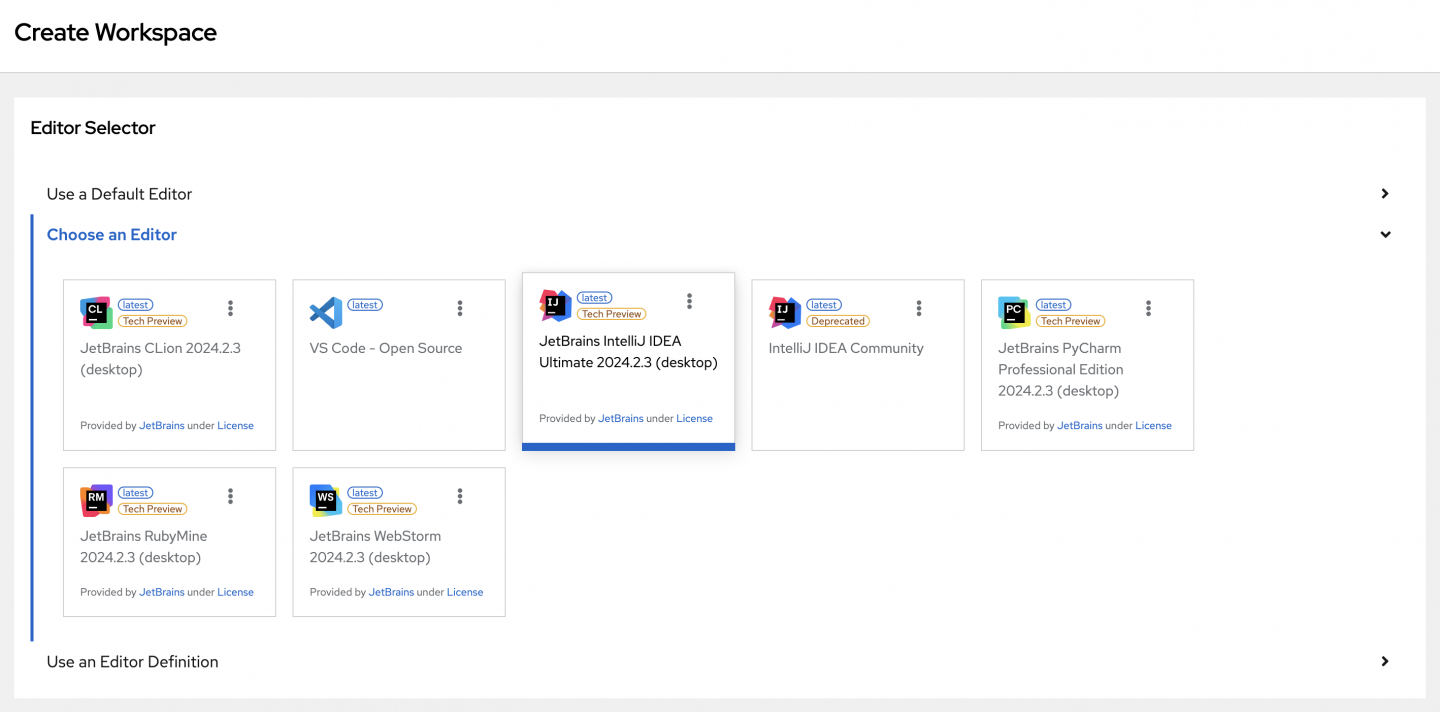
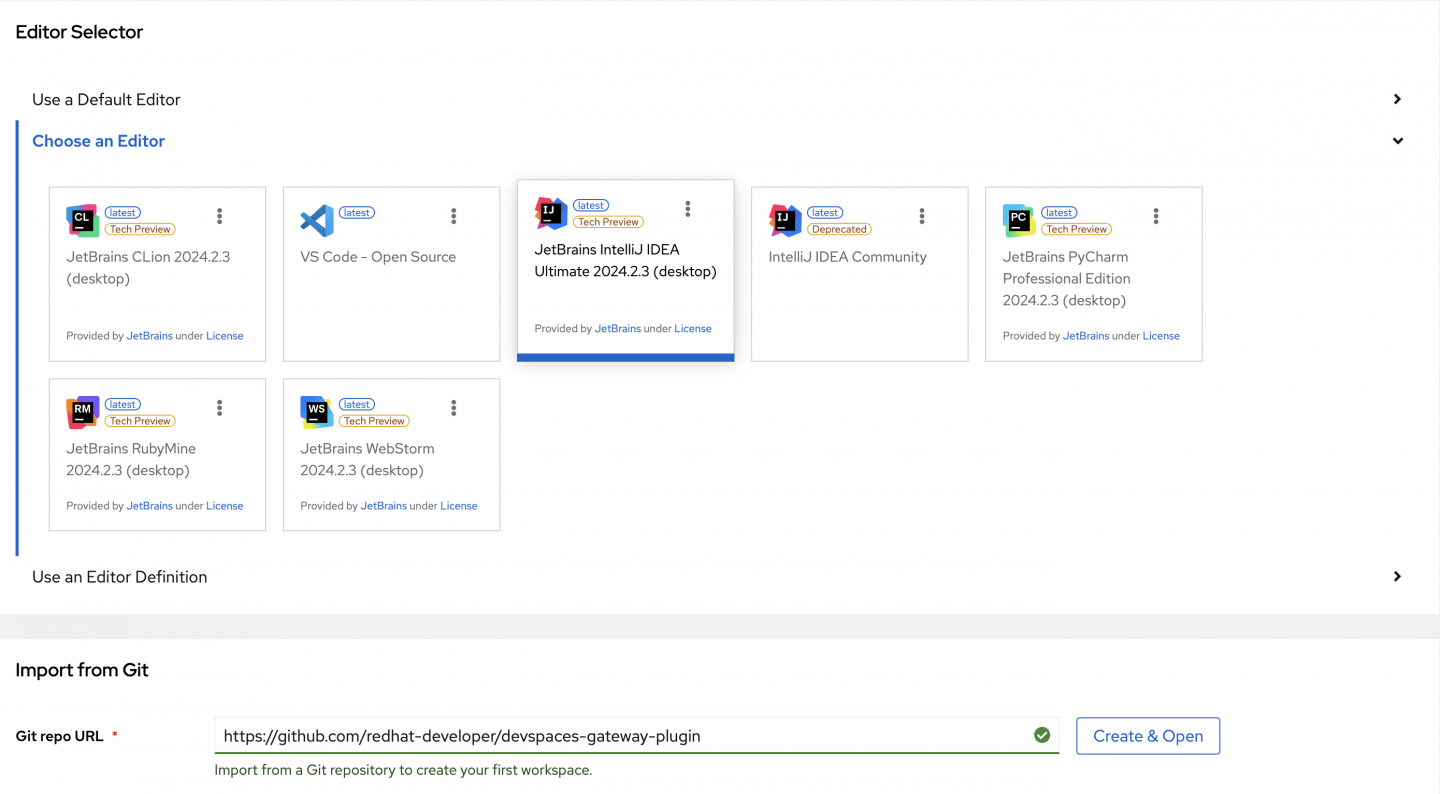
- Start a CDE. Open the OpenShift Dev Spaces Dashboard (in OpenShift), select a JetBrains IDE from the available list, and enter the source repository URL, as shown in Figure 3.

2. Initialize the CDE. During startup, OpenShift Dev Spaces:
- Downloads the selected JetBrains IDE binaries from JetBrains servers.
- Configures the IDE for a containerized environment.
- Launches the IDE inside the OpenShift cluster.
3. Authenticate and open Gateway: Once the CDE is running, your browser will prompt you to open JetBrains Gateway.
- Click Open Gateway button, shown in Figure 4, to launch the local Gateway application.

- This connects your JetBrains IDE Thin Client (Figure 5) to the remote CDE. All tasks and IDE processes, such as language processing, run on the remote server, while the user interface remains on the local machine. This setup provides a seamless development experience similar to a traditional local IDE, allowing users to download dependencies, index projects, and access full IDE features like syntax highlighting and code completion.

Note
If your OpenShift authentication token expires, you might need to login to your cluster again.
Let's try another example. This time, use the JetBrains WebStorm (Figure 6) and Node.js Runtime sample (Figure 7).


- Open the project in your local IDE: Click Open Gateway in the browser prompt.
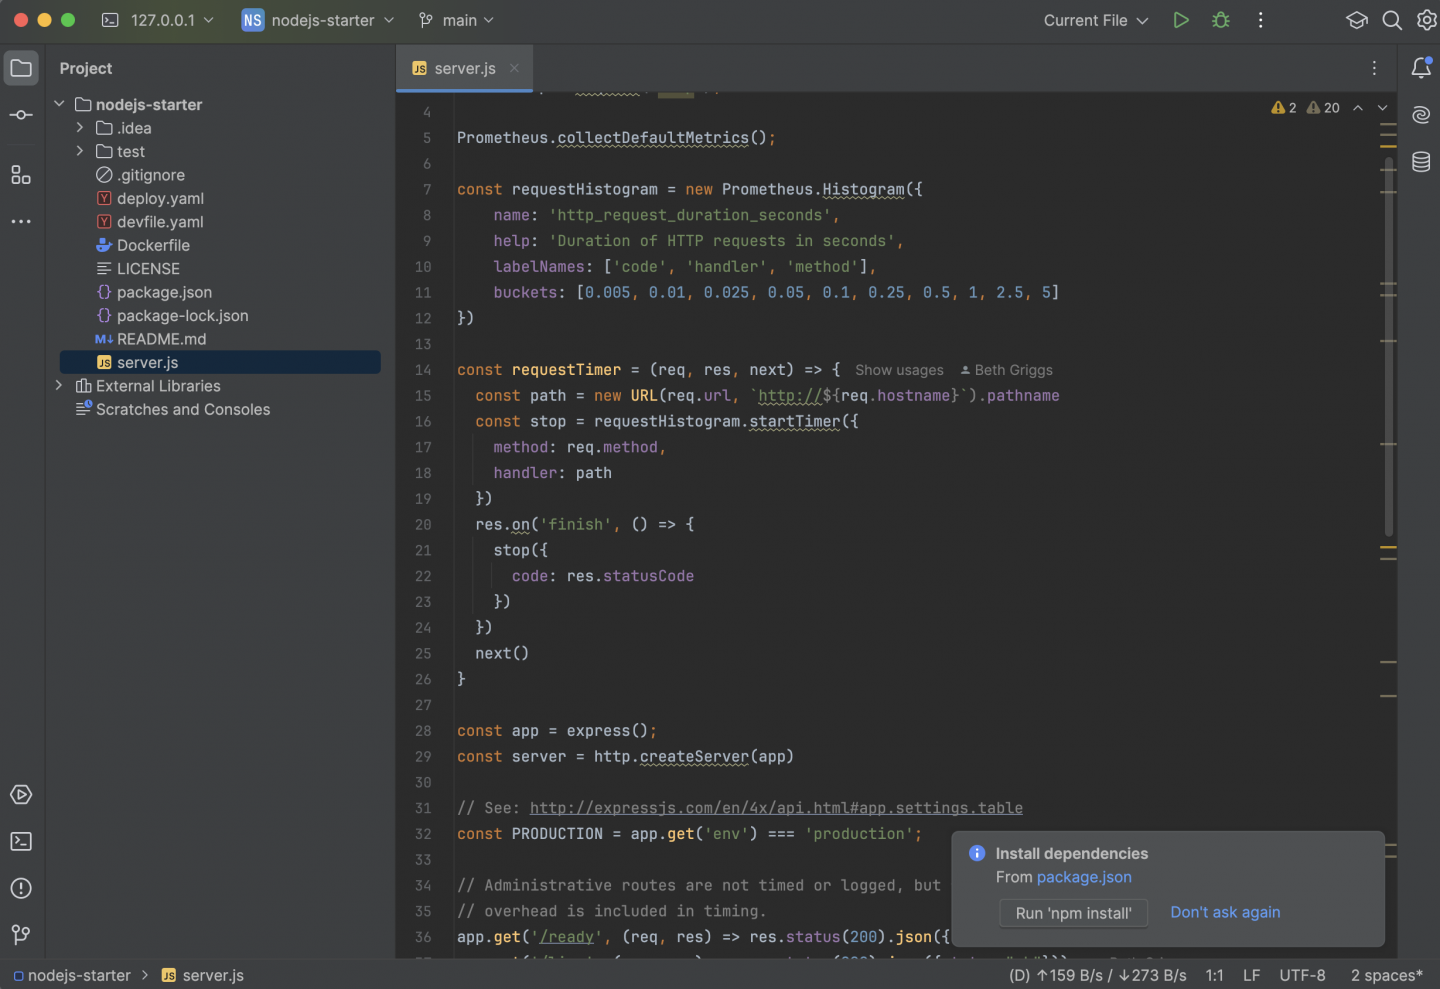
- Install dependencies: Click Run 'npm install' in WebStorm (Figure 8).

- Run your application: Click the Run button (Figure 9).

Your application will now start running inside the OpenShift cluster within your tools container.
Access the running application
Once the application starts, you will see a confirmation message that the application is running, as shown in Figure 10.

- Open the Backend Status Details window. See Figure 11.

- Add a Port Forwarding Rule to map the running application to your local machine.
- Access the app at
localhost:3000: JetBrains Gateway will forward your local request to the cloud-hosted container (Figure 12).

Verify the remote CDE connection
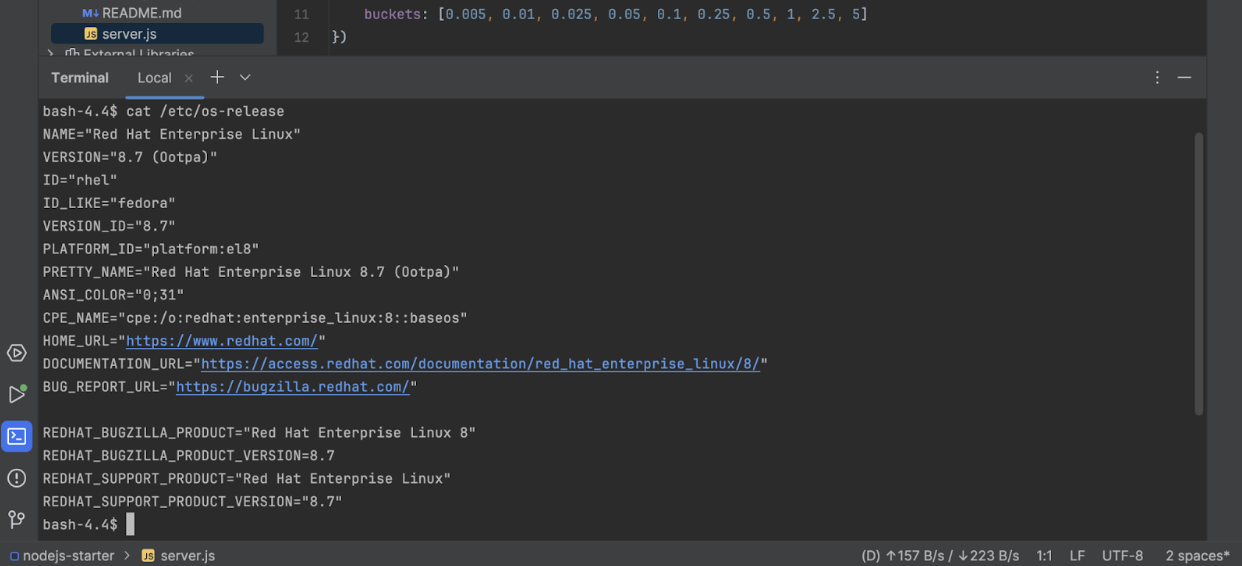
To confirm that your local IDE is correctly connected to the cloud-based CDE, open the JetBrains Terminal and run environment-specific commands. Figure 13 shows an example.

You're now developing locally with the power of cloud computing!
Connect to JetBrains Gateway without the OpenShift Dev Spaces dashboard
While the standard workflow works well for most cases, there is an alternative method for connecting to a remote CDE directly from your local machine without accessing the OpenShift Dev Spaces dashboard. This approach is particularly useful when a CDE with a JetBrains IDE is already running.
Steps to connect using JetBrains Gateway:
- Open JetBrains Gateway and click Connect to Dev Spaces.
- Click Check connection and continue to verify access.
- Select your CDE from the available list (Figure 14).
- Click Connect to establish the connection.

Once connected, JetBrains Gateway will launch the corresponding IDE and seamlessly link it to the selected CDE, providing a smooth, local-like development experience.
What’s next? Future improvements
At Red Hat, we are committed to enhancing the local development experience in OpenShift Dev Spaces. Some areas we are exploring include:
- Airgapped mode support: Enabling offline usage for enterprise environments.
- Full JetBrains IDE integration: Expanding support for all JetBrains IDEs.
- Faster CDE start-up: Caching both thin clients and headless IDE binaries to reduce initialization time.
- Multiple IDE connections: Allowing users to run multiple Thin Clients connected to different CDEs simultaneously.
- Enhanced image compatibility: Supporting a wider range of base images for user containers.
- Improved OpenShift DevSpaces integration: Adding features like devfile command execution, sidecar terminal access, and CDE management directly within JetBrains IDEs.
- Cluster login profiles: Enabling seamless switching between multiple OpenShift clusters.
- Better error handling and documentation: Improving troubleshooting guides and user experience.
Conclusion
The integration of JetBrains IDEs with OpenShift Dev Spaces represents a major step forward in cloud-native development. By combining the flexibility of cloud-hosted environments with the familiarity of local IDEs, this solution enables developers to work more efficiently while meeting enterprise security requirements.
With the Technology Preview in OpenShift Dev Spaces 3.19, we encourage you to explore, provide feedback, and help shape the future of local development within OpenShift. Stay tuned for more updates as we continue to improve and expand support!
Visit the OpenShift Dev Spaces product page to learn more.
Last updated: April 1, 2025