In this article, you will learn how to seamlessly automate the provisioning of Google Cloud Platform (GCP) resources using the new Red Hat Ansible modules and your Red Hat Ansible Tower credentials.
About the new GCP modules
Starting with Ansible 2.6, Red Hat has partnered with Google to ship a new set of modules for automating Google Cloud Platform resource management. The partnership has resulted in more than 100 GCP modules and a consistent naming scheme of gcp_*. While we still have access to the original modules, developers are recommended to use the newer modules whenever possible.
This article quickly gets you started with using the new modules in both Red Hat Ansible and Red Hat Ansible Tower. We'll start by connecting a Google Cloud Platform service account to your Red Hat Ansible Tower environment. We'll then be able to use Ansible Tower to run a simple Ansible playbook that will provision a new virtual machine (VM) disk, virtual private cloud (VPC) network, and IP address for an automated instance of Red Hat Enterprise Linux 8. You'll also see how to use Ansible Tower's Dynamic Inventory feature to discover the newly created Red Hat Enterprise Linux 8 instance on Google Cloud Platform.
Connect your GCP service account to Ansible Tower
This section assumes you already have a Google Cloud Platform service account. If you know your account details, the first thing to do is provide the authentication credentials to Ansible Tower. From the Ansible Tower console, select Credentials --> New Credential. Then select Google Compute Engine as the Credential Type. Figure 1 shows this sequence.

Figure 1. Select the credential type.">
Next, you are asked to provide the details of your Google Cloud Platform service account, as well as naming the project in which you plan to create resources. You can find all of this information in your Google Cloud Platform console.
Figure 2 shows the field where you will enter the email address associated with your Google Cloud Platform service account.

Figure 2. Enter the email address associated with your Google Cloud Platform service account">
Next, you'll be asked to enter the contents of the Privacy Enhanced Mail (PEM) file associated with your service account email address, as shown in Figure 3.

Figure 3. Enter the private key for your account.">
Finally, you'll enter the Google Cloud Platform project ID, as shown in Figure 4.

Figure 4. Enter the Google Cloud Platform project ID.">
If you prefer, you can upload a JSON file with your service account details instead of copying and pasting them in. Figure 5 shows the option to select and upload a JSON file.

Figure 5. Select and upload a JSON file.">
Figure 6 shows the Google Cloud Platform service account, associated email address, and project ID for the environment we've set up so far.

Figure 6. Configuration for the Google Cloud Platform service account.">
While it is not shown, I have also configured the Google Compute Engine API (compute.googleapis.com) to access the Google Cloud Platform project, and set the Identity and Access Management (IAM) role to Owner.
Create a new playbook for the Red Hat Enterprise Linux 8 instance
After configuring our environment, the next step is to create an Ansible playbook. We'll use the Ansible playbook to create a VM disk, a VPC network, an IPv4 address, and finally our new instance of Red Hat Enterprise Linux 8.
I'm showing the Ansible playbook in Figure 7 as a screenshot to preserve the indentation. You can also download the playbook and use it as an example.

Figure 7. The Ansible playbook to create a Red Hat Enterprise Linux 8 instance.">
Let's quickly look at each task in the playbook:
- Task 1: Create the VM disk: We can use a source image to create a VM disk and make the disk bootable. In this case, we'll use the certified Red Hat Enterprise Linux 8 image available from Google Cloud Platform. The
gcp_compute_diskmodule uses therhel-8-v20190905image to add a persistent disk for our Red Hat Enterprise Linux 8 instance. - Task 2: Create the VPC network: Next, the
gcp_compute_networkmodule creates a VPC network. The Red Hat Enterprise Linux instance will have an interface associated with that network. - Task 3: Create the IPv4 address: The
gcp_compute_addressmodule allocates an external IPv4 address to be associated with the Red Hat Enterprise Linux instance. - Task 4: Create the Red Hat Enterprise Linux instance: The
gcp_compute_instancemodule uses the resources from the previous tasks to create an instance of Red Hat Enterprise Linux 8. - Task 5: Check the IPv4 address: The debug module shows the IPv4 address associated with the Red Hat Enterprise Linux 8 instance.
Note that we will execute the playbook within Ansible Tower. We'll use the auth_kind attribute to reference the Google Cloud Platform credentials required for each task. We'll then use the gcp_cred_kind variable to map the tasks to our Google Cloud Platform serviceaccount.
During execution, Ansible Tower will use the GCP_AUTH_KIND environment variable to reference and pass the Google Cloud Platform service account's email, project, and private-key contents to the playbook.
Execute the playbook
Next, we want to create a new job template to execute the playbook in Ansible Tower. Before we can do that, we need to create an inventory and a project referencing the playbook. For this demo, the project is GCP and the inventory is GCP_Provision_Resources, as shown in Figure 8.

Figure 8. Create an inventory and a project referencing the playbook you want to run.">
Run the job template
Now, we can run the job template. Check the Google Cloud Platform console to see the new resources being created as each individual task is executed. From the job template output shown in Figure 9, you can see that the new resources were created.

Figure 9. Job template output shows the new resources have been created.">
You can also use the Google Cloud Platform console to verify the resources. In Figure 10, you can see the VM disk, disk-instance, was created with a size of 50 GB.
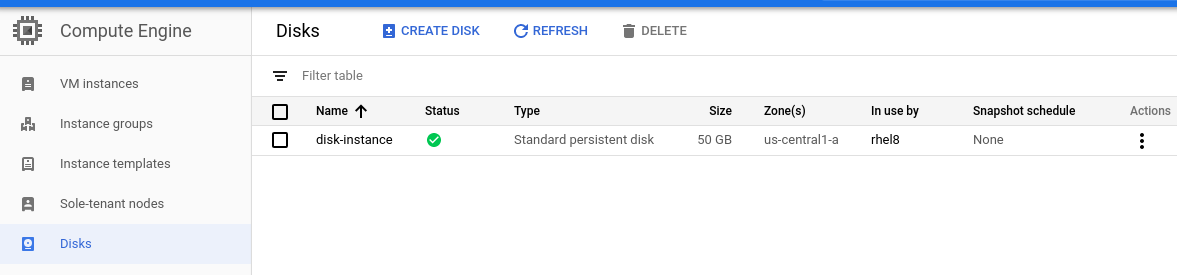
Figure 10. The VM disk has been created.">
Figure 11 shows that the VPC network, network-instance, was created on subnet 10.240.0.0/16.

Figure 11. The VPC network has been created.">
Figure 12 shows that the external public IPv4 address of 35.192.86.87 is associated with the newly created Red Hat Enterprise Linux 8 instance.
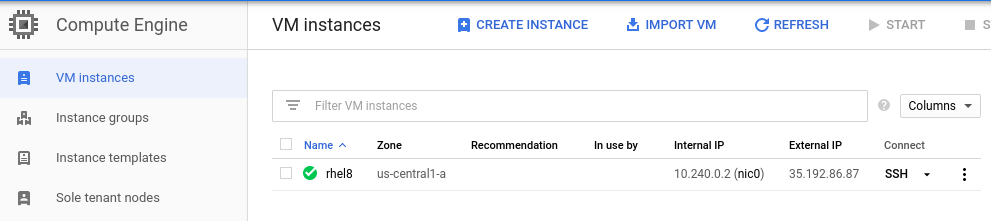
Finally, in Figure 13 we see that the new Red Hat Enterprise Linux 8 instance was created. The new instance, rhel8, has an internal IP address of 10.240.0.2 and a public external IP address of 35.192.86.87.
Create a dynamic inventory for GCP instances
Ansible Tower lets you periodically sync with the Google Cloud API to find realtime instance counts and details for resources hosted on Google Cloud Platform.
To create a new inventory, choose Google Compute Engine as the source, then select the Google Cloud Platform credential you created at the beginning of this article. Optionally, you can limit the sync to specific GCP regions, as shown in Figure 14.

Figure 14. Create a new inventory.">
Next, use the Inventory Sync button to synchronize the newly created instance rhel8 in the US Central (A) region.
Once synced, check the new hosts in the inventory. As you can see in Figure 15, the new instance is listed.

Figure 15. The new instance is listed.">
Conclusion
In this article, you've seen how to use the new gcp_* modules to automate the provisioning of resources on Google Cloud Platform. I also quickly showed you how to create a new dynamic inventory to periodically sync with the Google Cloud API and find realtime instance counts and details for resources hosted on Google Cloud Platform. Using the Dynamic Inventory feature is a recommended practice for large, fast-changing cloud environments where systems are frequently deployed, tested, and then removed.
Here is a video demonstration of the activities covered in this article.
Learn more
See the following resources to learn more about topics in this article:
Last updated: September 27, 2024