Single sign-on is often implemented with Keycloak. Few people know that Keycloak can also implement single sign-out, where logging out from one application causes Keycloak to log the user out of other applications. This article demonstrates how to enable single sign-out to clean up active sessions for security purposes. We implement these capabilities in Java and Spring Boot, but the principles apply to any language.
Single sign-on and single sign-out
Most users are familiar with single sign-on. Once the user logs in to one application, they no longer need to log in when using other applications on the same service. Figure 1 illustrates the benefits of single sign-on with two different applications, each requiring user authentication before gaining access.
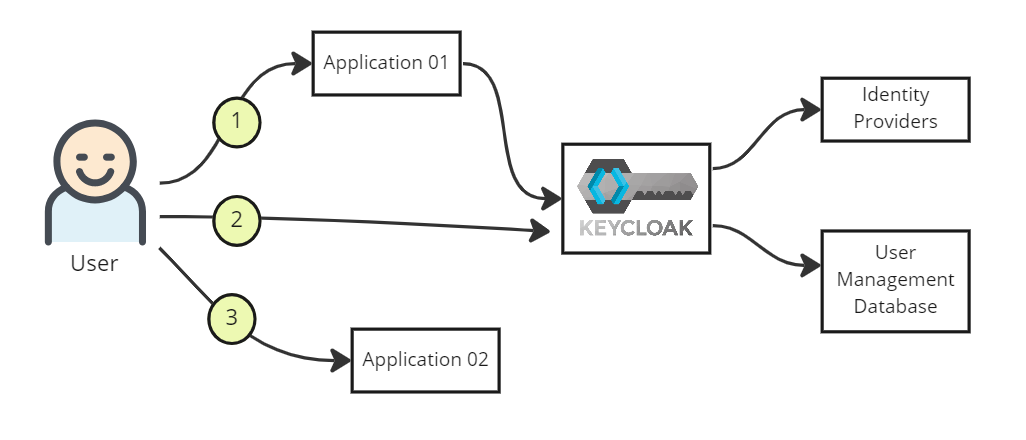
Single sign-on works as follows:
- The user visits Application 01's URL and presses the login button.
- The Keycloak login page pops up, prompting the user to log in.
- The user is redirected to Application 01's landing page when successfully logged in.
- Users who visit Application 02's URL within a reasonable amount of time don't have to log in again.
In single sign-out, the user logs out from either application and is logged out from the other automatically, almost immediately. There are several ways to achieve this logout mechanism, such as through OpenID Connect (OIDC).
Back-channel vs. front-channel logout
Before proceeding, you should understand the difference between a back-channel and a front-channel logout. This article implements back-channel logout because it is less subject to problems.
A back-channel logout takes place between Keycloak and its clients. Keycloak detects a user's logout and sends a request containing a logout token to all clients where the user is logged in. The important aspect of back-channel is that it does not rely on a browser. Figure 2 illustrates this operation.
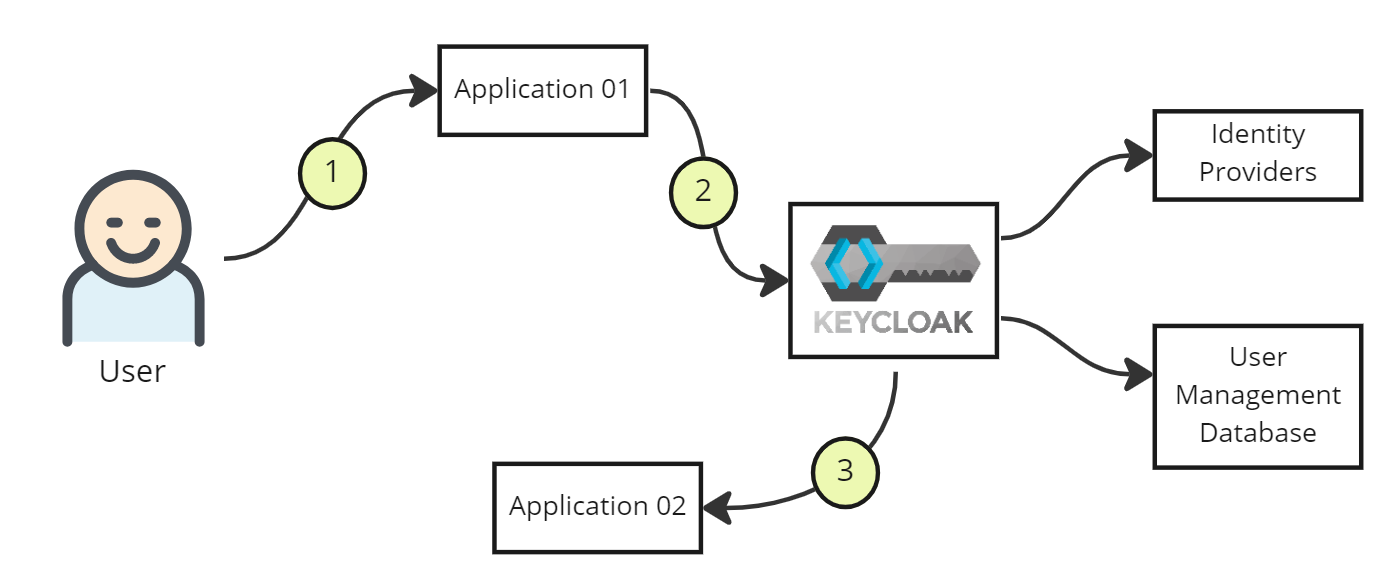
Back-channel logout operates as follows:
- The user presses the logout button in Application 01.
- Application 01 clears out the user's session while informing Keycloak that the user is logging out.
- Keycloak invokes Application 02's logout endpoint, asking it to remove the user's session.
In contrast, a front-channel logout relies on the browser with an iframe in the browser window that contains the application's logout URL within Keycloak's logout page. Figure 3 illustrates the intended operation.
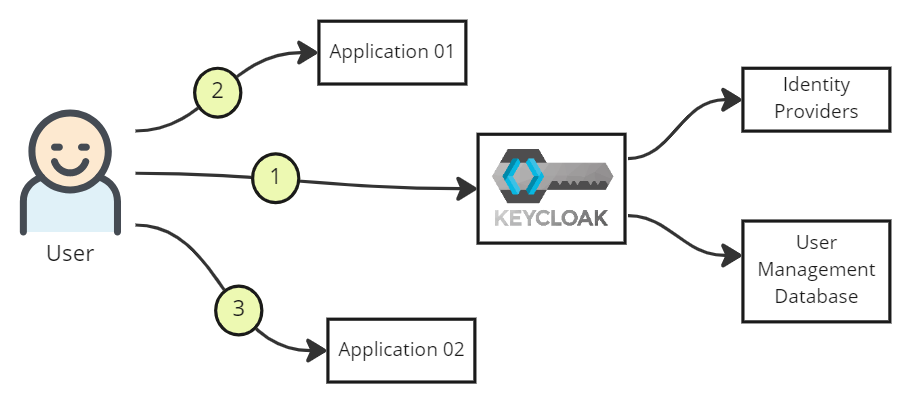
Front-channel logout operates as follows:
- The user goes to Keycloak's logout URL and presses the logout button.
- The user's browser triggers a logout from the Application 01 URL from an iframe.
- Almost simultaneously, the browser triggers a logout from the Application 02 URL from another iframe within the same page.
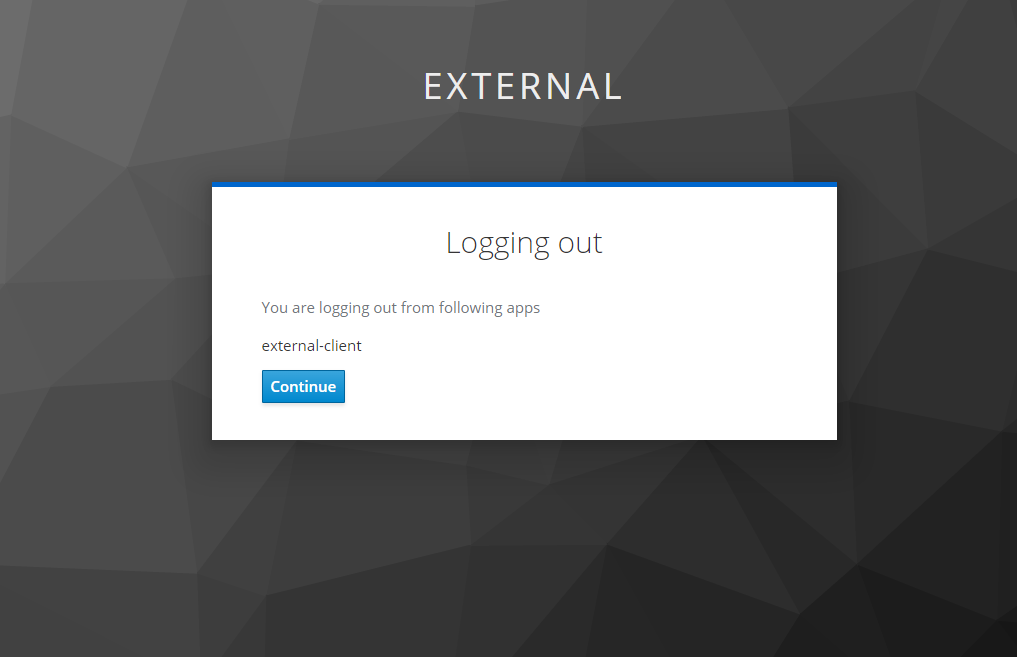
Figure 4 displays a typical user interface for a Keycloak front-channel logout.
Various surprises, such as the browser's security policy blocking requests, might happen in a front-channel logout. Therefore, this article implements back-channel logout. We'll see how to configure it and how applications can handle Keycloak's logout API requests. For this example, we use a standalone Keycloak instance listening at port 8080 and a Spring Boot application listening at port 8081.
Keycloak configuration
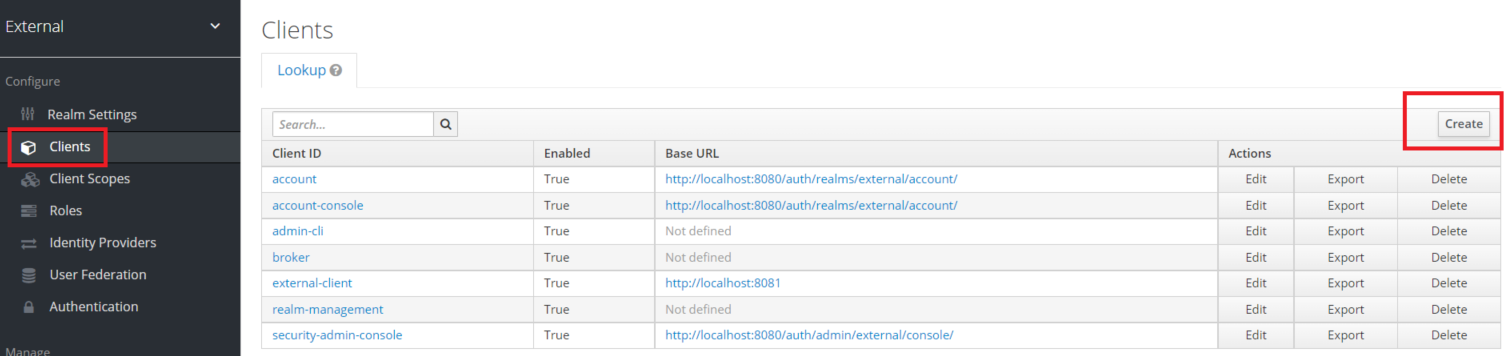
First, you need to open a browser and create a client on Keycloak admin page. Figure 5 displays the screen where you can do this.
Set the Client ID to external-client and the protocol to openid-connect. Press the Save button (Figure 6).

You can now configure the new Keycloak Client. Use the settings in Table 1.
|
Client ID |
external-client |
|
Enabled |
ON |
|
Client protocol |
openid-connect |
|
Access type |
confidential |
|
Standard flow enabled |
ON |
|
Direct access grants enabled |
ON |
|
Valid redirect URIs |
|
|
Base URL |
|
|
Backchannel logout URL |
|
|
Backchannel logout session required |
ON |
|
Backchannel logout revokes offline sessions |
ON |
Press the Save button to store your configuration.
Application configuration
Now create a simple Spring Boot application, starting with a pom.xml file shown as follows:
<?xml version="1.0" encoding="UTF-8"?>
<project xmlns="http://maven.apache.org/POM/4.0.0"
         xmlns:xsi="http://www.w3.org/2001/XMLSchema-instance"
         xsi:schemaLocation="http://maven.apache.org/POM/4.0.0 http://maven.apache.org/xsd/maven-4.0.0.xsd">
    <modelVersion>4.0.0</modelVersion>

    <groupId>org.edw</groupId>
    <artifactId>keycloak-backchannel-logout</artifactId>
    <version>1.0-SNAPSHOT</version>

    <properties>
        <maven.compiler.source>11</maven.compiler.source>
        <maven.compiler.target>11</maven.compiler.target>
        <project.build.sourceEncoding>UTF-8</project.build.sourceEncoding>
    </properties>

    <parent>
        <groupId>org.springframework.boot</groupId>
        <artifactId>spring-boot-starter-parent</artifactId>
        <version>2.2.6.RELEASE</version>
        <relativePath/>
    </parent>

    <dependencyManagement>
        <dependencies>
            <dependency>
                <groupId>org.keycloak.bom</groupId>
                <artifactId>keycloak-adapter-bom</artifactId>
                <version>19.0.2</version>
                <type>pom</type>
                <scope>import</scope>
            </dependency>
        </dependencies>
    </dependencyManagement>

    <dependencies>
        <!-- spring boot -->
        <dependency>
            <groupId>org.keycloak</groupId>
            <artifactId>keycloak-spring-boot-starter</artifactId>
        </dependency>
        <dependency>
            <groupId>org.springframework.boot</groupId>
            <artifactId>spring-boot-starter-web</artifactId>
        </dependency>

        <!-- spring security -->
        <dependency>
            <groupId>org.springframework.boot</groupId>
            <artifactId>spring-boot-starter-security</artifactId>
        </dependency>
        <dependency>
            <groupId>org.keycloak</groupId>
            <artifactId>keycloak-spring-security-adapter</artifactId>
        </dependency>

        <!-- storing session in external db -->
        <dependency>
            <groupId>mysql</groupId>
            <artifactId>mysql-connector-java</artifactId>
            <version>8.0.18</version>
        </dependency>
        <dependency>
            <groupId>org.springframework.session</groupId>
            <artifactId>spring-session-jdbc</artifactId>
            <version>2.2.6.RELEASE</version>
        </dependency>
        <dependency>
            <groupId>org.springframework.boot</groupId>
            <artifactId>spring-boot-starter-data-jpa</artifactId>
        </dependency>
    </dependencies>

    <build>
        <plugins>
            <plugin>
                <groupId>org.springframework.boot</groupId>
                <artifactId>spring-boot-maven-plugin</artifactId>
            </plugin>
        </plugins>
    </build>
</project>
Also, create an application.properties file. For this sample application, I'm using MySQL. So I need to put MySQL credentials here:
### server port
server.port=8081
spring.application.name=Keycloak for Backchannel

### Keycloak Configuration
keycloak.auth-server-url=http://localhost:8080/auth/
keycloak.realm=external
keycloak.resource=external-client
keycloak.public-client=false
keycloak.bearer-only=false
keycloak.principal-attribute=preferred_username
keycloak.credentials.secret=xxxxxxxxx
keycloak.use-resource-role-mappings=true
keycloak.confidential-port=8081
keycloak.ssl-required=none

spring.main.allow-bean-definition-overriding=true

logging.level.root=warn
logging.level.com.edw=debug

server.forward-headers-strategy=NATIVE

spring.session.jdbc.flush-mode=on_save
spring.session.jdbc.initialize-schema=always

spring.datasource.driver-class-name=com.mysql.cj.jdbc.Driver
spring.datasource.url=jdbc:mysql://127.0.0.1:3306/db_session
spring.datasource.username=root
spring.datasource.password=password
Next, you need to create a database named db_session containing two tables. These tables are needed to maintain the application sessions, especially if this application has multiple instances:
create table db_session.spring_session
(
	PRIMARY_ID char(36) not null
		primary key,
	SESSION_ID char(36) not null,
	CREATION_TIME bigint not null,
	LAST_ACCESS_TIME bigint not null,
	MAX_INACTIVE_INTERVAL int not null,
	EXPIRY_TIME bigint not null,
	PRINCIPAL_NAME varchar(100) null,
	constraint SPRING_SESSION_IX1
		unique (SESSION_ID)
);

create index SPRING_SESSION_IX2
	on db_session.spring_session (EXPIRY_TIME);

create index SPRING_SESSION_IX3
	on db_session.spring_session (PRINCIPAL_NAME);

create table db_session.spring_session_attributes
(
	SESSION_PRIMARY_ID char(36) not null,
	ATTRIBUTE_NAME varchar(200) not null,
	ATTRIBUTE_BYTES blob not null,
	primary key (SESSION_PRIMARY_ID, ATTRIBUTE_NAME),
	constraint SPRING_SESSION_ATTRIBUTES_FK
	foreign key (SESSION_PRIMARY_ID) references db_session.spring_session (PRIMARY_ID)
		on delete cascade
);
Note: Storing HTTP sessions in your database might negatively impact your application's performance. Therefore, consider other session storing mechanisms for production deployment, such as Infinispan.
Once you set up your database, you can create your application's logout mechanism. But first, you must understand how the Keycloak logout mechanism works and the parameters available for logging out.
Basically, every time a client triggers a logout to Keycloak, Keycloak issues a REST API call to all clients it has registered, instructing the clients to log out their sessions for the corresponding user. The REST API call resembles the following:
POST /sso-logout HTTP/1.1
Content-Length: 920
Content-Type: application/x-www-form-urlencoded
Host: localhost:8081
Connection: Keep-Alive
Accept-Encoding: gzip,deflate

logout_token=eyJhbGciOiJSUzI1NiIsInR5cCIgOiAiSldUIiwia2lkIiA6ICJaMHl
nYnpDZzJFSWstX0hLbWNtbllodk91RmpaazZ5ZG9mek5BNF8xQnNzIn0.eyJpYXQiOjE
2NjYzNjI4MTksImp0aSI6IjEyYjRmNWY5LWJhZDYtNDQ4MS1hMGUzLWRmMjEzN2U5MmUxY
iIsImlzcyI6Imh0dHA6Ly9sb2NhbGhvc3Q6ODA4MC9hdXRoL3JlYWxtcy9leHRlcm5hbCI
sImF1ZCI6ImV4dGVybmFsLWNsaWVudCIsInN1YiI6IjRhMzI0ODY0LTkwNDUtNGY2Mi05N
jE1LTc5MTdlZDg1NTk1MyIsInR5cCI6IkxvZ291dCIsInNpZCI6ImRkY2ZiZjc0LTYxZG
EtNGViNS1iZjBiLTM4MTAyYzdiMzUzNCIsImV2ZW50cyI6eyJodHRwOi8vc2NoZW1hcy
5vcGVuaWQubmV0L2V2ZW50L2JhY2tjaGFubmVsLWxvZ291dCI6e30sInJldm9rZV9vZmZs
aW5lX2FjY2VzcyI6dHJ1ZX19.LE34JQnUL2jZKuwlHwgeDnBNnBiacfvJJYpK7_B2bMfMe
SUmmOLQ6M3yRlt3nOT4r-AqkStwwFeUA6Io8iuDcQ87eBwoDEYqyJEV9DDduEW8dx8KNMA
Tqh_dQFgvq_aqk8P0U2Ap_DjZCCOTtgXTo3solavq2eL2shWLHni5uvSYpY8DLg73SH-n
WRp9j2_rjuVGupwSDTmTzftC9zN6_KcURTLgpal9UWr40kSbIa5knSbftcBjzTanLJynR
xfX1LckzCine9533h_HQHwqd-LAD3-SFRIkZeMVvv3-BVVubtyXL6VGdB-XLokzRGGh2j
d8sgMnEtqNFa8Ih3Iw0A
The content of the logout token is a JSON web token (JWT) with a session ID variable (sid) which matches the session ID from the first JWT token granted to a user when they successfully log in.
Now you need a Java class to handle the logout API call. The class that follows captures Keycloak's session ID in your session database and removes the ID when Keycloak calls your logout endpoint:
@RestController
public class IndexController {

    private Logger logger = LoggerFactory.getLogger(this.getClass());

    @Autowired
    private JdbcTemplate jdbcTemplate;

    @GetMapping(path = "/")
    public HashMap index(KeycloakAuthenticationToken authentication, HttpSession httpSession) {
        SimpleKeycloakAccount account = (SimpleKeycloakAccount) authentication.getDetails();
        AccessToken token = account.getKeycloakSecurityContext().getToken();
        httpSession.setAttribute(token.getSessionId(), token.getPreferredUsername());

        return new HashMap(){{
            put("hello", token.getPreferredUsername());
        }};
    }

    @PostMapping(path = "/sso-logout", produces = MediaType.APPLICATION_JSON_VALUE)
    public HashMap logout(@RequestParam("logout_token") String logoutToken) throws Exception {

        String[] splitString = logoutToken.split("\\.");
        String body = new String(java.util.Base64.getDecoder().decode(splitString[1]));

        ObjectMapper mapper = new ObjectMapper();
        HashMap bodyMap = mapper.readValue(body, HashMap.class);

        logger.debug("logging out {}", bodyMap.get("sid"));

        jdbcTemplate.update("DELETE FROM `spring_session` " +
                "WHERE `PRIMARY_ID` = (SELECT `PRIMARY_ID` FROM `spring_session_attributes` WHERE `ATTRIBUTE_NAME` = ?)",
                new Object[] { bodyMap.get("sid") });

        return new HashMap(){{
            put("status", true);
        }};
    }
}
Next, set up Keycloak as your default security configuration:
@KeycloakConfiguration
@EnableGlobalMethodSecurity(prePostEnabled = true)
public class KeycloakSecurityConfiguration extends KeycloakWebSecurityConfigurerAdapter {

    @Autowired
    public void configureGlobal(AuthenticationManagerBuilder auth) throws Exception {
        KeycloakAuthenticationProvider keycloakAuthenticationProvider = keycloakAuthenticationProvider();
        keycloakAuthenticationProvider.setGrantedAuthoritiesMapper(new SimpleAuthorityMapper());
        auth.authenticationProvider(keycloakAuthenticationProvider);
    }

    @Bean
    @Override
    protected SessionAuthenticationStrategy sessionAuthenticationStrategy() {
        return new RegisterSessionAuthenticationStrategy(new SessionRegistryImpl());
    }

    @Bean
    public org.keycloak.adapters.KeycloakConfigResolver KeycloakConfigResolver() {
        return new KeycloakSpringBootConfigResolver();
    }

    @Override
    protected void configure(HttpSecurity http) throws Exception{
        super.configure(http);
        http
                .logout()
                .logoutRequestMatcher(new AntPathRequestMatcher("/logout"))
                .logoutSuccessUrl("http://localhost:8080/auth/realms/external/protocol/openid-connect/logout?redirect_uri=http://localhost:8081/")
                .and()
                .authorizeRequests()
                .antMatchers("/sso-logout**").permitAll()
                .antMatchers("/").authenticated()
                .and().csrf().disable();
    }
}
You are all set. For the complete source code, please visit my GitHub respository for Keycloak Backchannel Logout.
Validating single sign-out
To see whether your application is handling Keycloak logout requests properly, start by logging in. Open your browser and visit your application's URL (localhost:8081). It should redirect you to Keycloak's login page (localhost:8080). A successful login brings you back to your application's landing page, displaying your username.
To log out, open a new tab within the same browser as your application's landing page, and enter the following URL:
http://localhost:8080/auth/realms/external/protocol/openid-connect/logout?redirect_uri=http://localhost:8081/
This action clears your session ID from Keycloak and your application. If you visit your application URL (localhost:8081) again, you will have to log in.
Single sign-out is a Keycloak feature
This article demonstrated how to implement single sign-out in Java. Applications in any language can handle the REST API call and JWT passed by Keycloak to clean up user sessions.
Last updated: July 31, 2023