Redhat Developers  Logo
  • Products

    Featured

    • Red Hat Enterprise Linux
      Red Hat Enterprise Linux Icon
    • Red Hat OpenShift AI
      Red Hat OpenShift AI
    • Red Hat Enterprise Linux AI
      Linux icon inside of a brain
    • Image mode for Red Hat Enterprise Linux
      RHEL image mode
    • Red Hat OpenShift
      Openshift icon
    • Red Hat Ansible Automation Platform
      Ansible icon
    • Red Hat Developer Hub
      Developer Hub
    • View All Red Hat Products
    • Linux

      • Red Hat Enterprise Linux
      • Image mode for Red Hat Enterprise Linux
      • Red Hat Universal Base Images (UBI)
    • Java runtimes & frameworks

      • JBoss Enterprise Application Platform
      • Red Hat build of OpenJDK
    • Kubernetes

      • Red Hat OpenShift
      • Microsoft Azure Red Hat OpenShift
      • Red Hat OpenShift Virtualization
      • Red Hat OpenShift Lightspeed
    • Integration & App Connectivity

      • Red Hat Build of Apache Camel
      • Red Hat Service Interconnect
      • Red Hat Connectivity Link
    • AI/ML

      • Red Hat OpenShift AI
      • Red Hat Enterprise Linux AI
    • Automation

      • Red Hat Ansible Automation Platform
      • Red Hat Ansible Lightspeed
    • Developer tools

      • Red Hat Trusted Software Supply Chain
      • Podman Desktop
      • Red Hat OpenShift Dev Spaces
    • Developer Sandbox

      Developer Sandbox
      Try Red Hat products and technologies without setup or configuration fees for 30 days with this shared Openshift and Kubernetes cluster.
    • Try at no cost
  • Technologies

    Featured

    • AI/ML
      AI/ML Icon
    • Linux
      Linux Icon
    • Kubernetes
      Cloud icon
    • Automation
      Automation Icon showing arrows moving in a circle around a gear
    • View All Technologies
    • Programming Languages & Frameworks

      • Java
      • Python
      • JavaScript
    • System Design & Architecture

      • Red Hat architecture and design patterns
      • Microservices
      • Event-Driven Architecture
      • Databases
    • Developer Productivity

      • Developer productivity
      • Developer Tools
      • GitOps
    • Secure Development & Architectures

      • Security
      • Secure coding
    • Platform Engineering

      • DevOps
      • DevSecOps
      • Ansible automation for applications and services
    • Automated Data Processing

      • AI/ML
      • Data Science
      • Apache Kafka on Kubernetes
      • View All Technologies
    • Start exploring in the Developer Sandbox for free

      sandbox graphic
      Try Red Hat's products and technologies without setup or configuration.
    • Try at no cost
  • Learn

    Featured

    • Kubernetes & Cloud Native
      Openshift icon
    • Linux
      Rhel icon
    • Automation
      Ansible cloud icon
    • Java
      Java icon
    • AI/ML
      AI/ML Icon
    • View All Learning Resources

    E-Books

    • GitOps Cookbook
    • Podman in Action
    • Kubernetes Operators
    • The Path to GitOps
    • View All E-books

    Cheat Sheets

    • Linux Commands
    • Bash Commands
    • Git
    • systemd Commands
    • View All Cheat Sheets

    Documentation

    • API Catalog
    • Product Documentation
    • Legacy Documentation
    • Red Hat Learning

      Learning image
      Boost your technical skills to expert-level with the help of interactive lessons offered by various Red Hat Learning programs.
    • Explore Red Hat Learning
  • Developer Sandbox

    Developer Sandbox

    • Access Red Hat’s products and technologies without setup or configuration, and start developing quicker than ever before with our new, no-cost sandbox environments.
    • Explore Developer Sandbox

    Featured Developer Sandbox activities

    • Get started with your Developer Sandbox
    • OpenShift virtualization and application modernization using the Developer Sandbox
    • Explore all Developer Sandbox activities

    Ready to start developing apps?

    • Try at no cost
  • Blog
  • Events
  • Videos

A demonstration of Drogue IoT using Node.js

August 18, 2022
Daniel Bevenius
Related topics:
RustNode.jsOpen source
Related products:
Red Hat build of Node.js

Share:

    The goal of the Drogue IoT project is to make it easy to connect devices to cloud-based applications. This article will demonstrate how to implement firmware in Rust based on Drogue's device support. This way, a device can communicate with the cloud using the low power LoRaWAN protocol. We will also illustrate how Node.js handles the server side.

    The purpose of Drogue IoT

    Many open source technologies already exist in the realm of messaging and the Internet of Things ( IoT). However, technologies change over time, and not everything that exists now is fit for the world of tomorrow. For instance, C and C++ still have issues with memory safety. The concepts of cloud native, serverless, and pods might also need a different approach to designing cloud-side applications. Drogue IoT aims to help support these new environments.

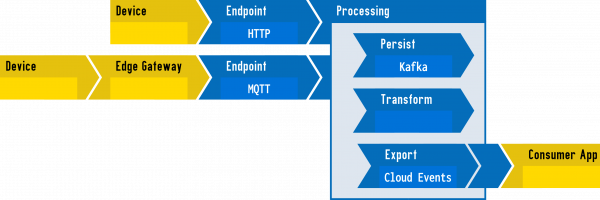
    Drogue Device is a firmware framework written in Rust with an actor-based programming model. Drogue Cloud is a thin layer of services that creates an IoT-friendly API for existing technologies such as Knative and Apache Kafka and a cloud-friendly API using CloudEvents on the other side. The idea is to give you an overall solution ready to run IoT as a service. Figure 1 illustrates the Drogue IoT architecture.

    An illustration of devices sending data that is transformed and exported.
    Figure 1: Devices send data using standard protocols of Drogue Cloud, where they are transformed and exported.

    LoRaWAN network coverage

    LoRaWAN is a low-power wireless network that enables you to run a device on batteries for months, sending telemetry data to the cloud every now and then. To achieve this efficient connectivity, you need LoRaWAN network coverage, and The Things Network (TTN) provides exactly that. You can extend the TTN network by running your gateway if your local area lacks coverage. TTN provides a public service that allows you to exchange data between devices and applications.

    Drogue Device

    Exchanging data with Drogue Device is easy. The following snippet focuses on the code  that exchanges data:

    let mut tx = String::<heapless::consts::U32>::new();
    let led = match self.config.user_led.state().unwrap_or_default() {
        true => "on",
        false => "off",
    };
    write!(&mut tx, "ping:{},led:{}", self.counter, led).ok();
    let tx = tx.into_bytes();
    
    let mut rx = [0; 64];
    let result = cfg
        .lora
        .request(LoraCommand::SendRecv(&tx, &mut rx))
        .unwrap()
        .await;

    Notice the await keyword at the end? Yes, that is indeed asynchronous Rust. A hardware access layer (HAL) named Embassy, another Drogue IoT project, allows the program to run on the device, which in this example is an embedded STM32 Cortex-M0 board. Thanks to Embassy and the drivers in Drogue Device, asynchronous programming becomes pretty simple. And thanks to Rust, your code is less likely to cause any undefined behavior, like corrupted memory.

    Node.js

    The cloud side of the IoT application needs a simple "reconcile loop." The device reports its current state, and you derive the desired state from that. The information received might result in a command you send back to the device.

    The application in this article is pretty much the same as connect-quarkus-applications-drogue-iot-and-lorawan written by Jens Reimann. But his version uses the Quarkus Java framework as the backend implementation, whereas our application uses Node.js.

    The entry point of the application is index.js, which configures and starts an HTTP server and an MQTT client. The HTTP server serves content from the static directory, which contains an index.html file shown in the screenshot below. This file contains a <script> element that uses Server Sent Events (SSE) to allow the server to send updates to it. In addition to serving the static content, the  HTTP server sends events through SSE. Fastify builds the server, and fastify-sse handles the SSE.

    The MQTT client handles a message event as follows:

    client.on('message', (receiveTopic, message) => {
        const json = JSON.parse(message);
        const framePayload = Buffer.from(json.data.uplink_message.frm_payload, 'base64');
    
        const event = {
          deviceId: json.device,
          timestamp: json.time,
          payload: framePayload.toString('utf8')
        };
        sse.sendMessageEvent(event);
    
        if (event.payload.startsWith('ping')) {
          const command = {
            deviceId: event.deviceId,
            payload: getPayload(event, sse)
          };
          sse.updateResponse(sse.lastResponse);
          sse.sendCommandEvent(command);
    
          const sendTopic = `command/${appName}/${command.deviceId}/port:1`;
          const responsePayload = Buffer.from(command.payload, 'utf8');
          client.publish(sendTopic, responsePayload, {qos: QOS_AT_LEAST_ONCE});
        }
      });

    Pretty simple, isn't it? For more details on the Node.js implementation, please see the ttn-lorawan workshop.

    Drogue Cloud

    So far, the code shown in this article is fairly straightforward, focusing on our use case. However, we are missing a big chunk in the middle. How do we connect Node.js with the actual device? Sure, we could recreate all that ourselves, implementing the TTN API, registering devices, and processing events. Alternatively, we could simply use Drogue Cloud and let it do the plumbing for us.

    Creating a new application and device is easy using the drg command-line tool. Installation instructions are on the drg installation page:

    $ drg create application my-app
    $ drg create device --app my-app my-device

    The device registry in Drogue Cloud not only stores device information but can also reconcile with other services. Adding the following information makes it sync with TTN:

    $ drg create application my-app --spec '{
        "ttn": {
                "api": {
                    "apiKey": "...",
                    "owner": "my-ttn-username",
                "region": "eu1"
                }
        }
    }'
    $ drg create --app my-app device my-device --spec '{
        "ttn": {
            "app_eui": "0123456789ABCDEF",
            "dev_eui": "ABCDEF0123456789",
                "app_key": "0123456789ABCDEF...",
            "frequency_plan_id": "...",
            "lorawan_phy_version": "PHY_V1_0",
                "lorawan_version": "MAC_V1_0"
        }
    }'

    This code creates a new TTN application, registers the device, sets up a webhook, creates the gateway configuration in Drogue Cloud, and ensures that credentials are present and synchronized.

    Learn more in the LoRaWAN end-to-end workshop

    Did that seem a bit fast? Yes, indeed! This is a lot of information for a single article, so we focused on the essential parts. We put together everything you need to know in the LoRaWAN end-to-end workshop, which provides more detail and background information. By the end of that workshop, you should have a web front-end to control your device, as shown in Figure 2. Most importantly, you will have a solid foundation for creating your own applications on top of Drogue IoT.

    A screenshot of the application displaying messages received from the device.
    Figure 2: The application displays messages received from the device.


    We hope you enjoyed this article. Now, you are ready to get started with Node.js and Drogue IoT. To learn more about what Red Hat is up to on the Node.js front, please explore our Node.js topic page.

    Last updated: August 14, 2023

    Related Posts

    • Connect Quarkus applications with Drogue IoT and LoRaWAN

    • Connect IoT devices with Drogue IoT and OpenShift Streams for Apache Kafka

    • LoRaWAN setup at the EclipseCon IoT playground

    • Building Containerized IoT solutions on OpenShift Lab

    Recent Posts

    • Assessing AI for OpenShift operations: Advanced configurations

    • OpenShift Lightspeed: Assessing AI for OpenShift operations

    • OpenShift Data Foundation and HashiCorp Vault securing data

    • Axolotl meets LLM Compressor: Fast, sparse, open

    • What’s new for developers in Red Hat OpenShift 4.19

    What’s up next?

    10 tips for nodejs cheat sheet tile card

    Run secure and efficient Node.js applications on OpenShift and other container environments. This cheat sheet rounds up 10 tips to help you learn best practices and get up to speed quickly.

    Get the cheat sheet
    Red Hat Developers logo LinkedIn YouTube Twitter Facebook

    Products

    • Red Hat Enterprise Linux
    • Red Hat OpenShift
    • Red Hat Ansible Automation Platform

    Build

    • Developer Sandbox
    • Developer Tools
    • Interactive Tutorials
    • API Catalog

    Quicklinks

    • Learning Resources
    • E-books
    • Cheat Sheets
    • Blog
    • Events
    • Newsletter

    Communicate

    • About us
    • Contact sales
    • Find a partner
    • Report a website issue
    • Site Status Dashboard
    • Report a security problem

    RED HAT DEVELOPER

    Build here. Go anywhere.

    We serve the builders. The problem solvers who create careers with code.

    Join us if you’re a developer, software engineer, web designer, front-end designer, UX designer, computer scientist, architect, tester, product manager, project manager or team lead.

    Sign me up

    Red Hat legal and privacy links

    • About Red Hat
    • Jobs
    • Events
    • Locations
    • Contact Red Hat
    • Red Hat Blog
    • Inclusion at Red Hat
    • Cool Stuff Store
    • Red Hat Summit

    Red Hat legal and privacy links

    • Privacy statement
    • Terms of use
    • All policies and guidelines
    • Digital accessibility

    Report a website issue