Redhat Developers  Logo
  • AI

    Get started with AI

    • Red Hat AI
      Accelerate the development and deployment of enterprise AI solutions.
    • AI learning hub
      Explore learning materials and tools, organized by task.
    • AI interactive demos
      Click through scenarios with Red Hat AI, including training LLMs and more.
    • AI/ML learning paths
      Expand your OpenShift AI knowledge using these learning resources.
    • AI quickstarts
      Focused AI use cases designed for fast deployment on Red Hat AI platforms.
    • No-cost AI training
      Foundational Red Hat AI training.

    Featured resources

    • OpenShift AI learning
    • Open source AI for developers
    • AI product application development
    • Open source-powered AI/ML for hybrid cloud
    • AI and Node.js cheat sheet

    Red Hat AI Factory with NVIDIA

    • Red Hat AI Factory with NVIDIA is a co-engineered, enterprise-grade AI solution for building, deploying, and managing AI at scale across hybrid cloud environments.
    • Explore the solution
  • Learn

    Self-guided

    • Documentation
      Find answers, get step-by-step guidance, and learn how to use Red Hat products.
    • Learning paths
      Explore curated walkthroughs for common development tasks.
    • Guided learning
      Receive custom learning paths powered by our AI assistant.
    • See all learning

    Hands-on

    • Developer Sandbox
      Spin up Red Hat's products and technologies without setup or configuration.
    • Interactive labs
      Learn by doing in these hands-on, browser-based experiences.
    • Interactive demos
      Click through product features in these guided tours.

    Browse by topic

    • AI/ML
    • Automation
    • Java
    • Kubernetes
    • Linux
    • See all topics

    Training & certifications

    • Courses and exams
    • Certifications
    • Skills assessments
    • Red Hat Academy
    • Learning subscription
    • Explore training
  • Build

    Get started

    • Red Hat build of Podman Desktop
      A downloadable, local development hub to experiment with our products and builds.
    • Developer Sandbox
      Spin up Red Hat's products and technologies without setup or configuration.

    Download products

    • Access product downloads to start building and testing right away.
    • Red Hat Enterprise Linux
    • Red Hat AI
    • Red Hat OpenShift
    • Red Hat Ansible Automation Platform
    • See all products

    Featured

    • Red Hat build of OpenJDK
    • Red Hat JBoss Enterprise Application Platform
    • Red Hat OpenShift Dev Spaces
    • Red Hat Developer Toolset

    References

    • E-books
    • Documentation
    • Cheat sheets
    • Architecture center
  • Community

    Get involved

    • Events
    • Live AI events
    • Red Hat Summit
    • Red Hat Accelerators
    • Community discussions

    Follow along

    • Articles & blogs
    • Developer newsletter
    • Videos
    • Github

    Get help

    • Customer service
    • Customer support
    • Regional contacts
    • Find a partner

    Join the Red Hat Developer program

    • Download Red Hat products and project builds, access support documentation, learning content, and more.
    • Explore the benefits

Deploy Helm charts with Jenkins CI/CD in Red Hat OpenShift 4

May 24, 2021
Shailendra Kumar Singh
Related topics:
CI/CDDevOpsKubernetes
Related products:
Red Hat OpenShift

    Helm is a package manager for Kubernetes. Helm uses a packaging format called charts, which include all of the Kubernetes resources that are required to deploy an application, such as deployments, services, ingress, etc. Helm charts are very useful for installing applications and performing upgrades on a Kubernetes cluster.

    In this article, I will show you how to deploy a Helm chart using Jenkins continuous integration and continuous delivery (CI/CD) and Red Hat OpenShift 4. Figure 1 shows a high-level view of the process.
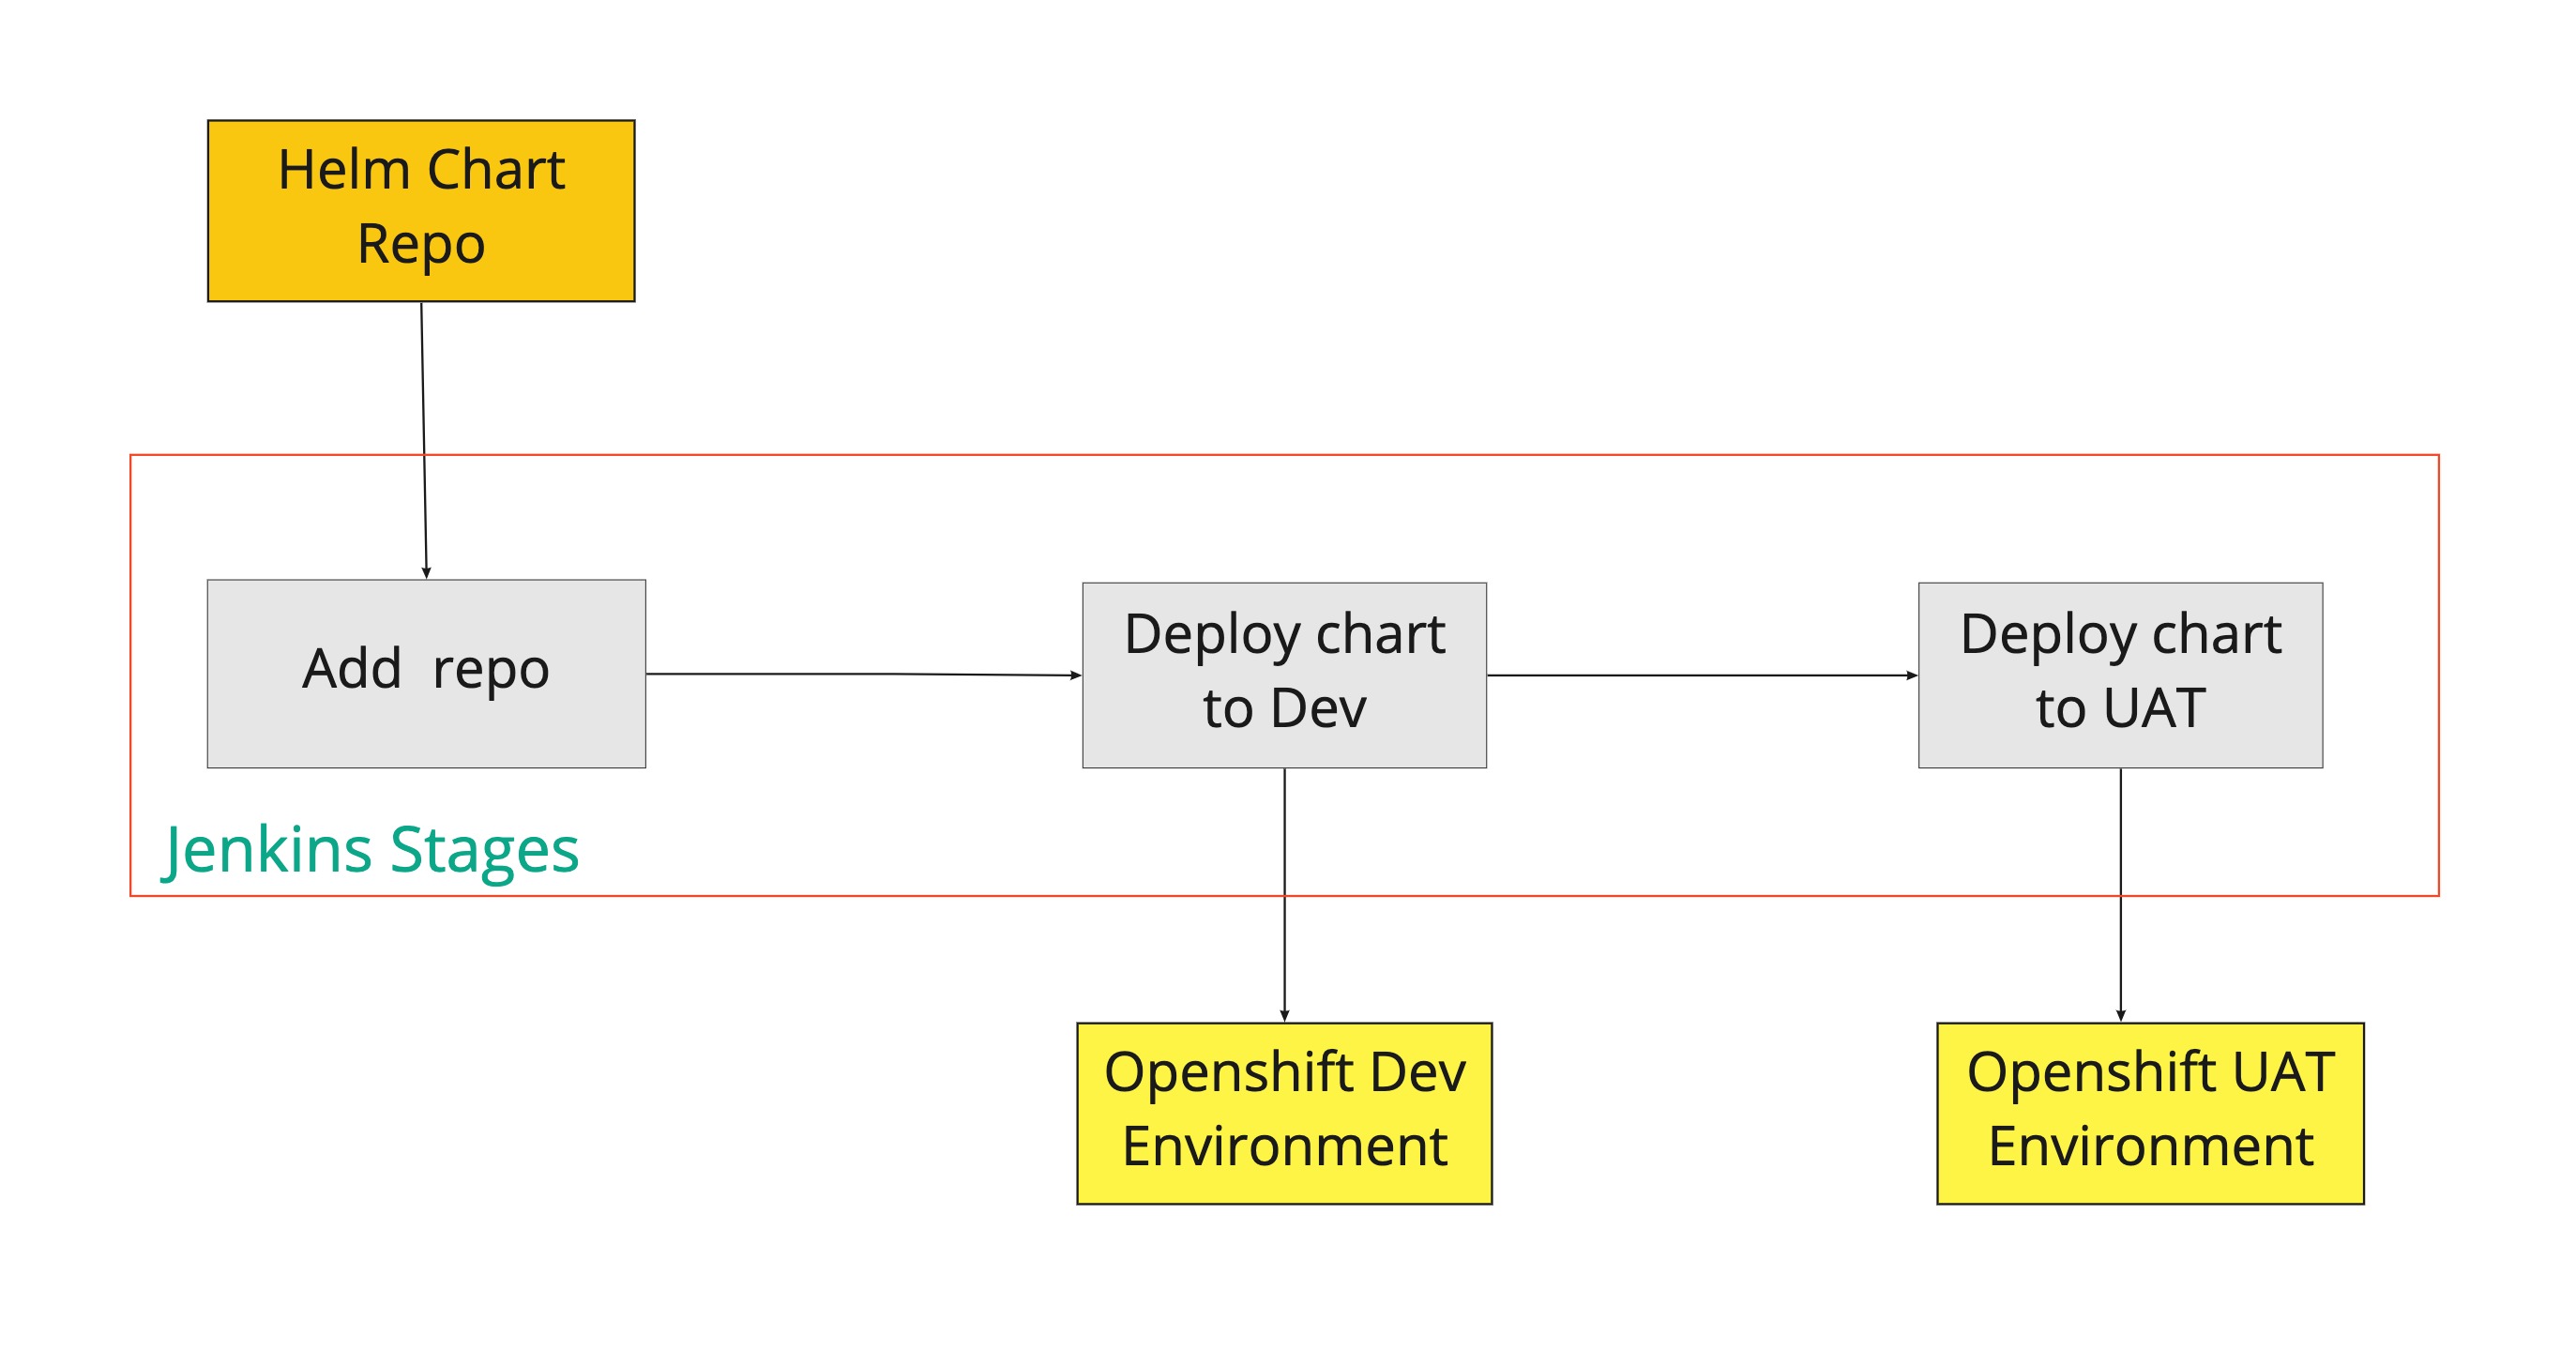
    Diagram showing how a Helm chart is deployed to Red Hat OpenShift with Jenkins CI/CD.
    Deploying Helm charts with Jenkins CI/CD.
    Figure 1: Deploying Helm charts with Jenkins CI/CD.

    Prerequisites

    You will need to install the following technologies before beginning this exercise:

    • Red Hat OpenShift Container Platform 4.6
    • Helm 3 command-line interface (CLI)

    Deploy Jenkins

    First, install Jenkins using either a template or the Developer Catalog on OpenShift:

    1. Assuming you have OpenShift Container Platform 4 in your development environment, navigate to Developer perspective in the OpenShift web console.
    2. Select Add from the Developer Catalog and search for Jenkins, then click Instantiate Template, as shown in Figure 2.
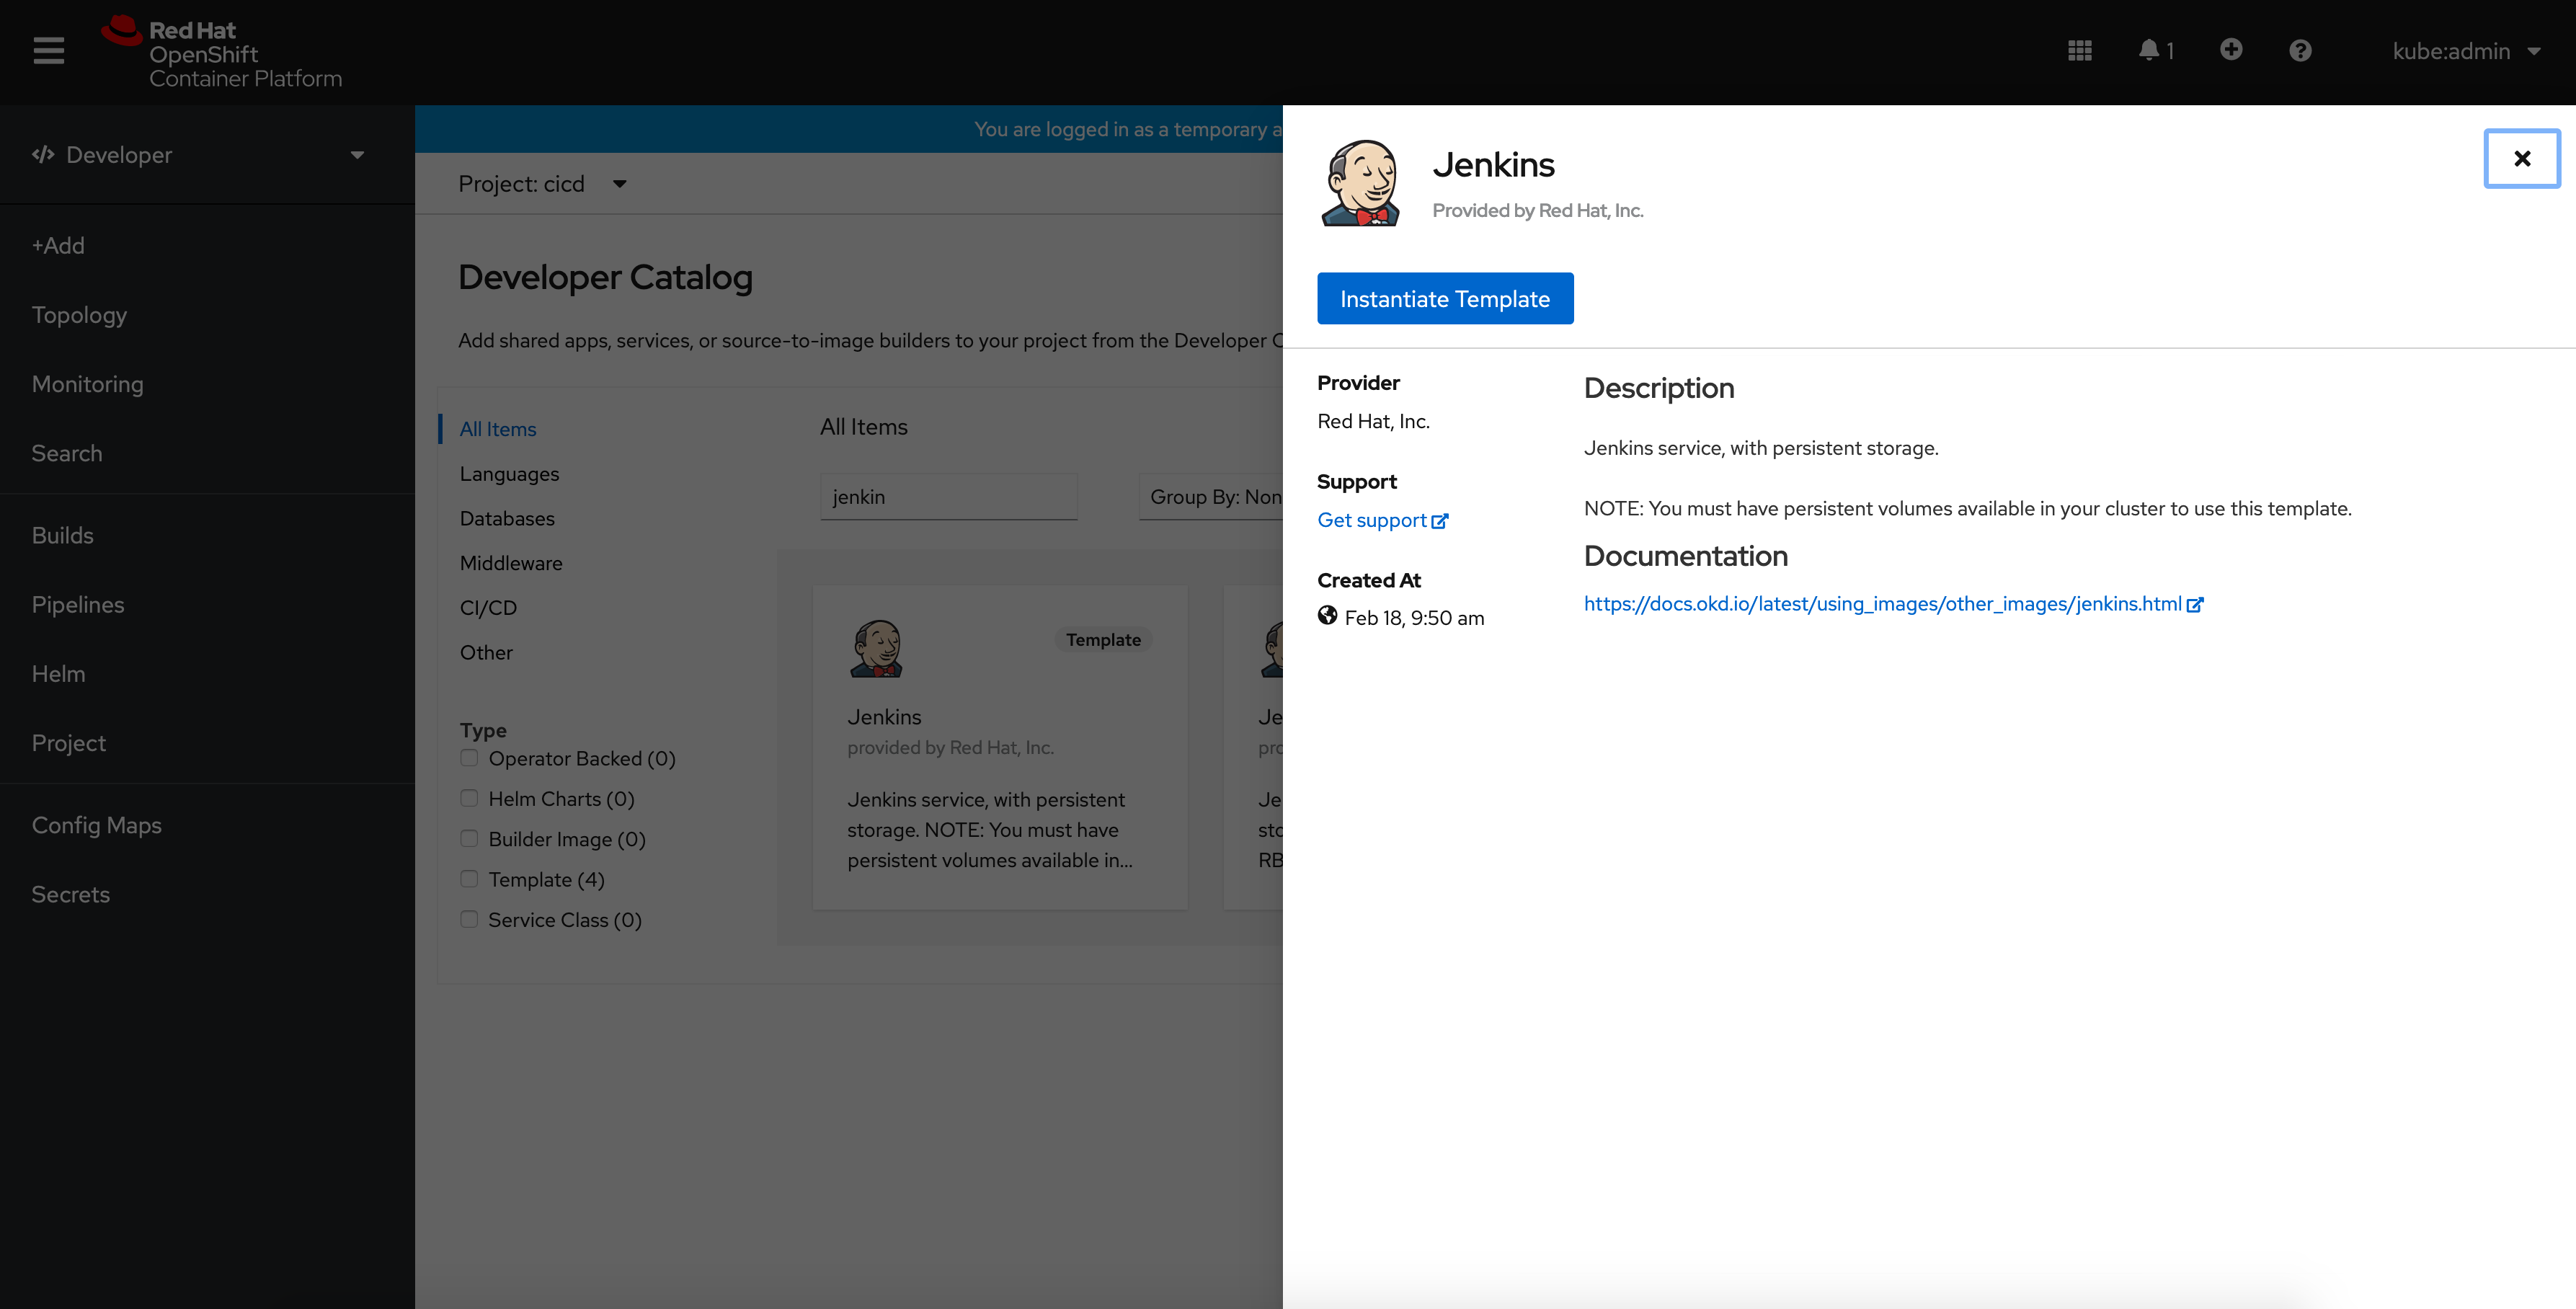
    Screenshot showing how to install Jenkins using the Developer Catalog on Red Hat OpenShift.
    Figure 2: Install Jenkins using the Developer Catalog on OpenShift.

    Create a Jenkins agent image with the Helm client

    This is required to run the helm CLI command in containers.

    To create the agent with the Helm client, we will use ose-jenkins-agent-base as the base image:

    1. Create the Dockerfile:
      FROM registry.redhat.io/openshift4/ose-jenkins-agent-base
      
      COPY helm /usr/bin/helm  ---> untar helm-linux-amd64.tar.gz(Helm 3 CLI) to get helm client. 
      RUN chmod +x /usr/bin/helm
    2. Build the image:
      podman build -t quay.io/<User-ID>/jenkins-helm-agent:v0.1 .
    3. Push the image to the repository:
      podman push quay.io/<USER-ID>/jenkins-helm-agent:v0.1

    Note: You can also push the image to the OpenShift internal image registry.

    Configure pod templates in Jenkins

    Next, configure the pod templates for the new Helm agent:

    1. Open the Jenkins console. Click Manage Jenkins —> Manage Nodes and Clouds —> Configure Clouds.
    2. Add new pod templates for the Helm agent and enter helm in the Name and Labels fields, as shown in Figure 3.
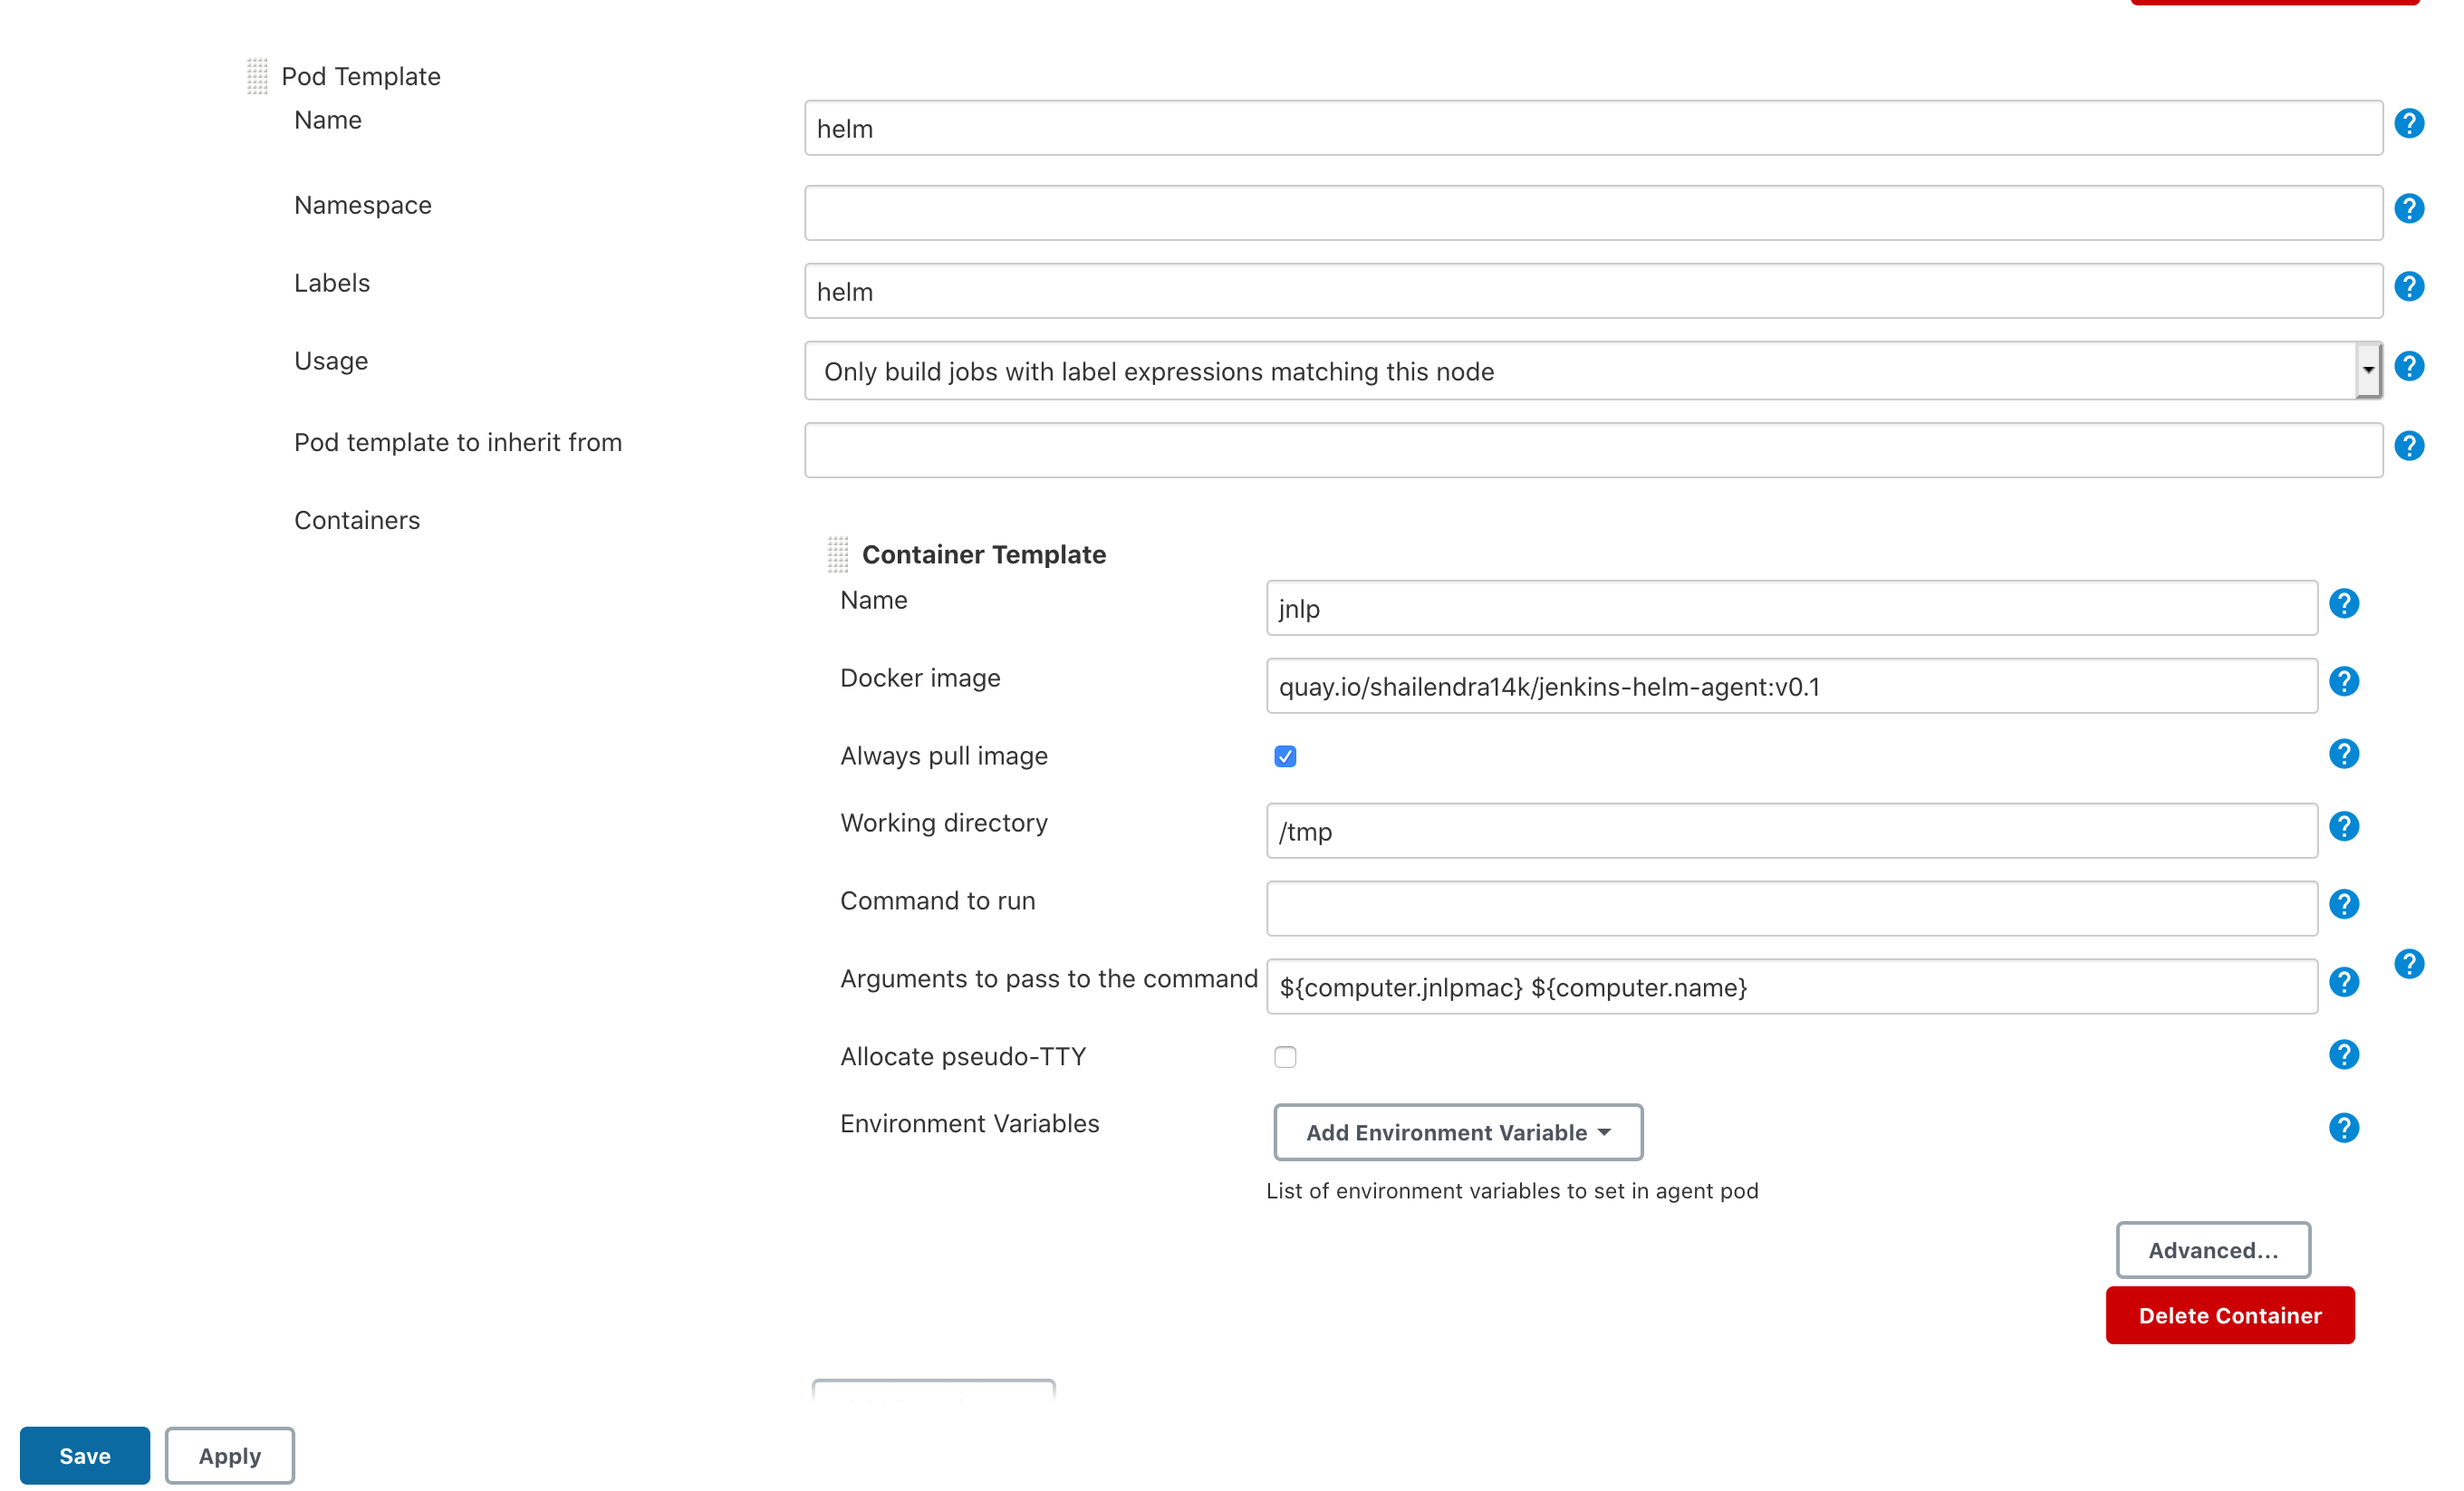
    Screenshot showing how to add new pod templates for the Helm agent; "helm" has been entered in the Name and Labels fields.
    Figure 3: Configuring the Helm agent in the pod template.

    Build the Jenkins pipeline stages

    Build the pipeline stages:

    1. Add the repo:
      stage("add Repo") {
                          steps {
                                 sh "helm repo add shailendra ${repo}"
                              }
                         }


    2. Deploy the chart to DEV/UAT:
      stage("Deploy to Dev") {
                              steps {
                                  script{
      					openshift.withCluster(){
                                              sh "helm upgrade --install my-guestbook shailendra/guestbook --values dev/values.yaml -n dev --wait"
                                          }
                                      }
                                  }
                          }

    Sample Jenkinsfile:

    def repo="https://shailendra14k.github.io/sample-helm-chart/"
    pipeline{
    		agent{
    			label 'helm'
    		}
    		stages{
    				
                    stage("add Repo") {
                            steps {
                                   sh "helm repo add shailendra ${repo}"
                                }
                        }
    				stage("Deploy to Dev") {
                            steps {
                                script{
    					openshift.withCluster(){
                                            sh "helm upgrade --install helm-app shailendra/sample-app --values dev/values.yaml -n dev --wait"
                                        }
                                    }
                                }
                        }
                    stage("Deploy to UAT") {
                            steps {
                                script{
    					openshift.withCluster(){
                                            sh "helm upgrade --install helm-app shailendra/sample-app --values uat/values.yaml -n uat --wait"
                                        }
                                    }
                                }
                        }
                }
            }

    Deploy the pipeline

    Now, you can deploy the pipeline:

    1. Open the Jenkins console and click New Item.
    2. Enter the name and select Pipeline.
    3. Go to the Pipeline tab.
    4. Select Pipeline script from SCM and provide the GitHub link that points to the Jenkinsfile: https://github.com/shailendra14k/sample-helm-chart.git. See Figure 4.
    Screenshot showing the Pipeline tab. Select Pipeline script from SCM is selected and the GitHub link that points to the Jenkinsfile is specified.
    Figure 4: Adding the GitHub link to the Jenkinsfile in the Pipeline tab.

    Run and verify the pipeline

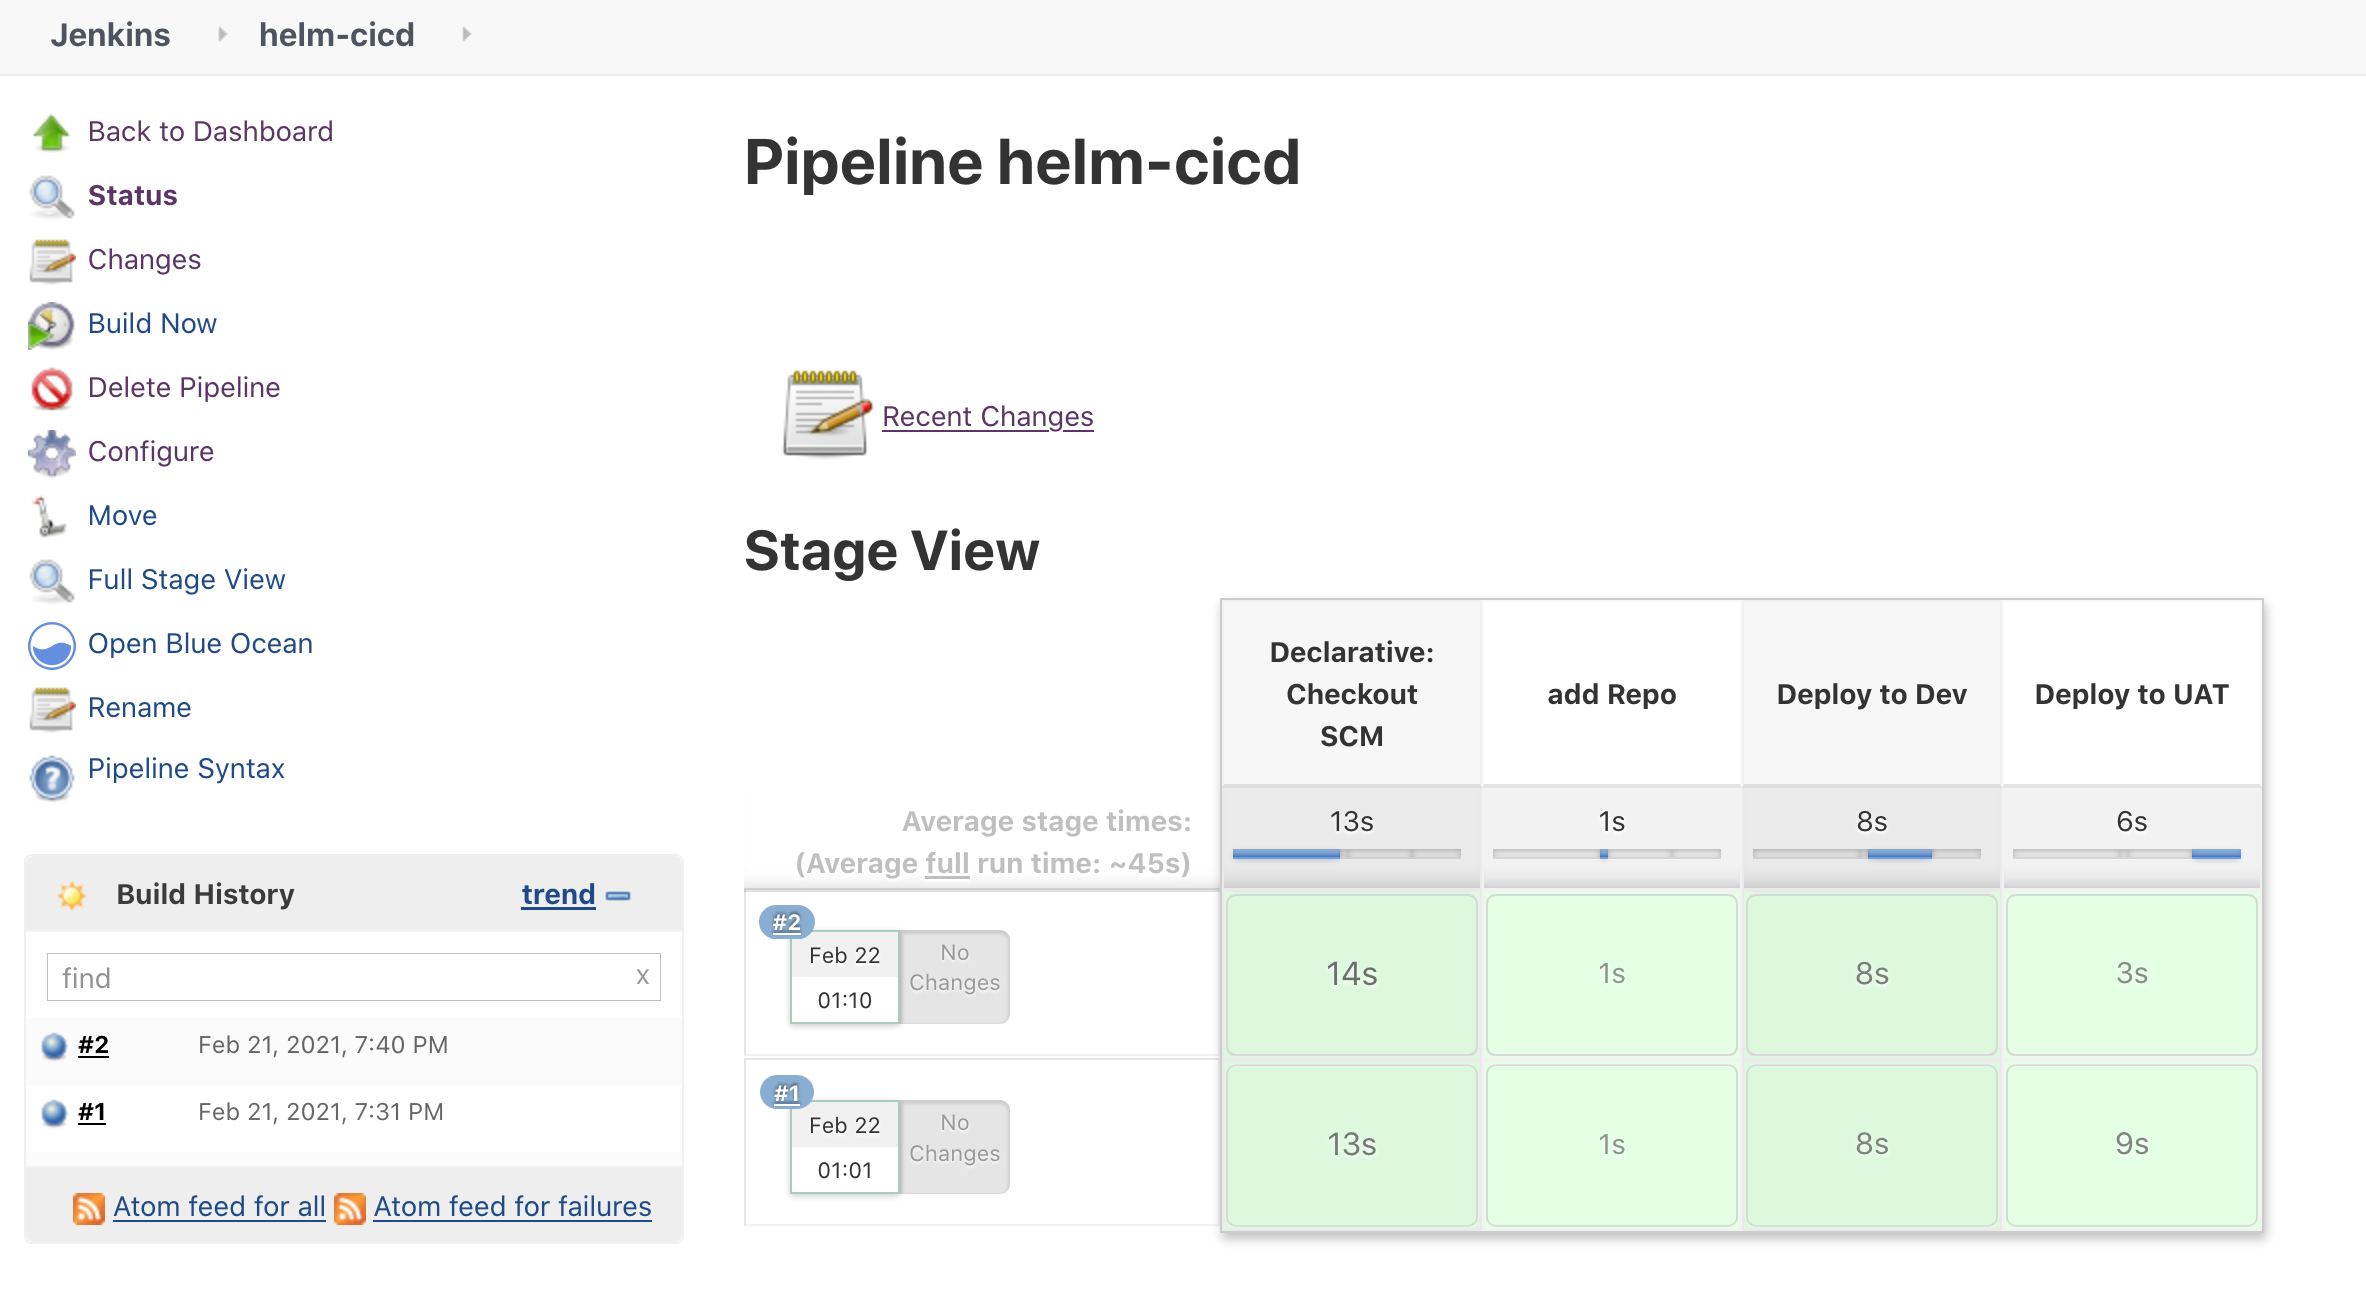
    Finally, run and verify the pipeline:

    1. Run the pipeline by clicking Build Now (see Figure 5) and then verify the output.
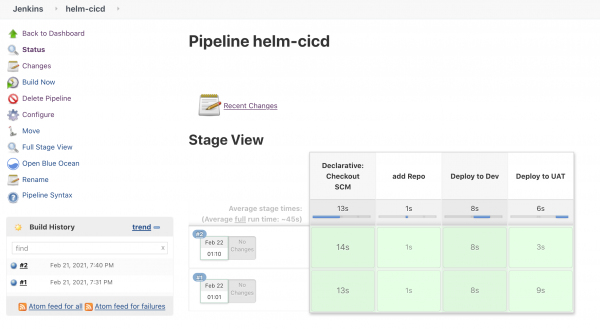
      Screenshot of the Jenkins console described in this section.
      Figure 5: Running the pipeline.
    2. Verify application deployment on the DEV namespace:
      oc get all -n dev
      NAME                                       READY   STATUS    RESTARTS   AGE
      pod/helm-app-sample-app-7b6bd8f757-bqzq7   1/1     Running   0          92s
      
      NAME                          TYPE        CLUSTER-IP     EXTERNAL-IP   PORT(S)    AGE
      service/helm-app-sample-app   ClusterIP   172.30.20.99           6379/TCP   92s
      
      NAME                                  READY   UP-TO-DATE   AVAILABLE   AGE
      deployment.apps/helm-app-sample-app   1/1     1            1           92s
      
      NAME                                             DESIRED   CURRENT   READY   AGE
      replicaset.apps/helm-app-sample-app-7b6bd8f757   1         1         1       93s
    3. Review the Helm chart status:
      helm list -A
      NAME    	NAMESPACE	REVISION	UPDATED                                	STATUS  	CHART           	APP VERSION
      helm-app    	dev      	2       	2021-02-21 19:40:41.251103914 +0000 UTC	deployed	sample-app-0.1.0	1.16.0
      helm-app    	uat      	2       	2021-02-21 19:40:47.85977876 +0000 UTC 	deployed	sample-app-0.1.0	1.16.0
    Conclusion

    Thanks for reading! I hope this article helps you get started with Helm CI/CD on OpenShift.

    Last updated: August 24, 2022

    Recent Posts

    • Red Hat Hardened Images: Top 5 benefits for software developers

    • How EvalHub manages two-layer Kubernetes control planes

    • Tekton joins the CNCF as an incubating project

    • Federated identity across the hybrid cloud using zero trust workload identity manager

    • Confidential virtual machine storage attack scenarios

    Red Hat Developers logo LinkedIn YouTube Twitter Facebook

    Platforms

    • Red Hat AI
    • Red Hat Enterprise Linux
    • Red Hat OpenShift
    • Red Hat Ansible Automation Platform
    • See all products

    Build

    • Developer Sandbox
    • Developer tools
    • Interactive tutorials
    • API catalog

    Quicklinks

    • Learning resources
    • E-books
    • Cheat sheets
    • Blog
    • Events
    • Newsletter

    Communicate

    • About us
    • Contact sales
    • Find a partner
    • Report a website issue
    • Site status dashboard
    • Report a security problem

    RED HAT DEVELOPER

    Build here. Go anywhere.

    We serve the builders. The problem solvers who create careers with code.

    Join us if you’re a developer, software engineer, web designer, front-end designer, UX designer, computer scientist, architect, tester, product manager, project manager or team lead.

    Sign me up

    Red Hat legal and privacy links

    • About Red Hat
    • Jobs
    • Events
    • Locations
    • Contact Red Hat
    • Red Hat Blog
    • Inclusion at Red Hat
    • Cool Stuff Store
    • Red Hat Summit
    © 2026 Red Hat

    Red Hat legal and privacy links

    • Privacy statement
    • Terms of use
    • All policies and guidelines
    • Digital accessibility

    Chat Support

    Please log in with your Red Hat account to access chat support.