Page
Set up your Developer Sandbox environment to run your application locally
Prerequisites
The command-line tools shown in Table 1 are required for running the exercises in this lab. Please have them installed and configured before starting the lab.
| Tool | macOS | Fedora | Microsoft Windows |
|---|---|---|---|
| Git | Download | Download | Download |
| Podman | Download | Download | Download |
Set up your Developer Sandbox
This section gets you started with the Developer Sandbox for Red Hat OpenShift, and with OpenShift itself.
Create a Developer Sandbox account
The first step toward deploying your application is to find a cluster to host it. You could use any OpenShift cluster for this demonstration, but if you don't have access to one, you can use the Developer Sandbox to get access to a free OpenShift cluster for 14 days.
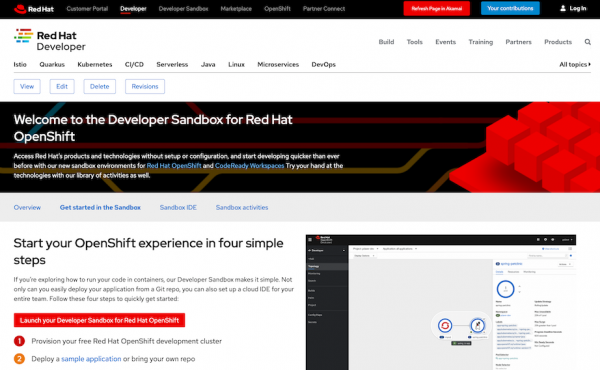
To create your account, go to the getting started page for the Developer Sandbox. Click on the red button that says Launch your Developer Sandbox for Red Hat OpenShift, as shown in Figure 1.
Use your existing Red Hat account or create a new one, then follow the instructions on the screen. When you are done, you should be redirected back to the Developer Sandbox page, but this time it should display a button labeled Start using your sandbox. Clicking on it opens the OpenShift login screen shown in Figure 2.
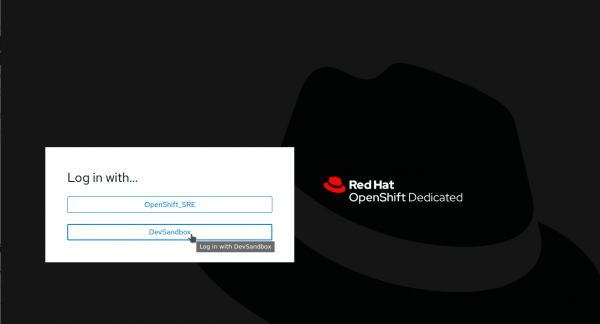
After you log in, you should see a DevSandbox button. Clicking this button opens your new OpenShift cluster console. Feel free to take the tour or skip it for now and continue with this lab.
Configure OpenShift
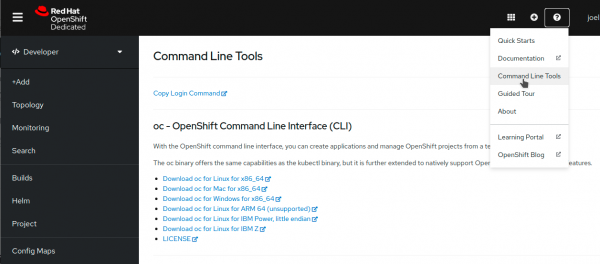
To interact with your OpenShift cluster, you need the oc command-line tool. Thankfully, the OpenShift team made it easy for you to install it. To get oc for your operating system, click the question mark icon at the top right of the OpenShift screen. From the drop-down list that appears, select Command Line Tools, shown in Figure 3. This option opens a page with the links required to install oc.
Once the tool is installed, click the link for Copy Login Command from the same Command Line Tools page. A new window will open with the authentication screen. Select DevSandbox, then click the Display Tokens link on the next page.
On this new page, you can find a command that starts with oc login. Copy this whole line with the --token and --server parameters and paste it into your terminal:
$ oc login --token=sha256~%TOKEN% --server=https://%SERVER%:6443
You should get a message back confirming that you successfully logged in to the developer sandbox:
Logged into "https://%SERVER%:6443" as "%USERNAME%" using the token provided.

You have access to the following projects and can switch between them with 'oc project <projectname>':

  * %USERNAME%-code
    %USERNAME%-dev
    %USERNAME%-stage

Using project "%USERNAME%-code".
Sample application
The application that you will deploy to this OpenShift cluster is a URL shortener and redirection service. It has a React front end to manage your links and connects to a Node.js API. That express server then connects to a Mongo database to store and retrieve the URLs.
Another application, called the "redirector" microservice, performs a database lookup and redirects the traffic to the matching URL. This service is built in PHP.
The following sections show you how to build your image and container for this application from source code. See the section "Alternative to building your own image" if you want to skip these steps and just use a predefined image.
Install the application locally
You need a copy of the source code to build your container images. Download the source code using git clone:
$ git clone https://github.com/nodeshift-blog-examples/urlshortener
Feel free to explore the application source code. If you want to run it locally, you can do so with docker-compose or podman-compose. The following command starts the application in development mode:
$ docker-compose up
To view the application, open a browser and visit http://localhost:3000.
Build the front end
To deploy this application, you can't just reuse the same container that you used in development. That container is for a development environment and includes a hot-reload server, among other things.
For your production environment, you need to package up your React application and deploy it on an Nginx server. Ideally, the application uses environment variables for its configuration and runs as a non-root user for maximum security.
The image also has to be stored in an image registry. We'll use Docker Hub.
Note: To find out more about building front-end containers, see the article Building rootless containers for JavaScript front ends. We'll use the templates provided in that article for this lab.
First, copy the Dockerfile, nginx.conf, and start-nginx.sh files from the Git repository mentioned earlier:
$ cd front
$ curl https://raw.githubusercontent.com/nodeshift-blog-examples/frontend-containers/main/react-project/Dockerfile.rootless -o Dockerfile
$ curl https://raw.githubusercontent.com/nodeshift-blog-examples/frontend-containers/main/react-project/start-nginx.sh -o start-nginx.sh
$ curl https://raw.githubusercontent.com/nodeshift-blog-examples/frontend-containers/main/react-project/nginx.conf -o nginx.conf
To avoid copying the whole node_modules folder in your container, you can instead create a .dockerignore file:
$ echo "node_modules" > .dockerignore
The next step is to build the image that you'll run later in a pod in your OpenShift cluster. You need to assign the registry name during the build. The $REGISTRY_HOST environment variable indicates which registry you are using. The image name must be in the following format:
$REGISTRY_HOST/$REGISTRY_USERNAME/urlshortener-front
An example is:
docker.io/janedoe/urlshortener-front
Start by setting the values of these two environment variables. Use the following commands, substituting your own values:
Bash:
$ export REGISTRY_HOST='quay.io'
$ export REGISTRY_USERNAME='janedoe'
PowerShell:
$Env:REGISTRY_HOST = "quay.io"
$Env:REGISTRY_USERNAME = "janedoe"
You are now ready to build this image:
Bash:
$ podman build -t
$REGISTRY_HOST/$REGISTRY_USERNAME/urlshortener-front .
PowerShell"
podman build -t $env:REGISTRY_HOST/$env:REGISTRY_USERNAME/urlshortener-front .
Push the image to a registry
Now that you have an image ready to be deployed, you can use the podman push command to store this image into a registry. Feel free to use any registry for this step. If you don't have access to an image registry, you can create a free account on Quay.io or skip to the deployment step and use the publicly available image.
Note: If you are using Podman instead of Docker, use the --format=docker option when pushing your image to Docker Hub.
To push this image to a registry, use the following command, replacing %REGISTRY_USERNAME% with your actual username:
Bash:
$ podman push urlshortener-front $REGISTRY_HOST/$REGISTRY_USERNAME/urlshortener-front
PowerShell:
podman push urlshortener-front $env:REGISTRY_HOST/$env:REGISTRY_USERNAME/urlshortener-front
Note: If you are using Quay.io as your registry, the image is added to your registry as a private image. You must go into the registry settings for the image at Quay.io and set the Repository Visibility to public.
This application image is now available to be used by OpenShift.
Alternative to building your own image
If you didn't build an image or push your custom image to a public registry, you could also use an image hosted at Docker with the latest version of the URL shortener front end. Note that the following command does not include the registry hostname, docker.io. This is because, if you don't specify a registry host, the default value of docker.io is used.
$ oc new-app nodeshift/urlshortener-front
OpenShift downloads the image from your registry and creates a new application with it.
Info alert: Note: If you run into an error message about hitting a rate limit, see the article How to work around Docker's new download rate limit on Red Hat OpenShift.
Deploy the front end
You are now ready to deploy this image in your OpenShift cluster. Using the oc command-line tool, you can initiate the deployment with a single command:
$ oc new-app $REGISTRY_HOST/$REGISTRY_USERNAME/urlshortener-front
Expose the application
The front end has been deployed to your cluster, but no one can connect to it yet from outside of the cluster. To enable access, you need to expose the service created with a route. Enter the following command:
$ oc expose svc/urlshortener-front --port=8080
Your application is now fully deployed to OpenShift, and you should be able to see it in the OpenShift Topology view of your application, shown in Figure 4.

Verify the application status
If you click on the Open URL button next to your application in the Topology view, it should open your front-end application.
From here, you can view the list of redirection URLs (currently empty). You can also see the form to add new URLs (currently nonworking). Finally, a third link in the navigation bar leads to an "About" page. There, you can see the status of the Node.js API, the Mongo database, and the redirector service, as shown in Figure 5.
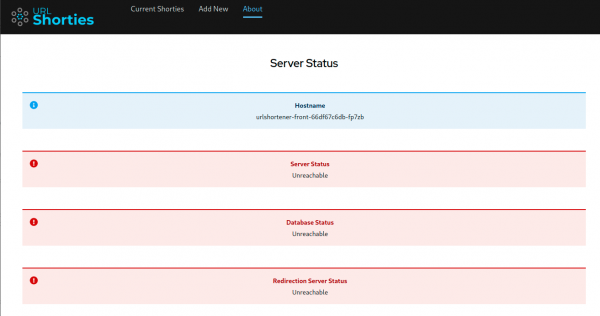
All the indicators are currently red because the front end doesn't have a back end to talk to. We'll address this issue in the second part of the lab.
Conclusion to Lesson 1
In Part 1 of this lab, you've started on the Developer Sandbox. You downloaded an application, deployed it to OpenShift, and verified that the front end is working. We'll complete the application in Lessons 2 and 3 of this learning path.
