Page
Deploy the database, then deploy a new microservice
In the second part of this learning path, you created your back-end container and deployed it using the Source-to-Image (S2I) toolkit. Now you need to add a database to your application so that you can store the URLs being passed around. You will select a template from the OpenShift developer catalog to deploy on the cluster.
Add a database to your JavaScript application
Select a database from the developer catalog. From the left navigation bar, click on +Add. This brings up a menu with various options to add your application to the OpenShift cluster.
Choose Database to open the developer catalog, filtered to show database templates. From this view, select the MongoDB (Ephemeral) card. A side panel should open. On this panel, click the blue Instantiate Template button.
Note: Because this selection is an ephemeral template, when the pod restarts, all data is lost. This is ideal for development purposes, but not so great for production. For a production deployment, look into Operator-backed templates.
On the next screen, fill in the fields with the following values, which are also shown in Figure 12:
- Database Service Name:
mongo - MongoDB Connection Username:
shorties - MongoDB Connection Password:
shorties - MongoDB Database Name:
urls
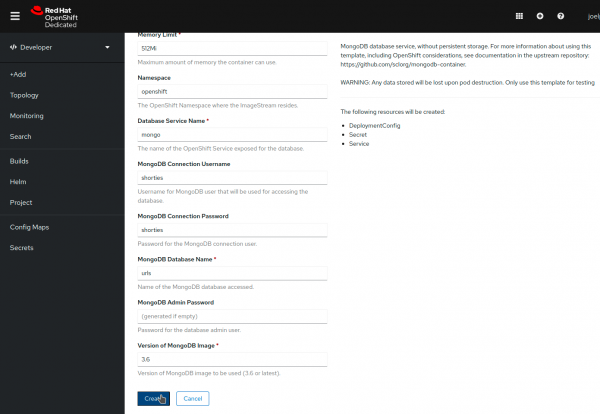
When you are done, select Create at the bottom of the screen.
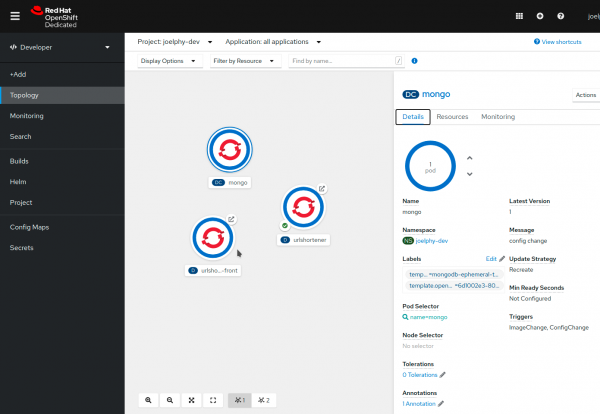
OpenShift will create all the necessary components to deploy the database to your cluster. In a few seconds, you should see the application in the Topology view with a blue ring indicating that it is running, as shown in Figure 13.
Configure the environment variables
The database has started, so now you need to configure the back end to connect to it. In the second part of this lab, you used the command-line interface (CLI) to configure environment variables. This time, you will configure the environment variables using the UI.
Click on the urlshortener deployment in the Topology view. This opens a side panel. In the Actions menu on the top right of the screen, select Edit Deployment.
From this new screen, select the Environment tab. This should take you back to the screen where you added the PORT variable in Part 2.
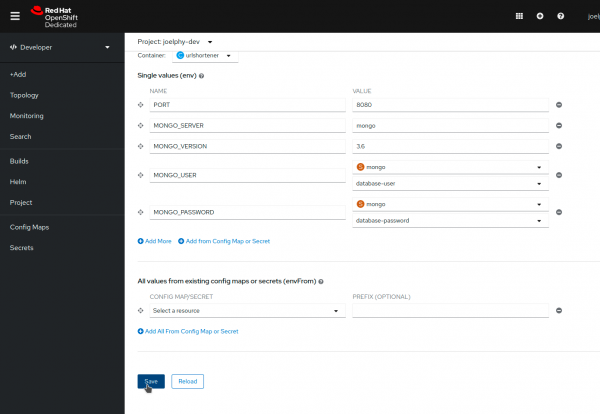
Click on Add More and add the following environment variables:
MONGO_SERVER:mongoMONGO_VERSION:3.6
For the username and password, you can also use the secret created by the MongoDB template.
Click Add from Config Map or Secret, and use the name MONGO_USER. In the Select a resource drop-down, pick the secret named mongo. In the Select a key dropdown, pick database-user.
Do the same for MONGO_PASSWORD, which maps to the database-password key.
When you are done, select Save at the bottom of the page, as shown in Figure 14.
Verify the application status
You've added the database component and connected it to the back end. Now, you will test the application again.
If you open the front end and look at the application's About page, you should see that the database is up and running, as shown in Figure 15.

You can now use the Add New page to create URL shortcuts, and you can see them on the Current Shorties page. All of this data is persisted if you refresh the page.
When clicking on the link icon, though, you get an error. This error shows up because the front end is trying to contact a redirector service that hasn’t been deployed yet. You will add this service next.
Add a new microservice
You now have a front end, an API, and a database deployed and running on OpenShift. This application needs another microservice that short URLs will point to, and that will redirect the application to the matching longer URL found in the database.
One of the many benefits of deploying containerized microservices is that they don’t need to be written in the same language. In this example, you will add a PHP server to the application.
Add a container from an existing image
The image containing the redirector service is already built for you. If you are curious, you can find the source code and Dockerfile in the demo project's redirector folder. You can use the same commands from the first part of this lab to add this new image, or you can use the UI. To use the UI, click on the +Add link in the console's left navigation bar.
Next, choose the Container Image card. A new page titled Deploy Image will be displayed. In the Image name from external registry field, enter quay.io/donschenck/urlshortener-redirector.
Info alert: Note: You can change the runtime icon if you wish.
For the Application Name, remove the redirector-app to keep urlshortener. This creates a group in the Topology view, and you will be able to add the other services to it. Scroll to the bottom of the page, select Resource type under the Advanced options section. Then select Deployment. (Figures 16 and 17)


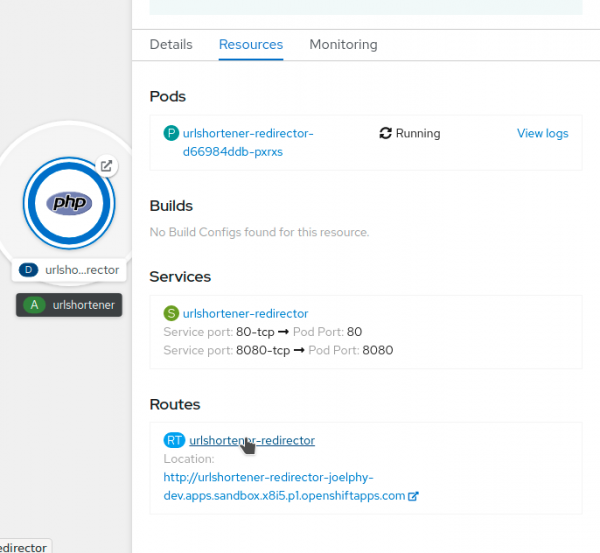
The application should have been successfully deployed, but the route won’t work for now. Because this image has two different exposed ports, the created route was mapped to the wrong port. To change this, click the urlshortener-redirector application in the Topology view. In the Resources tab from the side panel, click the route name (Figure 18).
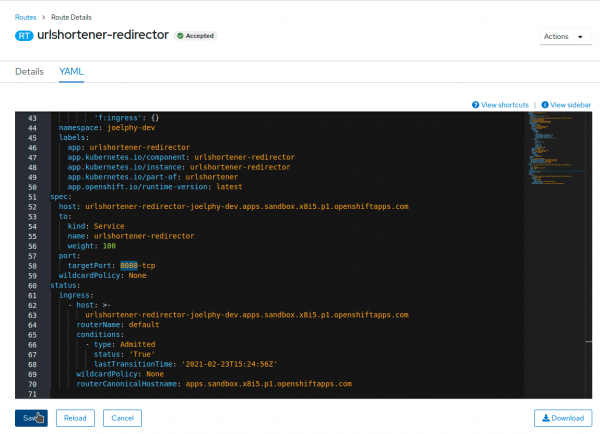
From the Actions dropdown, choose Edit Route. This opens a YAML editor. Scroll down to find the spec object in the alphabetical list. Then look for the port property. Note that the targetPort has the value of 80-tcp. Change the value to 8080-tcp and click Save (Figure 19).
You can now go back to the Topology view and click on the Open URL link for the urlshortener-redirector application. This shows a page with a few errors. As you'll see, the PHP application doesn’t have environment variables yet, so it can’t connect to the database.
Update the environment variables
For the redirector service to connect to the Mongo database, it needs a few environment variables.
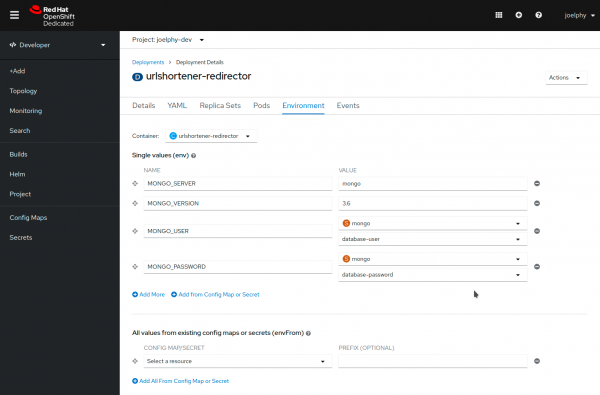
Click on the application, and from the Action dropdown in the side panel, choose Edit Deployment. Choose the Environment tab and fill in the following values (Figure 20):
- MONGO_SERVER:
mongo - MONGO_VERSION:
3.6 - MONGO_USER from mongo Secret:
database-user - MONGO_PASSWORD from mongo Secret:
database-password
Click Save, and the urlshortener-redirector application will restart with the new environment variables.
Now that the redirector service is configured and ready to go, update the REDIRECTOR_URL environment variable from the front end to point to this service:
$ oc set env deployment/urlshortener-front REDIRECTOR_URL=http://$(oc get route urlshortener-redirector | awk 'NR>1 {print $2}')
deployment.apps/urlshortener-front updated
The front-end pod will restart with the new environment variables.
Verify the application status
Everything is up and running, so open the application's About page again. All of the systems should now be green, as shown in Figure 21.
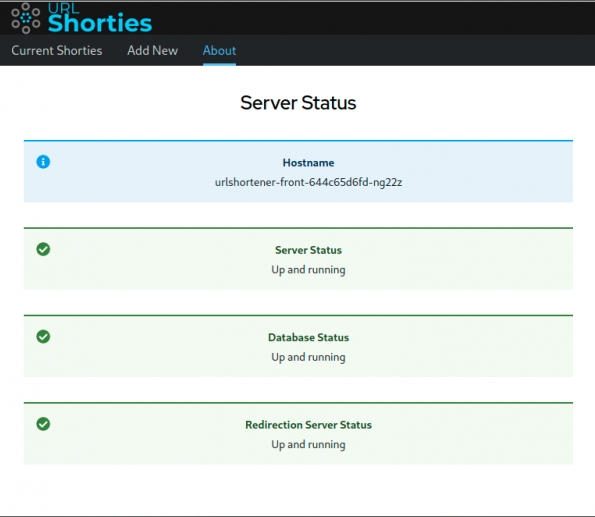
Congratulations! You’ve deployed a full-stack JavaScript application into an OpenShift cluster. You can now use the application.
Conclusion
Now that you have an application in the Developer Sandbox, you can try various things such as scaling up some of the applications, grouping the applications in the Topology view, and looking at the logs inside the pods.
To learn more about OpenShift, try out some of the smaller workshops available in the OpenShift Learning Portal.
