Page
Deploying an application on a Red Hat OpenShift Service on AWS cluster
One way to deploy the application would be to have the images for the front-end and back-end microservice containers already created (via CI/CD) and stored in an image repository. You can then create Kubernetes deployments (YAML) and use those to deploy the application.
For information on deploying using Source-to-Image methods, please see the S2I section later in this learning path.
What will you learn?
- Deploying an application via Kubernetes on a Red Hat OpenShift Service on AWS (ROSA) cluster
What do you need before starting?
- Working OpenShift Service on AWS cluster
- OpenShift CLI
- GitHub account
Steps for deployment
- Retrieve the login command.
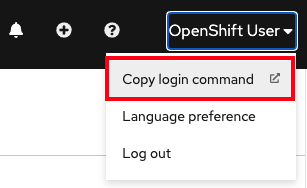
- If you are not logged in via the CLI, access your cluster via the web console, then click on the dropdown arrow next to your name in the top-right and select Copy Login Command (Figure 3).
- Click Display Token.
- Copy the command under where it says Log in with this token.
- Go to your terminal, paste that command, and press enter. You will see a similar confirmation message if you successfully logged in.
$ oc login --token=RYhFlXXXXXXXXXXXX --server=https://api.osd4-demo.abc1.p1.openshiftapps.com:6443 Logged into "https://api.osd4-demo.abc1.p1.openshiftapps.com:6443" as "0kashi" using the token provided. You don't have any projects. You can try to create a new project, by running oc new-project <projectname> -
Create a new project called "ostoy" in your cluster by entering the following command:
$ oc new-project ostoy Now using project "ostoy" on server "https://api.osd4-demo.abc1.p1.openshiftapps.com:6443". You can add applications to this project with the 'new-app' command. For example, try: oc new-app centos/ruby-25-centos7~https://github.com/sclorg/ruby-ex.git to build a new example application in Ruby.Note: Equivalently you can also create this new project using the web console UI by clicking on Projects under Home on the left menu, then clicking Create Project button on the right.
-
In your terminal, deploy the microservice using the following command:
oc apply -f https://raw.githubusercontent.com/openshift-cs/rosaworkshop/master/rosa-workshop/ostoy/yaml/ostoy-microservice-deployment.yamlYou should see the following response:
$ oc apply -f https://raw.githubusercontent.com/openshift-cs/rosaworkshop/master/rosa-workshop/ostoy/yaml/ostoy-microservice-deployment.yaml deployment.apps/ostoy-microservice created service/ostoy-microservice-svc created - Deploy the front-end service.
- If you open the ostoy-fe-deployment.yaml you will see we are defining:
- Persistent Volume Claim
- Deployment Object
- Service
- Route
- ConfigMaps
- Secrets
- If you open the ostoy-fe-deployment.yaml you will see we are defining:
-
In your terminal, deploy the front-end along and create all the preceding objects by entering:
oc apply -f https://raw.githubusercontent.com/openshift-cs/rosaworkshop/master/rosa-workshop/ostoy/yaml/ostoy-fe-deployment.yaml -
Get the route so that we can access the application via:
oc get routeYou should see the following response:
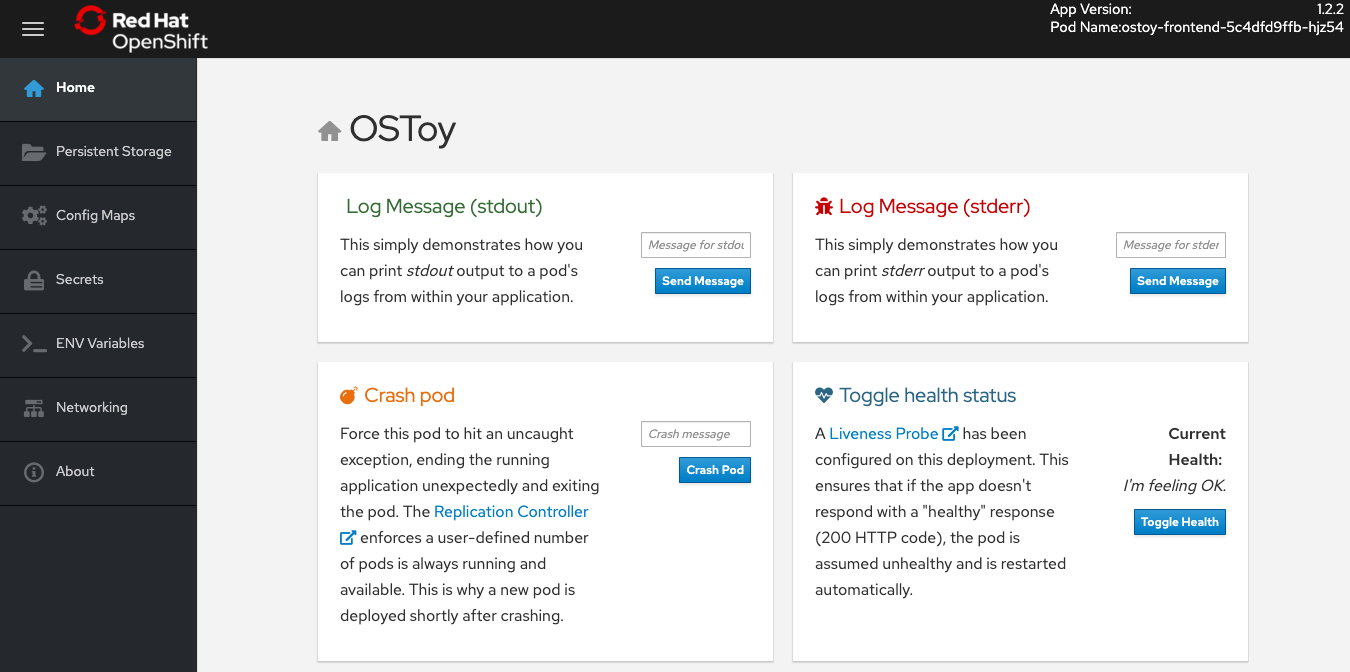
NAME HOST/PORT PATH SERVICES PORT TERMINATION WILDCARD ostoy-route ostoy-route-ostoy.apps.my-rosa-cluster.g14t.p1.openshiftapps.com ostoy-frontend-svc <all> None - Copy the following command, paste it into your browser, and press enter. You should see the OSToy homepage. (Figure 4)
Note: If the page does not come up, make sure that it is using http and not https.ostoy-route-ostoy.apps.my-rosa-cluster.g14t.p1.openshiftapps.com
Success! You now have a deployed application running on your OpenShift Service on AWS cluster. You are now ready to check its health.
Get more support
- Red Hat OpenShift Service on AWS frequently asked questions
- Troubleshoot with Red Hat support
- Troubleshoot with AWS support