Page
Deploying applications with Amazon Controller for Kubernetes (ACK)
The Amazon Controller for Kubernetes (ACK) allows you to create and use AWS services directly from Kubernetes. You can deploy your applications, including any required AWS services directly within the Kubernetes framework, using a familiar structure to declaratively define and create AWS services like S3 buckets or RDS databases.
In order to illustrate the use of the ACK on ROSA, we will walk through a simple example of creating an S3 bucket, integrating that with OSToy, uploading a file to it, and viewing the file in our application. This resource will also address granting your applications access to AWS services.
What will you learn?
- Creating and deleting buckets in the S3 service through a Kubernetes Custom Reference
- Installing the controller, which will also create the required namespace and the service account
- Creating the AWS IAM role for the ACK controller, assigning the S3 policy, and associating the AWS IAM role with the service account
- Granting access to the application container/pod to access the S3 bucket
What do you need before starting?
- A successfully deployed application on a ROSA cluster
Deploying applications with Amazon Controller for Kubernetes (ACK)
Install an ACK operator
There are a few ways to install a controller with ACK, but we will use an Operator to make it easy. The Operator installation will also create an ack-system namespace and a service account ack-s3-controller for you.
- Log in to your OpenShift cluster's web console (if you aren't already).
- In the left menu, select Operators > OperatorHub.
- In the filter box, enter S3 and select AWS Controller for Kubernetes - Amazon S3. (Figure 1)
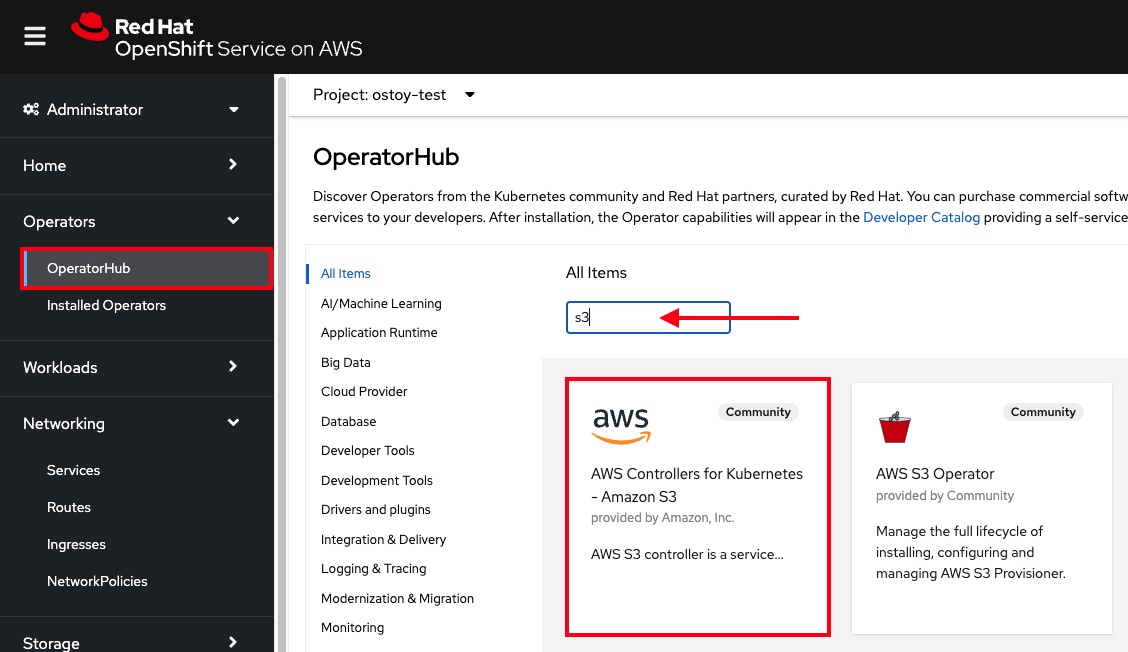
If you get a pop-up saying that it is a community operator, just click Continue.
- Click Install at the top left.
- Select All namespaces on the cluster for Installation mode.
- Select ack-system for Installed Namespace.
- Under Update approval, select Manual. Note: Make sure to select Manual Mode so that changes to the Service Account do not get overwritten by an automatic operator update.
- Select Install. Your settings should look like Figure 2.

Select Approve.
You will see that installation is taking place. The installation won't complete until the next step is finished, so you can proceed.
Set up access for the controller
To deploy a service in your AWS account, our ACK controller will need credentials for those AWS services (or S3 in our case). There are a few options for doing so, but the recommended approach is to use IAM Roles for Service Accounts (IRSA) that automates the management and rotation of temporary credentials that the service account can use.
As stated on the ACK documentation page: “Instead of creating and distributing your AWS credentials to the containers or using the Amazon EC2 instance’s role, you can associate an IAM role with a Kubernetes service account. The applications in a Kubernetes pod container can then use an AWS SDK or the AWS CLI to make API requests to authorized AWS services.”
To get the credentials, pods receive a valid OIDC JSON web token (JWT) and pass it to the AWS Security Token Service (STS) AssumeRoleWithWebIdentity API operation in order to receive IAM temporary role credentials.
The mechanism behind IRSA/STS in ROSA relies on the EKS pod identity mutating webhook, which modifies pods that require AWS IAM access. Since we are using ROSA w/STS, this webhook is already installed.
Note: Using IRSA allows us to adhere to the following best practices:
- Principle of least privilege - We are able to create finely tuned IAM permissions for AWS roles that only allow the access required. Furthermore, these permissions are limited to the service account associated with the role and therefore, only pods that use that service account have access.
- Credential Isolation - A pod can only retrieve credentials for the IAM role associated with the service account that the pod is using, and no other.
- Auditing - In AWS, any access of AWS resources can be viewed in CloudTrail.
Usually one would need to provision an OIDC provider, but since one is deployed with ROSA with STS, we can use that one.
Create an IAM role and policy for the ACK controller
- Create a new directory on your local machine to work from. Name it as you'd like. Here's what we're using:
mkdir rosaworkshop && cd rosaworkshop - Download the setup-s3-ack-controller.sh script which automates the process for you, or use: wget https://raw.githubusercontent.com/openshift-cs/rosaworkshop/master/rosa-workshop/ostoy/resources/setup-s3-ack-controller.sh
- Don't worry, you will perform these steps later for the application but the script creates an AWS IAM role with an AWS S3 policy and associates that IAM role with the service account. Feel free to read the script.
- Run the script:
-
./setup-s3-ack-controller.sh - When the script is complete, it will restart the deployment which will update the service controller pods with the IRSA environment variables.
- Confirm that the environment variables are set. Run the script:
-
oc describe pod ack-s3-controller -n ack-system | grep "^\s*AWS_" - You should see a response like:
-
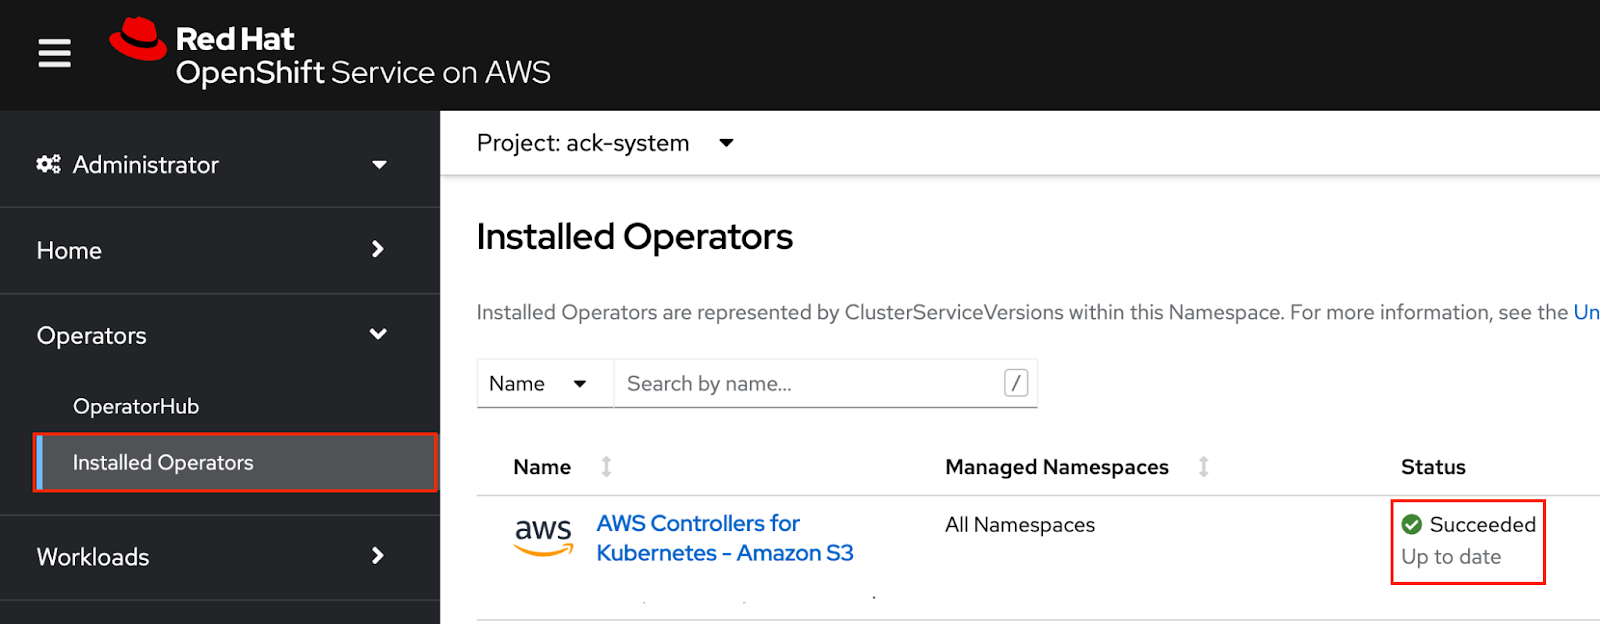
AWS_ROLE_ARN: arn:aws:iam::000000000000:role/ack-s3-controller AWS_WEB_IDENTITY_TOKEN_FILE: /var/run/secrets/eks.amazonaws.com/serviceaccount/token - The ACK controller should now be set up successfully. You can confirm this in the OpenShift Web Console under "Operators > Installed operators". (Figure 3)
Note: If after a minute you still do not see the Operator installation as successful and you do not see the IRSA environment variables, you may need to manually restart the deployment:
oc rollout restart deployment ack-s3-controller -n ack-system
Setting up access to the application
In this section, we will create an AWS IAM role and service account so that OSToy can read and write objects to the S3 bucket that we create. Before starting, ensure that you are in your OSToy project. If your project is named differently, then use the name for your project.
oc project ostoy
Create an AWS IAM role
Get your AWS account ID:
export AWS_ACCOUNT_ID=$(aws sts get-caller-identity --query Account --output text)
Get the OIDC provider:
export OIDC_PROVIDER=$(oc get authentication.config.openshift.io cluster -o jsonpath='{.spec.serviceAccountIssuer}' | sed 's/https:\/\///')
Get the current namespace:
export OSTOY_NAMESPACE=$(oc config view --minify -o 'jsonpath={..namespace}')
Create the trust policy file:
cat <<EOF > ./ostoy-sa-trust.json
{
  "Version": "2012-10-17",
  "Statement": [
    {
      "Effect": "Allow",
      "Principal": {
        "Federated": "arn:aws:iam::${AWS_ACCOUNT_ID}:oidc-provider/${OIDC_PROVIDER}"
      },
      "Action": "sts:AssumeRoleWithWebIdentity",
      "Condition": {
        "StringEquals": {
          "${OIDC_PROVIDER}:sub": "system:serviceaccount:${OSTOY_NAMESPACE}:ostoy-s3-sa"
        }
      }
    }
  ]
}
EOF
Create the AWS IAM role to be used with your service account:
aws iam create-role --role-name "ostoy-s3-sa-role" --assume-role-policy-document file://ostoy-sa-trust.json
Attach the S3 policy to the IAM role:
Get the Full Access policy ARN:
export POLICY_ARN=$(aws iam list-policies --query 'Policies[?PolicyName==`AmazonS3FullAccess`].Arn' --output text)
Attach that policy to the AWS IAM role:
aws iam attach-role-policy --role-name "ostoy-s3-sa-role" --policy-arn "${POLICY_ARN}"
Create the service account for the pod
Get the ARN for the AWS IAM role we created so that it will be included as an annotation when creating our service account:
export APP_IAM_ROLE_ARN=$(aws iam get-role --role-name=ostoy-s3-sa-role --query Role.Arn --output text)
cat <<EOF > ostoy-serviceaccount.yaml

apiVersion: v1

kind: ServiceAccount

metadata:

  name: ostoy-s3-sa

  namespace: ostoy

  annotations:

    eks.amazonaws.com/role-arn: "$APP_IAM_ROLE_ARN"

EOF
Warning: Do not change the name of the service account from ostoy-s3-sa. Otherwise you will have to change the trust relationship for the AWS IAM role.
Create the service account:
oc create -f ostoy-serviceaccount.yaml
oc describe serviceaccount ostoy-s3-sa -n ostoy
You should see an output like this:
Name:                ostoy-s3-sa

Namespace:           ostoy

Labels:              <none>

Annotations:         eks.amazonaws.com/role-arn: arn:aws:iam::000000000000:role/ostoy-s3-sa-role

Image pull secrets:  ostoy-s3-sa-dockercfg-b2l94

Mountable secrets:   ostoy-s3-sa-dockercfg-b2l94

Tokens:              ostoy-s3-sa-token-jlc6d

Events:              <none>
Creating an S3 bucket
Create a manifest file for your bucket. Copy the bucket manifest file below and save it as s3-bucket.yaml, or download it from here:
apiVersion: s3.services.k8s.aws/v1alpha1

kind: Bucket

metadata:

  name: ostoy-bucket

  namespace: ostoy

spec:

  name: ostoy-bucket
Warning: The OSToy application expects to find a bucket that is named based on the namespace/project that OSToy is in, such as <namespace>-bucket. If you place anything other than the namespace of your OSToy project, this feature will not work. For example, if our project is ostoy, the value for name must be ostoy-bucket.
You must also consider that because Amazon S3 requires that bucket names be globally unique, you must run OSToy in a project that is unique as well. See the note in Create a new project for how to deploy OSToy into a unique project.
Create the bucket:
oc create -f s3-bucket.yaml
aws s3 ls | grep ostoy-bucket
Redeploying the OSToy app with the new service account
Open the ostoy-frontend-deployment.yaml file (or download it here) and uncomment spec.template.spec.serviceAccount, so it looks like the example below.
spec:

  # Uncomment to use with ACK portion of the workshop

  # If you chose a different service account name please replace it.

  serviceAccount: ostoy-s3-sa

  containers:

  - name: ostoy-frontend

    image: quay.io/ostoylab/ostoy-frontend:1.5.0

    imagePullPolicy: IfNotPresent
Save the file, and apply the change:
oc apply -f ostoy-frontend-deployment.yaml -n ostoy
Give it a minute to update the pod.
Confirm that the IRSA environment variables are set
When AWS clients or SDKs connect to the AWS APIs, they detect AssumeRoleWithWebIdentity security tokens to assume the IAM role. See the AssumeRoleWithWebIdentity documentation for more details.
As we did for the ACK controller, we can use the following command to describe the pods and verify that the AWS_WEB_IDENTITY_TOKEN_FILE and AWS_ROLE_ARN environment variables exist for our application, which mean that our application can successfully authenticate to use the S3 service:
oc describe pod ostoy-frontend -n ostoy | grep "^\s*AWS_"
We should see a response like:
AWS_ROLE_ARN:                 arn:aws:iam::000000000000:role/ostoy-s3-sa
AWS_WEB_IDENTITY_TOKEN_FILE:  /var/run/secrets/eks.amazonaws.com/serviceaccount/token
See the bucket contents through OSToy
Use our app to see the contents of our S3 bucket.
- Switch to the browser tab for the OSToy application and refresh your browser.
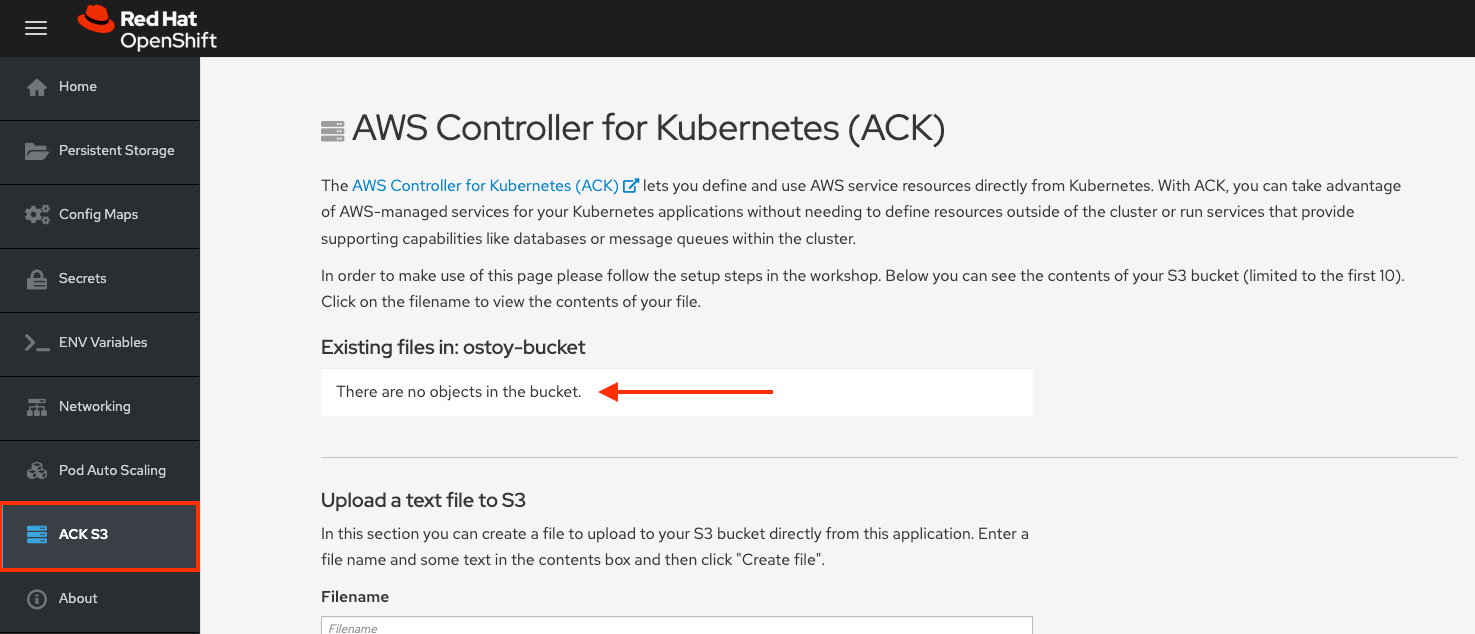
- A new menu item will appear. Click on ACK S3 in the left menu in OSToy.
- You will see a page that lists the contents of the bucket, which at this point should be empty.
Creating files in your S3 bucket
For this step, we will use OStoy to create a file and upload it to the S3 bucket. While S3 can accept any kind of file, we'll use text files for this workshop so that the content can easily be rendered in the browser.
- Click on ACK S3 in the left menu in OSToy.
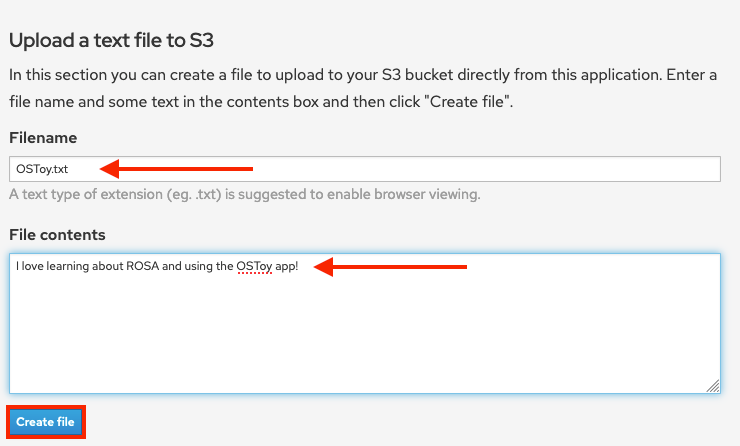
- Scroll down to the section underneath the Existing files section, titled Upload a text file to S3.
- Enter a file name for your file.
- Enter content for your file.
- Select Create file. (Figure 5)
-
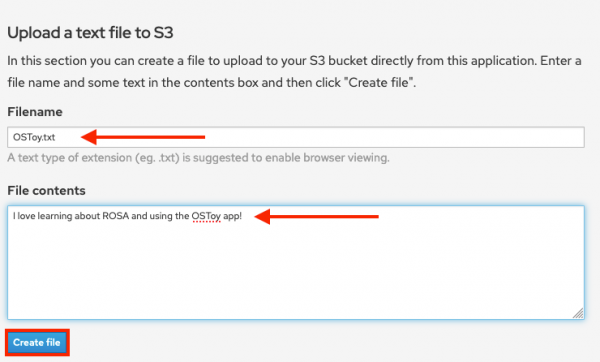
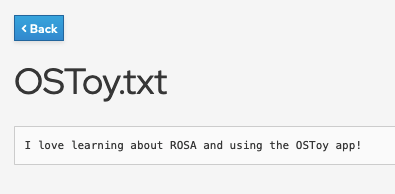
Figure 5: The window that appears for creating files. - Scroll up to the top section for existing files. You should see your file that you just created there.
- Click on the file name to view the file.
-

Figure 6: Click on the file name. - Now, let's confirm directly via the AWS CLI. Run the following to list the contents of our bucket:
-
aws s3 ls s3://ostoy-bucket - We should see our file listed there:
-
$ aws s3 ls s3://ostoy-bucket

2022-10-31 22:20:51         51 OSToy.txt
Get more support
- Troubleshoot with Red Hat support
- Troubleshoot with AWS support
- Customer Portal troubleshooting hub for ROSA
- #rosa Slack community