This is part 2 in our series on running Node.js applications on the edge with Red Hat Enterprise Linux (RHEL) and Fedora. In the first part, we introduced you to the hardware and software for our Node.js based edge example as well as some of the details on laying the foundation for deploying the application by building and installing the operating system using Fedora IoT.
In this part we’ll dive a bit deeper into the application itself and how to build, bundle, deploy, and update it using Podman and containers. Along the way, we’ll explain why we recommend this approach versus using rpm-ostree to manage the deployment of your applications.
Read the full series:
- Running Node.js applications on the edge with Red Hat Enterprise Linux (RHEL)/Fedora
- Containerizing your Node.js applications at the edge on RHEL/Fedora
- Advanced container management at the edge for Node.js applications
A quick reminder of the example from part 1
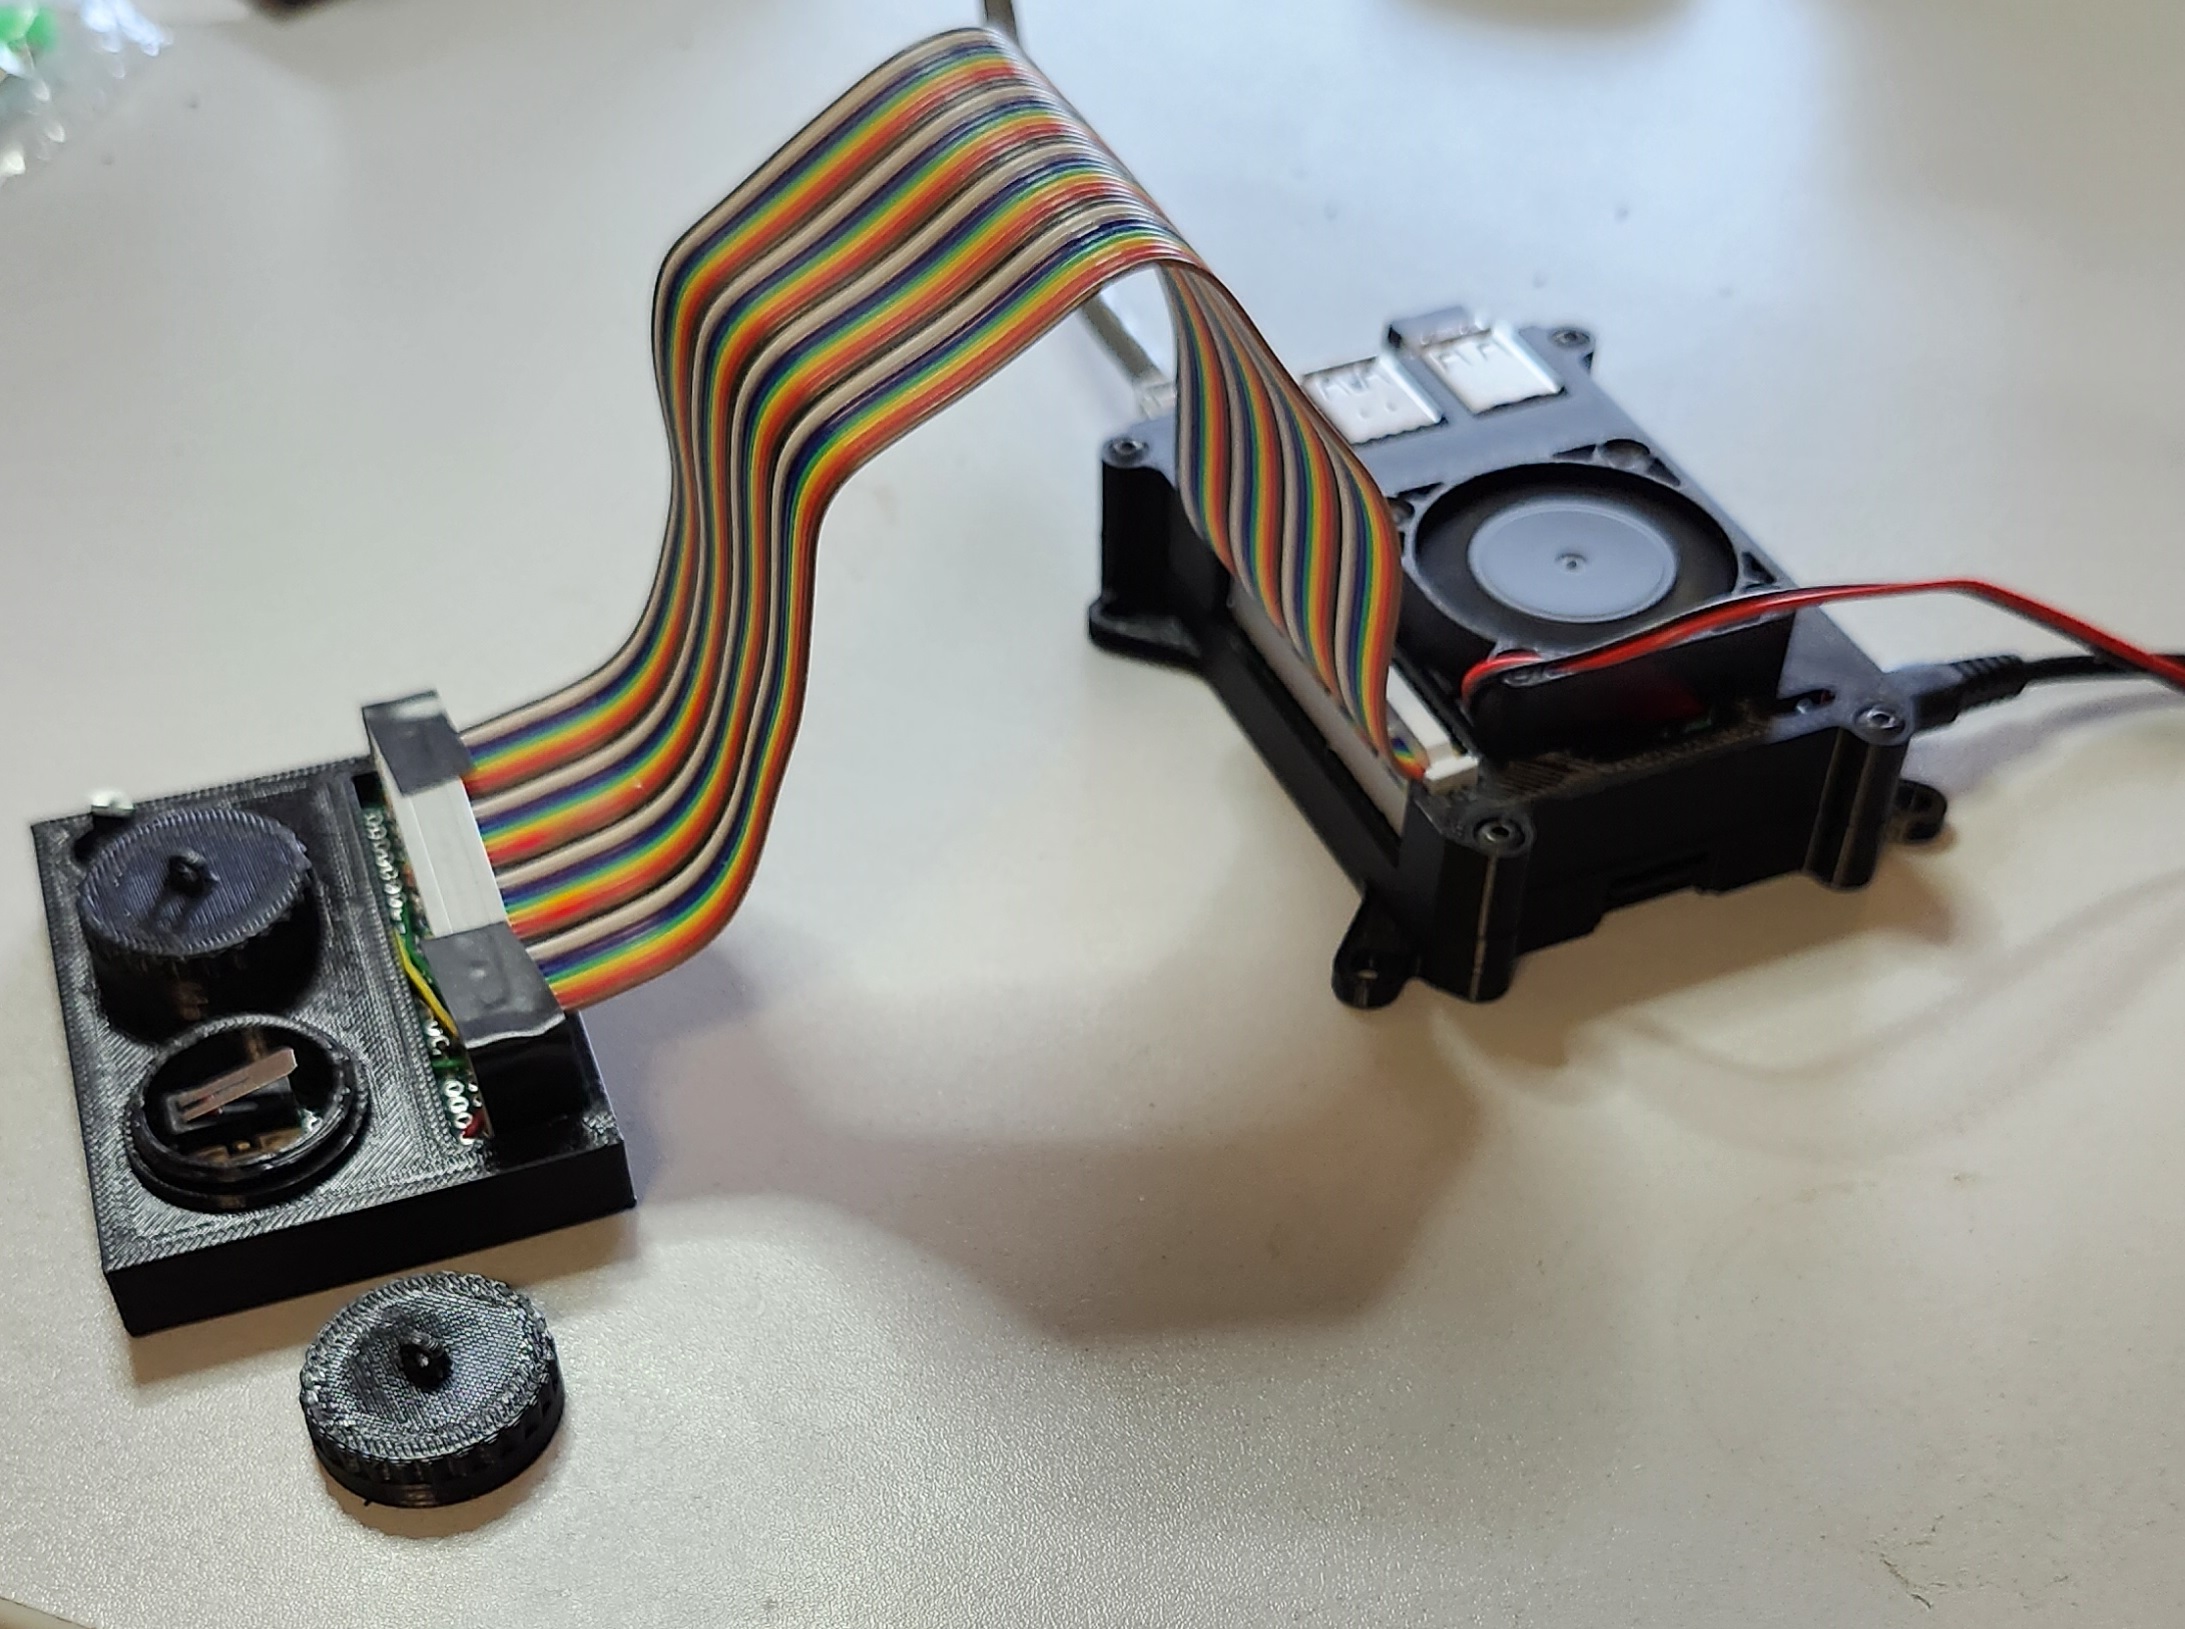
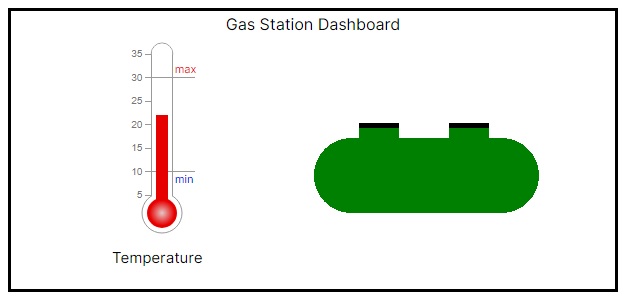
The hardware/software outlined in the example in part 1 monitors the underground gas tank at a gas station showing the current temperature and the status of the tank lids. The hardware is based on a Raspberry Pi 4 with a temperature sensor and lid switches. The software is a Next.js based application that displays the status of those sensors. Figure 1 shows the hardware while Figure 2 shows the UI.
The application
Part 1 gave a good introduction to the hardware, but we left a more detailed look at the application to this part of the series.
The application is a simple Next.js based application that we initially generated following the basic Create a Next.js app documentation.
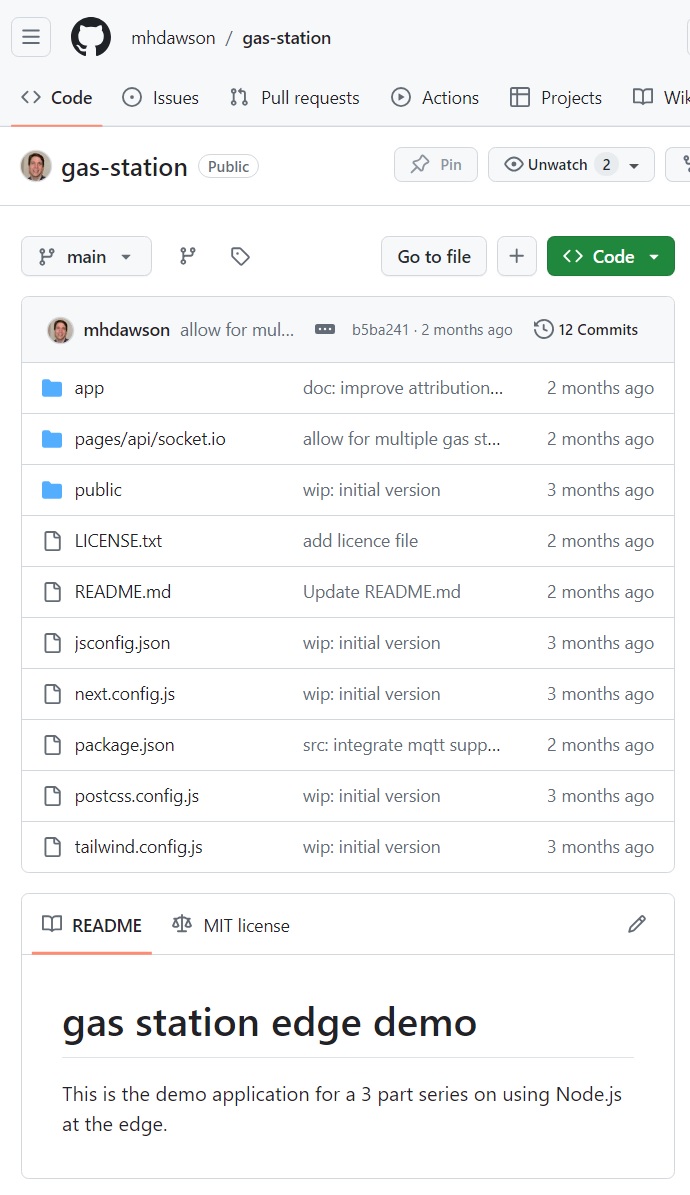
The full source code is available in https://github.com/mhdawson/gas-station. Figure 3 shows an overview.
It’s a pretty standard React/Next.js application with two components:
- Thermometer, derived from https://github.com/DavidBanksNZ/d3-thermometer
- GasTank
Which are displayed in a simple layout:
  return (
    <div >
      <div style={{ paddingLeft: '10px', paddingTop: '10px', height:'250px', width:'100%'}}>
        <table style={{ border: '3px solid black' }}>
          <tbody>
            <tr><td colSpan='2' style={{textAlign: 'center'}}>Gas Station Dashboard</td></tr>
            <tr><td><Thermometer data={currentTemp}/></td>
                <td><GasTank data={{Left: topLeft, Right: topRight}}/></td></tr>
          </tbody>
        </table>
      </div>
    </div>
  )
The components use D3 to draw an SVG picture for the thermometer and gas tank.
Websockets through socket.io are used to communicate with a back end microservice to get the current sensor data and update the UI.
  const [currentTemp, setTemp] = useState(10);
  const [topLeft, setLeft] = useState(false);
  const [topRight, setRight] = useState(false);

  React.useEffect(() => {
    // Create a socket connection
    const socket = io({ path: '/api/socket.io'});

    // Listen for incoming messages
    socket.on('message', (message) => {
      if (message.temp)
        setTemp(message.temp);

      if (message.topLeft !== undefined)
        setLeft(message.topLeft);

      if (message.topRight !== undefined)
        setRight(message.topRight);
    });

    // Clean up the socket connection on unmount
    return () => {
        socket.disconnect();
    };
  }, []);
The core of the back end microservice simply reads the sensors every POLL_INTERVAL milliseconds and publishes the data to both the front end and a MQTT server.
    setInterval(() => {
      const temp = readTemp(tempSensorFile);
      readGpio(TOP_LEFT_PIN, (left) => {
        readGpio(TOP_RIGHT_PIN, (right) => {
          io.emit('message', {temp: temp, topLeft: left, topRight: right});
          mqttClient.publish(TEMP_TOPIC, temp.toString());
          mqttClient.publish(TOP_LEFT_TOPIC, left.toString());
          mqttClient.publish(TOP_RIGHT_TOPIC, right.toString());
        });
      });
    } , POLL_INTERVAL);
The sensor data is read through a kernel module for the temperature sensor and with the gpioget utility for the gpio pins connected to the lid switches. You can take a look at the code to see exactly how the hardware is set up and how the values for the temperature and switches are read.
Containerizing the application
In part 1 we built the application by hand, transferred over the files to the device, and started the application manually. Of course that’s not what we want to do for a real product. We need to automate the process of building the application and bundling it with the operating system so that once the SD card is installed we can boot the Raspberry Pi 4 and the application starts automatically.
As discussed in part 1, we could build the application, package it into an rpm and then bundle it with the operating system using RHEL image builder and rpm-ostree. If you are a typical Node.js developer, I bet you’ve never done that before, and it sounds complicated.
Unless your application only needs to be updated in sync with the operating system, there a number of reasons we don’t want to package the application with rpm and rpm-ostree beyond it not being something we are familiar with:
- It requires a different development workflow from how typical hybrid cloud applications are delivered.
- It results in a tight binding to operating system components, versions and dependencies, beyond those needed by the code integrating the devices.
- It introduces potential conflicts between different pieces of an application in terms of operating system component versions.
- A reboot would be required each time the application was updated.
Instead we want to use existing hybrid cloud development workflows which already have tools and approaches for building applications, selecting only the required assets needed for deployment and bundling those into a nice self contained package: a container.
Containerfile
In order to build a container, the first step is to create a Containerfile. We adapted the standard Vercel example for dockerizing Next.js applications. Building on that, we applied some small changes needed for our application. The end result looks like this:
# Install dependencies only when needed
FROM registry.access.redhat.com/ubi8/nodejs-20 AS deps
USER 0
WORKDIR /app
# Install dependencies based on the preferred package manager
COPY package.json yarn.lock* package-lock.json* pnpm-lock.yaml* ./
RUN \
if [ -f yarn.lock ]; then yarn --frozen-lockfile; \
elif [ -f package-lock.json ]; then npm ci; \
elif [ -f pnpm-lock.yaml ]; then yarn global add pnpm && pnpm i; \
else echo "Lockfile not found." && exit 1; \
fi
# Rebuild the source code only when needed
FROM registry.access.redhat.com/ubi8/nodejs-20 AS builder
USER 0
WORKDIR /app
COPY --from=deps /app/node_modules ./node_modules
COPY . .
# Next.js collects completely anonymous telemetry data about general usage.
# Learn more here: https://nextjs.org/telemetry
# Uncomment the following line in case you want to disable telemetry during the build.
ENV NEXT_TELEMETRY_DISABLED 1
# If using yarn uncomment out and comment out npm below
# RUN yarn build
# If using npm comment out above and use below instead
RUN npm run build
# Production image, copy all the files and run next
FROM registry.access.redhat.com/ubi8/nodejs-20-minimal AS runner
USER 0
WORKDIR /app
ENV NODE_ENV production
# Uncomment the following line in case you want to enable telemetry during runtime.
ENV NEXT_TELEMETRY_DISABLED 1
COPY --from=builder /app/public ./public
# Set the correct permission for prerender cache
RUN mkdir .next
RUN chown 1001:1001 .next
# Automatically leverage output traces to reduce image size
# https://nextjs.org/docs/advanced-features/output-file-tracing
COPY --from=builder --chown=1001:1001 /app/.next/standalone ./
COPY --from=builder --chown=1001:1001 /app/.next/static ./.next/static
# add in libpiod for access to Raspberry PI IO pins
RUN rpm -ivh https://dl.fedoraproject.org/pub/epel/epel-release-latest-8.noarch.rpm
RUN microdnf install libgpiod-utils
USER 1001
EXPOSE 3000
ENV PORT 3000
CMD ["node", "server"]The first change is that we use ubi8/nodejs-20 as the base image to build the application and the ubi8/nodejs-20-minimal as the base image to package the application. This is because we want to use the supported Red Hat Node.js images.
# Install dependencies only when needed
FROM registry.access.redhat.com/ubi8/nodejs-20 AS deps
.
.
.
# Production image, copy all the files and run next
FROM registry.access.redhat.com/ubi8/nodejs-20-minimal AS runner
.
.
.The second change is that we add the commands needed to install the gpio utilities the application uses to read the switches (gpioget as mentioned earlier):
# add in libpiod for access to Raspberry PI IO pins
RUN rpm -ivh https://dl.fedoraproject.org/pub/epel/epel-release-latest-8.noarch.rpm
RUN microdnf install libgpiod-utilsOther than that, it is pretty much a standard Next.js container build. If you want to dive deeper into what each section of the Containerfile is doing, check out How to deploy Next.js applications to Red Hat OpenShift, which explains each section.
Building the container
Now that we have the Containerfile, the next step is to build the container. We did that by running:
podman build . -t gas-station:latestNote: we have used the tag latest here, but that is not something you would want to do in a real deployment. You will want to consider your tagging strategy carefully to ensure that what's running in the device updates/does not update as planned. Docker Tagging: Best practices for tagging and versioning docker images provides some insight into the pluses and minuses of some of the alternatives ways to managed tags.
If you want to try building the container yourself, make sure you have Podman (a free and open source alternative to Docker) installed, clone the gas-station repository, and run the same command. Some Linux distributions come with Podman installed. If you are on a platform where it is not already available, Podman Desktop lets you run Podman on Windows, macOS, or Linux. It’s free and a great way to build, run and manage your containers.
While you can build the container on any type of host, building one that will run on the Raspberry Pi takes a bit more care. The fastest way to do it is to run the podman build command on a Raspberry Pi. That is what we did initially to test out the container.
The great news, though, is that you can use Podman to build a container that will run on the Raspberry Pi on your local desktop or existing infrastructure, you just need to tell Podman what the target architecture is:
podman build . --arch=arm64 -t gas-station:latestIt may be a bit slower to build because building for an architecture that does not match the host machine uses emulation, but it’s a great option to have, particularly for CI where the build time might not matter as much as being able to reuse existing infrastructure.
Once the build is complete we should have a container in the local registry:
[user1@localhost gas-station]$ podman images |grep gas-station
localhost/gas-station latest 30ded1b2fcb5 2 hours ago 295 MBTypically you might iterate for development by building on the Raspberry Pi, but once updates are pushed to version control (e.g., GitHub), the production build could use existing CI infrastructure leveraging existing technologies like Tekton pipelines or OpenShift BuildConfigs.
Getting the container onto the Raspberry Pi
Ok, now we have a container. How do we get it to the Raspberry Pi? The easiest way is to push it to a registry like quay.io. We did that as follows:
podman tag 30ded1b2fcb5 quay.io/midawson/gas-station:latest
podman push quay.io/midawson/gas-station:latestWhere 30ded1b2fcb5 is the hash for the container we built earlier.
On the Raspberry Pi we can now run:
podman pull quay.io/midawson/gas-station:latest
podman run -d -p 3000:3000 quay.io/midawson/gas-station:latest
And our application will be up and running on the Raspberry Pi. Yay!
For our example we used a public repository, but for edge devices within a business, it’s more likely you’ll use an internal repository or repositories which are private to your organization. Either way, updates to the application are now as easy as pushing a new version of the container, pulling that container on the edge device and then starting the container.
That flow is a lot easier and faster than building an rpm and deploying with rpm-ostree. We also have used tools and processes that are a common part of the development of existing hybrid cloud applications.
Of course we don’t want to have to log onto the device to manually pull and start containers for a real deployment. We’ll show how to automate that in a later section.
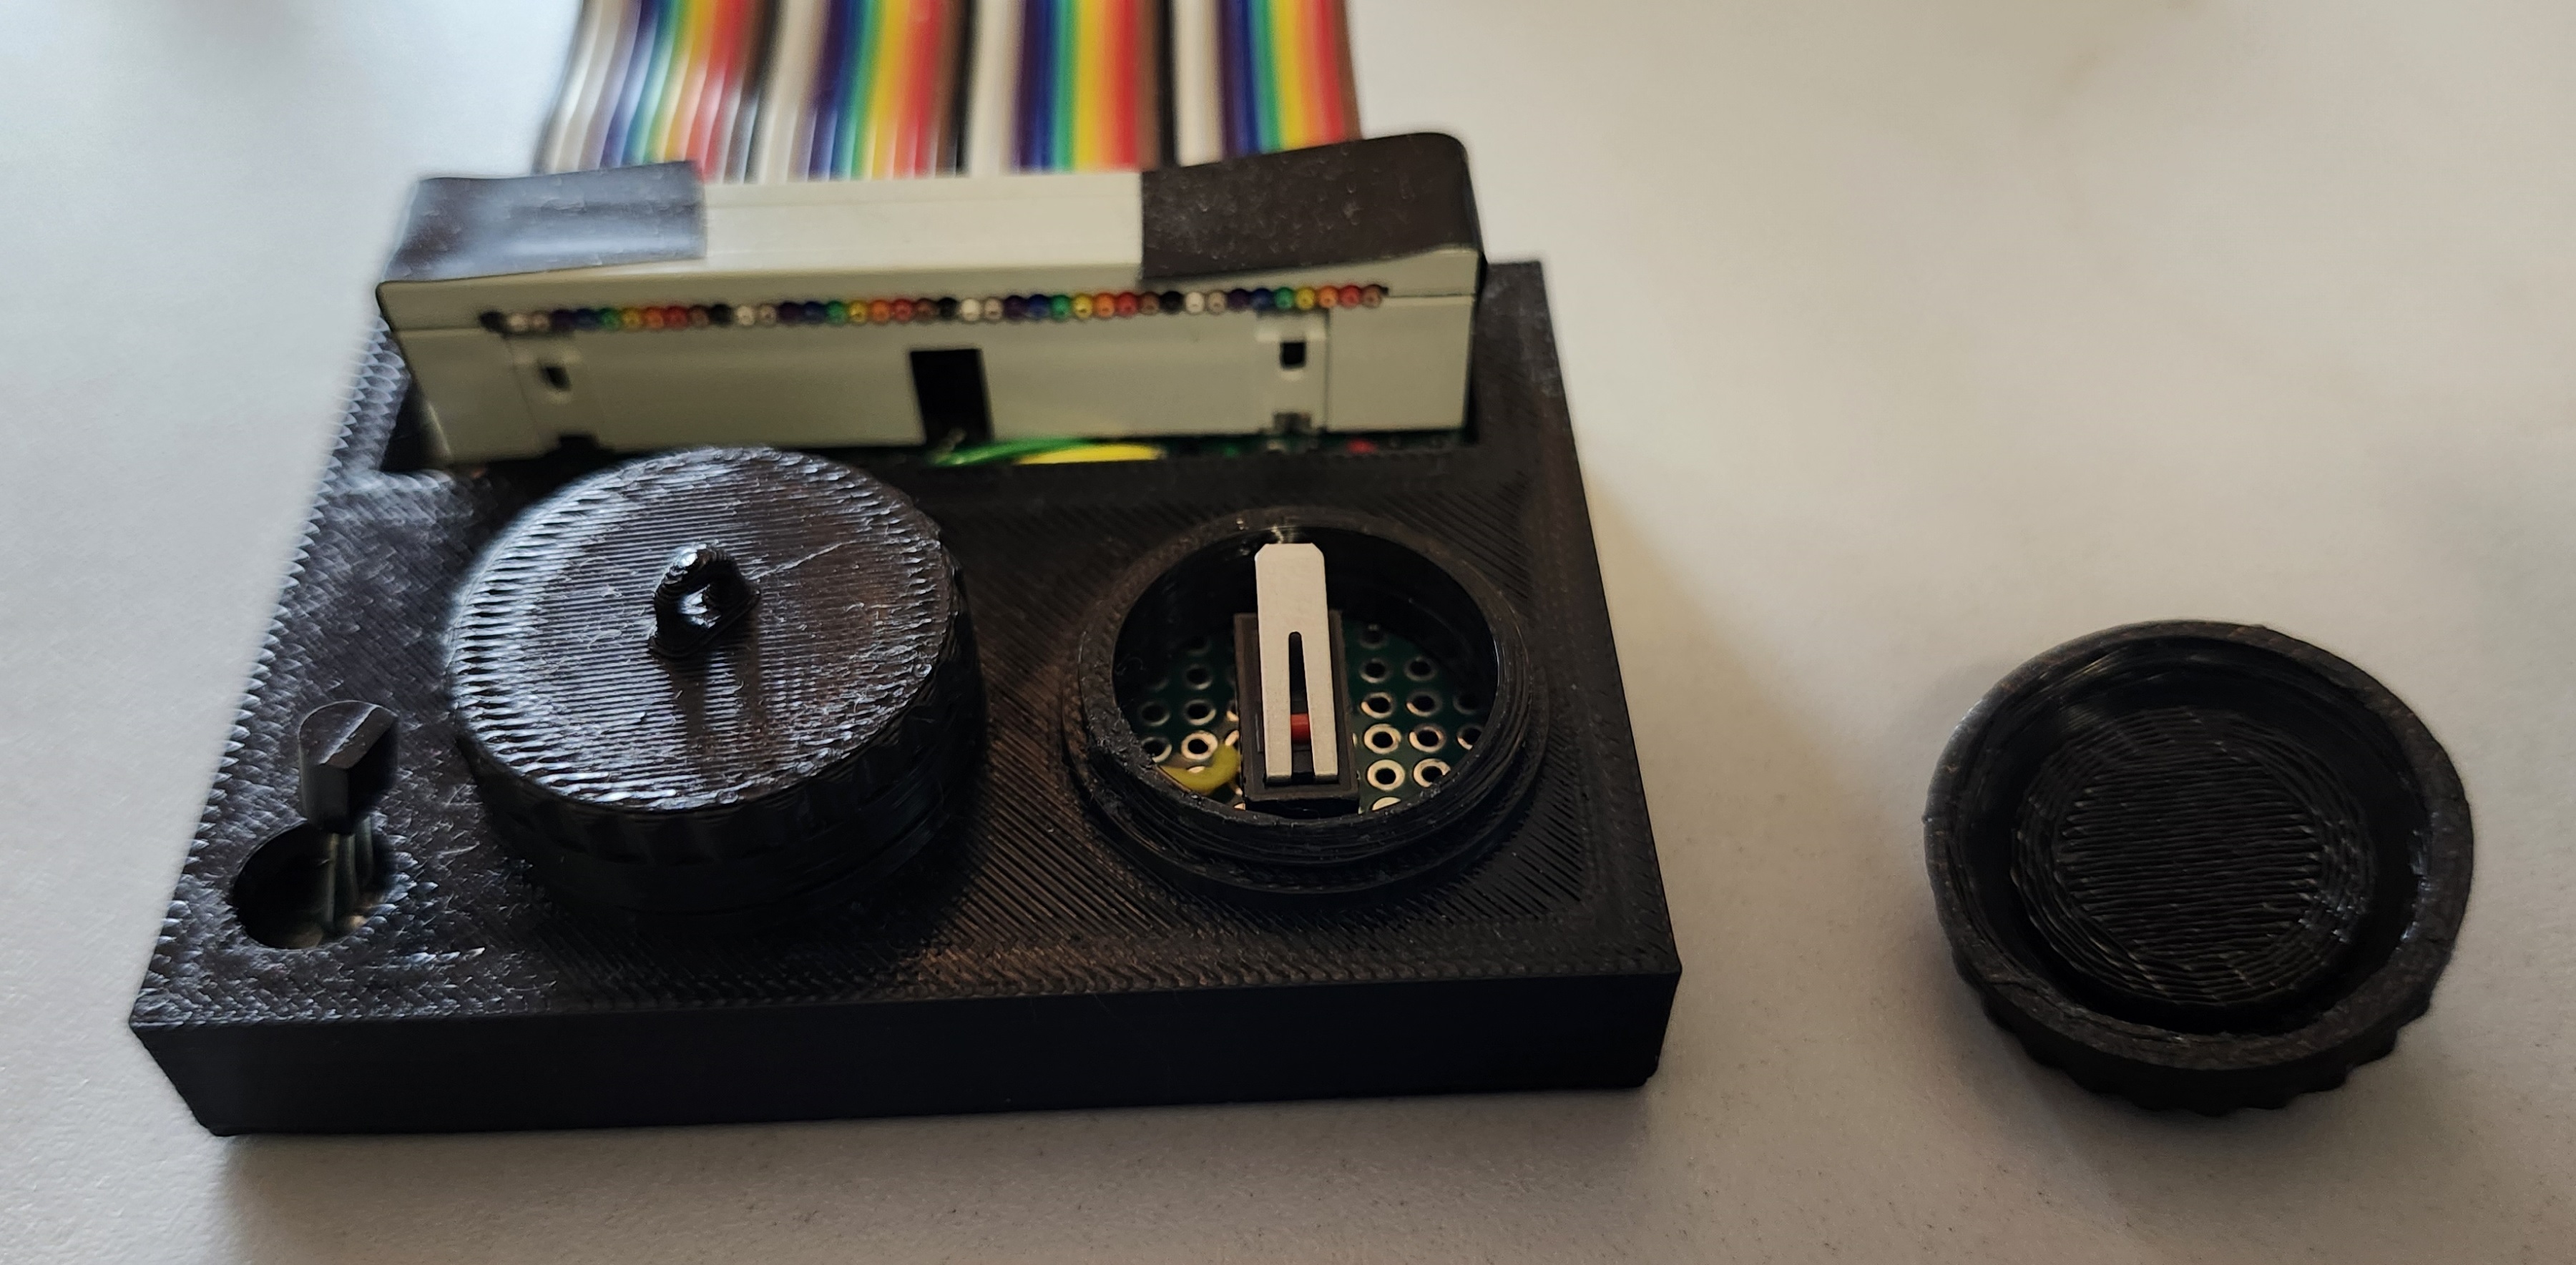
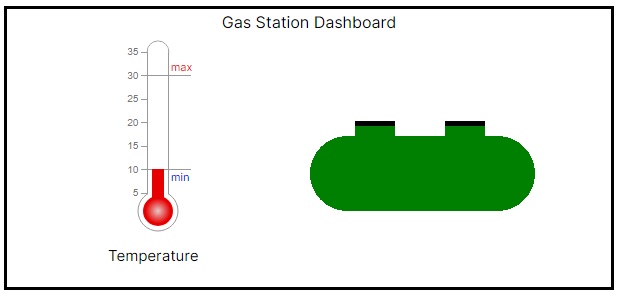
Unfortunately if we experiment a bit we’ll find that the application is not responding to the tank switches. With the right tank top removed, the tank should be red! Figure 4 shows the tank with one cap removed, but the UI is green, as shown in Figure 5.
That’s because the application is now running in a container. This means that it does not necessarily have access to the devices on the host. We’ll cover how to fix that in the next section.
Passing devices to the container
A container provides an isolated environment that the application runs in. That means that devices on the host are not necessarily available in the container. When we first ran the application we discovered that the device for the temperature sensor was available, while the device for the switches was not.
The good news is that Podman allows devices to be passed through to a container using the --device option. We added the following to our command to start the container:
podman run --device=/dev/gpiochip0 -d -p 3000:3000 quay.io/midawson/gas-station:latestFrom the application code you can see that the device used to read the switches is /dev/gipochip0. In Linux, devices are most often exposed as a file under /dev and you can use the --device or --volume to map the device into the container.
Unfortunately even after this change the switches could still not be read properly. This is because Podman runs the container rootless and simply mapping it in does not result in the correct rw attributes for it to be accessed. There are different ways to address this but we chose to add the option --group-add keep-groups which ensured groups were mapped in a way that allowed the device to be accessed (provided we had set the privileges to rw on /dev/gpiochip0 as outlined in part 1). You can read more about the issue in “Using files and devices in Podman rootless containers”. The resulting command was:
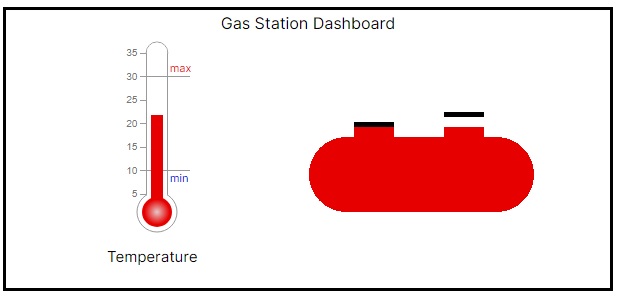
podman run --group-add keep-groups --device=/dev/gpiochip0 -d -p 3000:3000 quay.io/midawson/gas-station:latest.With that we confirmed that the device could read and access the devices. Now Figure 6 shows the tank with one cap removed, and the UI is red as expected (Figure 7.)

You may be wondering why the temperature sensor was available without any additional configuration. This is because containers share the kernel and any loaded kernel modules with the host. Since the temperature sensor was supported through a kernel module as outlined in part 1 it was automatically available in the container.
A fully configured edge device
Now we know how we can easily build the container, get it to the device and start the container. Doing that manually for development and testing is okay, but for deployment it is not feasible in most cases. This is where image builder can help us define and automate a flow that will generate an SD card which can be installed into a new device and when the device boots it will start the current version of the application.
Starting at boot
The first piece of the puzzle is the support in Podman called Podman Quadlet. It lets us add a file that will result in Podman running (and downloading if necessary) a container as part of the systemd startup of Fedora. In our case we added a file called:
/etc/containers/systemd/gas-station.containerWith the following contents:
[Service]
Restart=always
ExecStartPre=chmod 666 /dev/gpiochip0
ExecStartPre=modprobe w1-therm
ExecStartPre=/bin/sleep 30

[Container]
ContainerName=gas-station
Environment=STATION_TOPIC_PATH=gas_station/ottawa/bank-street
Image=quay.io/midawson/gas-station:latest
Label="io.containers.autoupdate=image"
PublishPort=3000:3000
AddDevice=/dev/gpiochip0
PodmanArgs=--group-add keep-groups

[Install]
WantedBy=multi-user.target
In the [Service] section we indicated that we want the container to restart if it stops running for some reason, and have a few ExecStartPre commands which are run before the container is started. These commands set the required rw access on the device we access the switches through and load the w1-therm kernel module that lets us access the temperature sensor. They also wait for 30 seconds after boot to start the container so that any other required system setup is complete.
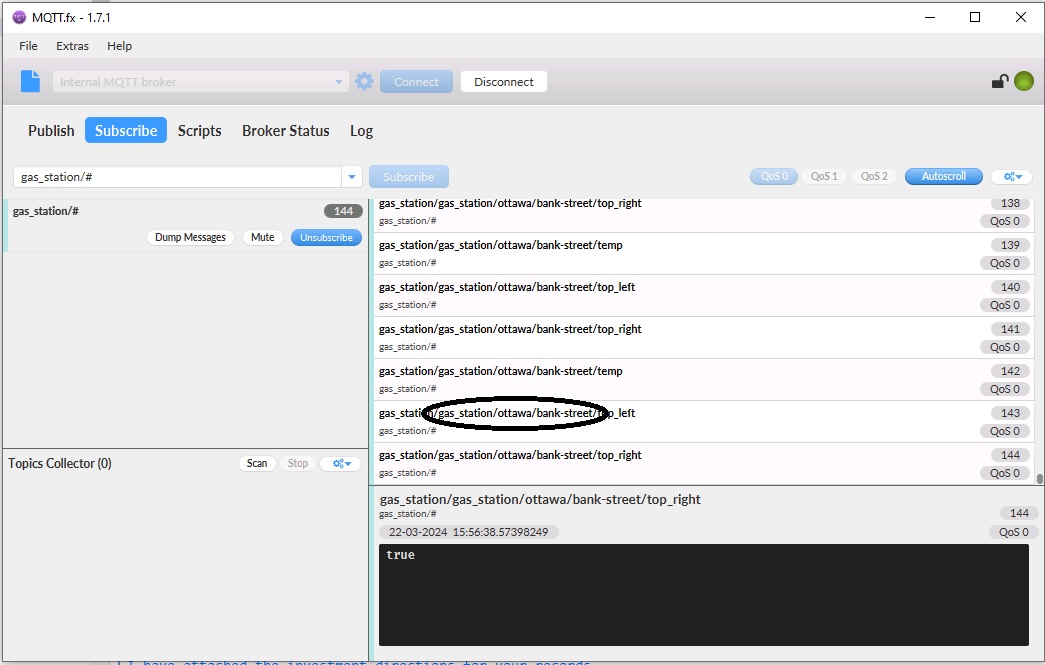
In the [Container] section, we provide the arguments needed to replicate the Podman command we used earlier to start the application container. If you look closely, you’ll notice that there are two additional arguments. The Environment command is used to set the MQTT topic on which the application posts messages. We externalized this so that we can set it differently for each station and have multiple gas stations publishing back to the shared MQTT server. Figure 8 shows the application publishing to the configured topic.
The other new option in the [Container] section, Label="io.containers.autoupdate=image", we’ll talk about in the section on updating the application.
The [Install] section indicates that we want to start the container once the system is ready to run applications after boot.
After adding the gas-station.container file, the container will now be downloaded from the registry if necessary and started when the system boots. The container will also be restarted if it ever stops so we know it will always be running, which is what we want for our edge device. If you log into the Raspberry PI you can also start/stop/restart the container with the following commands:
systemctl stop gas-station
systemctl start gas-station
systemctl restart gas-stationWe can also get the current status with:
bash-5.2# systemctl status gas-station

● gas-station.service
     Loaded: loaded (/etc/containers/systemd/gas-station.container; generated)
    Drop-In: /usr/lib/systemd/system/service.d
             └─10-timeout-abort.conf
     Active: active (running) since Fri 2024-03-22 19:47:21 UTC; 15min ago
    Process: 29720 ExecStartPre=chmod 666 /dev/gpiochip0 (code=exited, status=0/SUCCESS)
    Process: 29722 ExecStartPre=modprobe w1-therm (code=exited, status=0/SUCCESS)
    Process: 29723 ExecStartPre=/bin/sleep 30 (code=exited, status=0/SUCCESS)
   Main PID: 29857 (conmon)
      Tasks: 12 (limit: 8976)
     Memory: 55.2M
        CPU: 22.441s
     CGroup: /system.slice/gas-station.service
             ├─libpod-payload-484377384e684b45377a90e3f5d220684145d81f1c8bfafb66efabd4d340f108
             │ └─29859 next-server
             └─runtime
               └─29857 /usr/bin/conmon --api-version 1 -c 484377384e684b45377a90e3f5d220684145d81f1c8bfafb66efabd4d340f108 -u 484377384e684b45377a90e3f5d220684145d81f1c8bfafb66efabd4d340f108 -r /usr/bin/>

Mar 22 19:47:21 localhost.localdomain podman[29774]: 2024-03-22 19:47:21.289284965 +0000 UTC m=+0.844523639 container init 484377384e684b45377a90e3f5d220684145d81f1c8bfafb66efabd4d340f108 (image=quay.io/>
Mar 22 19:47:21 localhost.localdomain podman[29774]: 2024-03-22 19:47:21.298479267 +0000 UTC m=+0.853717866 container start 484377384e684b45377a90e3f5d220684145d81f1c8bfafb66efabd4d340f108 (image=quay.io>
Mar 22 19:47:21 localhost.localdomain systemd[1]: Started gas-station.service.
Mar 22 19:47:21 localhost.localdomain gas-station[29774]: 484377384e684b45377a90e3f5d220684145d81f1c8bfafb66efabd4d340f108
Mar 22 19:47:22 localhost.localdomain gas-station[29857]:    ▲ Next.js 14.0.3
Mar 22 19:47:22 localhost.localdomain gas-station[29857]:    - Local:        http://484377384e68:3000
Mar 22 19:47:22 localhost.localdomain gas-station[29857]:    - Network:      http://10.88.0.7:3000
Mar 22 19:47:22 localhost.localdomain gas-station[29857]:
Mar 22 19:47:22 localhost.localdomain gas-station[29857]:  ✓ Ready in 231ms
Mar 22 19:47:23 localhost.localdomain gas-station[29857]: Socket is initializing
Which lets us confirm that Podman ran successfully to start the application container.
Building a fully configured SD Card
It’s great to be able to configure the Raspberry PI to start the container on boot but we don’t want to have to do that manually for each device and we don’t want to have to do that if we need to send an updated SD Card to a gas station in the field.
This is where image builder comes in. By extending the blueprints we introduced in part 1 we can build an SD card which includes all of the configuration required so that we can just plug in a new SD card and the Raspberry PI will boot up, pull the latest version of the application container and start it running.
Note that this does mean that connectivity to the image registry will be required when the device starts the first time, otherwise it will not have any version of the application to run. If need to handle the case where there may not be connectivity on first installation, you might consider extending the blueprint to build in a container that has an initial version of the application.
If you replace the fedora-base blueprint outlined in part one with the following blueprint (fedora-base-container) and follow the instructions from part 1 it will build an SD card with the required configuration:
name = "fedora-base-container"
description = "base container launch template for Node.js edge example"
version = "0.0.1"
modules = []
groups = []
distro = ""

[[packages]]
name = "podman"

[[packages]]
name = "kernel-modules-extra"

[customizations]
[customizations.timezone]
[customizations.locale]
[customizations.firewall]
ports = ["3000:tcp"]
[customizations.firewall.services]
enabled = ["http", "https", "ntp", "dhcp", "ssh"]
disabled = ["telnet"]
[customizations.services]
enabled = ["sshd"]

[[customizations.files]]
path = "/etc/containers/systemd/gas-station.container"
user = "root"
group = "root"
mode = "644"
data = "[Service]\nRestart=always\nExecStartPre=chmod 666 /dev/gpiochip0\nExecStartPre=modprobe w1-therm\nExecStartPre=/bin/sleep 30\n\n[Container]\nContainerName=gas-station\nEnvironment=STATION_TOPIC_PATH=gas_station/ottawa/bank-street\nImage=quay.io/midawson/gas-station:latest\nLabel=\"io.containers.autoupdate=image\"\nPublishPort=3000:3000\nAddDevice=/dev/gpiochip0\nPodmanArgs=--group-add keep-groups\n\n[Install]\nWantedBy=multi-user.target\n"
The two main additions are the kernel-modules-extra which installs the kernel module for the temperature sensor, and the [[customizations.files]] second which adds the gas-station.container file described in the previous section (the format is a bit hard to read because newlines are not allowed in the data variable).
I should have said that using this new template “almost” let us build an SD card that could be inserted and would boot and run the container. We did have to add one more step. After the SD card is created using the arm-image-installer, we need to mount the first partition with:
mkdir /mnt/rpi1
mount /dev/sdb1 /mnt/rpi1  (first partition in my case)
And then edit /mnt/rpi1/config.txt to add:
dtoverlay=w1-gpio...at the end. This results in dtoverlay=w1-gpio being in /boot/efi/config.txt when the Raspberry PI boots which was needed to access the gpio as discussed in part 1.
With this approach we can manage configuration of individual devices through the template configured when building the image by adding options to the environment like STATION_TOPIC_PATH, or even better we might have the device query for its configuration on boot so that a single image can be shared across all devices. What’s important is that we’ve shown how to use image builder to create images in a way that can be automated using the image builder command line interface, and with all of the configuration files managed through version control.
At the same time the management of the version of the application itself is handled separately through containers in the registry allowing the application to be more easily updated. In the next section we’ll talk about updating the application.
Updating the application
With the approach outlined so far, we can update the application by:
- Building a new version of the application and pushing it to the registry with:
podman push quay.io/midawson/gas-station:latest- Logging into the device and running:
podman pull quay.io/midawson/gas-station:latest
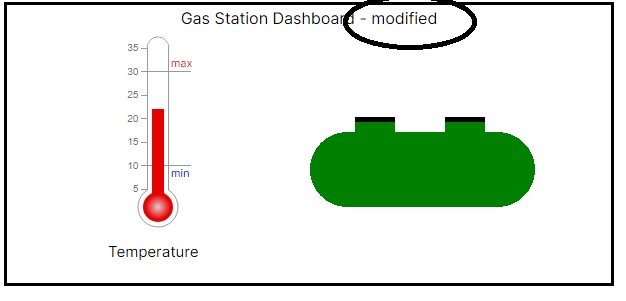
systemctl restart gas-stationFigure 9 shows the UI before having pushed an updated version of the application and Figure 10 shows the UI for application after the push.

We can just as easily revert to the old version of the application by tagging the older container with the latest again and then pushing and restarting on the Raspberry PI.
This is still a bit manual though, having to log into the device to pull the updated container and restart the service with systemctl. Earlier, we’d mentioned the additional Podman option that we added in gas-station.container - Label="io.containers.autoupdate=image". By default that makes Podman check at midnight for an updated image in the registry, pull down the update if necessary and restart the container. This means we already have an auto-updating application. If we push a new version of the application container all of the devices will start using that version of the application the next day.
While the auto update illustrates a simple way to update the application automatically at a certain interval (which can be configured), many organizations will want more control over how and when the application is updated. You can likely already think of a few ways you can build scripts to provide more flexibility; we’ll dive into that in the third part in the series, which will cover advanced container management at the edge for Node.js applications.
Wrapping up
In this installment of the 3-part series, we have:
- Provided a bit more detail on our example Node.js based application.
- Showed you how to use containers to build and deploy your Node.js/Next.js application to an edge device.
- Demonstrated how you can use RHEL image builder to create a fully configured image that once installed in a Raspberry Pi will boot, pull your application container image and start running your application.
Now that we know more about the application and how to build it into a container, in the next installment we will dive deeper in how you can better manage the Node.js application containers deployed to the edge: Advanced container management at the edge for Node.js apps
Node.js and JavaScript at the edge: The why, what, and how
You can watch the following video to learn more about building, deploying, and managing Node.js applications running on the edge.
If you would like to learn more about what the Red Hat Node.js team is up to while you wait for the next installment, you can check out the Node.js topic page, and the Node.js Reference Architecture.
Last updated: May 22, 2024