Next.js is a popular framework for deploying sites based on Node.js. You can read about many popular Node.js frameworks in part 6 of the Red Hat Developer series on the Node.js reference architecture.
In this article, you'll learn how to deploy Next.js applications using the ubi8/nodejs-16 and ubi8/nodejs-16-minimal containers available from Red Hat.
If you are a Red Hat customer with support, then you'll want to use the UBI or RHEL containers; this article was inspired in part because one of our customers asked us how to do that with Next.js. Even if you are not a customer yet, ubi8 containers are free to use and a great choice; we've seen their usage continue to grow.
Once you've seen how to build a Next.js application on top of the UBI containers, we'll show you how you can do the build and run on the Red Hat OpenShift Container Platform, which is a great way to deploy your applications in a hybrid cloud environment.
Using Next.js with or without Node.js?
Like a number of other frameworks, Next.js can export your application as static HTML. However, only a subset of features are supported, with serverless functions and server-side rendering being two major features you wouldn't be able to use. If you are deploying as static HTML only, you most likely want to use Nginx to serve that static HTML. The Red Hat Developer article Modern web applications on OpenShift: Using chained builds shows you how you can do that with Nginx and OpenShift.
In this article, though, we'll assume you do want to use features like serverless functions and server-side rendering. That means you need Node.js to run your Next.js application in production.
Building a container to run your Next.js application
While the stewards of Next.js would like you to run in their environment, there are reasons you might not want to do so. Some organizations want more control over their deployments and either prefer to host them on their own infrastructure or with a cloud provider of their choice.
The good news is that there is some information on building containers to host a Next.js application in the examples that Next.js provides. We can use that pattern and adapt it to use the ubi8 Node.js containers using a multi-stage build.
A multi-stage build is a best practice that uses a larger builder image during the build and a smaller deployment image for the final container. This works because not all components that are needed during the build are required for deployment. For example, a C++ compiler that may be needed to build a native add-on would not ultimately be needed when you deploy the application. The result is that the end container can be much smaller than it would be if the build container were used for the final image. You can read more about this here.
In order to build the Next.js application into a container, we need the applications files, a Dockerfile, and a Next.js configuration file that tells Next.js to build for a stand-alone deployment. Here's what the Next.js configuration file, called next.config.js, should look like:
/** @type {import('next').NextConfig} */

module.exports = {

  output: 'standalone',

}
The Dockerfile is as shown below. We will explain each section after the listing.
# adapted from https://github.com/vercel/next.js/tree/canary/examples/with-docker
# needs next.config.js to set build to stand-alone with context as follows
# /** @type {import('next').NextConfig} */
# module.exports = {
#  output: 'standalone',
# }

# Recommended to have .dockerignore file with the following content
# Dockerfile
# .dockerignore
# node_modules
# npm-debug.log
# README.md
# .next
# .git

# Install dependencies only when needed
FROM registry.access.redhat.com/ubi8/nodejs-16 AS deps
USER 0
WORKDIR /app

# Install dependencies based on the preferred package manager
COPY package.json yarn.lock* package-lock.json* pnpm-lock.yaml* ./
RUN \
  if [ -f yarn.lock ]; then yarn --frozen-lockfile; \
  elif [ -f package-lock.json ]; then npm ci; \
  elif [ -f pnpm-lock.yaml ]; then yarn global add pnpm && pnpm i; \
  else echo "Lockfile not found." && exit 1; \
  fi

# Rebuild the source code only when needed
FROM registry.access.redhat.com/ubi8/nodejs-16 AS builder
USER 0
WORKDIR /app
COPY --from=deps /app/node_modules ./node_modules
COPY . .

# Next.js collects completely anonymous telemetry data about general usage.
# Learn more here: https://nextjs.org/telemetry
# Uncomment the following line in case you want to disable telemetry during the build.
ENV NEXT_TELEMETRY_DISABLED 1

# If using yarn uncomment out and comment out npm below
# RUN yarn build

# If using npm comment out above and use below instead
RUN npm run build

# Production image, copy all the files and run next
FROM registry.access.redhat.com/ubi8/nodejs-16-minimal AS runner
USER 0
WORKDIR /app

ENV NODE_ENV production
# Uncomment the following line in case you want to enable telemetry during runtime.
ENV NEXT_TELEMETRY_DISABLED 1

COPY --from=builder /app/public ./public

# Automatically leverage output traces to reduce image size
# https://nextjs.org/docs/advanced-features/output-file-tracing
COPY --from=builder --chown=1001:1001 /app/.next/standalone ./
COPY --from=builder --chown=1001:1001 /app/.next/static ./.next/static

USER 1001

EXPOSE 3000

ENV PORT 3000

CMD ["node", "server.js"]
The Dockerfile builds two intermediate layers (deps and builder) and then the final image that we will deploy.
The first section installs the dependencies in the deps layer. The FROM line indicates that ubi8/nodejs-16 should be used as the base image for the layer.
# Install dependencies only when needed
FROM registry.access.redhat.com/ubi8/nodejs-16 AS deps
USER 0
WORKDIR /app

# Install dependencies based on the preferred package manager
COPY package.json yarn.lock* package-lock.json* pnpm-lock.yaml* ./
RUN \
  if [ -f yarn.lock ]; then yarn --frozen-lockfile; \
  elif [ -f package-lock.json ]; then npm ci; \
  elif [ -f pnpm-lock.yaml ]; then yarn global add pnpm && pnpm i; \
  else echo "Lockfile not found." && exit 1; \
  fi
The second part copies over the dependencies and then builds the application as a builder layer. Again, we use ubi8/nodejs-16 as the base image. We've also chosen to disable telemetry and to build with npm.
# Rebuild the source code only when needed
FROM registry.access.redhat.com/ubi8/nodejs-16 AS builder
USER 0
WORKDIR /app
COPY --from=deps /app/node_modules ./node_modules
COPY . .
# Next.js collects completely anonymous telemetry data about general usage.
# Learn more here: https://nextjs.org/telemetry
# Uncomment the following line in case you want to enable telemetry during the build.
ENV NEXT_TELEMETRY_DISABLED 1
# If using yarn uncomment out and comment out npm below
# RUN yarn build
# If using npm comment out above and use below instead
RUN npm run build
In the final step, we use the ubi8/nodejs-16-minimal image, as we don't need the tools and packages required for the build. Then we copy over the components that were built to create the final minimal image that will run the application.
# Production image, copy all the files and run next
FROM registry.access.redhat.com/ubi8/nodejs-16-minimal AS runner
USER 0
WORKDIR /app

ENV NODE_ENV production
# Uncomment the following line in case you want to enable telemetry during runtime.
ENV NEXT_TELEMETRY_DISABLED 1

COPY --from=builder /app/public ./public

# Automatically leverage output traces to reduce image size
# https://nextjs.org/docs/advanced-features/output-file-tracing
COPY --from=builder --chown=1001:1001 /app/.next/standalone ./
COPY --from=builder --chown=1001:1001 /app/.next/static ./.next/static

USER 1001

EXPOSE 3000

ENV PORT 3000

CMD ["node", "server.js"]
In each of these steps, we set the user to 0 with USER 0 at the start so that we can copy to the desired locations. This is necessary because the UBI Node.js images have the user set to 1001 by default for usage with Source-to-Image. In the final step, we set the user back to 1001, as we don't want our container to run as root. User 1001 is a user that has been added to the UBI Node.js containers as a user suitable for running the application.
Trying it out
You can try building and running a sample application with the Dockerfile by following the steps below. For those running on Fedora or RHEL, you can replace the docker command with podman.
npx create-next-app --example with-docker myapp
cp Dockerfile myapp
cp next.config.js myapp
cd myapp
docker build . -t ubi-nextjs
This should result in an image tagged with ubi-nextjs:latest. You can then run that image with:
docker run -p 3000:3000 ubi-nextjs
You should see the following output and then be able to connect with your web browser to port 3000:
Listening on port 3000 url: http://localhost:3000
You now have your first Next.js application running on the ubi8/nodejs-16 docker image!
Deployment to OpenShift
The next step is to build and deploy the Next.js application in OpenShift. There are many other ways to build and deploy in OpenShift—with Tekton, for instance—but for this example we'll stick to one of the easiest: the trio of an ImageStream, BuildConfig, and Deployment.
We'll also need a place to get the application from, and a Git repository is an easy place so that is what we'll use. You can push your Next.js application along with the Dockerfile and Next.js configuration file to a GitHub repository; I used this one. The BuildConfig will pull the application from that repository as part of the build.
An ImageStream provides us an easy place to store our Docker image once it's built. Once you've logged into OpenShift, you can create one by adding the following content to image-stream.yaml and then running oc apply -f image-stream.yaml:
kind: ImageStream
apiVersion: image.openshift.io/v1
metadata:
  name: ubi8-nextjs
  namespace: default
This will create a new ImageStream named ubi8-nextjs.
The next step is to create a BuildConfig that will build our application from the Dockerfile we discussed earlier and push it to the ubi8-nextjs ImageStream. You can do that by adding the following content to build-config.yaml and running oc apply -f build-config.yaml:
apiVersion: build.openshift.io/v1
kind: BuildConfig
metadata:
  name: ubi8-nextjs
  labels:
    app: ubi8-nextjs
spec:
  source:
    type: Git
    git:
      uri: https://github.com/nodeshift-blog-examples/ubi8-nextjs
    contextDir:
  strategy:
    type: Docker
    dockerStrategy:
      dockerfilePath: Dockerfile    # Look for Dockerfile in: gitUri/contextDir/dockerfilePath
  output:
    to:
      kind: ImageStreamTag
      name: ubi8-nextjs:latest
This BuildConfig will clone the contents of a GitHub repository for your application and then build it using the Dockerfile at the root of the application. Once built, the container is pushed to the ubi8-nextjs ImageStream with the tag latest.
Once you've applied the YAML for the BuildConfig, you can go to the OpenShift UI, select the ubi8-next BuildConfig and then select Start build under the Actions dropdown, as shown in Figure 1. (Of course you can do this from the command line as well.)

Once the build completes, the same Docker image that you built locally earlier is now stored in the ImageStream.
The last step is to deploy the application from the ImageStream. To do that, we'll use a Deployment, which we can do either through the UI or some more YAML. The easiest way is through the UI, as it will automatically create additional resources like services that we need to access the application.
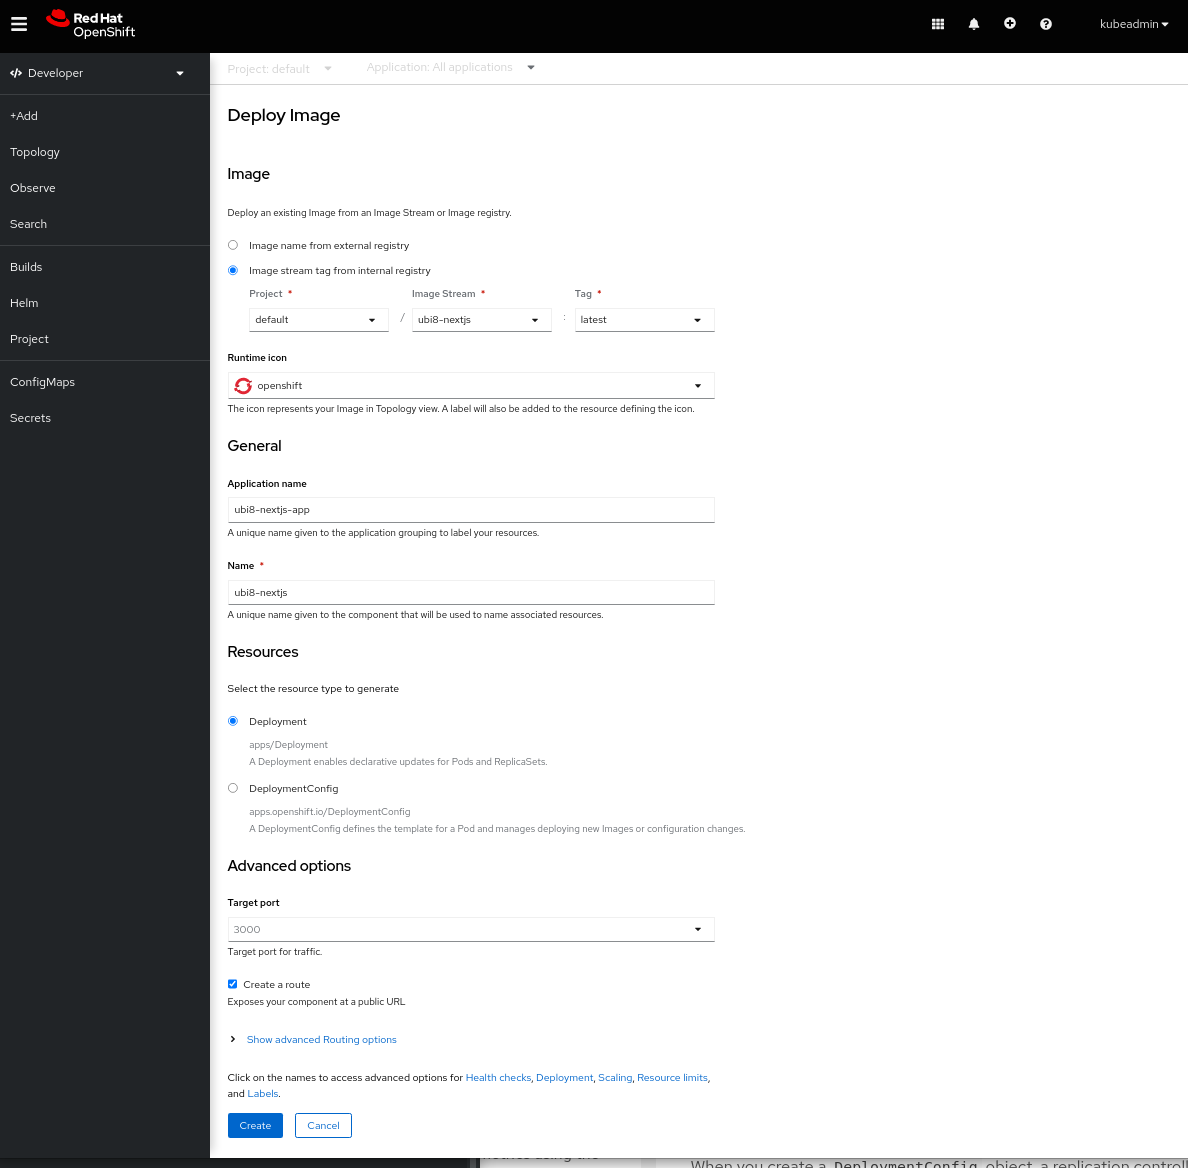
Navigate to the Developer Topology view and select the Add Page link. From the Add page, select Container images. From the Deploy image page that pops up (Figure 2), select Image stream tag from internal registry, and then ubi8-nextjs for the Image Stream and latest for the Tag. Scroll down and set the Target port to match the value in our Dockerfile, which is 3000. Accept the rest of the default values and select Create.
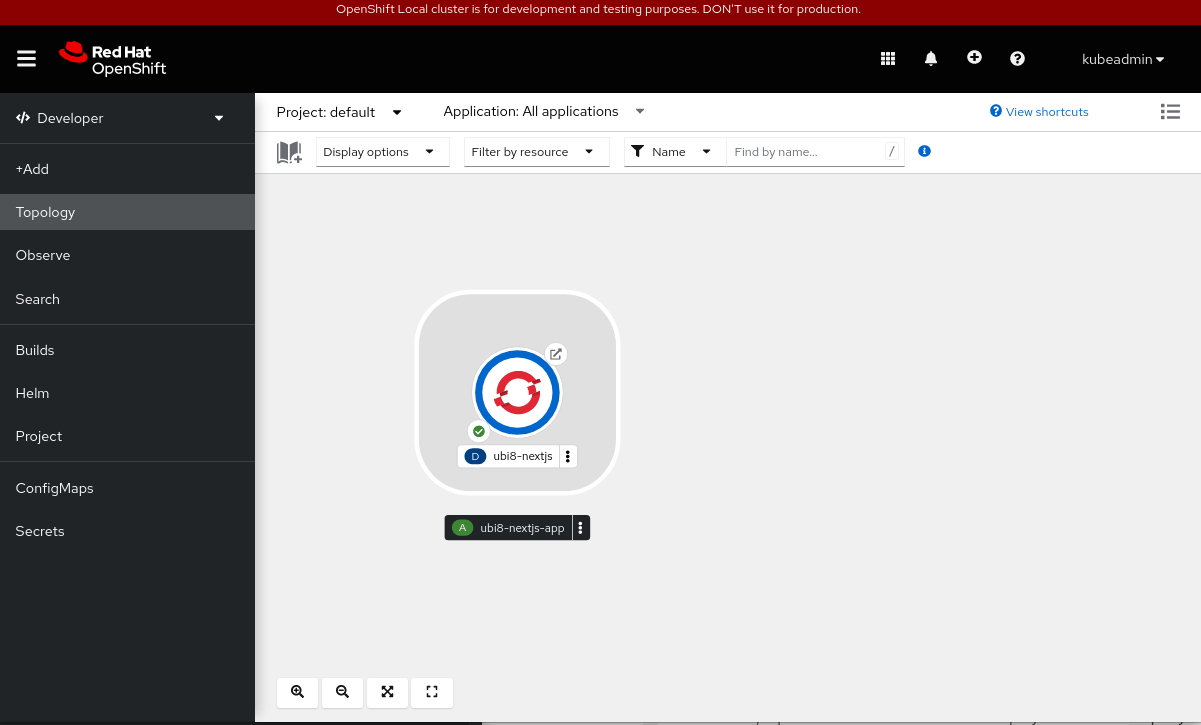
You should then return to the Topology page, where you will see the running application, as in Figure 3.
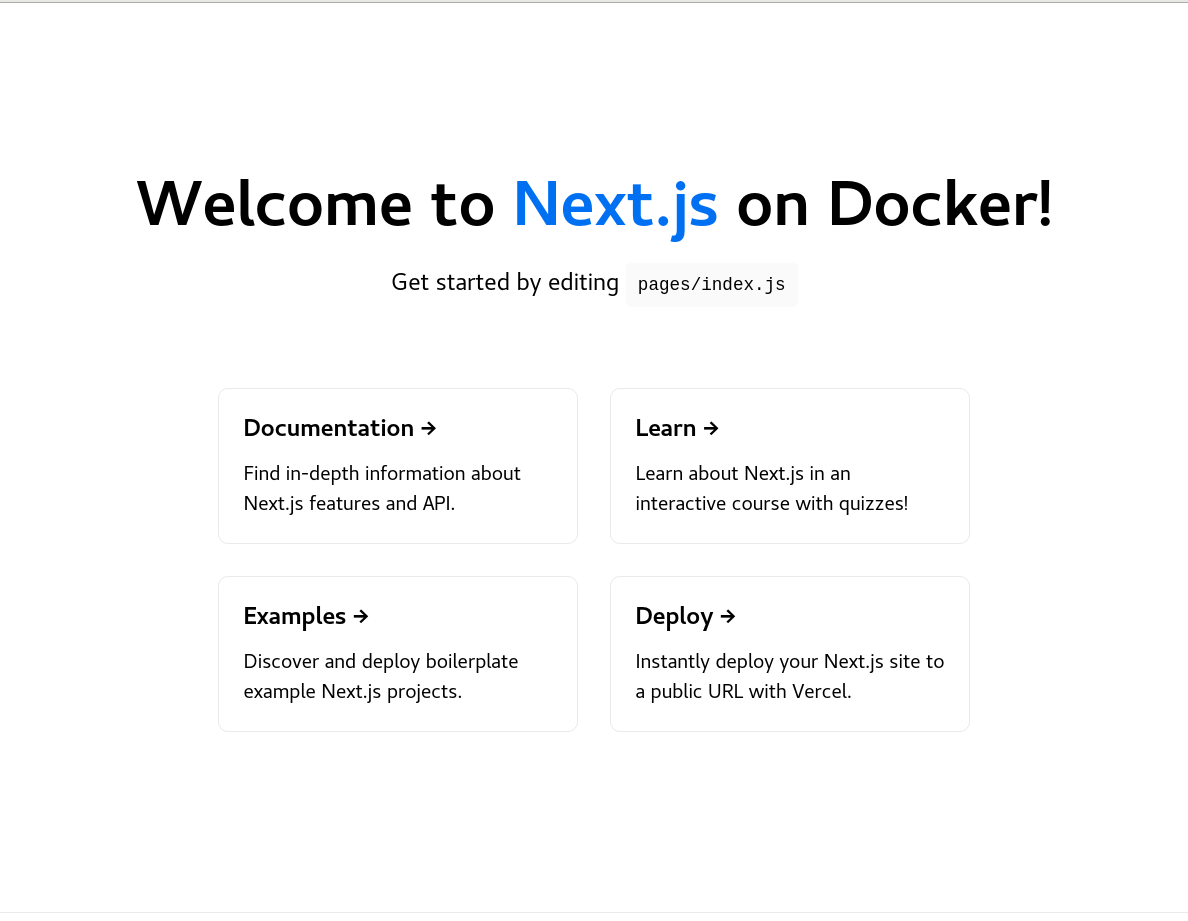
OpenShift automatically creates the service and route needed to access the application. Just click on the application to get more information and then follow the link provided under Routes, as in Figure 4.

That will take you to the default Next.js starter app that you created earlier. The welcome screen should look like Figure 5.
An easier way
I've talked you through the "hard way" of deploying this application so you'd understand a bit about ImageStreams and BuildConfigs. But in fact, it could have been even easier than that.
We could have simply selected Import from Git on the Add page, provided the URL for our GitHub repository, accepted all the defaults except for setting the target port to 3000, and selected Create. This would have created the ImageStream, BuildConfig, Deployment, service and route automatically for us! You can't get much easier than that.
Wrapping up
In this article, you've learned how to build a Next.js application using the Red Hat ubi8 Node.js containers, and how to easily build and deploy that application in OpenShift. If you want to use Next.js and are a Red Hat customer, it's good to know how easy it is to use it with the supported Red Hat Node.js container images and then get it deployed to your OpenShift environment.
If you want to learn more about what Red Hat is up to on the Node.js front, check out our Node.js page.
Last updated: September 20, 2023