As the cost to performance ratio of small computer systems improves, more and more enterprises are moving from simpler IoT systems to deploying devices that can do more processing at the edge. As part of this transition, these edge devices start looking a lot more like servers in existing IT infrastructure. As a result, managing them as such becomes not only feasible but more cost effective.
This post is the first in a three-part series includes:
- Running Node.js applications on the edge with Red Hat Enterprise Linux (RHEL)/Fedora (this post)
- Containerizing your Node.js applications at the edge on RHEL/Fedora
- Advanced container management at the edge for Node.js applications
Why Node.js at the edge?
One question before we dive in might be “Why Node.js at the edge?” We’ve heard from the field that the convergence between IoT systems and existing IT infrastructure is being driven from two directions:
- The first is from those building IoT systems for many years. The developers typically use C/C++ for integration with hardware and the need to have some part of the software for edge devices to be written in C/C++ will likely remain. At the same time these C/C++ developers recognize that C/C++ is not an easy tool for building UIs, which are also a common requirement for edge devices. JavaScript with Node.js stands out as the most often used tool for building these UIs.
- The second direction driving the convergence is from those building and managing existing hybrid cloud based server IT infrastructure. As edge devices look more and more like the servers already being managed by existing IT infrastructure they look to use existing tools and approaches to manage edge devices. Node.js is a natural fit with the hybrid cloud, with its small footprint and fast startup.
With Node.js being a good fit with the existing hybrid cloud management systems and C/C++ developers wanting to learn “just one more language,” a natural solution is an edge system based on C/C++ for hardware integration and Node.js for the UI and integration into external messaging systems like MQTT.
The first part of this series will introduce our edge example built with Node.js. The second and third parts will improve the deployment of that application to make it both easier to deploy and manage.
We hope that this series helps both existing Node.js developers, as well as C/C++ developers, understand how Node.js can be used at the edge and how to support the convergence with existing hybrid cloud IT systems.
Our edge example
We’ve not worked in a gas station, so it’s unlikely our example covers a real-world use case. However, from what we’ve heard from the field, it should include elements of what might be commonly needed:
- Reading open/close sensors
- Reading temperature sensors
- Displaying sensor data
- Signaling alerts based on sensors
- Publishing sensor data to a shared communication infrastructure like MQTT
In the example, the hardware emulates monitoring of the main underground storage tank at the gas station. The tank has two fill lids that are opened/closed when refilled by a tanker. The attendant needs to ensure gas is only pumped when the lids are closed and the temperature is within the required range.
Hardware
The hardware (see Figure 1) includes:
- A Raspberry PI 4 running Fedora IoT.
- Two switches, each monitoring one of the two fill lids on the underground gas storage tank.
- A temperature sensor to monitor the temperature of the tank.
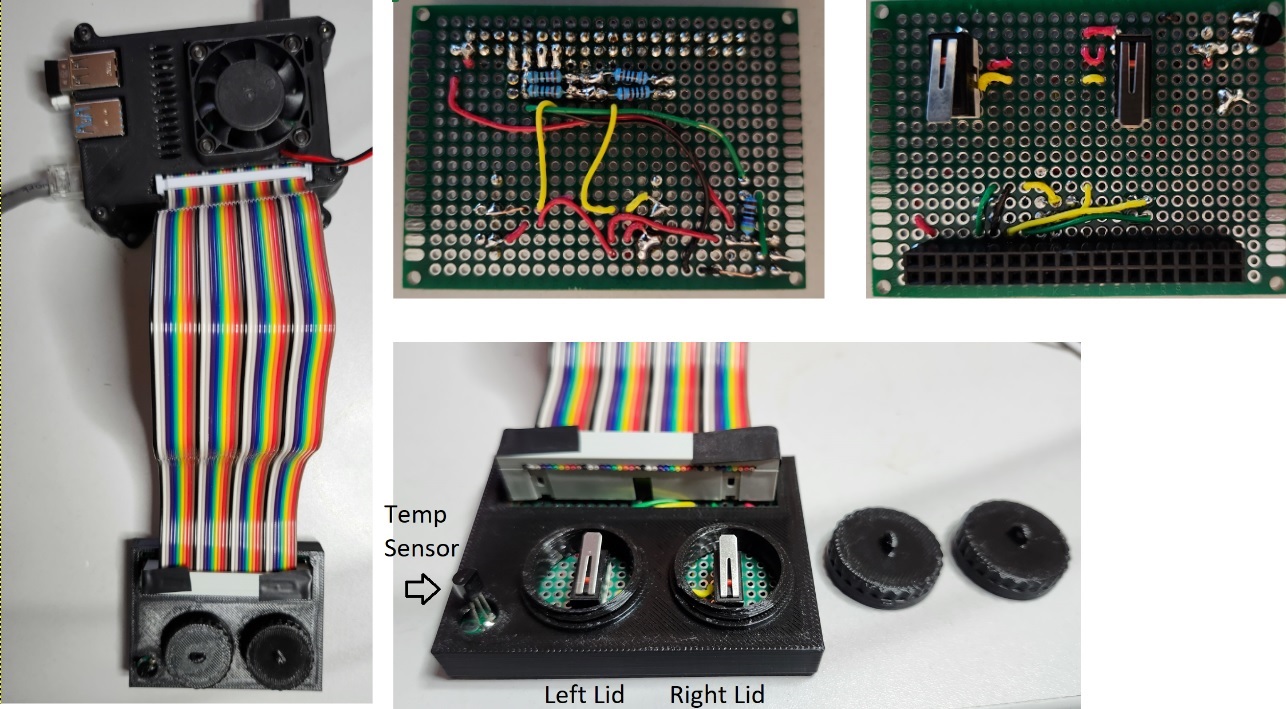
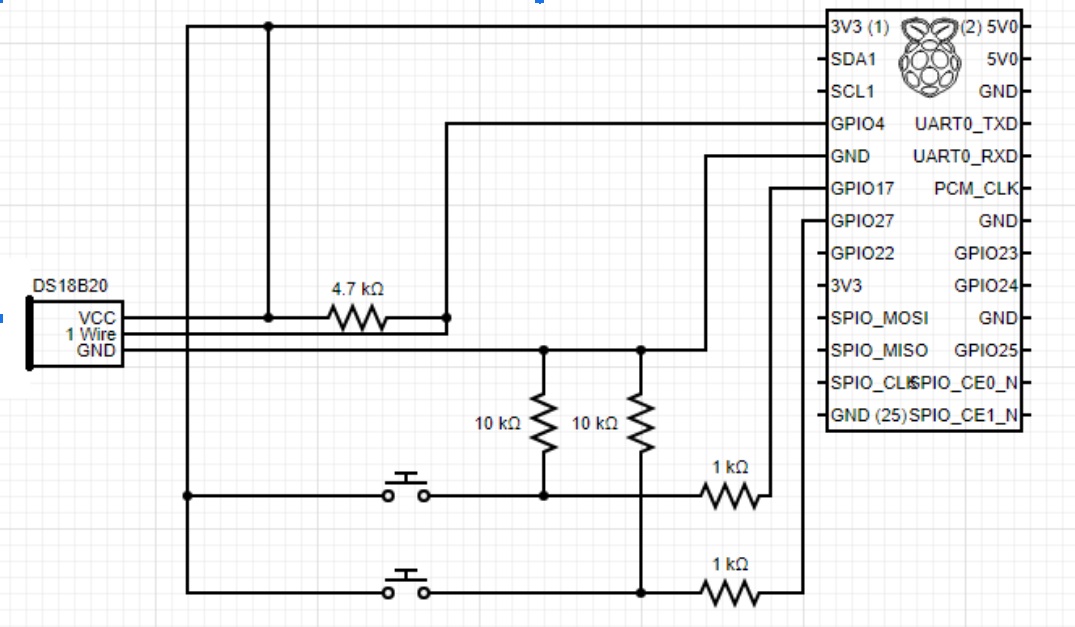
As you can see from the picture we can simulate opening the Left or Right fill lids by unscrewing the caps over the switches. We can simulate changing temperatures by breathing or touching the temperature sensor. The circuit for those interested is as follows (see Figure 2).
In a real-world use case, you'd probably be using a more hardened system (for example, a Compulab Fitlet2) running Red Hat Device Edge versus Fedora IoT. Having said that, this is what was available to us and Fedora-IoT is the upstream for Red Hat Device Edge so things will be pretty similar.
The software
There are three main components to the software that we need for our example:
- Operating system
- Device drivers
- The application
Operating system
Generating a good operating system image for an edge system is a whole topic on its own. However, we will try to cover what we did for the example quickly. The goal is to give you a feel of a good operating system base for an edge device and some of the attributes of how it is built and managed that impact how we later deploy our application on top of it.
Even a low cost Raspberry Pi 4 (~100 Canadian) provides quite a bit of horsepower with a quad core processor and 8GB of memory. This lets us run a full operating system like Fedora IoT which is great because it brings along with it a larger number of familiar tools and options.
For edge systems, the operating system should be immutable and image based so that the image can be fully tested and signed before being deployed at scale. You want to be sure that every gas station has a known configuration of the Operating System and that updates can be done safely, including rollbacks. We won’t go into all of the details but you can read more in the Fedora IoT docs.
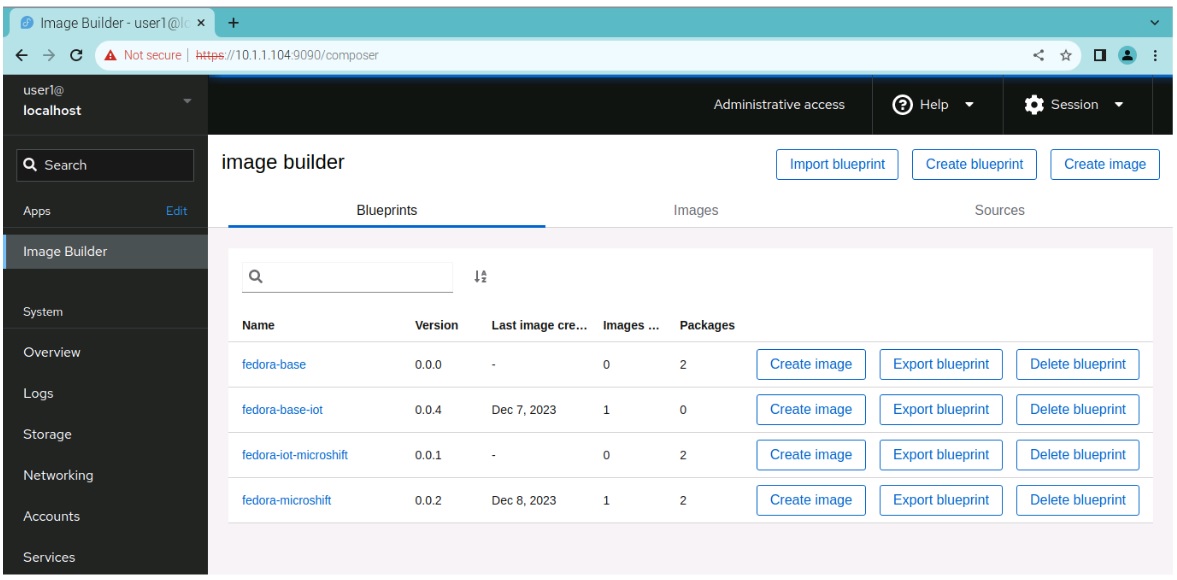
To create Fedora IoT images, you can use image builder either through the GUI available in Fedora or from the command line. Figure 3 is an example of the GUI on the system we used.
We don’t have enough space in this post to go into all of the details of using image builder but I’ll share how we used it to build the images for the gas-station edge device.
It’s easiest to build the images on the same kind of device on which they will be deployed. To make experimentation easier we used two devices (see Figure 4):
- Development system
- Target system
Both of these were Raspberry Pi 4s with 8 GB of memory. The Development system ran off a 512 G SSD which made it faster and easier to have multiple virtual machines. It was much faster to install and start/stop virtual machines than burning and installing SD cards on the development system.
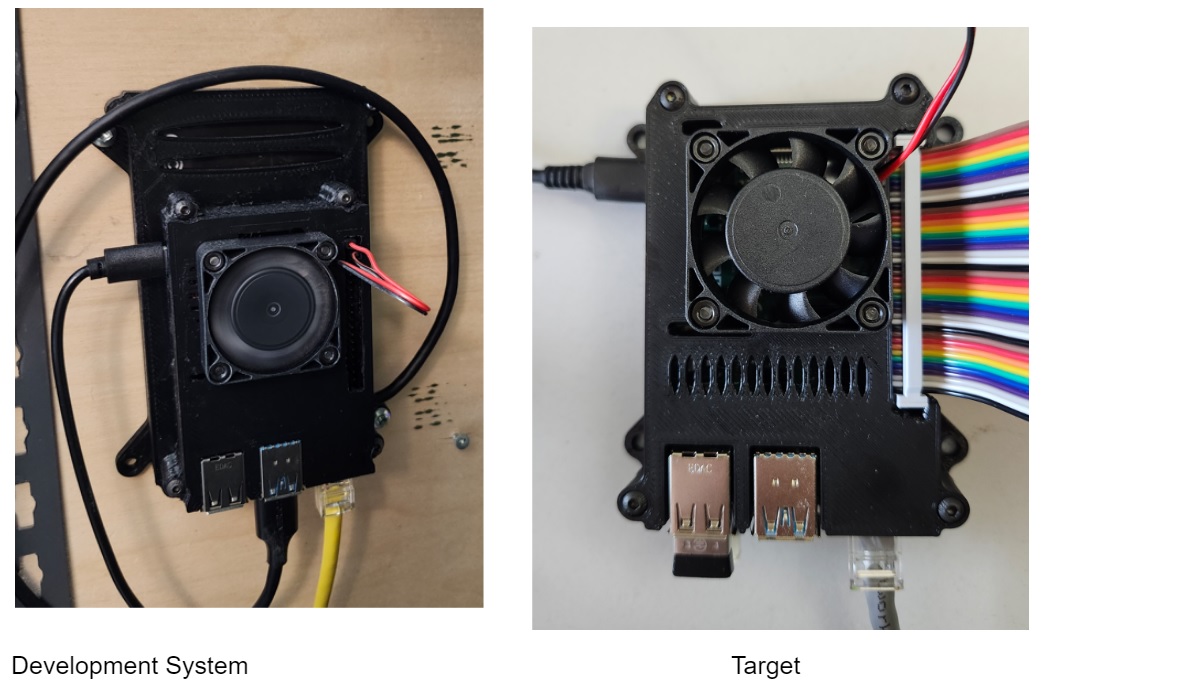
For the development system we first installed the default Raspberry Pi OS and then added the KVM virtual machine manager so that we could easily start/stop multiple virtual machines. We then created a virtual machine running Fedora server for ARM using the “Fedora-Server-dvd-aarch64-38-1.6.iso” (You should likely start with the most current release from the Fedora project.
Once you have the system up and running, you can connect on http://X1.X2.X3.X4:9090, where X1.X2.X3.X4 is the IP for your virtual machine in order to access the administrative UI. From there you can enable Image Builder. Introduction to Image builder provides the instructions for enabling and getting started with building images.
We used two blueprints, the first to create the edge commit that included the packages and configuration we needed for the edge example and the second to build an image we could install onto an SD card from that edge commit:
- fedora-base
- fedora-base-iot
The blueprints contained:
name = "fedora-base"

description = "base template for Node.js edge example"

version = "0.0.4"

modules = []

groups = []

distro = ""


[[packages]]

name = "nodejs20"


[[packages]]

name = "podman"


[customizations]

[customizations.timezone]

[customizations.locale]

[customizations.firewall]

ports = ["3000:tcp"]

[customizations.firewall.services]

enabled = ["http", "https", "ntp", "dhcp", "ssh"]

disabled = ["telnet"]

[customizations.services]

enabled = ["sshd"]
---------------------------------
name = "fedora-base-iot"

description = "blueprint to create raw image from edge commit"

version = "0.0.6"

packages = []

modules = []

groups = []

distro = ""


[customizations]


[[customizations.user]]

name = "user1"

password = "$6$2pfpVqA5m6O8xGsl$cIWiHLAXXYGtVWb.JlooEOjUCefz2PMkkk2ONeGrTfPlUPGps6cbYjZlyFJY.N9Ybwpmo8JG6u649YnVUj70Q/"

key = "ssh-rsa AAAAB3NzaC1yc2EAAAADAQABAAABgQDfJX+EGzjCbokZV7WjWovRVbTx0P2N/cpEhYYJQphCYoW7aRonQB4Oxd8w7En4B9YPTA9FeKKdVoCSa5cU0xwNq1FR2SoBYAHPT3YZMltN/Ee6Zomwd0ugH6RcjtU+MEkGbFW9jb6ZckxKEMqjX1x8tGpfWHZA3AngwuTdYYlTONbVEo+/zV3ccYx7YHpCogvKGyL2x/aZgEVEAqze/jyh0Ri2u19sN5nvEzOrTkVDzi0j8fKt0TmGEv8bzdt/0+YBC3LYrL6InX5Joy8ctmz/HN09EqhJm7m2mpgYslCT9Eca7jp530nKV9vOAXpLnExPqqqkwfSQOuPJ7okY7JPDRR+hbmagdvulHe/45dv1Nt3rQ8b6jM4kdlj6/Bb9dtTUC7cWFuaJvTjOt0SX62siPHMY4Za0i7Nx3Gi6sOy2rN4MscjNHLlPz8U5iBm1bfSSlHC0Z8cpJiyIUHvLLSCpybRI/mAxC8ZSeHJIYIcsm2UslQ9pR42nFQsq7FDZ7E0= user1@fedora"

groups = ["wheel"]
One hint when developing your blueprint is that the image builder GUI can help make it easier to add the user ID/password and/or ssh keys to the blueprints.
Building the image that we installed on the target Raspberry Pi was a three-step process:
- Building the edge commit and starting a container which serves that commit
- Building a raw image
- Burning the raw image to an SD card
1. To build the edge commit that that has the packages and required configuration (for example, additional firewall configuration), run:
  composer-cli compose start fedora-base iot-container

  composer-cli compose list (to get status wait until compose start command completes before proceeding)

  composer-cli compose image  <UUID>

  skopeo copy oci-archive:<UUID>-container.tar containers-storage:localhost/fedora-ostree

  podman run -p 8080:8080 -dt localhost/fedora-ostree
Where UUID is the id for the image created by the compose start command. These steps create the image, get the image created, copy the image into the local podman registry, and then start a container to serve the edge commit.
2. To build the raw image, run:
  composer-cli compose start-ostree --ref "fedora/38/aarch64/iot" --url http://10.1.1.104:8080/repo  --size 12000 fedora-base-iot iot-raw-image

  composer-cli compose list  (to get status wait until compose start-ostree command completes before proceeding)

  composer-cli compose image <UUID>
replacing fedora/38/aarch64/iot with the ref that matches your fedora level, 10.1.1.104 with the IP of the machine where you started the container with Podman, and UUID with the UUID generated by the compose start-ostree command.
You need to wait until the compose start-ostree command is complete (composer-cli compose list will show you the status) before getting the image with the compose image command.
3. To burn the image to an SD card run, use the arm-image-installer as follows:
arm-image-installer --image=<UUID>-image.raw.xz --media=/dev/sdb --resizefs --target=rpi4Warning alert: WARNING
This will DESTROY anything on the target device (ex /dev/sdb), so make sure that this matches the SD card that you want to write to.
All of these steps were run in the Fedora virtual machine running on the development system.
If all went well, you now have an SD card that you can put into the target Raspberry Pi, which will boot up and be running Fedora-IoT. The templates don’t include all of what you need for a real-world deployment (for example signing) but should give you a feeling for some of the configuration you can do with image builder.
Device drivers
As mentioned in the intro above, an edge system will often include code written in C/C++ to interface with hardware devices. These are often referred to as device drivers.
The drivers needed to access the Raspberry Pi GPIO and, therefore, the status of the switches in our example were already built into Fedora IoT. Yay! One thing I left for part 2 in the series is running a script at startup to make the gpio accessible. The startup script will be needed for a few reasons in part 2; for now, I just ran sudo chmod +666 /dev/gpiochip0 manually.
The drivers needed for the DS18B20 temp sensor were not built into Fedora IoT by default and it took a while for us to figure out what to do. Boo. :(
A kernel module (w1-therm) that interfaces with the DS18B20 temp sensor is in the Linux kernel source, but Fedora does not include the module itself by default. We found out the hard way (by building the required kernel module a number of times) that loadable kernel modules need to match the kernel exactly and may even need to be built with the same versions of tools like the compilers. We were never successful in building a module that the kernel on the target system would accept.
Along the way, however, we learned that the “extra” kernel modules in the Linux source but not included in Fedora-Iot by default are available for most of the kernels from “https://koji.fedoraproject.org/koji/search?match=glob&type=build&terms=kernel-*”.
To get the right version of the module, you need to find the version of your kernel by running uname -a. For example, on my Fedorat-IoT image:
$ uname -a
Linux localhost.localdomain 6.6.4-100.fc38.aarch64 #1 SMP PREEMPT_DYNAMIC Sun Dec 3 18:33:57 UTC 2023 aarch64 GNU/LinuxBased on that, you then need to find the matching entry on koji. In my case, for 6.6.4-100.fc38.aarch64, where the available packages were available at https://koji.fedoraproject.org/koji/buildinfo?buildID=2327454.
From that page, the rpm needed was kernel-debug-modules-extra-6.6.4-100.fc38.aarch64.rpm.
You might ask why we could not just dnf install the kernel-debug-modules-extra package? At least for us, that tried to install a more recent version of the package versus the version that matched my kernel.
Following the image builder creation approach outlined in the earlier section we should have updated the blueprint to install this rpm. Because we’d already learned more about image builder than we had originally planned we took a short cut and instead curl’d the module to the target system and used the rpm-ostree install kernel-debug-modules-extra-6.6.4-100.fc38.aarch64.rpm to install it. This created a new edge commit which took effect after a reboot. rpm-ostree is the tool used to manage the configuration of a Fedora-IoT operating system and supports rollbacks if things go wrong. It’s a useful tool during development and experimentation but in the end any additional components or configuration should be added to the blueprints used to build the image installed on the target.
Now that the kernel module was available and could be loaded with modprobe w1-therm, there was just one thing left to fix; that was adding dtoverlay=w1-gpio to the kernel options. This is widely documented for getting w1 devices like the temp sensor working on the Raspberry Pi, but unfortunately none of the instructions we could find worked. The instructions we found said to add it to the kernel parameters through a config.txt file that did not exist on our system.
We tried adding it using rpm-ostree, which has an option to add kernel options, but that did not work for us. We finally managed to find config.txt in /boot/efi/config.txt and after adding dtoverlay=w1-gpio (without the quotes) on its own line at the end of the file the temperature sensor started working. :)
The application
As we said earlier, JavaScript and Node.js are a natural fit for GUIs and hybrid cloud applications. For GUIs, some kind of framework is most often used. For the edge example, we used Next.js, which is currently one of the popular React-based frameworks. The web application (exposed on port 3000 on the IP of the Raspberry Pi) provides the following GUI (see Figure 5) as well as pushing sensor data to an MQTT server.
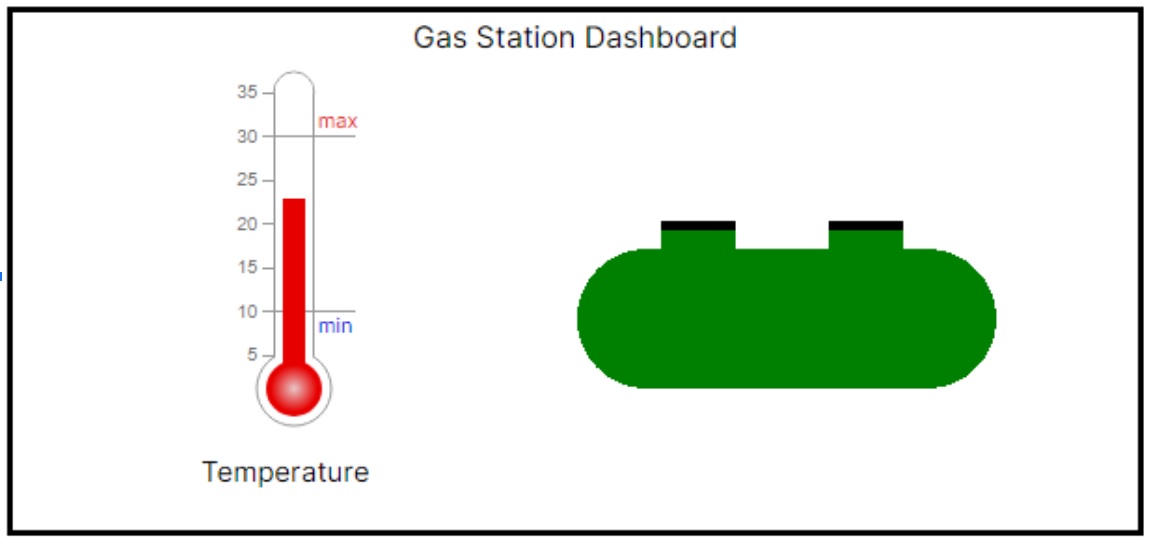
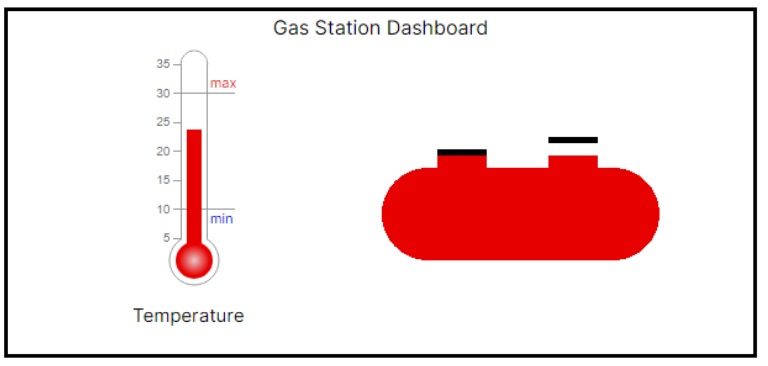
The thermometer shows the temperature of the tank, while the picture of the tank shows if the lids are closed or not. If both lids are closed, the tank is green. If one or both of the lids are open, the tank is Red and it shows which of the lids are not closed. For example, if the right lid is open (see Figure 6).
In addition to the GUI, the application also publishes the temperature and lid status to an MQTT server on the topics:
- gas_station/XXX/temp
- gas_station/XXX/top_left
- gas_station/XXX/top_right
Where XXX can be set for the specific gas station through an environment variable. The assumption is that we’ll be managing a fleet of gas stations and collecting/monitoring data for those gas stations through MQTT. In the example below, I set XXX to be “canada/ontario/ottawa/station1” to represent the first of several gas stations in Ottawa, Ontario in Canada.
We can see this using an MQTT client and listening for all messages under gas_station in Figure 7.
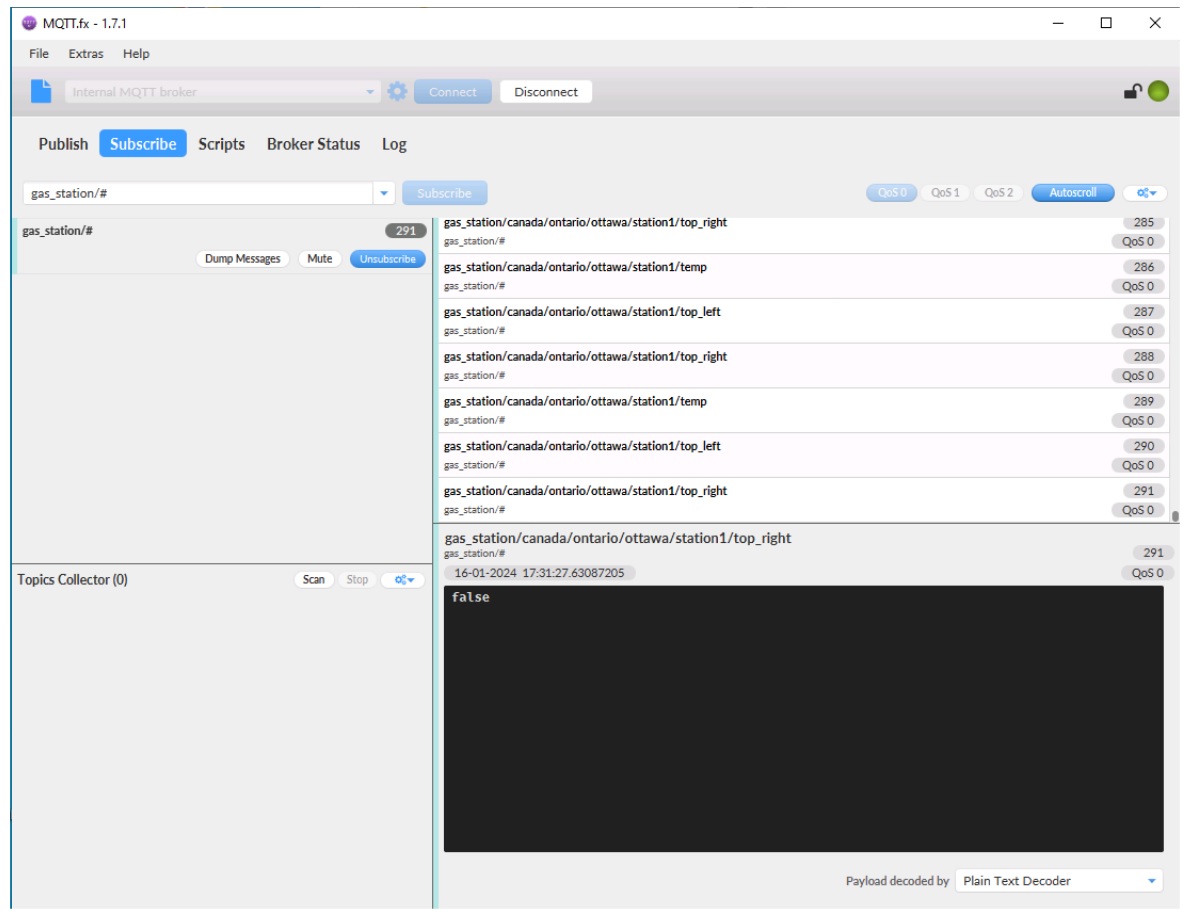
The client shows that every 3 seconds there is a set of 3 MQTT messages, one on each of the three topics.
Node.js is naturally asynchronous and that makes it a great fit for integration with hardware in edge devices. Both polling at a regular interval or taking action on an asynchronous event is easy. The code to capture the data from the sensors, pass it up to the GUI and publish it to the MQTT server is all of 78 lines with the main work being this loop:
 setInterval(() => {

      const temp = readTemp(tempSensorFile);

      readGpio(TOP_LEFT_PIN, (left) => {

        readGpio(TOP_RIGHT_PIN, (right) => {

          io.emit('message', {temp: temp, topLeft: left, topRight: right});

          mqttClient.publish(TEMP_TOPIC, temp.toString());

          mqttClient.publish(TOP_LEFT_TOPIC, left.toString());

          mqttClient.publish(TOP_RIGHT_TOPIC, right.toString());

        });

      });

    } , POLL_INTERVAL);
The full source for the data capture and sharing is available in https://github.com/mhdawson/gas-station/blob/main/pages/api/socket.io/index.js. Note that we’ve left out most error handling that would be present in a real world application to make it easier to read.
For the GUI we created two React components, one for the thermometer and one for the tank. Those components use D3 to draw the thermometer or the tank. You can check out the source in:
Communication between the GUI running in the browser and the back end service which reads and shares the sensor data is done with socket.io. The main page that runs in the browser basically sets up the socket.io connection, add listeners that update the react components when the sensor data changes and then shows the components with the main content being:
   <div >

      <div style={{ paddingLeft: '10px', paddingTop: '10px', height:'250px', width:'100%'}}>

        <table style={{ border: '3px solid black' }}>

          <tbody>

            <tr><td colSpan='2' style={{textAlign: 'center'}}>Gas Station Dashboard</td></tr>

            <tr><td><Thermometer data={currentTemp}/></td>

                <td><GasTank data={{Left: topLeft, Right: topRight}}/></td></tr>

          </tbody>

        </table>

      </div>

    </div>
The full source is available at https://github.com/mhdawson/gas-station/blob/main/app/page.js.
The GitHub project is available in https://github.com/mhdawson/gas-station if you want to look at all of the source code.
Deploying the application: Don't use rpm-ostree
Now that you have a good feeling of the hardware and software that make up our edge example, we’ll spend a bit more time talking about the deployment of the application.
Fedora IoT provides a solid platform for managing the operating system including updates, rollback and related activities. One approach for managing application deployment would be to extend the rpm-ostree based management to the application by packaging up the right parts of the application into an rpm and managing updates in the same way we update the operating system. However, We don’t want to do that because:
- It requires a different development workflow from how typical hybrid cloud applications are delivered.
- a tight binding to operating system components, versions and dependencies, beyond those needed by the code integrating the devices.
- Potential conflicts between different pieces of an application in terms of operating system component versions.
- A reboot would be required each time the application was updated.
Existing hybrid cloud development workflows already have tools and approaches for building applications, selecting only the required assets needed and bundling those into a nice self contained package: a container. With the convergence we mentioned in the introduction, the advantages of using containers often make them the most easily managed and cost effective approach for deploying the application in an edge device.
To get the application running for the first part of this series, we just manually built/extracted and copied over the application components to the Raspberry Pi. Because our recommended approach is to use containers, we are not going to dive into packaging and deployment of the application directly on top of the operating system.
Wrapping up
In this installment of the 3-part series we have introduced you to the hardware and software for our Node.js based edge example as well as some of the details on laying the foundation for deploying the application by building and installing the operating system using Fedora IoT.
In the next installment, Containerizing your Node.js applications at the edge on RHEL and Fedora, we’ll dive a bit deeper into the application itself, and how to build, bundle, deploy, and update it using Podman and containers.
Node.js and JavaScript at the edge: The why, what, and how
You can watch the following video to learn more about building, deploying, and managing Node.js applications running on the edge.
If you would like to learn more about what the Red Hat Node.js team is up to, you can check out the Node.js topic page and the Node.js reference architecture.
Last updated: May 22, 2024