Red Hat OpenShift is an ideal location to re-platform Red Hat JBoss Enterprise Application Platform (JBoss EAP) workloads. We discussed this topic in previous articles, such as Why you should migrate your Java workloads to OpenShift. Here's a summary of the benefits:
- Scalability: OpenShift can automatically scale JBoss EAP instances based on demand, making it more efficient and responsive to changes in traffic.
- Immutability: JBoss EAP applications deployed on OpenShift are built as immutable images, making it easier to promote with confidence from lower to higher environments and removing the possibility of configuration creep.
- Resource allocation: On OpenShift, resources can be allocated dynamically based on actual usage, allowing for better resource utilization and cost efficiency.
- Deployment process: OpenShift provides automated deployment and management of JBoss EAP instances, reducing the risk of errors and simplifying the deployment process.
- High availability: In OpenShift, high availability is built in with automatic failover and load balancing across JBoss EAP instances.
- DevOps integration: OpenShift provides a DevOps-friendly platform that supports continuous integration and continuous deployment (CI/CD) workflows, making it easier to integrate JBoss EAP applications into a larger DevOps pipeline.
In the article, How to migrate your Java applications to Red Hat OpenShift, we went through the steps to migrate a simple JBoss EAP application. But what's involved with deploying a more complex real-world JBoss EAP application to OpenShift? We will describe the steps to deploy a monolith JBoss EAP application using message queues and clustering. For the purpose of this exercise, we'll use the CoolStore Monolith application.
The main points of this application are as follows:
- It uses message driven beans that rely on an embedded message queue for communication.
- It uses single sign-on (SSO) for authorization.
- It requires a PostgreSQL database for persistence.
If we look at a comparison of JBoss EAP on a VM and JBoss EAP on OpenShift, we can see embedded messaging is not supported. Because our application requires a message queue, we need to deploy a separate instance of AMQ broker.
In addition to deploying our application, we will also need to deploy a PostgreSQL database, AMQ broker, and SSO.
Single sign-on
To deploy single sign-on in OpenShift, we'll use the SSO operator. This operator is comprehensive, allowing us to not only install an SSO cluster but also configure the required realm, client, and user objects.
Our sample application must have a realm, client, and user created. In addition to this, our application also needs to know the URL for the SSO instance. This URL can be configured as an environment variable when the application is deployed.
AMQ broker
As we mentioned earlier, embedded messaging is not supported when JBoss EAP is deployed on OpenShift. The recommended approach is to use an instance of AMQ broker to provide messaging functionality.
As with SSO, we can use the AMQ broker operator to deploy an AMQ broker instance on OpenShift. Once the operator is deployed we can use custom resources to create an AMQ broker cluster and the required queues and topics. To create the AMQ broker cluster we can use the following custom resource:
apiVersion: broker.amq.io/v1beta1
kind: ActiveMQArtemis
metadata:
  name: eap74-amq7
spec:
  acceptors:
    - name: my-acceptor
      port: 61616
      protocols: 'core'
  deploymentPlan:
    image: placeholder
    jolokiaAgentEnabled: false
    journalType: nio
    managementRBACEnabled: true
    messageMigration: false
    persistenceEnabled: false
    requireLogin: false
    size: 2
Once this cluster is created, we need to create the topic required by the application.
Looking at our app source code, we can see our application needs a topic named topic/orders.
@ActivationConfigProperty(propertyName = "destinationLookup", propertyValue = "topic/orders")
To create this topic in our AMQ broker instance, we can use the following custom resource:
apiVersion: broker.amq.io/v1beta1
kind: ActiveMQArtemisAddress
metadata:
  name: artemis-address-topic
spec:
  addressName: topic.orders
  queueName: topic/orders
  routingType: multicast
We set the routingType to multicast because our application requires sending messages to every consumer subscribed to an address. This is described in the documentation.
PostgreSQL database
There are multiple ways to deploy PostgreSQL databases on OpenShift. Here, we created a simple YAML script to create the deployment, service, and secret required to deploy the database.
Application analysis
During the image building process, a JBoss EAP instance is provisioned to host our application. When this JBoss EAP instance is provisioned, we can determine which layers to use to ensure our application has the capabilities required to run and remove any unnecessary capabilities to improve resource usage and reduce the attack surface.
You should review the supported JBoss EAP layers and WildFly layers.
Looking at our application code, we can determine the following:
- The application uses a PostgreSQL database, so it will need the PostgreSQL JDBC driver.
- The application requires web clustering, due to the presence of <distributable> in
web.xml. - The application uses a JMS queue.
- The application includes the javax.ejb package, so EJB is required.
We can address a few of these requirements from the set of layers included with JBoss EAP 7.4:
- The cloud-server layer is the minimal layer for JBoss EAP running on OpenShift. This layer includes the health and metrics subsystems, and also includes messaging-activemq. So this meets our requirement for message queue connectivity.
- We can use the web-clustering layer for clustering.
- We can use the ejb layer (from the list of WildFly layers) for ejb support.
This leaves support for the PostgreSQL database. To add this, we can use the JBoss EAP datasources feature pack. This feature pack adds a postgresql-datasource layer that installs the required driver for PostgreSQL and sets up a JDBC DataSource to connect to the database.
All we need to do is define the version of the PostgreSQL JDBC driver as an environment variable: POSTGRESQL_DRIVER_VERSION. We will use version 42.6.0.
To add these layers, environment variables, and feature packs to our application, we can specify the following to our Helm chart configuration:
build:
  uri: https://github.com/deewhyweb/eap-coolstore-monolith.git
  ref: ocp
  s2i:
    featurePacks:
      - 'org.jboss.eap:eap-datasources-galleon-pack:7.4.0.GA-redhat-00003'
    galleonLayers:
      - cloud-server
      - postgresql-datasource
      - ejb
      - web-clustering
  env:
    - name: POSTGRESQL_DRIVER_VERSION
      value: 42.6.0
deploy:
  enabled: false
Application configuration
Once our application is deployed to OpenShift, we will configure it to connect to our instances of PostgreSQL, AMQ broker, and SSO. All configuration is done by providing environment variables either through a ConfigMap or inline on the WildFly Server custom resource definition.
When we deployed our AMQ broker with the ActiveMQArtemis custom resource definition, we named the instance eap74-amq7. We must use this name in the MQ_SERVICE_PREFIX_MAPPING, EAP74_AMQ_TCP_SERVICE_HOST, and AMQ_JNDI, as shown in the following snippet. This is documented in the Getting Started with JBoss EAP for OpenShift Container Platform guide.
  MQ_SERVICE_PREFIX_MAPPING: eap74-amq7=MQ
  EAP74_AMQ_TCP_SERVICE_HOST: eap74-amq7-hdls-svc
  EAP74_AMQ_TCP_SERVICE_PORT: "61616"
  MQ_TOPICS: orders
  AMQ_JNDI: java:/eap74-amq7/ConnectionFactory
To pull credentials from the eap74-amq7-credentials-secret secret, use these configurations:
    - name: MQ_USERNAME
      valueFrom:
        secretKeyRef:
          key: AMQ_USER
          name: eap74-amq7-credentials-secret
    - name: MQ_PASSWORD
      valueFrom:
        secretKeyRef:
          key: AMQ_PASSWORD
          name: eap74-amq7-credentials-secret
To connect to the PostgreSQL database, add the following environment variables:
  POSTGRESQL_DATABASE: postgresDB
  POSTGRESQL_DATASOURCE: CoolstoreDS
  POSTGRESQL_SERVICE_HOST: postgresql
To pull credentials from the PostgreSQL secret, add these configurations:
    - name: POSTGRESQL_PASSWORD
      valueFrom:
        secretKeyRef:
          key: database-password
          name: postgresql
    - name: POSTGRESQL_USER
      valueFrom:
        secretKeyRef:
          key: database-user
          name: postgresql
To connect to the SSO instance, add the following environment variable: KEYCLOAK_URL. We can determine this URL once single sign-on is deployed.
KEYCLOAK_URL: https:/<<red hat sso url>>/auth
Clustering support
Because our application requires clustering support, we must ensure our pods are deployed using a service account with permissions to view the pods in the same namespace. The default service account does not have this permission.
Create a service account called coolstoresa. Then create a role called pod-viewer and assign this role to the coolstoresa service account. We will accomplish this by applying the following YAML:
apiVersion: v1
kind: ServiceAccount
metadata:
  name: coolstoresa
---
apiVersion: rbac.authorization.k8s.io/v1
kind: Role
metadata:
  name: pod-viewer
rules:
- apiGroups: [""]
  resources: ["pods"]
  verbs: ["get", "watch", "list"]
---
apiVersion: rbac.authorization.k8s.io/v1
kind: RoleBinding
metadata:
  name: pod-viewer

roleRef:
  apiGroup: rbac.authorization.k8s.io
  kind: Role
  name: pod-viewer
subjects:
- kind: ServiceAccount
  name: coolstoresa
Once the pod starts up, you should see the following log, indicating clustering is configured correctly:
INFO Service account has sufficient permissions to view pods in kubernetes (HTTP 200). Clustering will be available.
Testing the application by deploying on OpenShift
In this section, we're going to explain the steps to deploy this application and all required components on OpenShift.
Prerequisites
Before we begin, you will need to complete the following:
- OpenShift 4.12 with cluster admin access.
- OpenShift CLI logged into cluster with cluster admin access.
- Check out the code from GitHub.
Run the following commands from the local directory into where the code has been cloned. Make sure to check out the ocp branch first with:
git checkout ocp
Step 1: Create a project
Create a new project in OpenShift by running the following command:
oc new-project coolstore
This will create a new project called coolstore.
Step 2: Deploy the operators
Deploy the SSO, AMQ broker, and JBoss EAP operators by creating subscription custom resources.
Run the following command:
oc apply -f./openshift/operators
This will deploy the necessary operators to the cluster. Wait for the operators to be deployed by running the following command:
oc get csv -w
Wait until their ClusterServiceVersion PHASE is set to "Succeeded".
Step 3: Deploy resources
Now that the operators have been deployed, we can create the coolstoresa service account and deploy the SSO, AMQ broker, and PostgreSQL instances.
Run the following command:
oc apply -f./openshift/resources
Then run the following command to get the route for the SSO instance:
oc get route keycloak
It may take a few attempts to create the route. Once you have the route, update the KEYCLOAK_URL value in helm.yaml with the correct route for SSO. Make sure to prepend https:// and append /auth to this URL. The value should look like this:
  - name: KEYCLOAK_URL
    value: https://keycloak-coolstore.apps.openshift.domainname.com/auth
Step 4: Build the application image
To build the application image, navigate to the developer UI and click on +Add, then Helm Chart.
Select the Eap74 Helm chart.
Paste the contents of openshift/helm.yml as the config.
Wait for the application image to be built by running the following command:
oc get build -w
The application image is built when the eap74-2 build is complete.
Step 5: Deploy the application
We can deploy the application by running the following command:
oc apply -f./openshift/app
Step 6: Testing the application
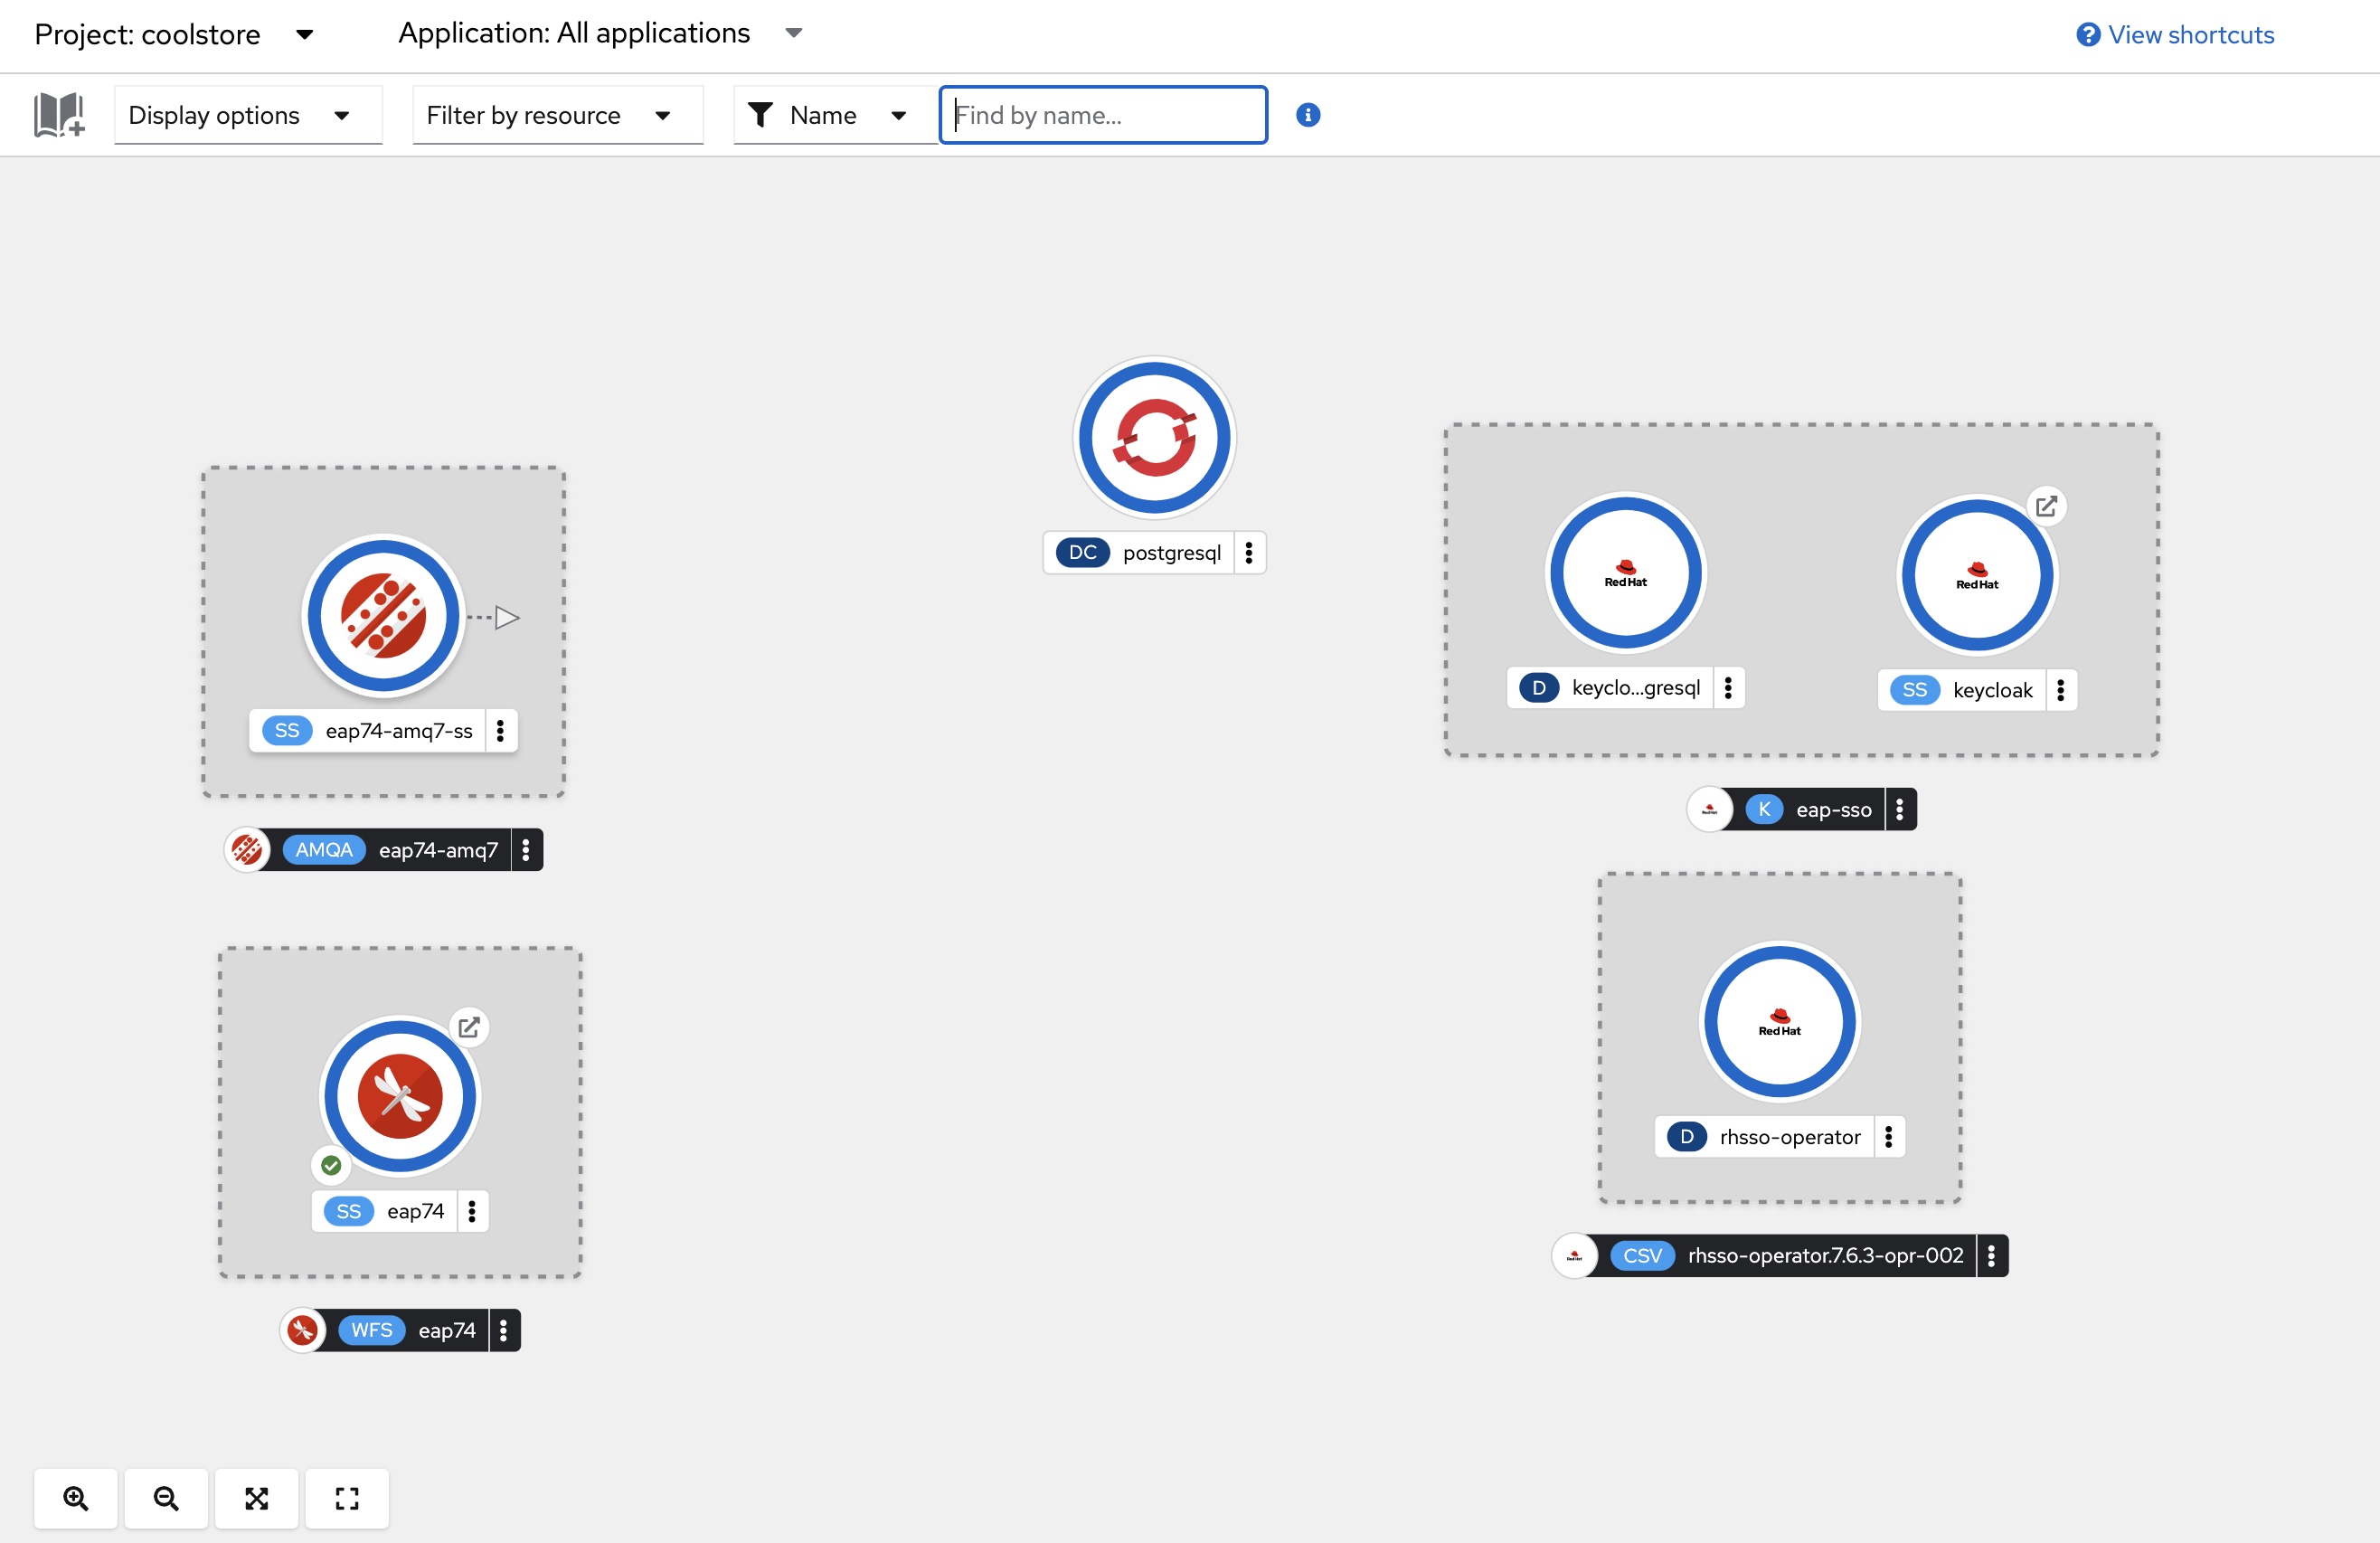
Once the application is running, you should see a topology similar to Figure 1.
You should be able to access this via the external route. From the application, click on Sign in in the top right-hand corner. This will take you to the single sign-on login page. Log in with the credentials user1 / pass.
Now, you should be able to add products to your cart and complete the checkout process.
Step 7: Testing clustering
If we scale up our application, we should see additional members forming a cluster. To scale up the application, run the following command:
oc scale WildFlyServer eap74 --replicas=2
While the second instance starts, monitor the logs of the existing pod. You should see the addition of a node to the cluster similar to the following:
10:46:45,408 INFO [org.infinispan.CLUSTER] (ServerService Thread Pool -- 63) ISPN000078: Starting JGroups channel ee
10:46:45,501 INFO [org.infinispan.CLUSTER] (ServerService Thread Pool -- 63) ISPN000094: Received new cluster view for channel ee: [eap74-0] (2) [eap74-0, eap74-1]
10:46:45,507 INFO [org.infinispan.CLUSTER] (ServerService Thread Pool -- 63) ISPN000079: Channel ee local address is eap74-1, physical addresses are [10.130.0.67:7600]
JBoss EAP migrated to OpenShift
In this article, we migrated a real-world monolith JBoss EAP application to OpenShift. The application required a PostgreSQL database, message queue, and single sign-on. We used Kubernetes operators to deploy and configure AMQ broker and single sign-on.
We also performed analysis on the application to determine which layers to use and concluded the requirement of the following layers:
- cloud-server
- ejb
- web-clustering
In addition to these layers, we also used the postgresql-datasource from the JBoss EAP-datasources-galleon-pack to provide PostgreSQL database drivers and configuration.
Last updated: October 31, 2023