Red Hat recently launched a new offering for Red Hat JBoss Enterprise Application Platform (JBoss EAP), an efficient and comprehensive Java platform on the Amazon Web Services marketplace. This offering allows you to deploy certified Amazon Machine Images (AMIs) equipped with Red Hat Enterprise Linux (fully supported by Red Hat) and JBoss EAP.
Note: You are not required to have an existing JBoss EAP subscription from Red Hat prior to utilizing this service. This is a pay-as-you-go offering. Amazon will bill you for the service.
6 Steps to deploy a JBoss EAP on AWS
The following six steps guide you through provisioning, running, and connecting to JBoss EAP on AWS.
Step 1: Prerequisites set up
Set up the following prerequisites:
- Sign up for an Amazon Web Services account.
- Install the Amazon Web Services command-line interface (CLI) and configure with your account credentials.
Step 2: Subscribe to the software agreement
Before you launch an instance of Red Hat JBoss Enterprise Application Platform on AWS EC2, you need to find the appropriate offering in your locality and subscribe to the software agreement.
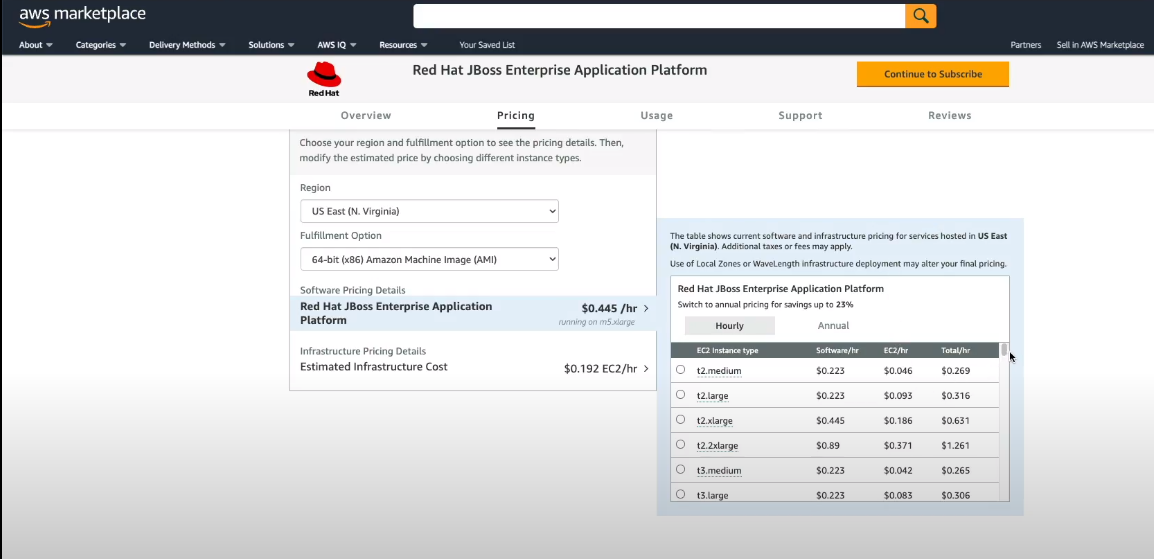
- Search the AWS Marketplace for JBoss EAP and filter by Red Hat and Red Hat Limited to find the offerings (Figure 1).

- If you are based in the EU, select the offer from Red Hat Limited. Otherwise, select the offer from Red Hat.
- On the offer subscription page, click Continue to Subscribe (Figure 2).
- Next, you will move to the Subscribe to Software page (Figure 3). Accept the terms and conditions of the subscription by clicking Accept Terms.
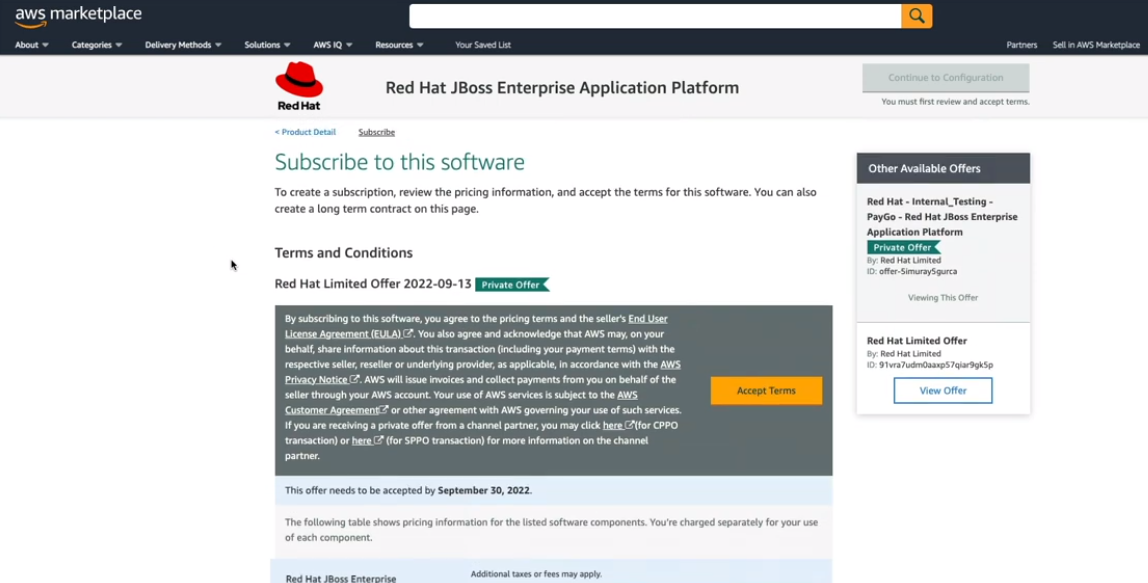
- Once you have subscribed to this software subscription and accepted the terms and conditions, you can configure and launch an EC2 instance.
Step 3: Set up billing options
There are two billing options for JBoss EAP on AWS:
- Hourly: You pay on an hourly basis for using JBoss EAP on AWS and for the associated EC2 infrastructure.
- Annual: You will be billed upfront for the JBoss EAP subscription. The cost of the associated EC2 infrastructure is on an hourly basis.
We will choose the hourly billing option. You can skip the contract selection on the main offer page.
Step 4: Launch an instance of JBoss EAP on AWS
As with all AWS services, You can launch JBoss EAP EC2 instances in multiple ways, such as the AWS management console, AWS CLI, or cloud formation templates. In this article, we will use the AWS management console and the AWS CLI. There are several steps involved for each method.
7 steps to create an instance in the AWS management console
For this article, we will simulate the experience of a user configuring and deploying an EC2 instance into a new AWS environment with no security groups. You may find some objects in your environment. You can choose these or create new objects as described in this case.
1. Click Continue to Configuration on the marketplace offering page to launch an instance of JBoss EAP on AWS using the AWS management console. Then the console displays the Configure this software screen shown in Figure 4.
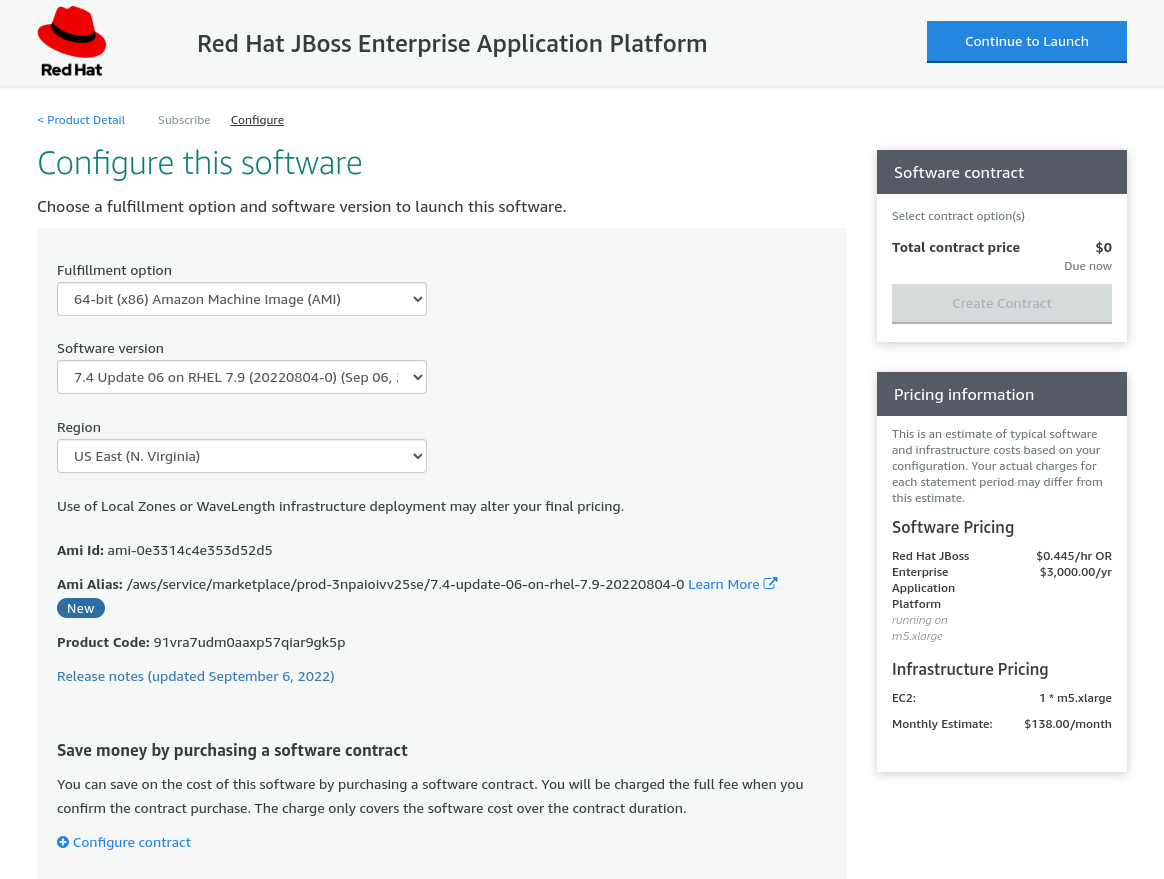
2. From this page (Figure 4), you can choose your Amazon Machine Image (AMI), software version, and region. For this example, we select the defaults. Click Continue to Launch to configure the EC2 instance. Then the Launch this software page appears (Figure 5).

3. Configure the EC2 Instance Type in Figure 5. Choose the smallest available instance size: t2.medium.
4. Configure the virtual private cloud (VPC) settings:
- If you don't have a VPC available in your region, click Create a VPC in EC2. This will bring you to the Your VPCs page (Figure 6).
- Click Create VPC, then select VPC and more. This choice creates the associated subnets, route tables, and network connections, as shown in Figure 7.
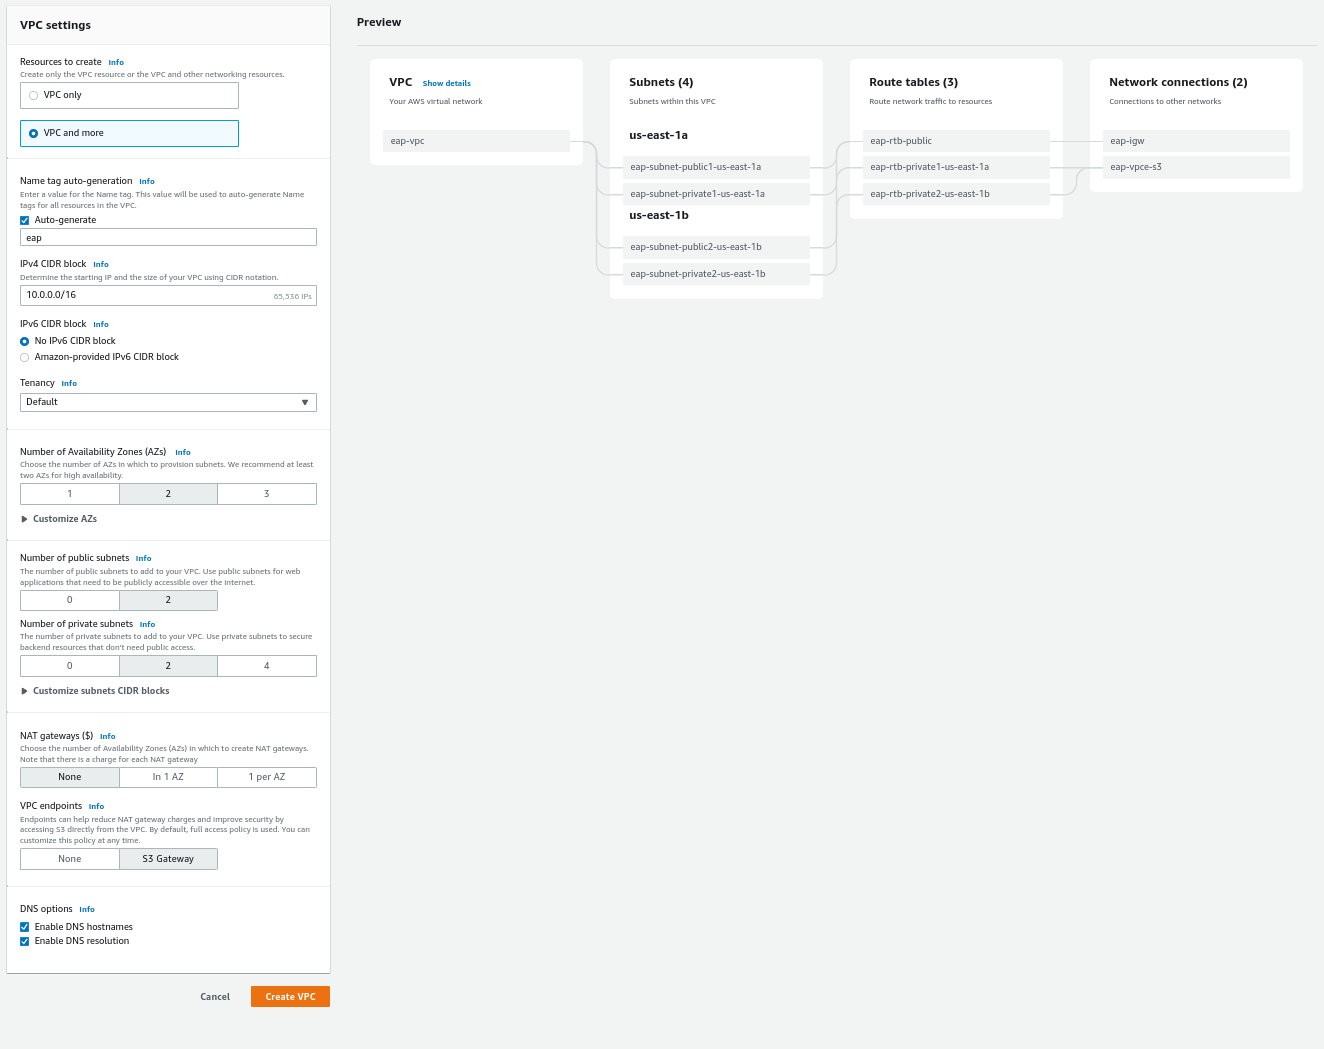
- Enter a name, such as
eapand a CIDR block. I used 10.0.0.0/16 for the CIDR block (a private IP subnet). - Set the Number of Availability Zones and the Number of public subnets to 1. Set the Number of private subnets to 0. Ensure that Enable DNS hostnames and Enable DNS resolution are selected.
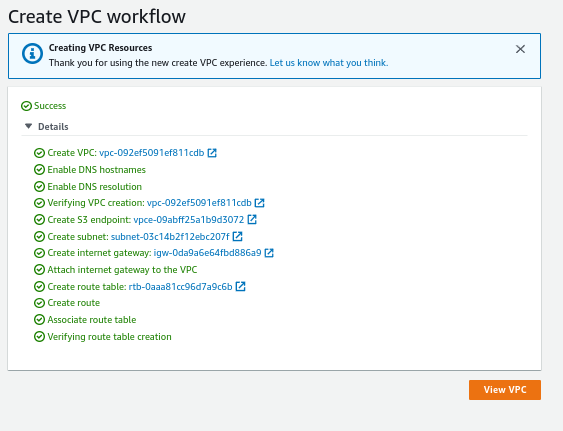
- Click Create VPC to create the VPC and associated interfaces. Once the Create VPC workflow is complete, you will see a list of resources like Figure 8.
5. Configure the subnet settings
Here, you need to make a minor change to the subnet. Follow these steps:
- Click the subnet link in Figure 8 to open the list of subnets (Figure 9).

- Click the subnet link.
- Next, select Actions, and then Edit subnet settings to bring up the screen in Figure 10.
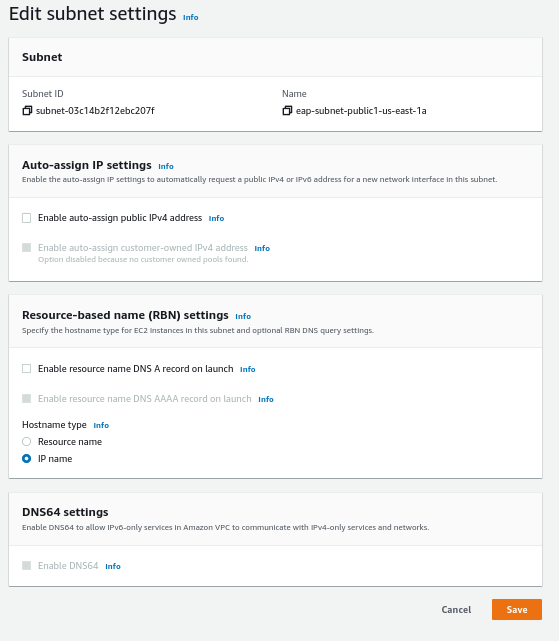
- Ensure that Enable auto-assign public IPv4 address is selected. This setting assigns an IP address to the network interface of any EC2 instance associated with this subnet.
- Return to the Launch this instance page and click the refresh icon on the VPC Settings field. You should see your newly created VPC and Subnet Settings fields populated.
6. Configure security group settings
- Click Create New Based on Seller Settings. These settings, shown in Figure 11, include the ports recommended by Red Hat: 22 for SSH, 8080 as the default web front-end port, and 9990 as the default management port.
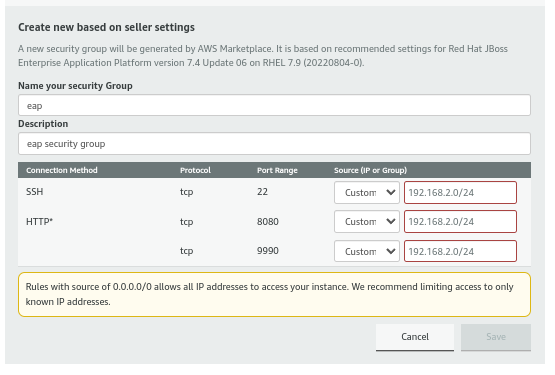
- You can enable public access to these ports by using 0.0.0.0 as the source IP. For example, you may wish to allow access to port 8080 from any IP address. For testing purposes, we recommend you restrict all access to your public IP address for this instance.
- Select Custom from the Source (IP or Group) to restrict access to your local machine. Then enter your public IP address and netmask in the format
nnn.nnn.nnn.nnn/32. - Click Save to create this security group. The security group you create will be selected in Security Group Settings.
7. Configure Key Pair Settings
- You can use this existing record if you already have a key pair generated and the key pair file available.
- Otherwise, click Create a key pair in EC2 and navigate to the EC2→Network & Security→Key Pairs page.
- Click Create Key Pair and follow the instructions to create a new key pair. Your new private key file downloads to your local machine.
- Return to the Launch this software page and click the refresh icon in the Key Pair Settings panel. Your new key pair should appear on the list for you to select.
- Once you configure all the options in this form, you can launch your instance with the Launch button. You will see the screen in Figure 12 showing the details of your new instance.

16 quick steps to create an instance using the AWS CLI
You need to configure a VPC, subnet, security group, and key pair in AWS to deploy an instance of JBoss EAP on AWS using the AWS CLI. The commands in this section configure all the required objects. Then you can create a JBoss EAP EC2 instance and expose it to the public Internet following these steps.
1. Create a VPC with a 10.0.0.0/16 CIDR block through the following create-vpc command. This command also stores the resulting ID in an environment variable named VPCID:
$ export VPCID=$(aws ec2 create-vpc --cidr-block 10.0.0.0/16 --query Vpc.VpcId --output text) && echo $VPCID2. Modify the VPC to enable DNS hostnames:
$ aws ec2 modify-vpc-attribute --vpc-id $VPCID --enable-dns-hostnames "{\"Value\":true}"3. Create a subnet with a 10.0.1.0/24 CIDR block using the following create-subnet command. This command also stores the resulting ID in an environment variable named SUBNET:
$ export SUBNETID=$(aws ec2 create-subnet --vpc-id $VPCID --cidr-block 10.0.1.0/24 --query Subnet.SubnetId --output text) && echo $SUBNETID4. Create an internet gateway and store the ID in an environment variable named GATEWAY:
$ export GATEWAY=$(aws ec2 create-internet-gateway --query InternetGateway.InternetGatewayId --output text) && echo $GATEWAY5. Attach the internet gateway to your VPC using the following attach-internet-gateway command:
$ aws ec2 attach-internet-gateway --vpc-id $VPCID --internet-gateway-id $GATEWAY6. Create a custom route table for your VPC using the following create-route-table command, and store the route table ID in an environment variable named ROUTETABLE:
$ export ROUTETABLE=$(aws ec2 create-route-table --vpc-id $VPCID --query RouteTable.RouteTableId --output text) && echo $ROUTETABLE7. Create a route that points all traffic (0.0.0.0/0) to the internet gateway using the following create-route command:
$ aws ec2 create-route --route-table-id $ROUTETABLE --destination-cidr-block 0.0.0.0/0 --gateway-id $GATEWAY8. Associate the route table with the subnet:
$ aws ec2 associate-route-table --subnet-id $SUBNETID --route-table-id $ROUTETABLE9. Modify the subnet to assign a public IP address automatically:
$ aws ec2 modify-subnet-attribute --subnet-id $SUBNETID --map-public-ip-on-launch10. Create a new security group and store the ID in an environment variable named GROUPID by entering the following:
$ export SGROUPID=$(aws ec2 create-security-group --group-name eap-security2 --description "EAP security group" --vpc-id $VPCID --query GroupId --output text) && echo $SGROUPID11. Create another variable with the public IP address of your local machine:
$ export IP=nnn.nnn.nnn.nnn12. Add inbound rules to this security group with the following commands:
$ aws ec2 authorize-security-group-ingress --group-id $SGROUPID --protocol tcp --port 22 --cidr $IP/32
$ aws ec2 authorize-security-group-ingress --group-id $SGROUPID --protocol tcp --port 8080 --cidr $IP/32
$ aws ec2 authorize-security-group-ingress --group-id $SGROUPID --protocol tcp --port 9990 --cidr $IP/32
13. If you need to create a key pair, enter the following command, which stores the private key in the ~/.ssh/eap-key.pem file:
$ aws ec2 create-key-pair --region us-east-1 --key-name "eap-key" | jq -r ".KeyMaterial" > ~/.ssh/eap-key.pem14. Restrict the permissions for your key file:
$ chmod 400 ~/.ssh/eap-key.pem15. Before you create the EC2 instance, you need to know the ID of the AMI to use. Find this ID through the AWS CLI with one of the following commands:
For countries outside the EU:
$ export AMI=$(aws ec2 describe-images --filters 'Name=name,Values=RHEL-7-JBEAP*' 'Name=description,Values="Provided by Red Hat, Inc."' --query "Images[*].ImageId" --output text) && echo $AMIFor countries within the EU:
$ export AMI=$(aws ec2 describe-images --filters 'Name=name,Values=RHEL-7-JBEAP*' 'Name=description,Values="Provided by Red Hat Limited."' --query "Images[*].ImageId" --output text) && echo $AMI
16. Launch an EC2 instance by entering the following:
$ aws ec2 run-instances --image-id $AMI --count 1 --instance-type t2.medium --key-name eap-key --security-group-ids $SGROUPID --subnet-id $SUBNETIDThe response from this command gives the details of the EC2 instance (e.g., InstanceId).
Step 5: Connect to the EC2 instance
To connect to your JBoss EAP on AWS, use SSH to connect to the public DNS name of your instance. Again, we will use the AWS management console and the AWS CLI.
Connect via the AWS management console
- Before you connect to your EC2 instance, you need to restrict the permissions on your local
.pemfile. You might need to search for this file to find its directory:
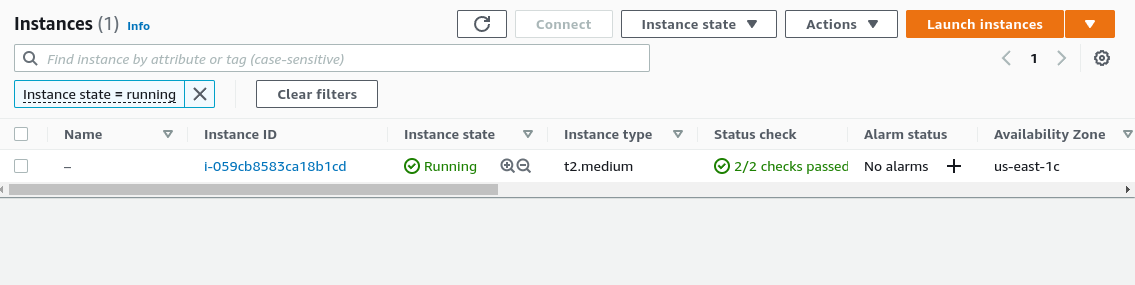
$ chmod 400 eap-key.pem- To find the public DNS name of your instance from the AWS console, navigate to the AWS EC2 running instances page. You should see a list of active instances (Figure 13).
- Select your instance to view the instance details (Figure 14).
- On the page illustrated in Figure 14, click the Connect button.
- The next page displays options for connecting (Figure 15). Select the SSH client tab.

- This page also shows the instructions for connecting to your EC2 instance (Figure 15).
- Copy the example from the panel in the AWS console.
- Run the
sshcommand in your local terminal to connect via SSH.
Connect via the AWS CLI
- Find the public DNS name of your instance using the AWS CLI by entering the following:
$ aws ec2 describe-instances --query "Reservations[*].Instances[*].PublicDnsName" --filters "Name=instance-state-name,Values=running" "Name=image-id,Values='$AMI'" --output textThis command lists each running EC2 instance using the JBoss EAP AMI with the instance's public DNS name.
- Store this value in a variable with the following command:
$ export PUBLICDNS=$(aws ec2 describe-instances --query "Reservations[*].Instances[*].PublicDnsName" --filters "Name=instance-state-name,Values=running" "Name=image-id,Values='$AMI'" --output text) && echo $PUBLICDNS - Connect to your instance via SSH with the following command:
$ ssh -i ~/.ssh/eap-key.pem ec2-user@$PUBLICDNS- Confirm when prompted to connect to a new host. Then, you will successfully connect to your instance.
Step 6: Starting JBoss EAP
Now that you can connect to your JBoss EAP EC2 instance, you can start the JBoss EAP server.
- Run the following commands from an SSH session connected to your EC2 instance:
$ sudo su -
$ echo "JAVA_OPTS=\"$JAVA_OPTS -Djboss.bind.address=0.0.0.0 -Djboss.bind.address.private=0.0.0.0 -Djboss.bind.address.management=0.0.0.0\"" >> /opt/rh/eap7/root/usr/share/wildfly/bin/standalone.conf
$ systemctl start eap7-standalone- Use your browser to navigate to the public DNS name of your EC2 instance on port 8080 (i.e.,
http://<public dns>:8080). - You will see the default home page for JBoss EAP displayed. From this page, you can access the administration console.
- You must create an administrative user before you deploy applications. Follow the instructions in the Red Hat JBoss EAP documentation.
JBoss EAP service makes AWS deployments easy
In this article, we illustrated how the JBoss EAP service makes AWS deployments of Java applications easy. You have learned how to provision a JBoss EAP on an AWS EC2 instance using the AWS console and the AWS CLI. In our next article, we will explore how to deploy a JBoss EAP application and connect it to an Amazon RDS MySQL database.
Please feel free to comment below. We welcome your questions and feedback.
Last updated: October 8, 2024