Redhat Developers  Logo
  • AI

    Get started with AI

    • Red Hat AI
      Accelerate the development and deployment of enterprise AI solutions.
    • AI learning hub
      Explore learning materials and tools, organized by task.
    • AI interactive demos
      Click through scenarios with Red Hat AI, including training LLMs and more.
    • AI/ML learning paths
      Expand your OpenShift AI knowledge using these learning resources.
    • AI quickstarts
      Focused AI use cases designed for fast deployment on Red Hat AI platforms.
    • No-cost AI training
      Foundational Red Hat AI training.

    Featured resources

    • OpenShift AI learning
    • Open source AI for developers
    • AI product application development
    • Open source-powered AI/ML for hybrid cloud
    • AI and Node.js cheat sheet

    Red Hat AI Factory with NVIDIA

    • Red Hat AI Factory with NVIDIA is a co-engineered, enterprise-grade AI solution for building, deploying, and managing AI at scale across hybrid cloud environments.
    • Explore the solution
  • Learn

    Self-guided

    • Documentation
      Find answers, get step-by-step guidance, and learn how to use Red Hat products.
    • Learning paths
      Explore curated walkthroughs for common development tasks.
    • See all learning

    Hands-on

    • Developer Sandbox
      Spin up Red Hat's products and technologies without setup or configuration.
    • Interactive labs
      Learn by doing in these hands-on, browser-based experiences.
    • Interactive demos
      Click through product features in these guided tours.

    Browse by topic

    • AI/ML
    • Automation
    • Java
    • Kubernetes
    • Linux
    • See all topics

    Training & certifications

    • Courses and exams
    • Certifications
    • Skills assessments
    • Red Hat Academy
    • Learning subscription
    • Explore training
  • Build

    Get started

    • Red Hat build of Podman Desktop
      A downloadable, local development hub to experiment with our products and builds.
    • Developer Sandbox
      Spin up Red Hat's products and technologies without setup or configuration.

    Download products

    • Access product downloads to start building and testing right away.
    • Red Hat Enterprise Linux
    • Red Hat AI
    • Red Hat OpenShift
    • Red Hat Ansible Automation Platform
    • See all products

    Featured

    • Red Hat build of OpenJDK
    • Red Hat JBoss Enterprise Application Platform
    • Red Hat OpenShift Dev Spaces
    • Red Hat Developer Toolset

    References

    • E-books
    • Documentation
    • Cheat sheets
    • Architecture center
  • Community

    Get involved

    • Events
    • Live AI events
    • Red Hat Summit
    • Red Hat Accelerators
    • Community discussions

    Follow along

    • Articles & blogs
    • Developer newsletter
    • Videos
    • Github

    Get help

    • Customer service
    • Customer support
    • Regional contacts
    • Find a partner

    Join the Red Hat Developer program

    • Download Red Hat products and project builds, access support documentation, learning content, and more.
    • Explore the benefits

How to install an open source tool for creating machine learning pipelines

May 5, 2022
JooHo Lee
Related topics:
Artificial intelligenceCI/CD
Related products:
Developer ToolsetRed Hat OpenShift LocalRed Hat OpenShift Container Platform

    Pachyderm is an open source tool for creating and running machine learning (AI/ML) pipelines. It runs on Kubernetes and provides modern developer benefits such as versioning and autoscaling. Pachyderm also integrates with the JupyterHub information sharing platform. On March 8, 2022, Red Hat announced that Pachyderm has been added to the Open Data Hub (ODH), which is a blueprint for building an AI-as-a-service platform on the Red Hat OpenShift Container Platform. In this article, you'll learn how to install Pachyderm using Open Data Hub.

    To walk through the steps in this article, you'll need a Red Hat OpenShift cluster with a default StorageClass. The procedure in this article has been tested in the following environments:

    • OpenShift Dedicated 4.9 on AWS with a gp2 StorageClass
    • An OpenShift cluster using Red Hat OpenShift Local (formerly Red Hat CodeReady Containers) with an nfs StorageClass set up by the NFS Provisioner Operator.

    The first option is used in this article. OpenShift Dedicated provides a default gp2 StorageClass, but it is not cost-free. As an alternative, with the second option you can set up a cost-free environment as follows:

    1. Use OpenShift Local to install an OpenShift All-in-One cluster on your laptop.
    2. Add an nfs StorageClass using the NFS Provisioner Operator, available from OperatorHub or Github.

    Once you've followed those steps, you'll have essentially the same environment as OpenShift Dedicated.

    This article also contains an embedded video illustrating the steps.

    If you want to experiment with the Red Hat OpenShift Local test environment, please refer to the following articles:

    • Configure CodeReady Containers for AI/ML development
    • Create and manage local persistent volumes with CodeReady Containers

    Deploy the Open Data Hub Operator

    Installing an Operator is the easiest step in this procedure. Go to the OperatorHub menu option in the OpenShift console, search for the Open Data Hub Operator, and click its link (Figure 1).

    From the OperatorHub menu option, search for the Open Data Hub Operator and click its link.
    Figure 1. From the OperatorHub menu option, search for the Open Data Hub Operator and click its link.
    Figure 1: Find the Open Data Hub Operator in the Openshift console.

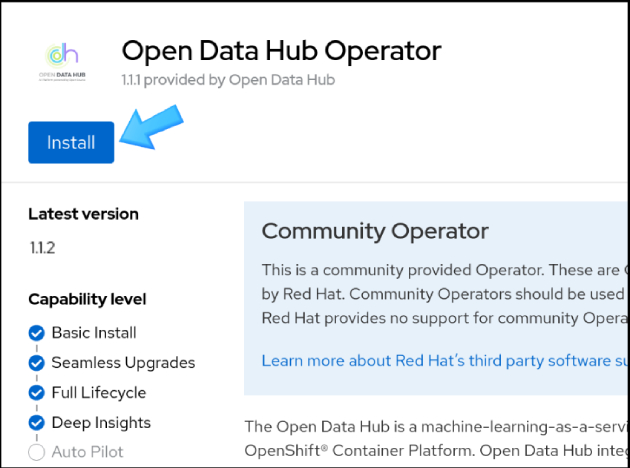
    You'll be taken to the Operator page for the Open Data Hub Operator (Figure 2). Click Install.

    From the Open Data Hub Operator page, click Install.
    Figure 2. From the Open Data Hub Operator page, click Install.
    Figure 2: Begin the Operator installation process by clicking here.

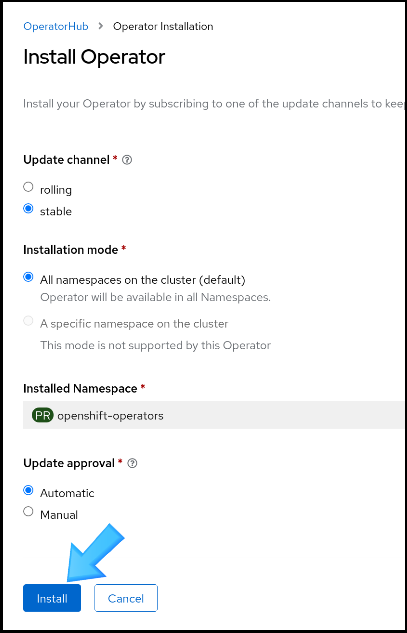
    Next, you'll see the Install Operator page (Figure 3). Keep all the defaults and click Install again.

    From the Install Operator page, click Install.
    Figure 3. From the Install Operator page, click Install.
    Figure 3: Click Install on the Install Operator page.

    When installation is complete, you'll see a message saying "saying "Installed operator — ready for use," as in Figure 4.

    When you finish installation, a page comes up saying "Installed operator — ready for use."
    Figure 4. When you finish installation, a page comes up saying "Installed operator — ready for use."
    Figure 4: The Operator is now installed.

    After you install Open Data Hub Operator, you need to create a new project that we'll call opendatahub, where all required components—Jupyterhub, Ceph Nano, and Pachyderm—will be deployed

    $ oc new-project opendatahub

    Create a KfDef to deploy Pachyderm, JuypterHub, and Ceph Nano

    Pachyderm supports any storage option compatible with AWS S3 object storage. Open Data Hub provides two of these storage options:

    • Full automation: Deploy Ceph Nano on Open Data Hub, which creates a secret for Pachyderm.
    • Partial automation: Manually create a secret for the credentials to access S3 or another S3-compatible object storage, such as MinIO.

    Full automation using Ceph Nano

    Open Data Hub provides a full automation YAML configuration using a Kubernetes Job named pachyderm-deployer. Here's an excerpt of the configuration:

    # Ceph Nano 
    - kustomizeConfig:
        repoRef:
          name: manifests
          path: ceph/object-storage/scc
      name: ceph-nano-scc
    - kustomizeConfig:
        repoRef:
          name: manifests
          path: ceph/object-storage/nano
      name: ceph-nano
    
    # Pachyderm operator
    - kustomizeConfig:
        parameters:
          - name: namespace
            value: openshift-operators
        repoRef:
          name: manifests
          path: odhpachyderm/operator
      name: odhpachyderm-operator
    
    # Pachyderm deployer
    - kustomizeConfig:
        repoRef:
          name: manifests
          path: odhpachyderm/deployer
      name: odhpachyderm-deployer

    The configuration contains a script that makes sure Ceph Nano is in a ready state, and then creates an S3 bucket in Ceph Nano. After that, the script creates a secret for the S3 bucket credentials, which Pachyderm will use to gain access to the S3 bucket.

    To use full automation on Kubernetes, you need a KfDef custom resource (CR). A manifest for this KfDef can be found in my GitHub repository. Create the KfDef on OpenShift through the following command:

    $ oc create -f https://bit.ly/3wHwt59

    Partial automation using S3 or other compatible storage (MinIO)

    If you want to go the partial automation route, the only difference from using Ceph Nano is that you need to create a secret before creating the KfDef, then pass that information to pachyderm-deployer in the KfDef. The relevant line can be found in context in the YAML file.

    An oc command that creates a secret for AWS S3 looks like this:

    $ oc create secret generic pachyderm-aws-secret \
    --from-literal=access-id=XXX  \
    --from-literal=access-secret=XXX \
    --from-literal=region=us-east-2 \
    --from-literal=bucket=pachyderm 

    An oc command that creates a secret for MinIO looks like this:

    $ oc create secret generic pachyderm-minio-secret \
    --from-literal=access-id=XXX  \
    --from-literal=access-secret=XXX \
    --from-literal=custom-endpoint=${minio_ip}
    --from-literal=region=us-east-2 \
    --from-literal=bucket=pachyderm 

    The following excerpt from a KfDef manifest shows how to use the secret with S3. The example uses pachyderm-aws-secret for the secret:

    # Pachyderm Operator
    - kustomizeConfig:
        parameters:
          - name: namespace
            value: openshift-operators
        repoRef:
          name: manifests
          path: odhpachyderm/operator
      name: odhpachyderm-operator
    
    # Pachyderm Deployer
    - kustomizeConfig:
        parameters:
          - name: storage_secret             #<=== Must set this
            value: pachyderm-aws-secret      #<=== Use your Secret Name
        repoRef:
          name: manifests
          path: odhpachyderm/deployer
      name: odhpachyderm-deployer

    Once you've created the secret, you can create the KfDef through the following command:

    $ oc create -f https://bit.ly/3NkV31I

    After you create the KfDef, OpenShift creates several pods in the opendatahub project. Four pods are created for Pachyderm:

    $ oc get pod 
    etcd-0                          1/1     Running   0          12m
    postgres-0                      1/1     Running   0          12m
    pachd-874f5958c-7w98p           1/1     Running   0          11m
    pg-bouncer-7587d49769-gwn8f     1/1     Running   0          11m

    Even more pods might be devoted to Pachyderm if you are using Red Hat OpenShift Local. If resources on your cluster are tight, it could take some time to create the pods.

    Now you can try Pachyderm on your cluster.

    Video demo

    The following video illustrates the steps outlined so far.

    Troubleshooting

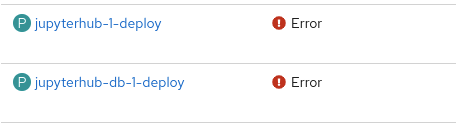
    If you are running this example on your laptop, you might see some errors with the JupyterHub pods, jupyterhub and jupyterhub-db, due to a lack of resources (Figure 5).

    Sometimes, jupyterhub and jupyterhub-db show errors at startup.
    Figure 5. Sometimes, jupyterhub and jupyterhub-db show errors at startup.
    Figure 5: Sometimes, jupyterhub and jupyterhub-db show errors at startup.

    traefix-proxy pods might show some errors, but you can ignore them. When jupyterhub and jupyterhub-db are recovered, traefix-proxy will be automatically healed.

    If you see these errors, start a rollout of the DeploymentConfigs for jupyterhub and jupyterhub-db as shown in Figures 6 and 7.

    Pull up the DeploymentConfigs page to get access to pages for jupyterhub and jupyterhub-dc.
    Figure 6. Pull up the DeploymentConfigs page to get access to pages for jupyterhub and jupyterhub-dc.
    Figure 6: Pull up the DeploymentConfigs page to get access to pages for jupyterhub and jupyterhub-dc.
    On the jupyterhub page, choose "Start rollout."
    Figure 7. On the jupyterhub page, choose "Start rollout."
    Figure 7: On the jupyterhub page, choose Start rollout.

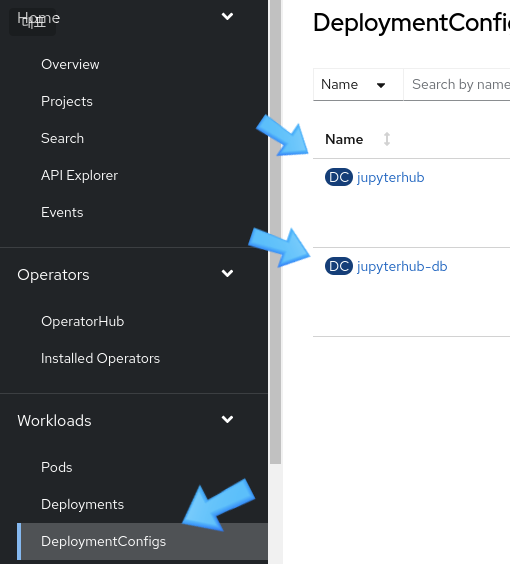
    Start a rollout for jupyterhub-db in the same way.

    If these steps don't solve the problem, roll out jupyterhub-db first, wait until it is ready, then roll out jupyterhub. Then enjoy experimenting with what Pachyderm has to offer!

    Last updated: November 8, 2023

    Related Posts

    • Configure CodeReady Containers for AI/ML development

    Recent Posts

    • Best Practice Configuration and Tuning for Linux and Windows VMs

    • Red Hat UBI 8 builders have been promoted to the Paketo Buildpacks organization

    • Using eBPF in Red Hat products

    • How we made one data layer serve the UI, the mocks, and the E2E tests

    • Build trusted Python containers with Project Hummingbird and Calunga

    What’s up next?

    book cover


    Open Source Data Pipelines for Intelligent Applications provides data engineers and scientists insight into how Kubernetes provides a platform for building data platforms that increase an organization’s data agility. 

    Download the free e-book
    Red Hat Developers logo LinkedIn YouTube Twitter Facebook

    Platforms

    • Red Hat AI
    • Red Hat Enterprise Linux
    • Red Hat OpenShift
    • Red Hat Ansible Automation Platform
    • See all products

    Build

    • Developer Sandbox
    • Developer tools
    • Interactive tutorials
    • API catalog

    Quicklinks

    • Learning resources
    • E-books
    • Cheat sheets
    • Blog
    • Events
    • Newsletter

    Communicate

    • About us
    • Contact sales
    • Find a partner
    • Report a website issue
    • Site status dashboard
    • Report a security problem

    RED HAT DEVELOPER

    Build here. Go anywhere.

    We serve the builders. The problem solvers who create careers with code.

    Join us if you’re a developer, software engineer, web designer, front-end designer, UX designer, computer scientist, architect, tester, product manager, project manager or team lead.

    Sign me up

    Red Hat legal and privacy links

    • About Red Hat
    • Jobs
    • Events
    • Locations
    • Contact Red Hat
    • Red Hat Blog
    • Inclusion at Red Hat
    • Cool Stuff Store
    • Red Hat Summit
    © 2026 Red Hat

    Red Hat legal and privacy links

    • Privacy statement
    • Terms of use
    • All policies and guidelines
    • Digital accessibility