There are many different ways to deploy your Node.js applications to Red Hat OpenShift. This article shows you how to deploy a Node.js application using Helm, along with some recent additions to OpenShift.
What is Helm?
Helm is a package manager for Kubernetes, which you can use to define, install, and upgrade all types of Kubernetes applications. You can think of Helm as an operating system packager (such as apt or yum) but for Kubernetes. With Helm, you package your Kubernetes application into a chart, which is a series of files that define the Kubernetes resources for your deployment. You can use Helm for a variety of scenarios—from very simple applications to complex ones with many dependencies.
Helm offers a fast and effective way for you and your customers to automate Node.js application deployments. Helm also supports Go, which allows for greater chart customization depending on user-specified values. (You can turn certain features on or off depending on the values.) For more information, see the Helm documentation.
You can use Helm to deploy applications to any Kubernetes environment through the command line. It’s often as easy as helm install XYZ. However, in OpenShift we’ve worked to make it even easier. There are now two ways to deploy applications with Helm using the OpenShift user interface (UI).
We'll start with a Helm chart template that was recently made available on OpenShift. You can use the template to deploy your Node.js application to OpenShift via Helm as a starter, and then customize it to create your own Helm chart. While you can also use this template to deploy to Kubernetes, it includes OpenShift extensions that make deployments easier in that environment.
In the next sections, I will show you how to use the Helm chart template to deploy a Node.js application to OpenShift with just a few clicks. After that, we'll talk through the chart's implementation, and I'll show you how to package up your own Helm chart and add it to the OpenShift developer catalog.
Note: You can also add your own Helm charts to OpenShift by using a custom resource (CR) to create a new Helm chart repository.
Setting up the demonstration
To follow this demonstration, you will need access to an OpenShift cluster. I'm using Red Hat CodeReady Containers, which allows me to run a single-node OpenShift cluster locally. It doesn’t have all the features of an OpenShift cluster, but it has everything we need for this article. Alternatively, You could use the Developer Sandbox for Red Hat OpenShift, which requires a Red Hat account.
You will also need a Node.js application that can be containerized. If you don't have one, you can use the sample program here.
Deploy a simple application with Helm on OpenShift
The Helm chart that I added allows you to easily deploy a simple application with Helm through the OpenShift user interface, without having to write your own chart. Let's go through the steps together.
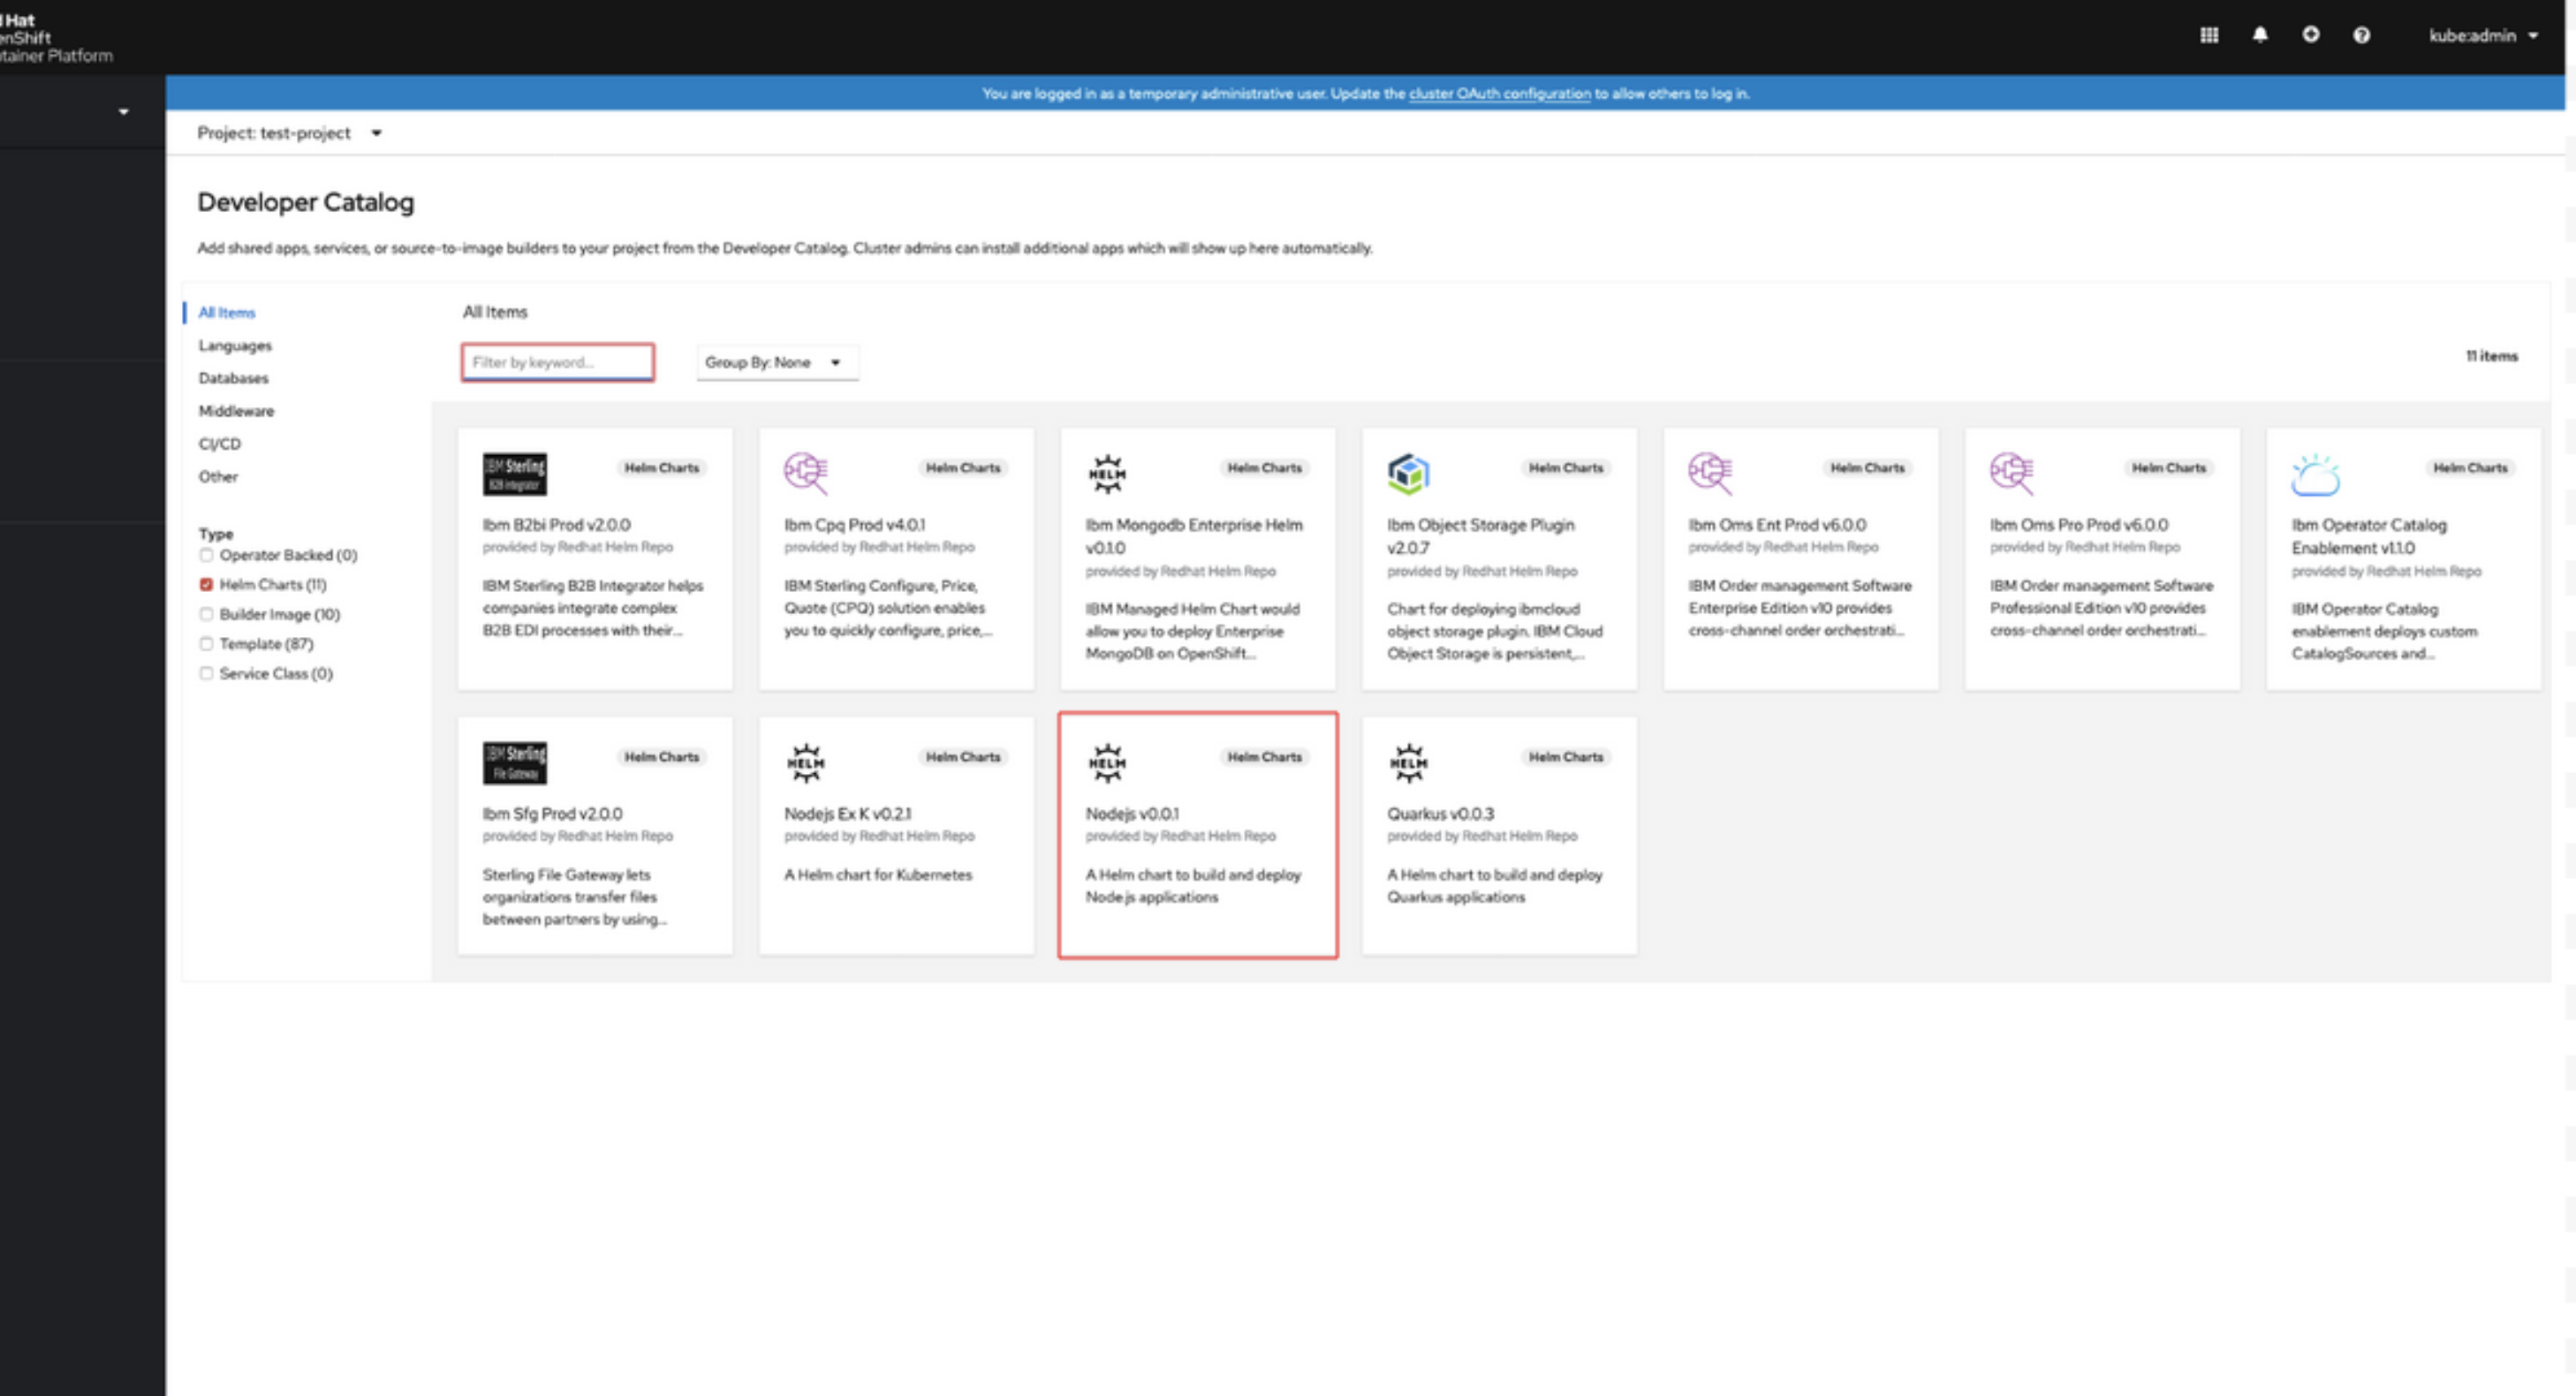
Step 1: Select Helm Chart from the project's topology view
First, you want to be inside the OpenShift console's developer view. From there, click on the topology view in the left-hand menu. You will be presented with the developer catalog, featuring a variety of deployment options. Go ahead and click on Helm Chart, as shown in Figure 1.

Step 2: Select the Node.js chart
From within the Helm Chart section of the developer catalog, select the Node.js chart, which is highlighted in Figure 2. Then, click Install Helm Chart.
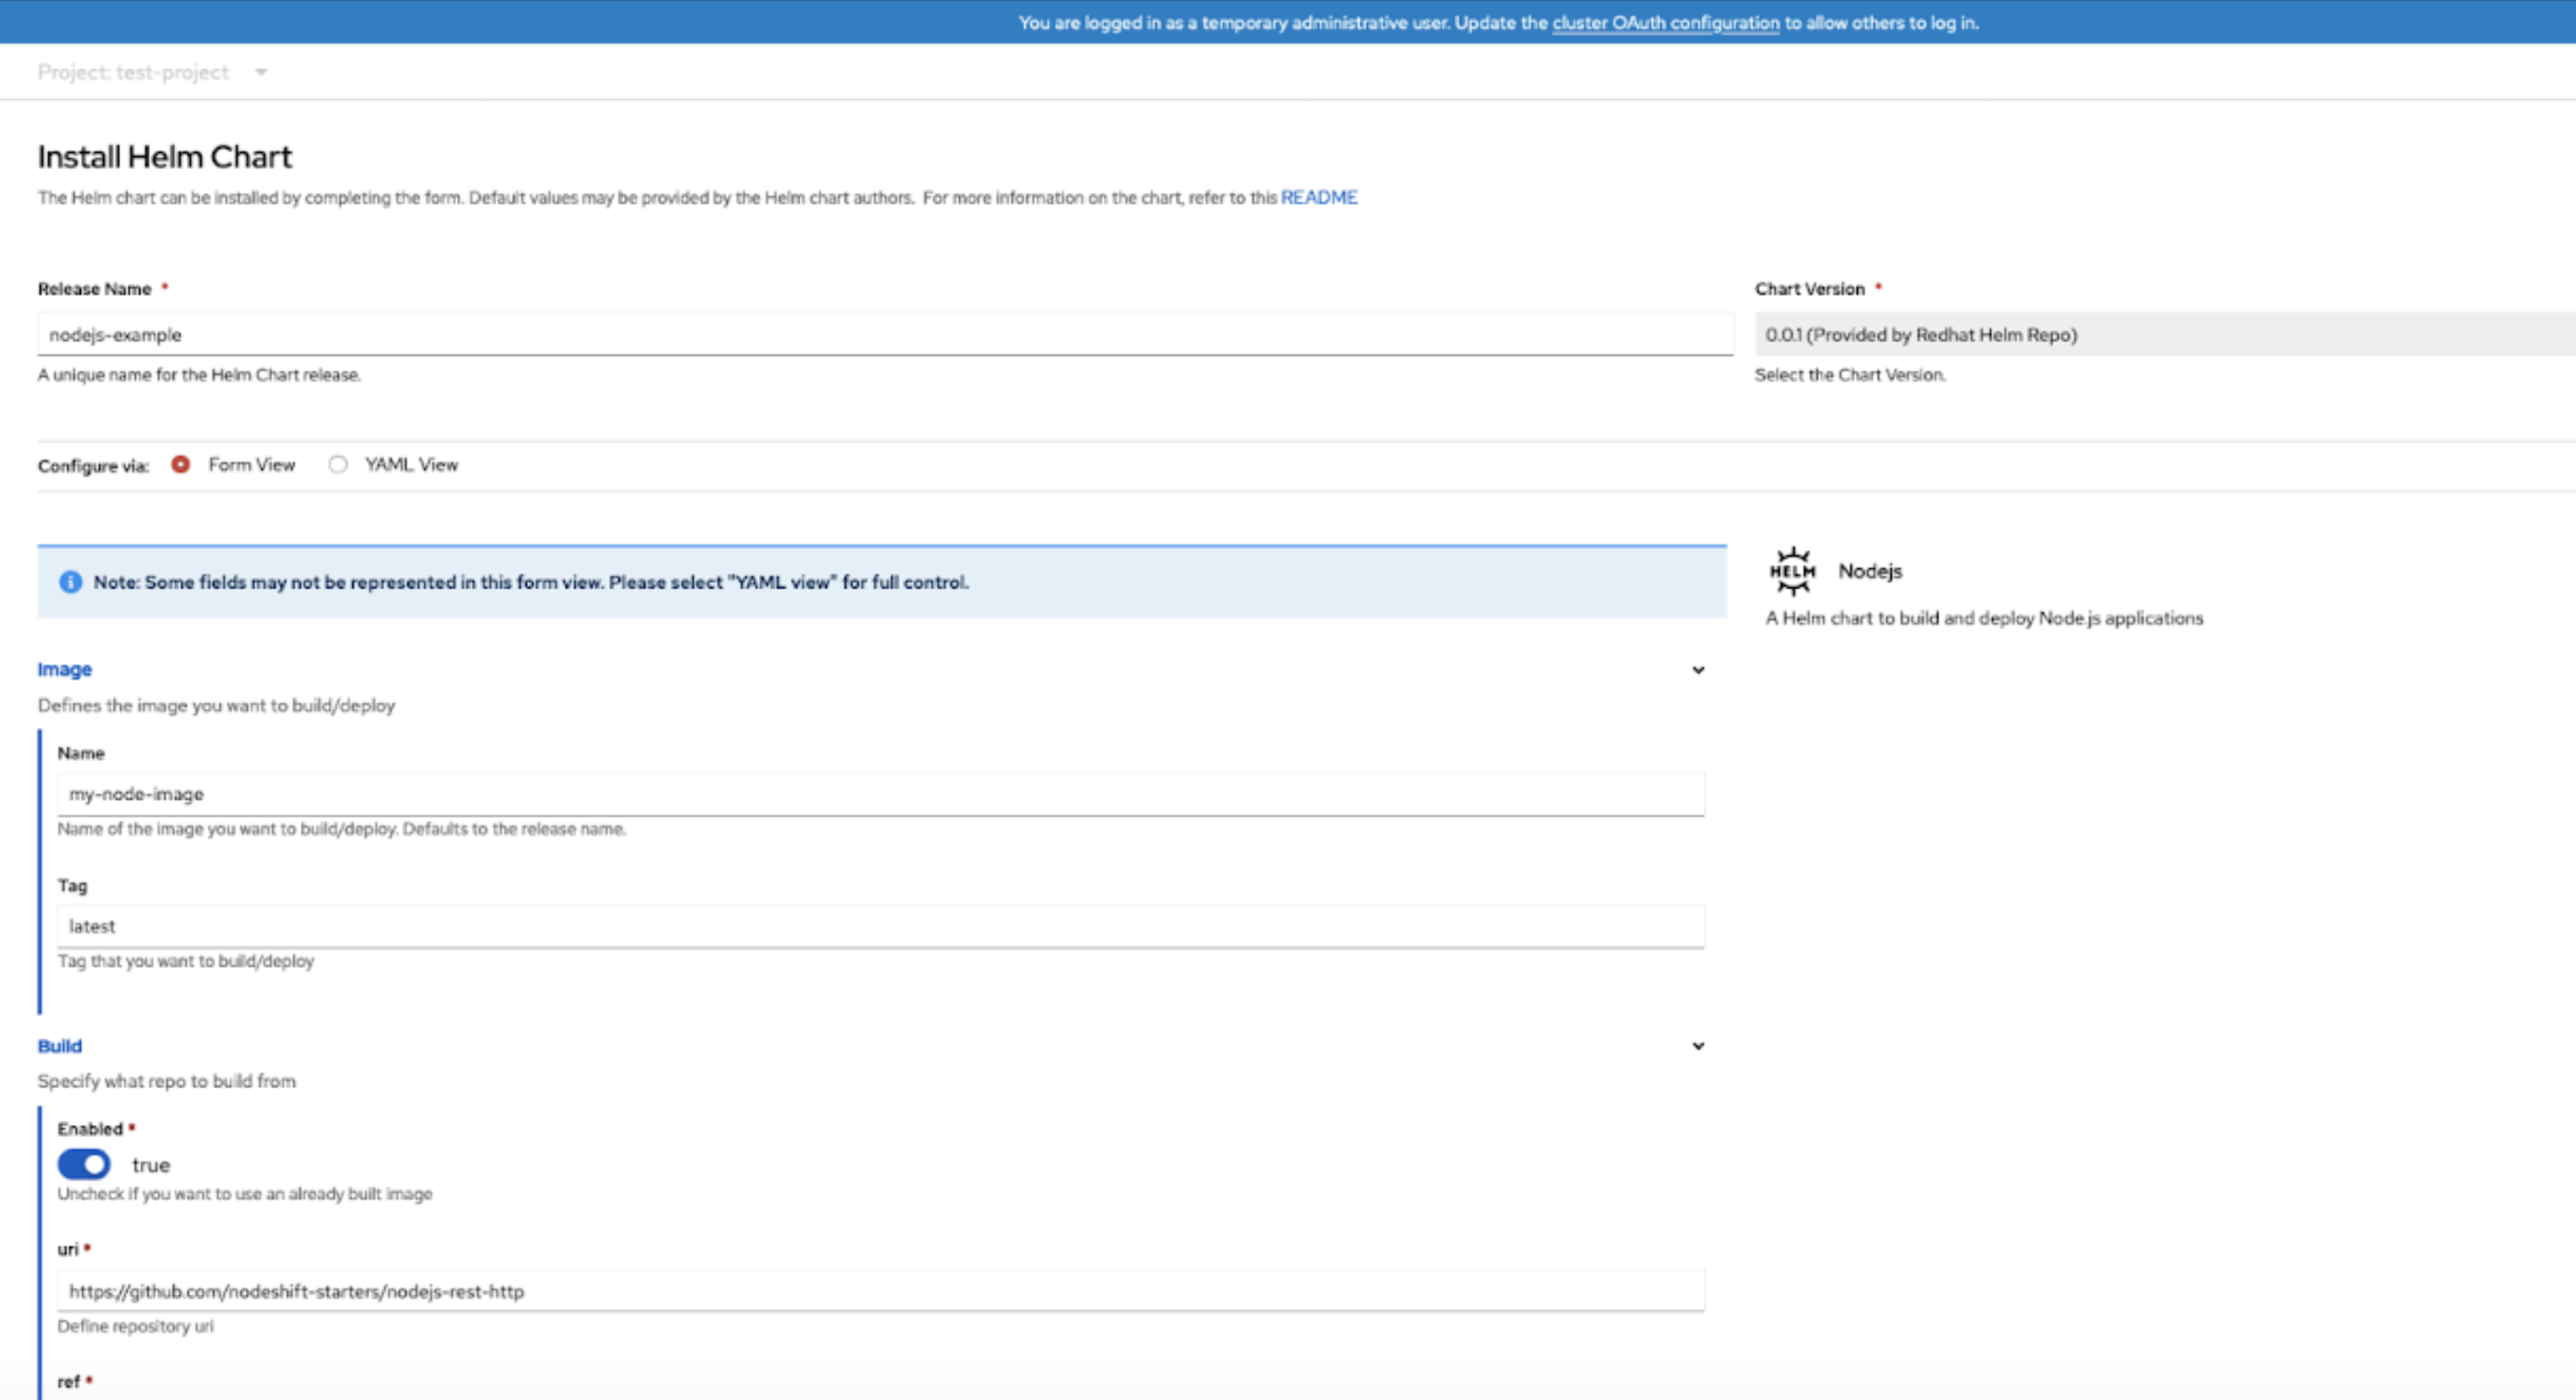
Step 3: Configure the Helm release
Now, you can configure the values that will be implanted in your Helm release. OpenShift gives you two ways to input values, using either the user-friendly form view or the YAML view. For the purpose of this demonstration, we'll use the form view.
Note: Not all of the available values are presented in the form view, so the YAML view gives you more control.
In the form shown in Figure 3, I name my release nodejs-example, set my image name as my-node-image, and input the URL of my source code’s Git repository. For this example, I'm using the nodejs-http-rest example from nodeshift-starters, but feel free to use your own repository if you wish.
I'll leave the rest of the options set to default (blank) for now, but you can change them. For example, you might want to pull from a different Node source image for the S2I builder. Figure 3 shows my completed form.
Step 4: Install and track the build
Once you have filled in the required values, go ahead and click Install. At first, you will notice the pod within your deployment is reporting ErrImagePull. This is normal. The pod is unable to pull down your image because it hasn't been built yet! You can track your image's progress under the Builds section of your deployments submenu, as shown in Figure 4.
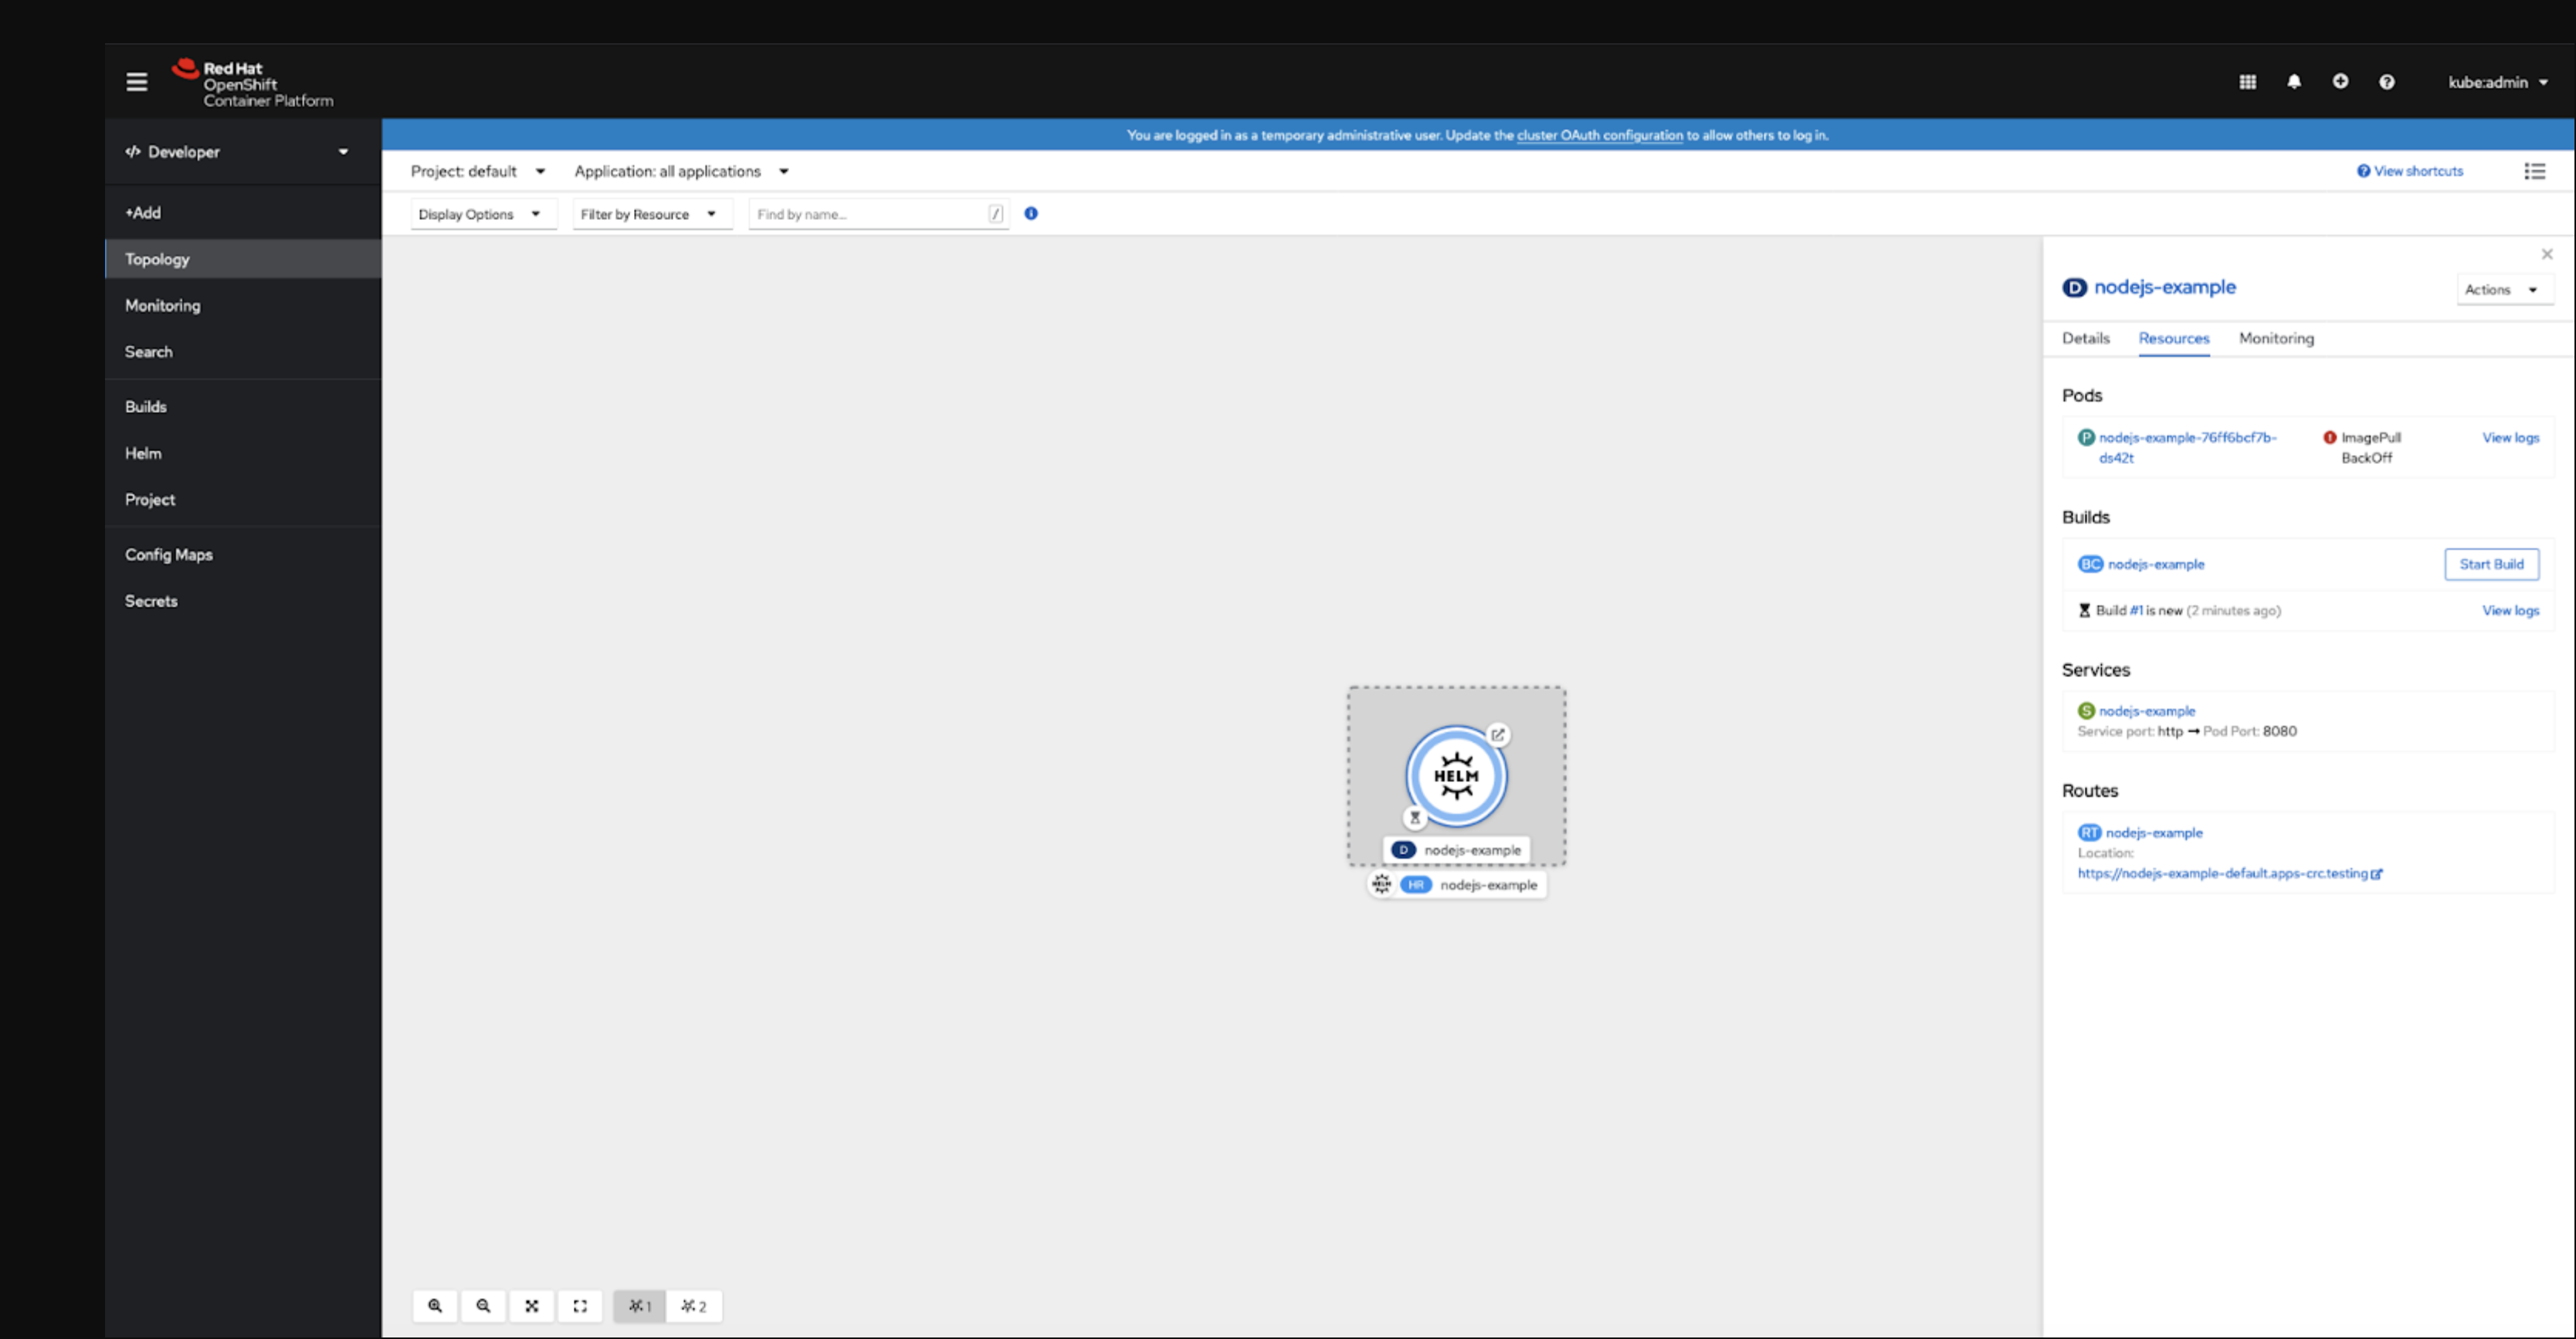
Congratulations—you've just deployed your Node.js application to OpenShift via Helm! To view your application, click the open url button in the top right corner of the deployment in the topology view.
Customize your Helm chart
For this section, I assume you already have a basic understanding of how Helm charts are structured, so we won't dig deep into the base files. Instead, we will explore the OpenShift-specific files you wouldn't normally find in a standard Helm chart. We'll explore the following files, which you can use to develop a custom Helm chart:
values.yamlbuildconfig.yamlimagestream.yamlroute.yaml
Note that the buildconfig.yaml, imagestream.yaml, and route.yaml files are all specific to OpenShift.
values.yaml
The values.yaml file is very important as it is the one your user will interact with, either directly or through the UI. So, you need to make sure it is easy to follow and that you have enough values to cover all the customization use cases you wish your user to have.
buildconfig.yaml
The buildconfig.yaml is the first OpenShift-specific file in the Helm chart. Let's have a look at the file for the sample Node.js chart:
{{- if .Values.build.enabled }}
apiVersion: build.openshift.io/v1
kind: BuildConfig
metadata:
 name: {{ include "nodejs.name" . }}
 labels:
   {{- include "nodejs.labels" . | nindent 4 }}
spec:
 source:
   type: Git
   git:
     uri: {{ .Values.build.uri }}
     ref: {{ .Values.build.ref }}
{{- if .Values.build.contextDir }}
   contextDir: {{ .Values.build.contextDir }}
{{- end }}
 strategy:
   type: Source
   sourceStrategy:
     from:
       kind: ImageStreamTag
       namespace: {{ .Values.build.source.namespace }}
       name: {{ .Values.build.source.name }}
 {{- if .Values.build.pullSecret }}
     pullSecret:
       name: {{ .Values.build.pullSecret }}
 {{- end }}
 {{- if .Values.build.env }}
     env:
       {{- tpl (toYaml .Values.build.env) . | nindent 8 }}
 {{- end }}
 output:
   to:
     kind: {{ .Values.build.output.kind }}
     name: {{ include "nodejs.imageName" . }}
 {{- if and (eq .Values.build.output.kind "DockerImage") .Values.build.output.pushSecret }}
   pushSecret:
     name: {{ .Values.build.output.pushSecret }}
 {{- end }}
{{- if .Values.build.resources }}
 resources:
   {{- toYaml .Values.build.resources | nindent 4 }}
{{- end }}
 triggers:
   - type: ConfigChange
{{- end }}
The first thing you'll notice is {{- if .Values.build.enabled }}, which is an if conditional in Golang templating. It allows the user to specify if they wish to build the image themselves using this config or use an image already in the OpenShift instance. You can also use this option to turn the OpenShift-specific features on or off. This option is useful if you want to be able to deploy your Helm chart to a vanilla Kubernetes environment.
The next line to look at is apiVersion: build.openshift.io/v1. This line specifies that the file is OpenShift-specific and uses the OpenShift API to build a deployable image.
The next key section is the source section under spec. This section, as the name hints, is where you specify the source of the program: What Git repo and which reference should be checked out.
Next up, we specify what strategy we will use to build the image. For this Helm chart, I used the source-to-image (S2I) build strategy but you could choose to use a Docker strategy or a custom build. Inside the strategy block, I specify that I want to build from an ImageStreamTag and then have variables for the namespace, name, and if the source has a pull secret or not. The user can also use the strategy block to specify if they have environment variables for the build.
Finally, we see the output and resources blocks. The resources block is where the user can specify if they want to limit the resources (such as CPU and memory) to be available to the pod once it is built. The output block is where the user specifies what type of output they would like (I defaulted to ImageStreamTag for this example), the name of the output, and the push secret (if needed) to upload the image.
imagestream.yaml
Now, let's have a look at the imagestream.yaml file, which is another OpenShift-specific file. It's a fairly simple file where you just specify the kind of image stream and its name and labels. For more information about image streams please refer to the OpenShift documentation for image streams.
route.yaml
Lastly, let's take a look at the route.yaml file. This file is used to set up the routes for your application within OpenShift. Here is where you will do things like establishing a TLS connection, and specifying ports and certificates. You can use this file to expose your application in OpenShift without having to mess around with port forwarding like you would in standard Kubernetes.
Package and deploy the Helm chart
Once you have your Helm chart completed, you'll need to package it into a .tar file and upload it to your repository of choice. You can then deploy it to OpenShift via a custom resource definition (CRD), like so:
cat <<EOF | oc apply -f -
apiVersion: helm.openshift.io/v1beta1
kind: HelmChartRepository
metadata:
  name: $name
spec:
  name: $name
  connectionConfig:
    url: https://raw.githubusercontent.com/$org/$repo/$ref
EOF
The CRD will show up under Custom Resource Definitions in the OpenShift administrator view, and the chart itself will show up in the OpenShift developer catalog. You will be able to select the chart from the catalog to deploy your application.
Conclusion
This article has been an introduction to deploying Node.js applications to OpenShift via Helm. You saw how to use an example Helm chart or build your own chart to deploy a Node.js application.
If you want to learn more about what Red Hat is up to on the Node.js front, check out the Node.js page.
Last updated: November 8, 2023