Cloud-native applications are often composed of different services and can communicate in an event-driven manner. Red Hat OpenShift Serverless already enables developers to easily create and deploy stateless functions, and supports event-driven communication through eventing.
With serverless logic, you can now also define and deploy workflows to orchestrate functions, events, and other services. Not only does this give developers a declarative way to build applications using workflows (YAML or JSON format), it also provides the necessary features, services, and tools to simplify development, deployment, and runtime management. Serverless logic has now reached general availability in OpenShift Serverless 1.33.
A first look
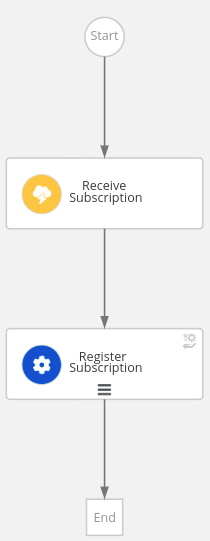
If you're wondering what this looks like: Imagine you want to build a small application that automatically processes subscription events by invoking the subscription service to register the user. A workflow to automatically do this would only contain two steps:
- One to listen for the event (3).
- Followed by an invocation of the function to register the subscription (4) with the right arguments from the event (5).
Events (1) and functions (2) are defined upfront by referencing their definition (for example, using OpenAPI), so that the framework can know where to find them and generate code to invoke them:
{
  "id": "SubscriptionWorkflow",
  "version": "1.0",
  "specVersion": "0.8",
  "name": "Subscription Workflow",
  "description": "Registering subscriptions upon an event",
  "start": "Receive Subscription",
  "events": [ (1)
    {
      "type": "newSubscription",
      "name": "NewSubscriptionEvent"
    }
  ],
  "functions": [ (2)
    {
      "name": "registerSubscriptionFunction",
      "operation": "subscription.openapi.json#register"
    }
  ],
  "states": [
    {
      "name": "Receive Subscription", (3)
      "type": "event",
      "onEvents": [
        {
          "eventRefs": ["NewSubscriptionEvent"]
        }
      ],
      "transition": "Register Subscription"
    },
    {
      "name": "Register Subscription", (4)
      "type": "operation",
      "actions": [
        {
          "name": "registerSubscription",
          "functionRef": {
            "refName": "registerSubscriptionFunction",
            "arguments": { (5)
              "name": "$.event.name",
              "email": "$.event.email"
            }
          }
        }
      ],
      "end": true
    }
  ]
}
Figure 1 depicts this workflow.

Note that this is a very simple example to get you started. A more elaborate example could, for instance, include email verification by waiting for a confirmation email with a specified timeout. (You should configure your Maven project to Red Hat build of Quarkus and OpenShift serverless logic first, as explained in this chapter.)
Serverless workflow specification
Serverless logic uses the Serverless Workflow Specification to define these orchestrations. Serverless Workflow is a vendor-neutral, open-source standard for defining workflows, at the Cloud Native Computing Foundation (CNCF).
The specification not only provides building blocks for events (incoming and outgoing) and function invocations (either synchronously or with a callback) as already seen to some extent in the previous example, but it also offers easy to use constructs for a lot of common patterns. This includes switches or parallel branches, input and output mapping, timeouts, error management and compensation for each, and more. All these constructs allow developers to build workflows that orchestrate any number of functions, services and/or events.
Focus on developer efficiency and insights
To be able to execute these workflows, serverless logic leverages SonataFlow, an open source serverless workflow runtime, upstream part of the Apache KIE incubator project.
SonataFlow is a serverless workflow implementation based on a generic cloud-native workflow engine. As a result, it offers the ability to automatically generate a lightweight workflow service for your workflow(s), with fast startup time and integration with many other cloud-native technologies. This runtime supports stable, scalable execution of your workflow(s) using generated remote REST interfaces, with (optional) support for persistence, timers, monitoring, auditing, and many more capabilities (leveraging the underlying Quarkus platform for their implementation).
To empower developers, serverless logic offers more than just a runtime:
- The OpenShift serverless logic Operator, in combination with the
kn-workflowcommand line interface (CLI), allows you to create a workflow project, run it, and deploy the workflow into your cloud environment. Through a simple CLI command you can submit a Custom Resource (CR) containing the workflow (and potentially some supporting files) and the Operator will deploy a workflow runtime for you (supporting both a developer profile using a prebuilt image or a production profile building a custom immutable image). - Creating workflows is a lot easier with the right tooling support, in this case by offering a VSCode extension that offers validation, code completion, graphical visualization, and more.
- Workflows can become complex, and developers need help and insights (based on audit information collected by the runtime), both during the development cycle or when monitoring workflows at runtime. The runtime console gives a detailed view of the status of all your workflow instances.
Benefits
By extending the developer’s toolbox with workflows, developers can spend less time writing code hooking services together, but instead can leverage higher-level workflow building blocks to build applications. The simplified experience hides a lot of the underlying complexity (related to state persistence, audit, timers, and etc.) and instead focuses on providing domain-level insights into the status of your application workflows.
How to get started with serverless logic
Head to the OpenShift documentation for instructions on how to get started. After installing the kn-workflow CLI, you can use it to create and run your workflows. Typically developers can implement and test their workflows locally, on their laptop, before deploying them in the cloud using the Operator.
To get your first workflow running locally, all you need is the following commands:
kn-workflow create --name my-projectkn-workflow runThe second command (to be executed in your project folder in the first step) will start a workflow service (using Podman/Docker) for the workflow in your project. You can immediately access the runtime tools on this service to start your workflow or look at the status of running instances. The following video shows the getting started experience.
Conclusion
If you made it this far, congratulations! You are now ready to update the workflow according to your own needs, using all the building blocks at your disposal to orchestrate your services and/or events. Not finding what you’re looking for? There are a lot more guides and examples available.
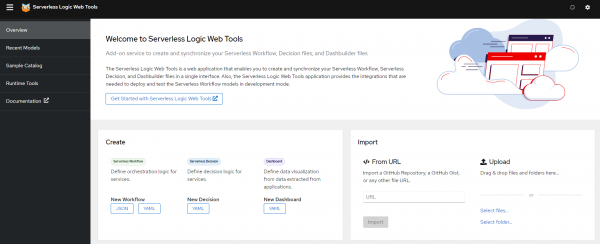
If you want to take a quick look, you can also access our online playground start.kubesmarts.org (running completely in your browser) for a quick first look at the tooling and some examples (Figure 3).

