Argo CD introduced us to the concepts of ApplicationSets and generators sometime ago. It added several generators, such as the Git generator and the list generator (to get full details on those, see the Argo CD documentation).
The idea behind these new generators is to provide users, developers, administrators, and platform teams with a way to create their flavor of generator with a basic web application server that exposes a POST path with a JSON body of the desired schema.
So why do I bring you all here, you might be asking?
I have created a small plug-in that uses a simple Node.js application server and a Helm chart to dynamically update, create, and delete those new applications from the ApplicationSet, all in the GitOps style of practices.
Let's begin
The repository we will use in this tutorial can be found here. Fork and follow the README file on how to use and duplicate.
What you need to make this work:
- Red Hat OpenShift 4.13 cluster (get Red Hat OpenShift Local).
- Red Hat OpenShift GitOps 1.10 (Argo CD 2.8)
- oc client
- Helm command-line interface (CLI)
- yq processor
The sample application project can be found here; please fork if you plan to change stuff.
The repository files and folder are shown in Figure 1.
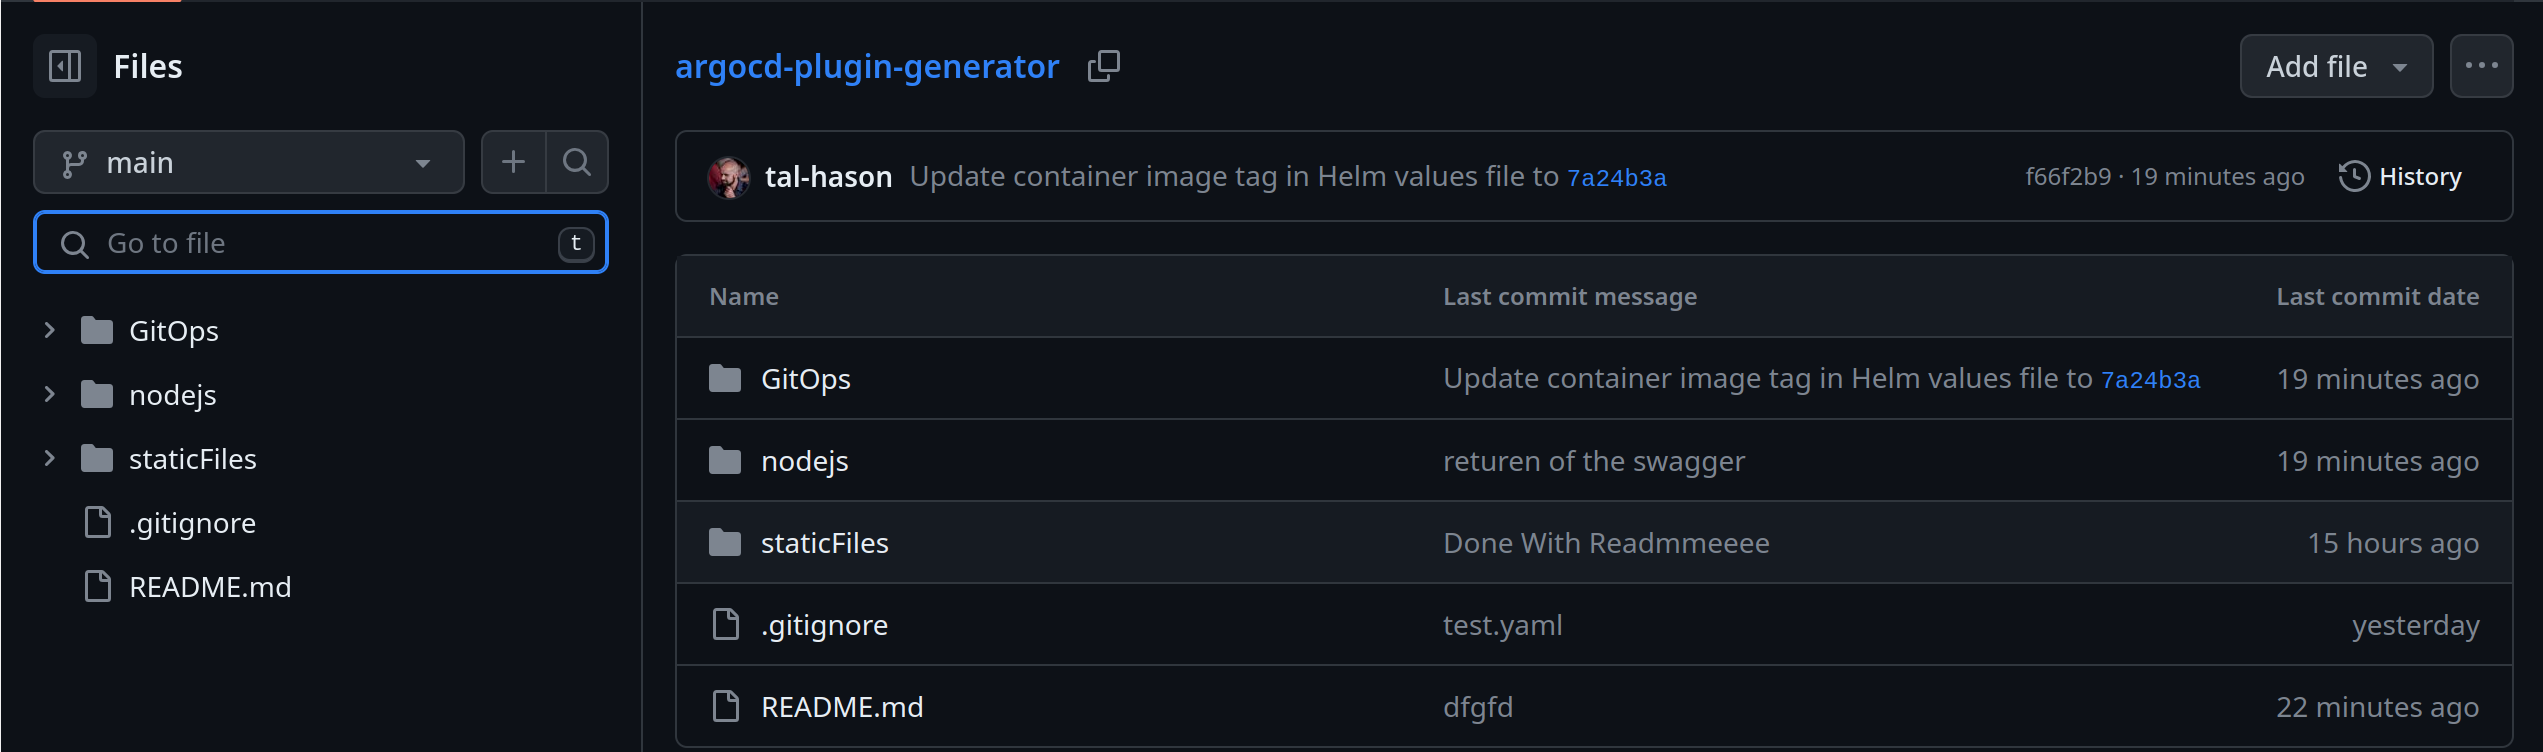
Let's explain the nodejs folder.
Under it, we have:
srcfolder, with theapp.jsfile that contains our web application server.src/config; here we store a defaultapp.yamlfile with basic config.argocd-plugin-app.postman_collection.json: Postman collection to assist with testing the POST request.automation.shscript to assist with building, testing, and pushing the application image.Dockerfile, a multi-stage Docker file to build the application container image.
The automation.sh file will make it easier to run podman build/run/push.
The script accepts two running arguments; the first is the commit message, and the second is the desired operation.
test: This will build and run the application image.push: This will build and push the application image to the image registry after it prompts to either update the Helm chart values file or not with the new image tag.- To work with the file, create an environment variable named
IMAGE_NAMEwith your_image.registry/repo_name/image_; if you forget, the script will ask you for the image name in the first run.
I added a Swagger UI to the application to assist with testing the payload on the fly directly from the server for environments with limited resources (no Postman, for example).
To access the Swagger UI, you need to navigate to the application route from your cluster, i.e., https://plugin-argo-plugin-openshift-gitops.<>/API-docs.
You should be presented with the Swagger UI, as shown in Figure 2.
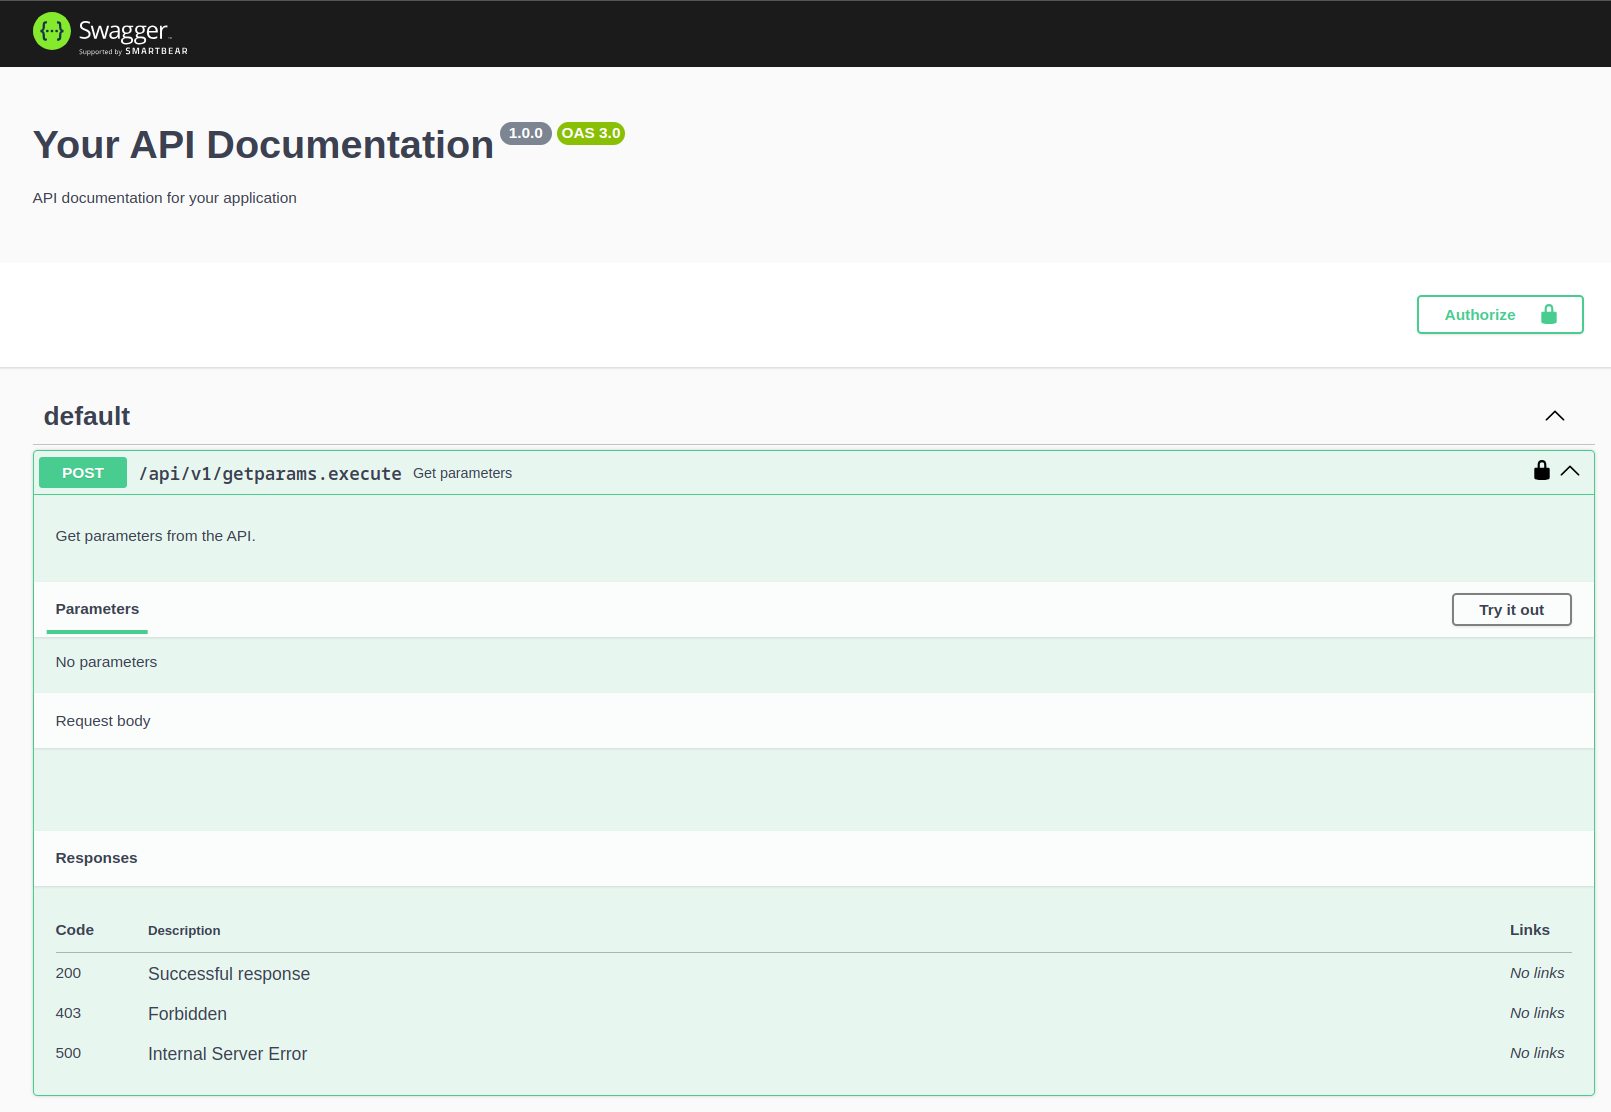
The API is protected with a simple bearer token, the deployment mechanism generating a new one after each commit so to get the latest token, run the following:
oc get secrets plugin-argocd-app-set-plugin-token -n openshift-gitops -o yaml | yq eval '.data.token' | base64 -d
This will print the token to the terminal and you can click the Authorize button on the top-right of the Swagger UI to enter it. Click Login, and you are all set (Figure 3).

The GitOps folder
In our GitOps folder, we find 2 subfolders:
Argo-Plugin: Holds our Helm chart with its values file to deploy our plug-in web application.ArgoApps: Holds all our Argo CD objects with Kustomize.
I built it this way because Helm is more flexible with application deployment manipulation, and Kustomize is better with non-planned add-ons and changes. To duplicate the plug-in, there are changes that we need to make, which I will explain later on.
Argo-Plugin folder
Read the README file to understand the chart options; it's very basic.
Some tricks and tips
Folders:
Certificates: Paste your domain certificate and it will be added to the route that will be generated by the ingress.ApplicationFiles: This is the most important folder, in which we will put our{Application}.yamlfiles like the following example. The application supports multiple config files (i.e.,batman.yaml,robin.yaml,joker.yaml, etc.), and will merge them to a single JSON payload:
batman.yaml:
GenerateApplication:
  name: batman
  project: gotham-demo
  image: quay.io/gotham/batman
  tag: 4a7050d
  repoURL: https://github.com
  branch: main
  gitopsRepo: gotham-cd
The JSON body payload:
{
  "output": {
    "parameters": [
      {
        "name": "batman",
        "project": "gotham-demo",
        "image": "quay.io/gotham/batman",
        "tag": "4a7050d",
        "repoURL": "https://github.com",
        "branch": "main",
        "gitopsRepo": "gotham-cd"
      },
      {
        "name": "joker",
        "project": "gotham-demo",
        "image": "quay.io/gotham/joker",
        "tag": "8280f51",
        "repoURL": "https://github.com",
        "branch": "main",
        "gitopsRepo": "gotham-cd"
      },
      {
        "name": "robin",
        "project": "gotham-demo",
        "image": "quay.io/gotham/robin",
        "tag": "a678098",
        "repoURL": "https://github.com",
        "branch": "main",
        "gitopsRepo": "gotham-cd"
      }
    ]
  }
}
Each new Object in the GenerateApplication key will generate an Argo application via the ApplicationSet.
You can add more or even change the schema—just adapt the ApplicationSet.yaml file to the current schema:
apiVersion: argoproj.io/v1alpha1
kind: ApplicationSet
metadata:
  name: plugin-applicationset
  namespace: openshift-gitops
spec:
  generators:
    - plugin:
        configMapRef:
          name: plugin-config
        requeueAfterSeconds: 30
  template:
    metadata:
      name: "{{name}}-{{project}}"
    spec:
      project: argocd-plugin
      source:
        helm:
          valueFiles:
            - '{{project}}/develop/values-{{name}}.yaml'
          parameters:
            - name: "image.name"
              value: '{{image}}'
            - name: "image.tag"
              value: '{{tag}}'
            - name: "global.namespace"
              value: 'plugin-test'
        repoURL: '{{repoURL}}/{{project}}/{{gitopsRepo}}.git'
        targetRevision: '{{branch}}'
        path: Application
      destination:
        server: https://kubernetes.default.svc
        namespace: plugin-test
      syncPolicy:
        automated:
          prune: true
          selfHeal: true
        syncOptions:
          - CreateNamespace=true
{{name}}: This is thenameobject from each item in theGenerateApplicationarray (i.e., the name of the application or whatever you think is relevant).{{project}}: This is theprojectobject from each item in theGenerateApplicationarray (i.e., the organization name in GitHub).{{image}}: This is theimageobject from each item in theGenerateApplicationarray (i.e.,quay.io/gotham/batman).{{tag}}: This is thetagobject from each item in theGenerateApplicationarray (i.e.,v1.0.1).{{repoURL}}: This is therepoURLobject from each item in theGenerateApplicationarray (i.e.,<http://www.github.com>).{{branch}}: This is thebranchobject from each item in theGenerateApplicationarray (i.e., the branch name for the GitOps repo).{{gitopsRepo}}: This is thegitopsRepoobject from each item in theGenerateApplicationarray (i.e., the repository name for the GitOps repo).
Info alert: Note
These fields are for my example; you can create any fields you want or need. Just remember they all have to be consistent in all the files.
Secrets
We have 2 secrets in the template:
secret-ca-cert.yaml, which will be generated with the ingress (i.e.,deploy.ingress.enabled=true)header-secret.yaml; this secret auto-generates the bearer token for the web application and the ApplicationSet.
apiVersion: v1
kind: Secret
metadata:
  name: '{{ .Values.global.serviceName }}-argocd-app-set-plugin-token'
  labels:
    {{- include "app.labels" . | nindent 4 }}
    app.kubernetes.io/part-of: argocd
  annotations:
    helm.sh/hook: "pre-install"
    helm.sh/hook-delete-policy: "before-hook-creation"
type: Opaque
data:
  token: '{{ randAlphaNum 14 | b64enc }}'
Notes:
- The secret will generate a new token each time a new commit is created, so always double-check your token if you testing with the Swagger or Postman.
- If the Secret has been changed, the deployment will roll out and reload the new token.
- The name of the token is part of the plug-in config in the ConfigMap
plugin-config.
ArgoApps folder
Under the ArgoApps folder, we have the following:
- A plug-in folder, which holds the plug-in Argo application that directs the Git repo to the Helm chart folder.
Project.yaml, an Argo project.AppofApps.yaml, an app of apps application to bootstrap the plug-in and ApplicationSet.kustomization.yaml, an easy way to deploy all YAMLs in one command.
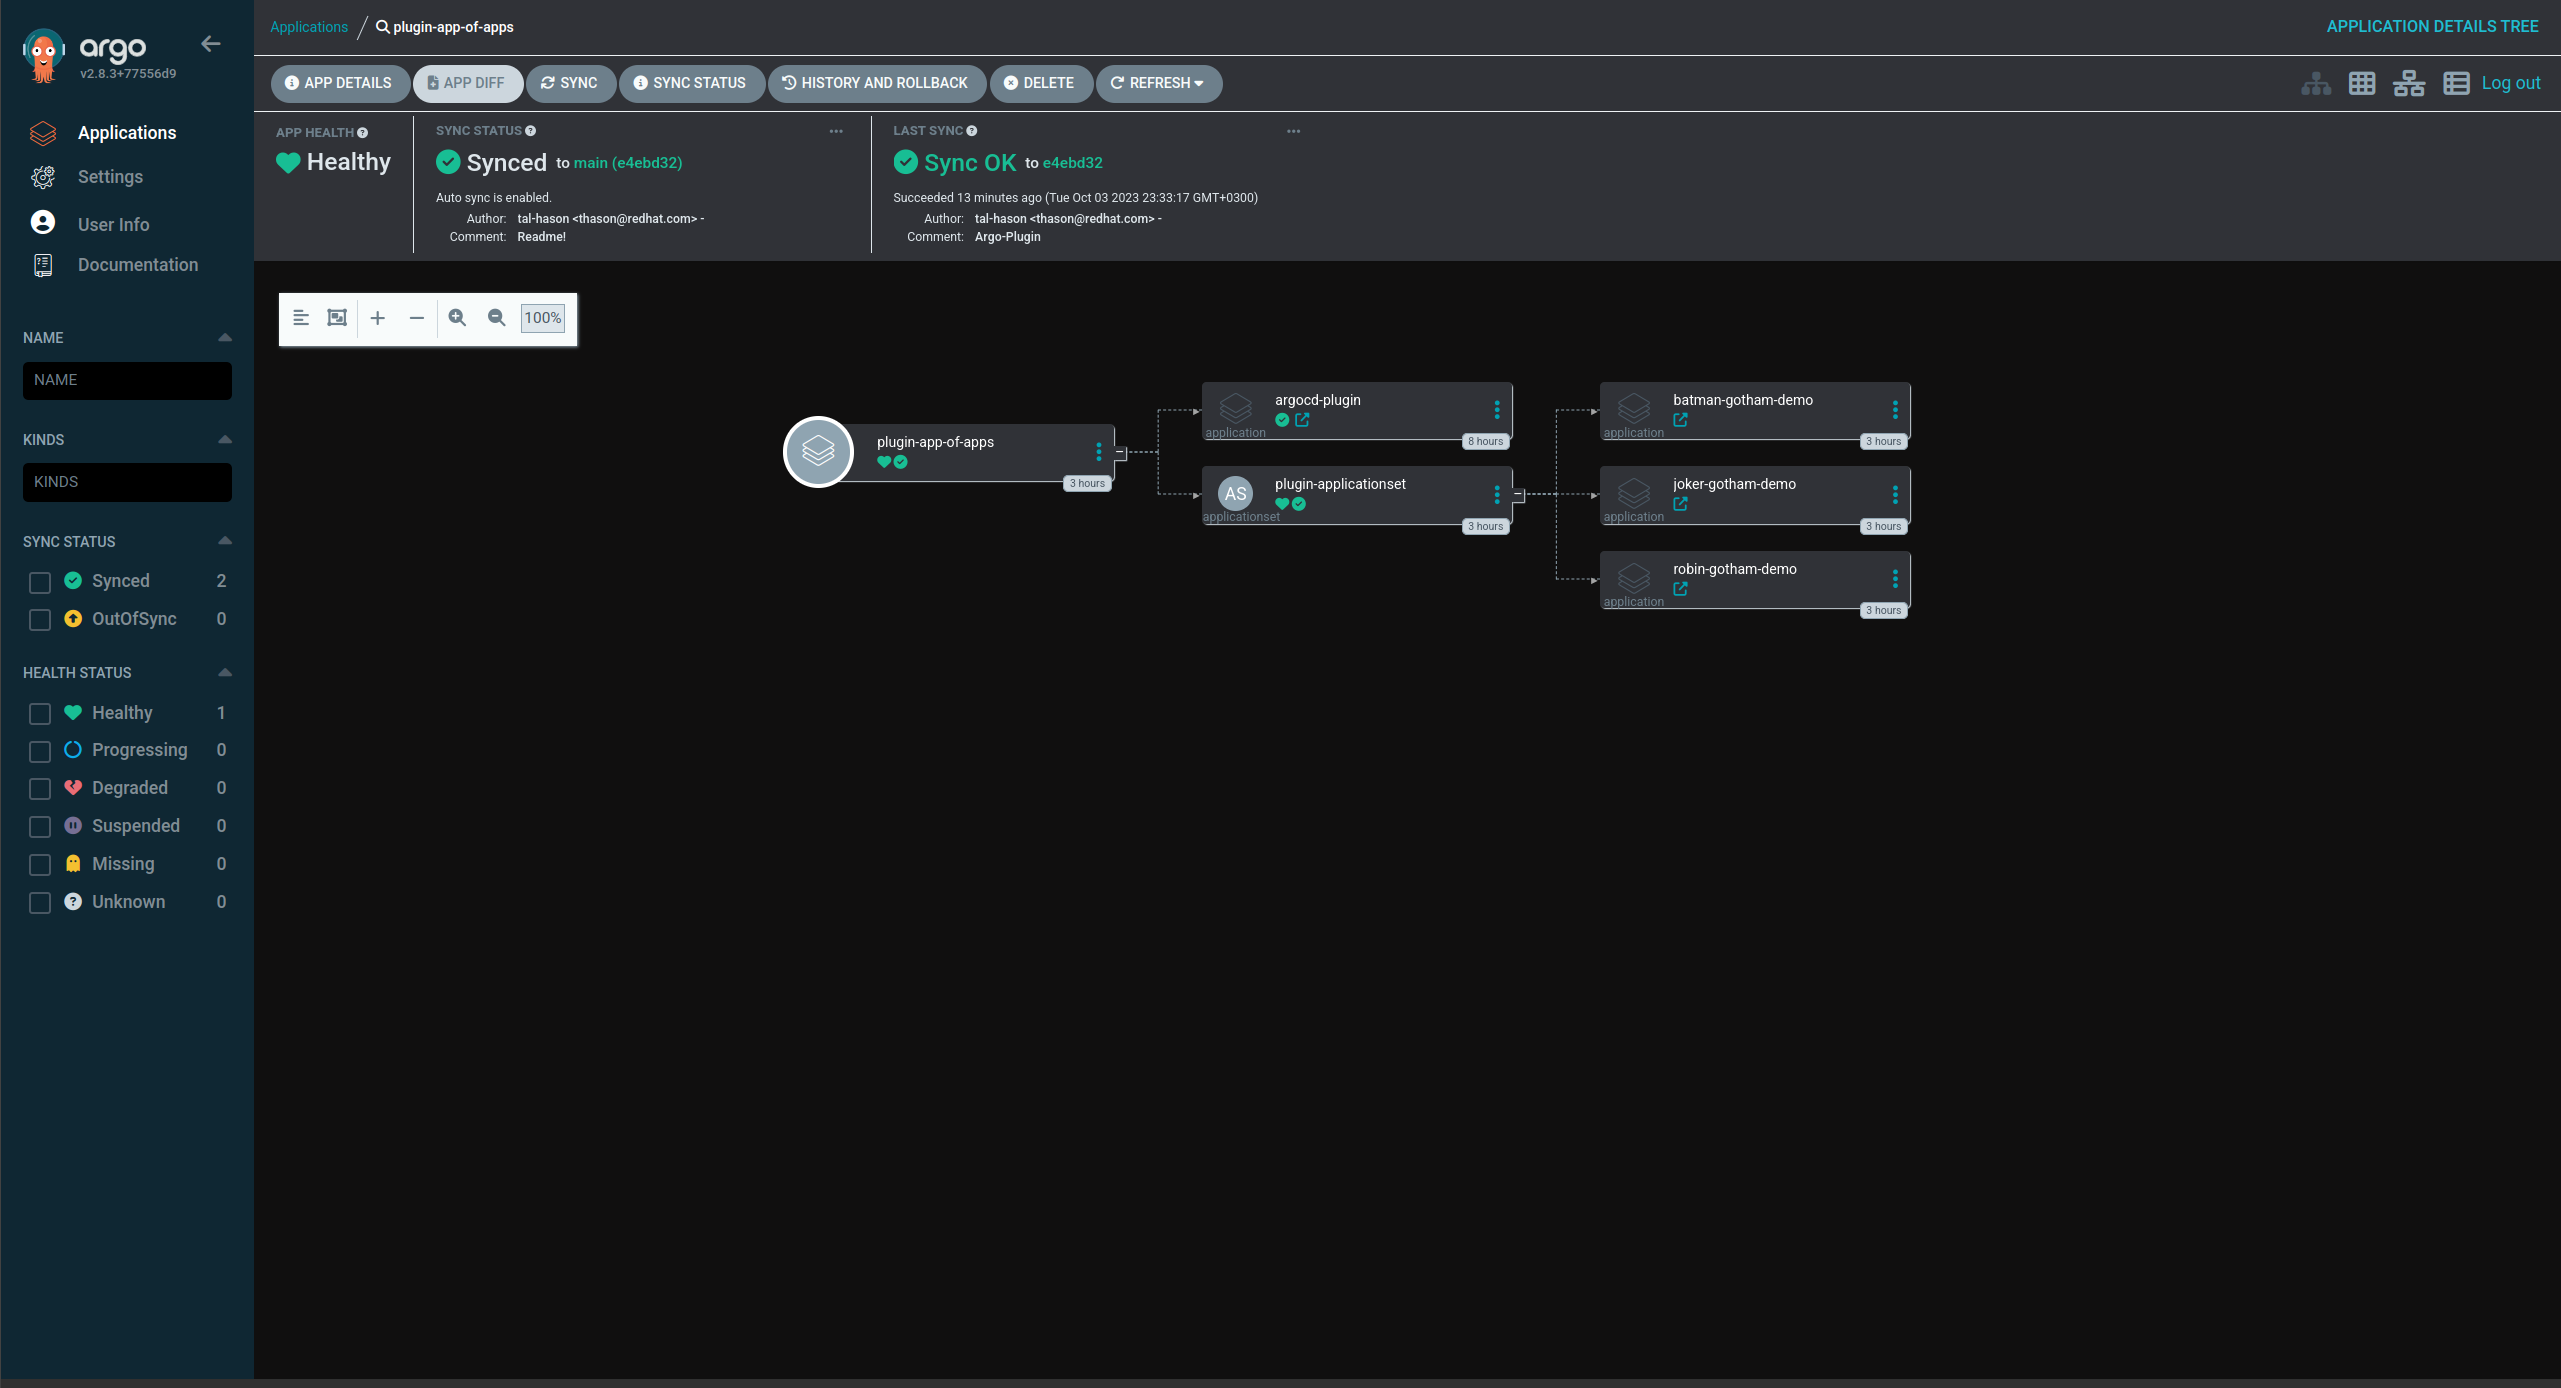
To bootstrap the plug-in generator, just run the following command from the root of the repo:
oc apply -k GitOps/ArgoApps
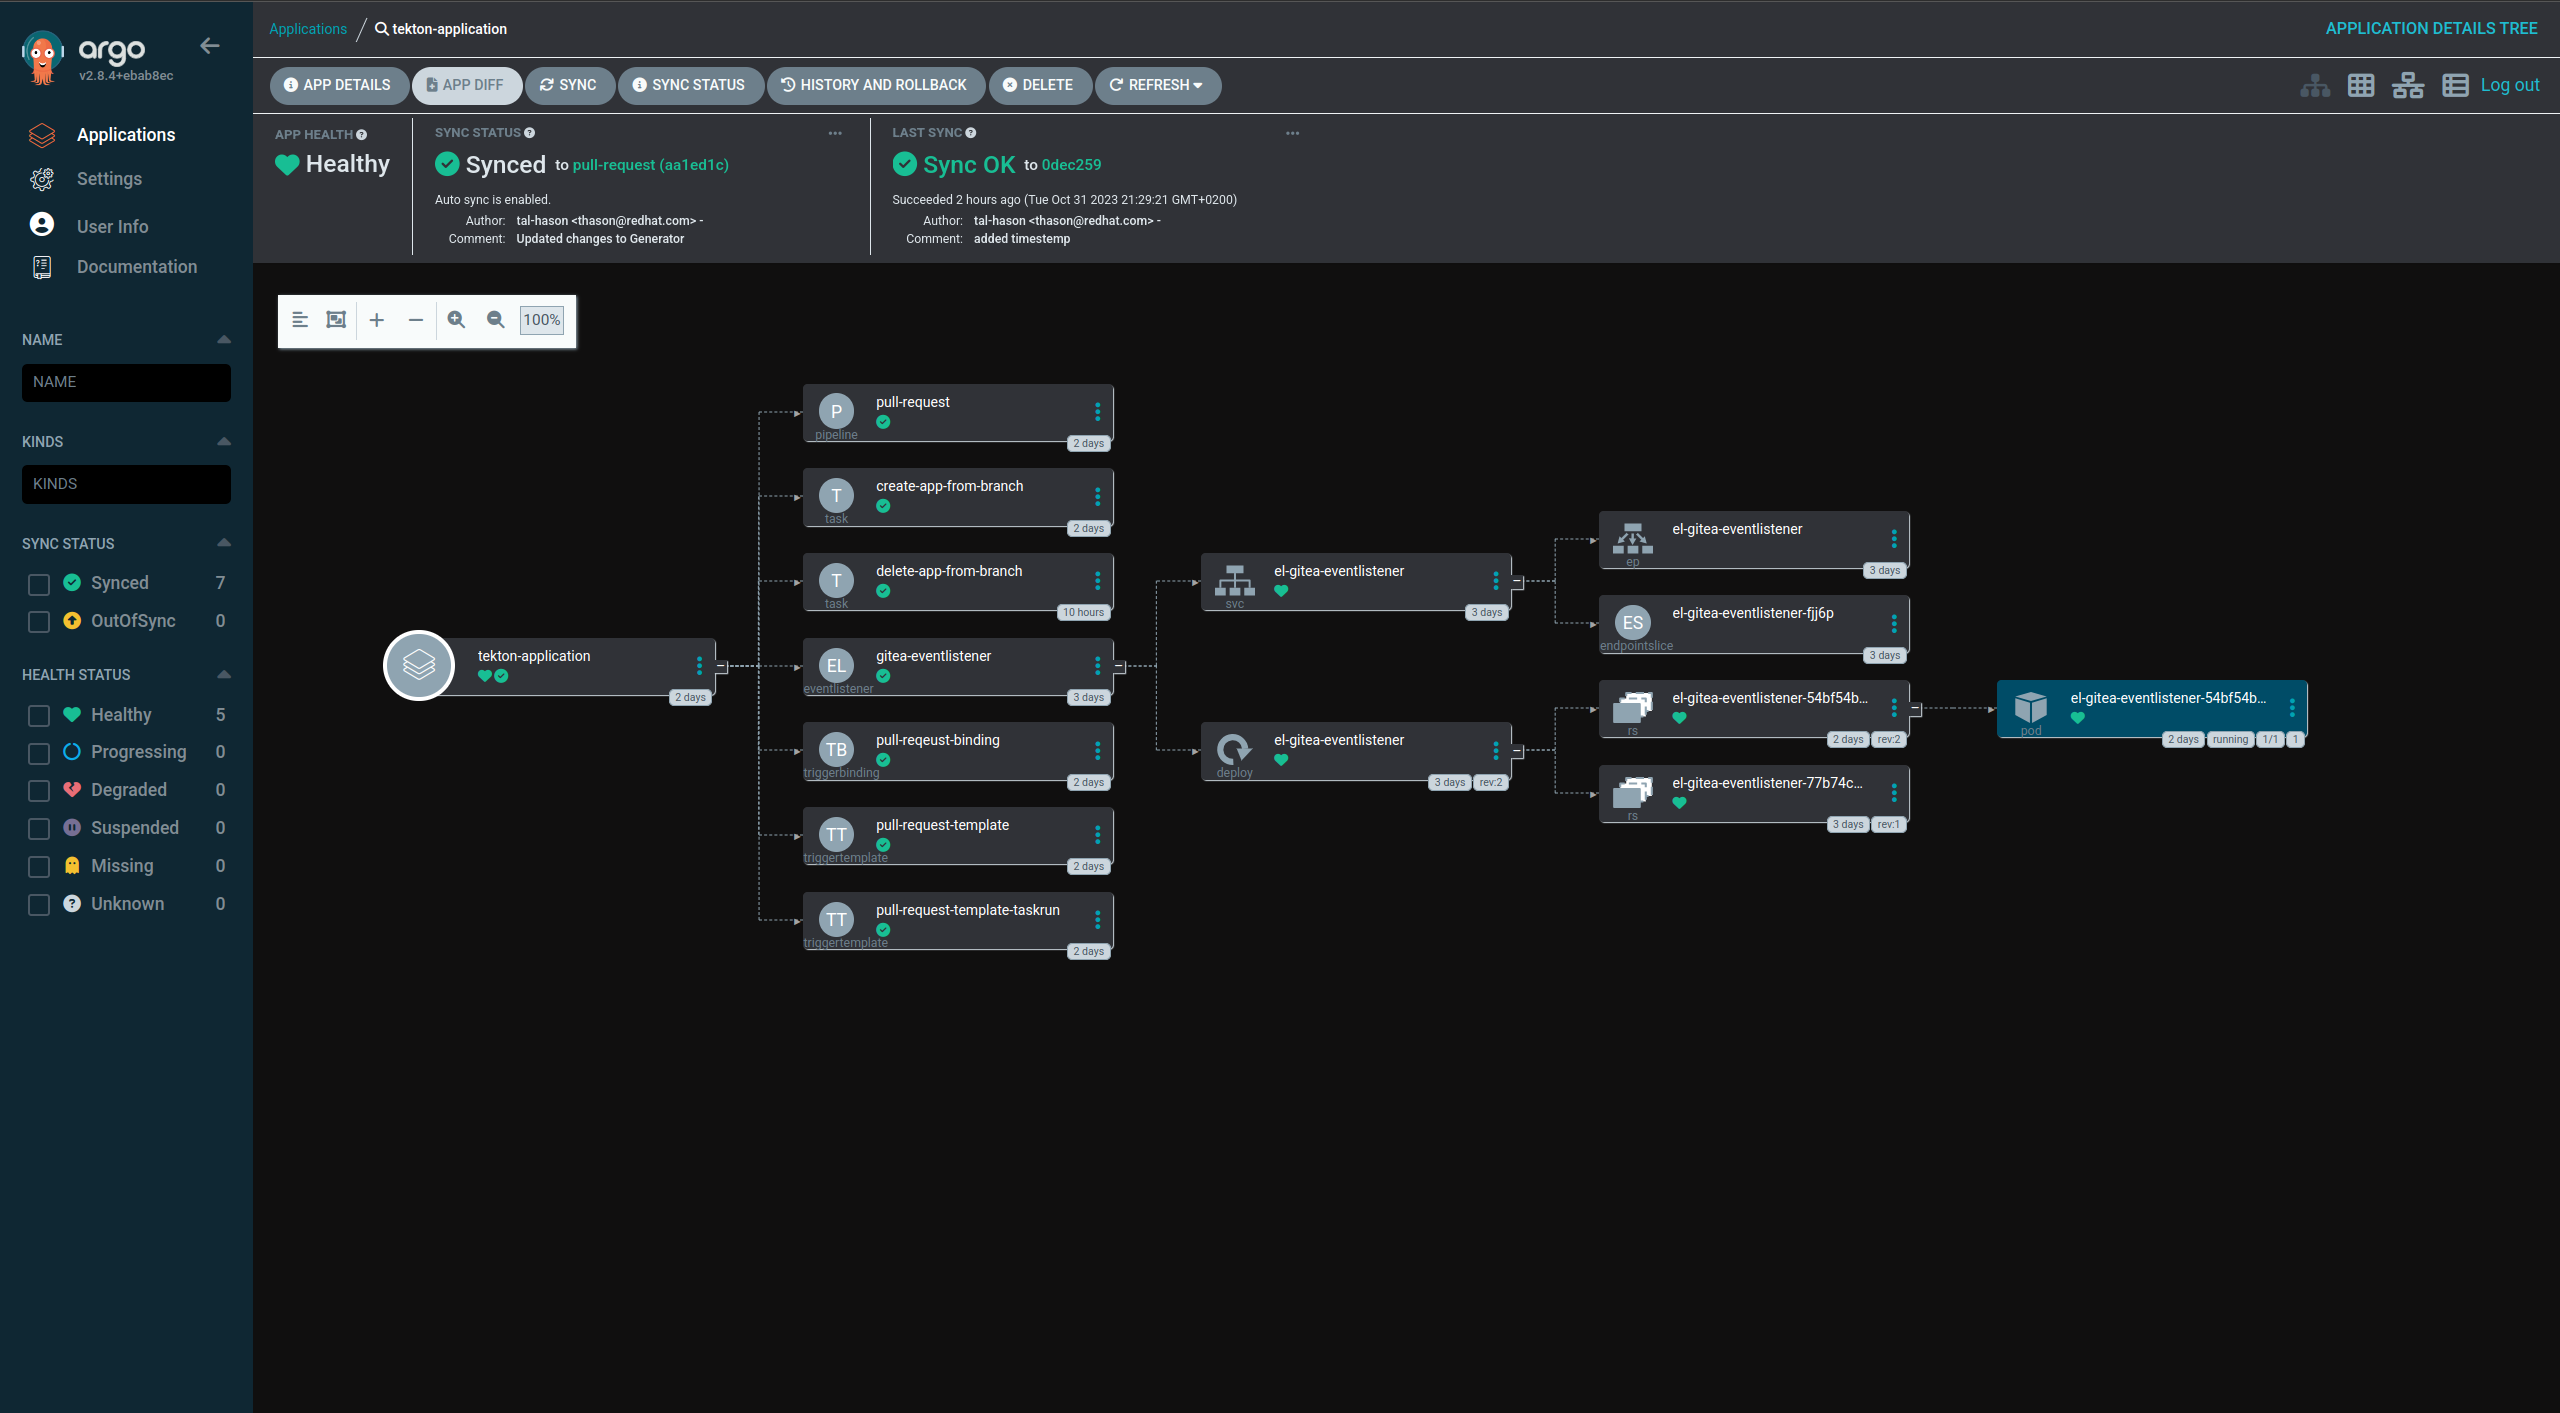
This will install the Argo project and the app of apps, and then the plug-in application and the ApplicationSet (Figure 4).
How to create support for multiple schemas and patterns
This plug-in supports a single schema that is defined in our YAML file under the ApplicationFiles in the Helm chart folder. If we want to support multiple patterns, we can easily just duplicate our Helm chart and create a new schema in it. Here is how to do it:
- Duplicate the
Argo-Pluginfolder under GitOps folder and rename it. - Update the
Chart.yamlwith the new folder name undername:. - Under
ArgoApps/Plugin, duplicate theApplicationSet-Plugin.yamland thePlugin-Application.yaml, rename them and update the paths to your new plug-in deployment under theGitOpsfolder. - Update the
values.yamlfile under your newly created folder withglobal.serviceName={new name}. - In the ApplicationSet, adjust the template to the new schema that you apply in the new config files and update the config name to the new ConfigMap name (tip: the ConfigMap name has the service name at the beginning).
- Sync the app of apps, and a new plug-in will be created with a new ApplicationSet.
Now you can add your new application YAML files into it and see your application generated.
Watch this demo video to see it in action.
Using the Plugin-Generator to create a Pull-Request generator
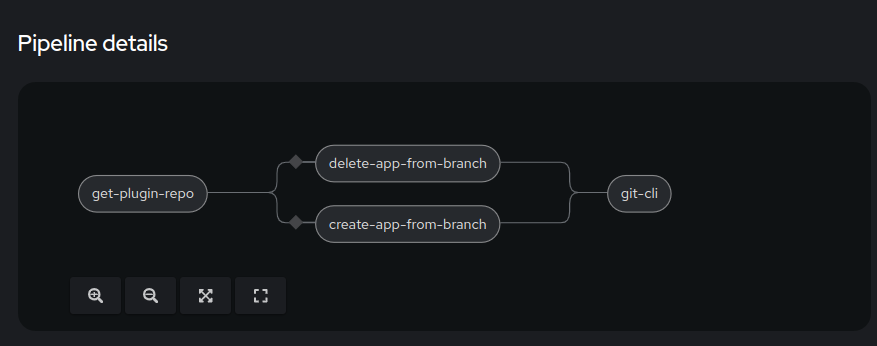
Under a branch named Pull-Request, there is an example of how to combine Tekton Pipelines and the Plugin-Generator. It's a very simple pipeline that listens to PR webhooks, and for every new PR open, the pipeline creates a new file under the ApplicationFiles folder. See Figures 5 and 6.
Then, a new application is created via the new branch, and when the PR is closed, the pipeline deletes the file, and the branch application is deleted.
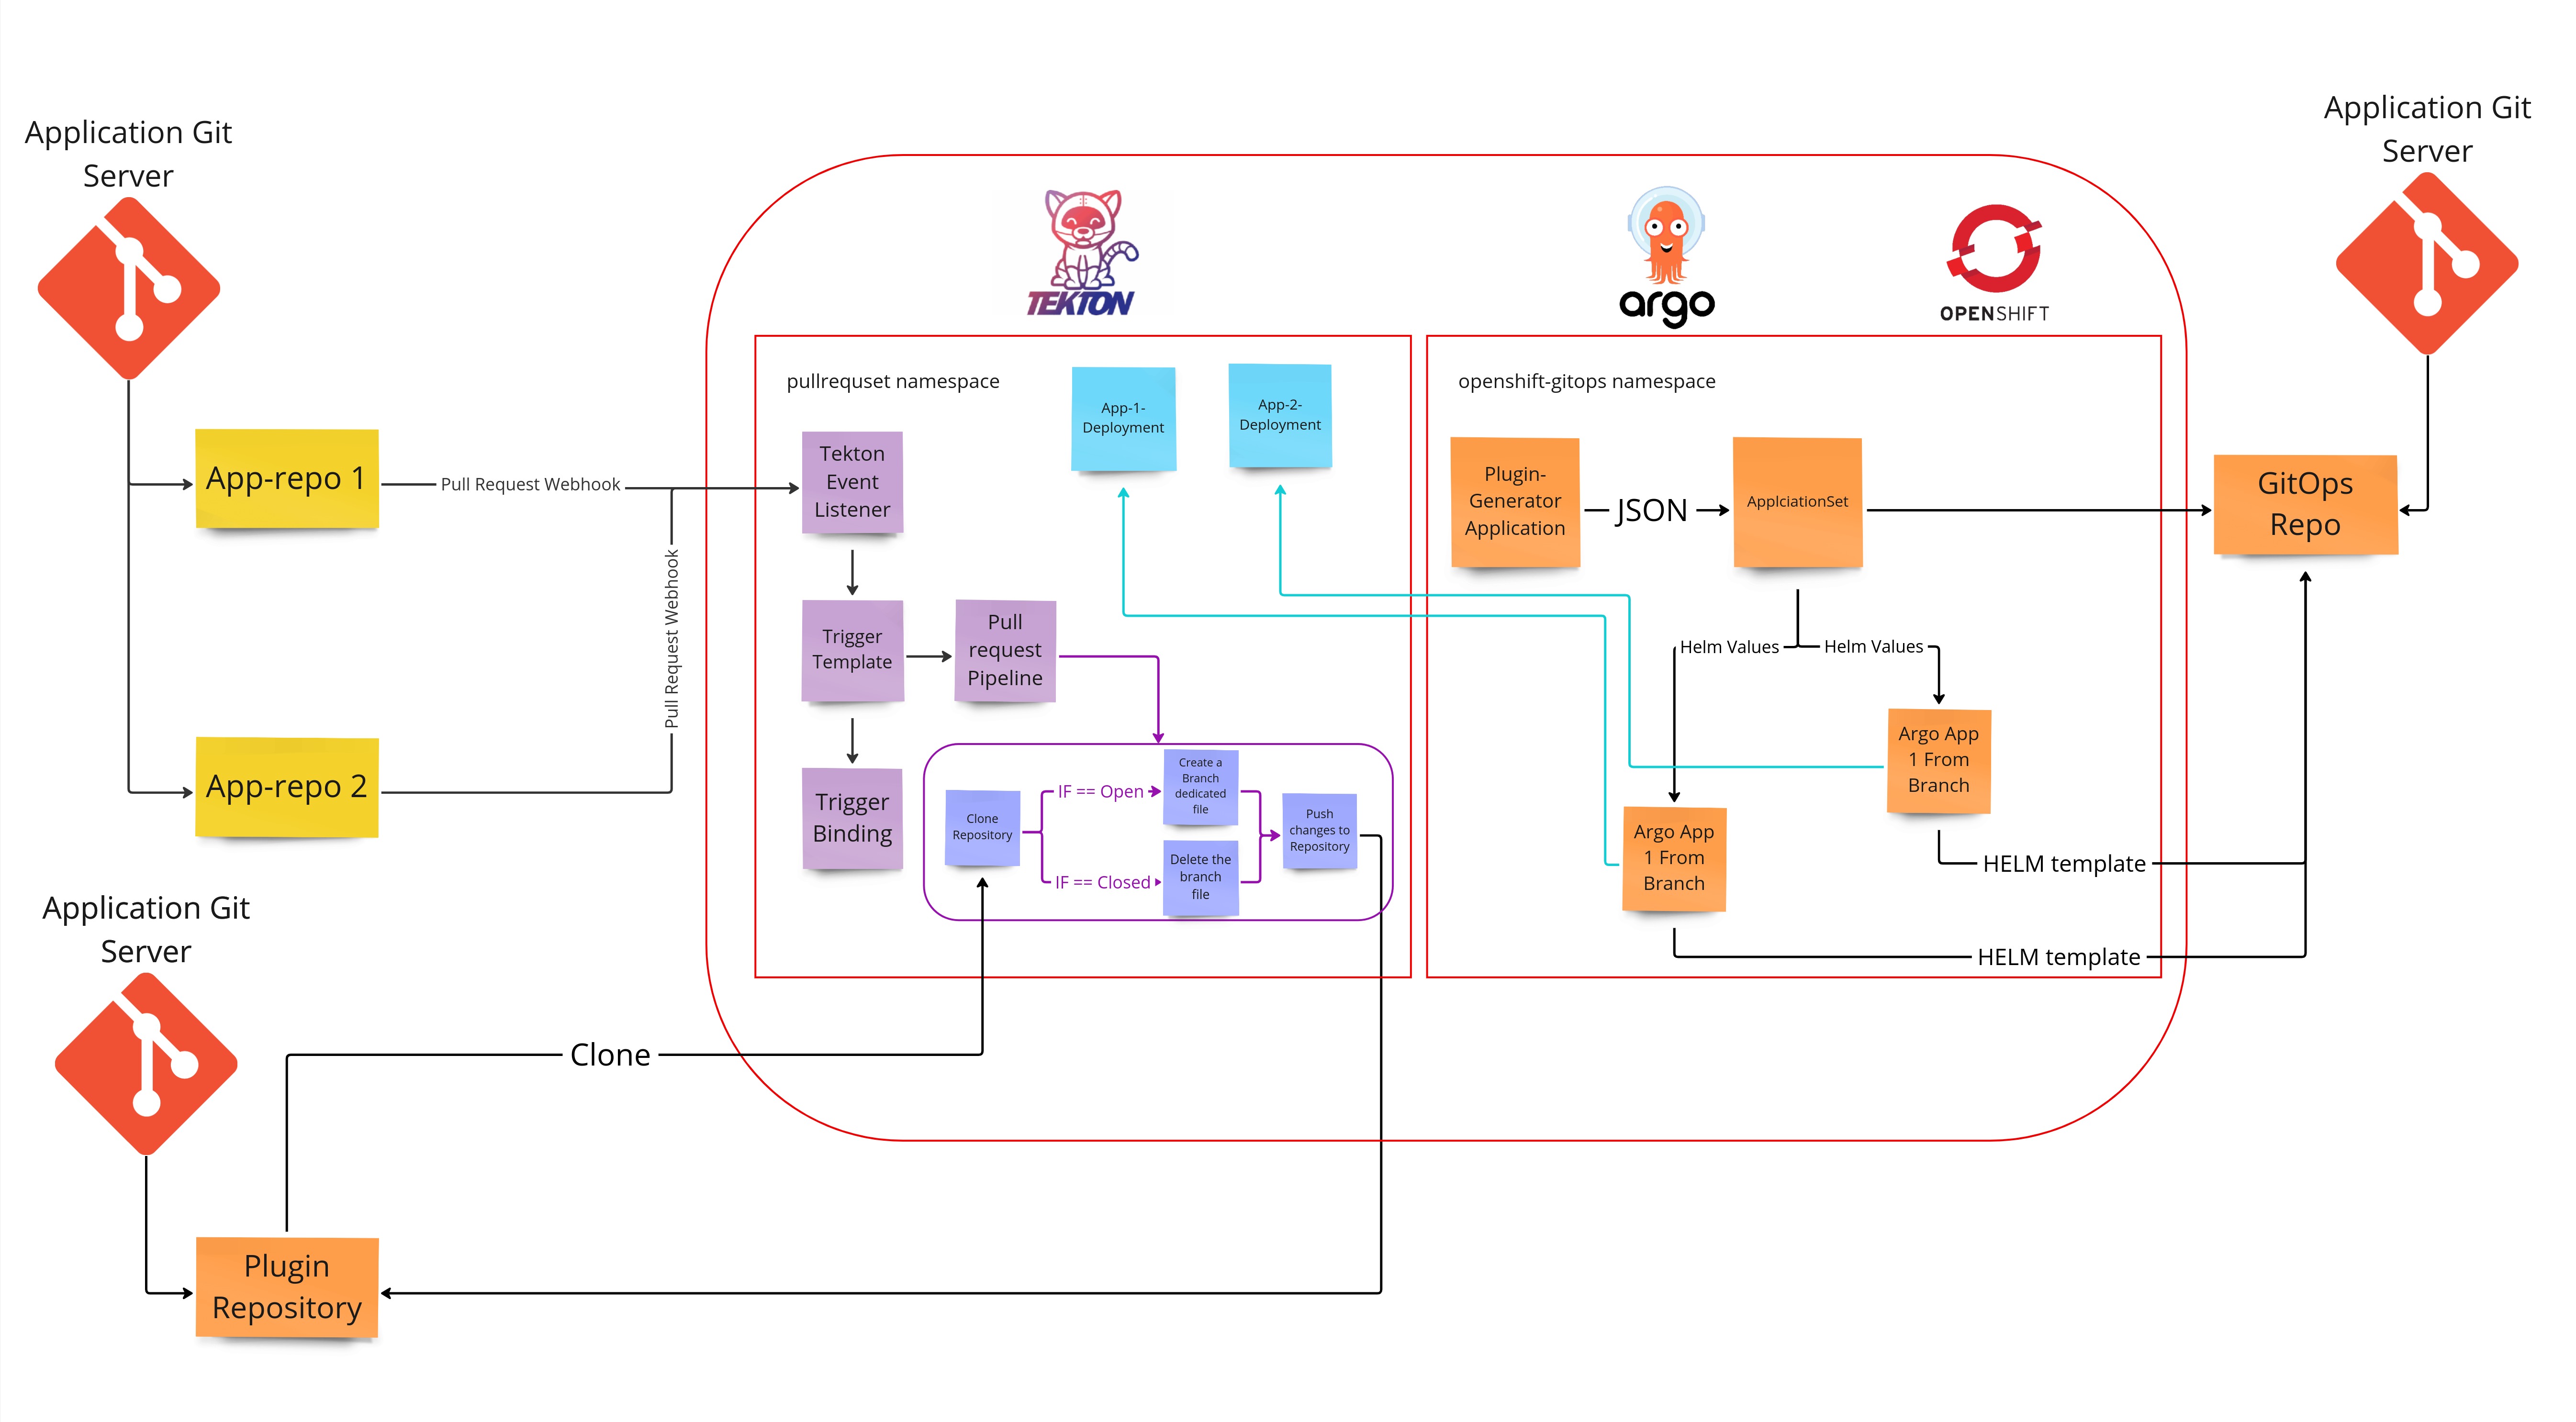
Okay, so let's go over that mess of Topology. From left to right:
- On top, we have my local running Git server (Gitea, running inside my OpenShift instance).
- Under that, we have the plug-in repository that is stored in GitHub.
-
In the OpenShift instance, I have created a namespace named
pullrequest. In it, I have created the following:- Tekton event-listener
- Tekton Template trigger
- Tekton Trigger Binding
- Tekton Pipeline
- Tekton Task — Create branch file
- Tekton Task — Delete Branch file
- Tekton Task — git cli push changes to the repository
- Secret with my
.gitconfigand.git-credentialsfiles, that will be mounted to the “git-cli” task.
- For the testing, I set an Argo CD ApplicationSet that deploys my PR application to this namespace.
-
In the OpenShift instance, under the
Openshift-GitOpsnamespace (the default instance), the ApplicationSet generates applications from a GitOps repository that is hosted in GitHub, with an Argo CD application that deploys:- The plug-in generator application
- The Tekton YAMLs
- The ApplicationSet
For this demo, I have 2 applications in the Git repository that are in the Gitea Git server: Batman and Joker.
I have added a webhook to each of those repositories (Figure 7).
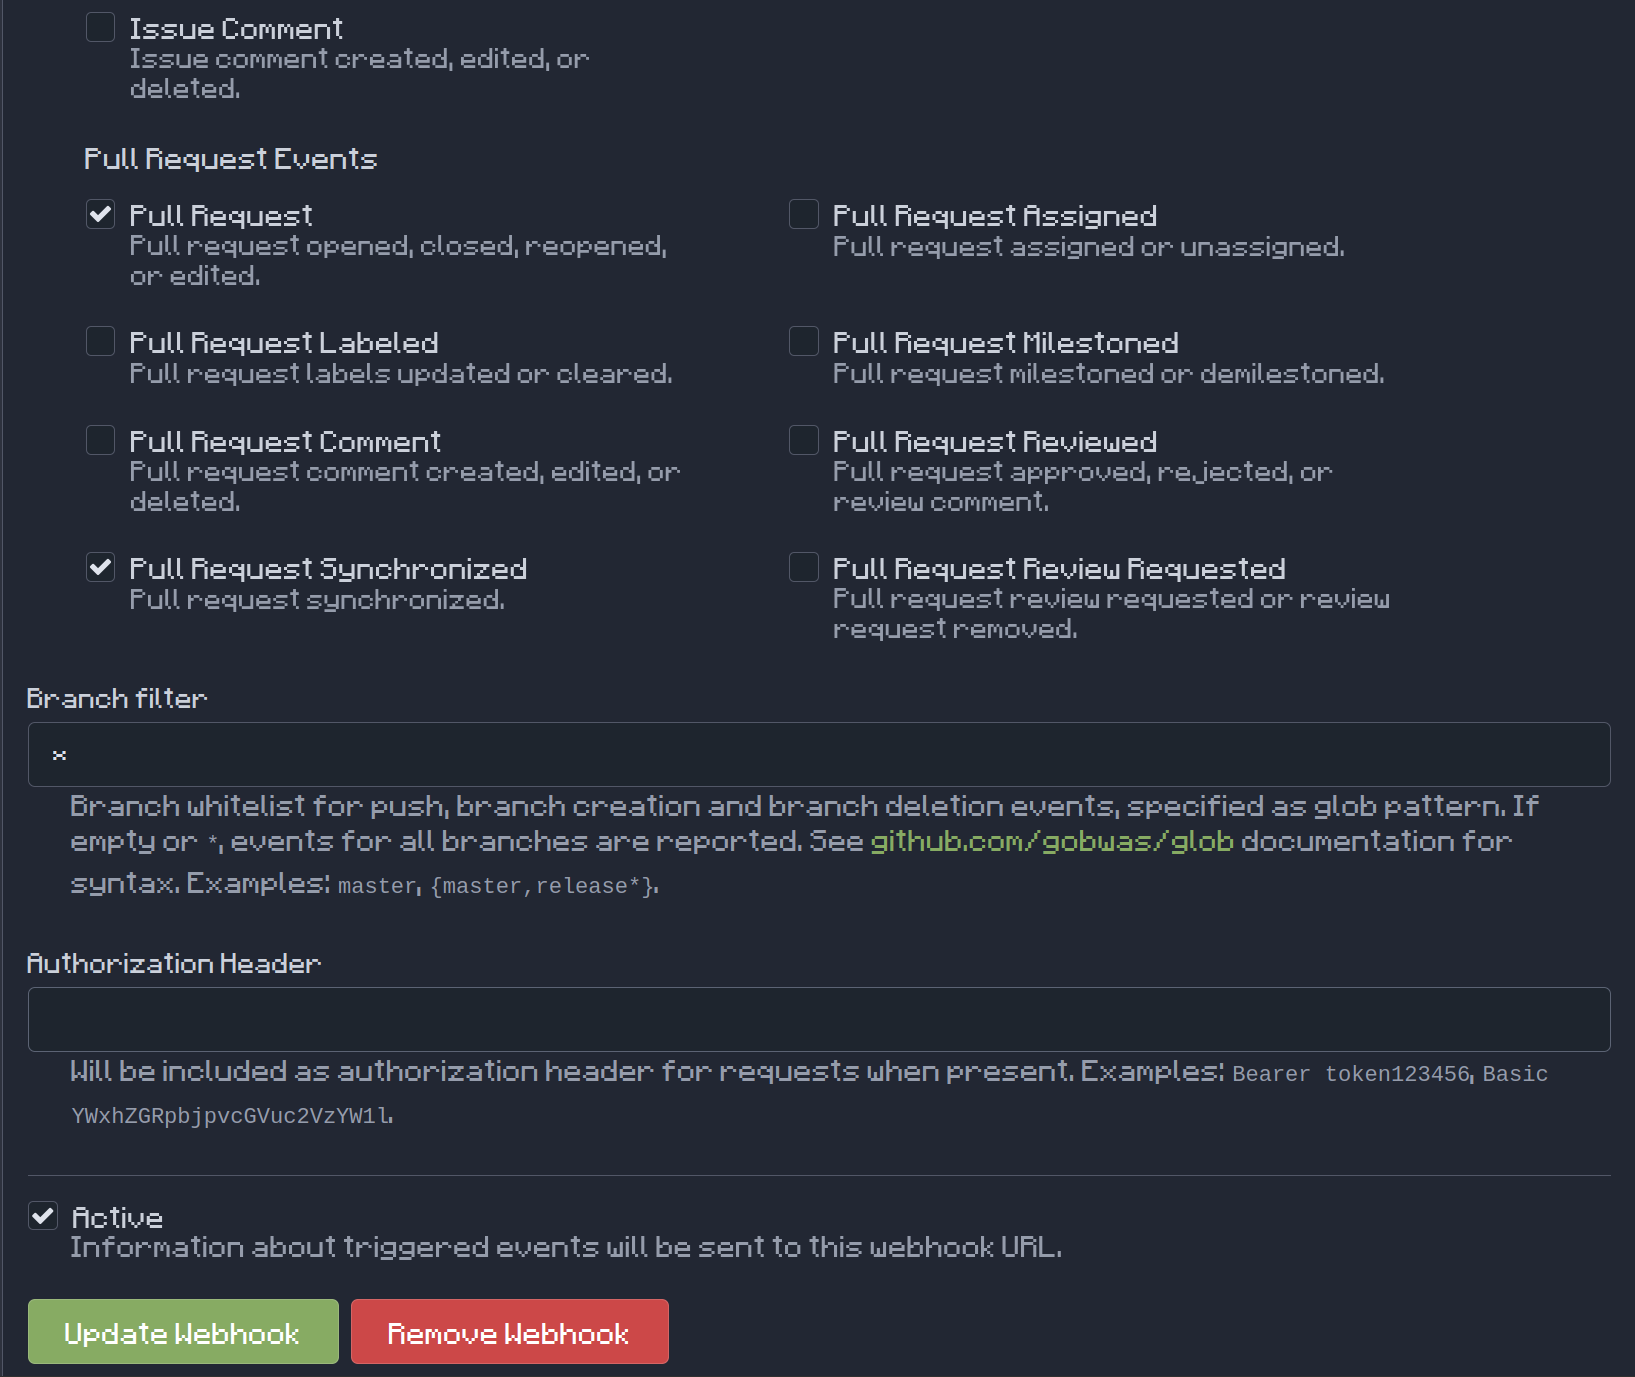
In the Config, I have set the Pull Request checkbox, which sends an event when a pull request is opened, reopened, or closed. Also, I checked the Pull request synchronized checkbox, so the pipeline will be triggered for every change in the commit head in the branch.
Note: I have another pipeline that has an event listener that is webhook to the Gitea repository and builds a new image for each new commit, so any changes to the Git repo will create a new image in the image repository.
Tekton folder
The Tekton folder holds the following files:
event-listener.yaml: This file holds the Tekton event listener that creates the end-point that will be set as a webhook to our source repo webhook config.gitea-trigger-binding.yaml: This file maps the webhook Payload to Tekton parameters that later can be used in the pipeline.pull-request-pipeline.yaml: Tekton pipeline config and structure.task-create-branch.yaml: a Tekton task that will create a file in theArgo-Pluginfrom the Pull-Request event payload data.task-delete-branch.yaml:A Tekton task that will delete the relevant file from the close pull request event.trigger_template-PipelineRun.yaml: A Tekton pipelineRun template that will be triggered from the event-listener.trigger_template-taskRun.yaml: A Tekton taskRun template to test the payload data.
The application is shown in Figure 8.
To access all the files, you can go to my repo: Plugin-Generator Branch: pull-request
Demo time
Feel free to clone or fork the repo and try and use it. You can also open issues and contact me if you have questions or need any assistance.
Links:
- Git repository (note that you are in the
pull-requestbranch) - Argo CD Plugin Generator manual
- Argo CD webhooks for the applications
- Argo CD webhooks for ApplicationSet