Cluster administrators on Kubernetes need to create namespaces for multiple developer teams and limit their use of resources by provisioning those namespaces with resource quotas and limit ranges. In this article, you'll learn how to automate these tasks with Argo CD, and how to use either Kustomize or Helm charts to simplify the process. The result implements the fundamentals of DevOps and GitOps, whereby any changes to the repository update the deployed resources.
There are two types of configuration that administrators have to deal with are:
- Resource quota: A Kubernetes object that controls the amount of CPU or memory consumed by a namespace. This quota can also limit the number of resources that can be created in a namespace.
- Limit range: This is used in Kubernetes along with resource quotas. Although resource quotas control the overall resource consumption of an entire namespace, they do not place any limit on a pod or container within that namespace, so a single pod or container could use up all of the namespace's resources. Limit ranges specify resources available per pod or container.
While the general principles outlined here apply to any Kubernetes environment, some of the examples in this article assume that you are deploying on Red Hat OpenShift and can use its graphical user interface as well as the oc command-line interface (CLI).
A simple Argo CD application
To automate the administrator's configuration tasks, you'll use Argo CD, a powerful continuous delivery tool for Kubernetes resources. Because namespaces and quotas are Kubernetes resources, Argo CD can manage them.
In this section, you'll create a simple Argo CD application from an example in my GitHub repository. In the sections that follow this one, I'll demonstrate two better ways to create the application using Kustomize and Helm along with Argo CD. But we'll start with a simple example to help you get your bearings with Argo CD.
-
Create a Git repository on your system based on the namespaces-config example in my GitHub repository. The repository comprises the manifest for all namespaces, quotas, and limit ranges for all the teams in the example.
-
Add Syncwaves under the
annotationsproperty in these configuration files. Syncwaves is valuable for imposing an order on separate activities. In this case, you need to create a namespace before you can associate a resource quota and limit range to it. The following files show how you can assure that the namespace is created first by assigning a Syncwave of -1, whereas the resource quota and limit range have a Syncwave of 0.The configuration for a namespace looks like this:
apiVersion: v1
kind: Namespace
metadata:
  name: dev
  annotations:
    argocd.argoproj.io/sync-wave: "-1"
  labels:
    argocd.argoproj.io/managed-by: openshift-gitops
The configuration for a resource quota looks like this:
apiVersion: v1
kind: ResourceQuota
metadata:
  name: resource-quota
  namespace: dev
  annotations:
    argocd.argoproj.io/sync-wave: "0"
spec:
  hard:
    pods: "10"
The configuration for a limit range looks like this:
apiVersion: v1 kind: LimitRange metadata: name: limits namespace: dev annotations: argocd.argoproj.io/sync-wave: "0" spec: limits: - default: cpu: 200m memory: 512Mi defaultRequest: cpu: 100m memory: 256Mi type: Container -
Log in to your OpenShift cluster as a cluster administrator.
-
The Argo CD application controller needs additional permissions to create resource quotas and limit ranges in cluster namespaces. Use OpenShift cluster roles and cluster role bindings to grant these permissions to the application controller of the default
argocdinstance in theopenshift-gitopsnamespace. To carry out this step, create aClusterRoleandClusterRoleBindingand apply them to your cluster.The configuration for a cluster role looks like this:
apiVersion: rbac.authorization.k8s.io/v1
kind: ClusterRole
metadata:
  # "namespace" omitted since ClusterRoles are not namespaced
  name: quota-limit-cluster-role
rules:
- apiGroups: [""] #specifies core api groups
  resources: ["resourcequotas", "limitranges"]
  verbs: ["create"]
Enter the following command to create the
ClusterRoleon the cluster:$ oc create -f <cluster-role-file-name>.yamlThe configuration for a cluster role binding looks like this:
apiVersion: rbac.authorization.k8s.io/v1
# This cluster role binding allows Service Account to create resource quotas and limit ranges in any namespace.
kind: ClusterRoleBinding
metadata:
  name: create-quota-limit-global
roleRef:
  apiGroup: rbac.authorization.k8s.io
  kind: ClusterRole
  name: quota-limit-cluster-role # Name of cluster role to be referenced
subjects:
- kind: ServiceAccount
  name: openshift-gitops-argocd-application-controller
  namespace: openshift-gitops
Enter the following command to create the
ClusterRoleBindingon the cluster:$ oc create -f cluster-role-binding.yaml -
Create an Argo CD Application via the user interface (Figure 1), with the following sample Git repository:
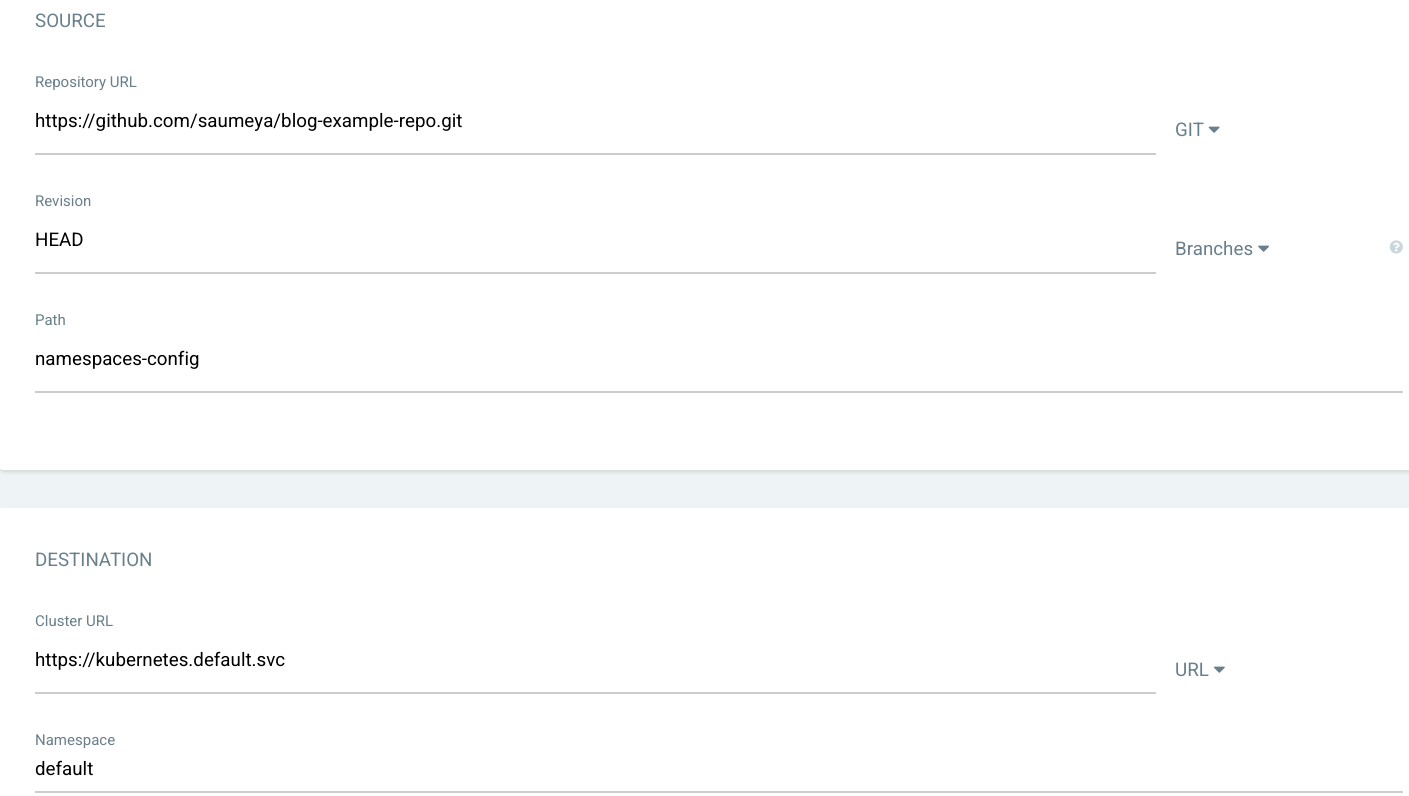
Figure 1. In the OpenShift console, you can create an Argo CD Application from this article's example repository. Figure 1: In the OpenShift console, you can create an Argo CD Application from this article's example repository. You could also use an
Applicationcustom resource to create an application using the CLI. If you want to take this route, your configuration should look like this:
Enter the following command to create the application:apiVersion: argoproj.io/v1alpha1 kind: Application metadata: name: namespace-management spec: destination: name: '' namespace: default server: 'https://kubernetes.default.svc' source: path: namespaces-config repoURL: 'https://github.com/saumeya/blog-example-repo.git' targetRevision: HEAD project: default$ oc create -f <application-cr-file-name>.yaml -
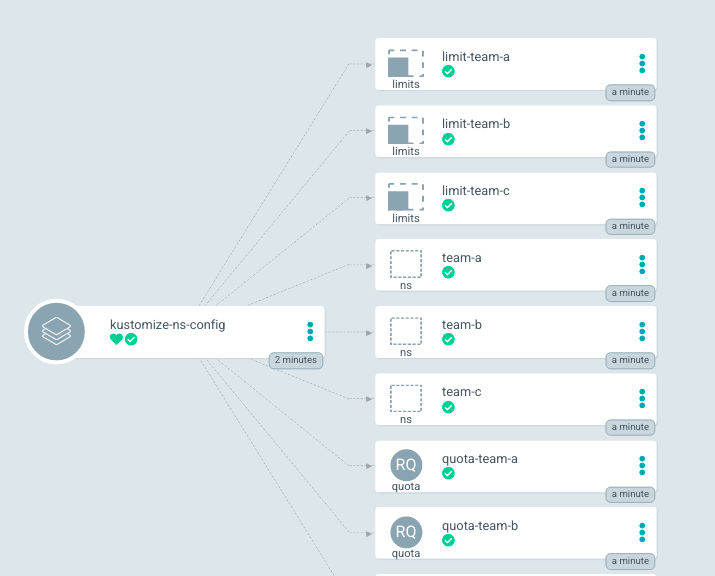
Refresh and synchronize the application to create the namespaces with their related quotas and limit ranges (Figure 2).


Argo CD automates the assignment of resource limits, but the procedure shown in this example so far requires you to maintain an individual manifest for each team. This repetition of files makes it tedious to manage the configurations, especially if you're dealing with a large number of teams and projects. In the following sections, you'll see some better approaches that make use of Kustomize and Helm.
Use Kustomize to create and manage resources
The procedure in this section optimizes some of the tasks in the previous section and leaves others unchanged. By using custom patches in Kustomize, a Kubernetes-native configuration management tool, you can avoid creating multiple manifests and reuse common elements from resource quotas and limit ranges.
I have placed the relevant files for this example in my GitHub repository. The teams directory defines all the patches for different teams in the base manifests. The associated resources are created when you create the Argo CD Application.
Here is the kustomization.yaml for a patch:
apiVersion: kustomize.config.k8s.io/v1beta1
kind: Kustomization

namespace: team-a

bases:
- ../../base

patches:
- target:
    kind: Namespace
    name: default-dev
  patch: |-
    - op: replace
      path: /metadata/name
      value: team-a
- target:
    kind: ResourceQuota
    name: resource-quota
  patch: |-
    - op: replace
      path: /metadata/name
      value: quota-team-a
    - op: replace
      path: /spec/hard/limits.cpu
      value: 1
    - op: replace
      path: /spec/hard/services
      value: 10
- target:
    kind: LimitRange
    name: limit-range
  patch: |-
    - op: replace
      path: /metadata/name
      value: quota-team-a
Here is the kustomization.yaml file for all the teams:
bases:
- ./team-a
- ./team-b
- ./team-c
Now follow steps 3, 4, and 5 from the previous example to grant additional permissions and create Argo CD Applications to manage your namespaces (Figure 3). Make sure to correctly specify the Path in step 5 to kustomize-namespace-config/teams. Refresh and synchronize the application.
Use Helm and an ApplicationSet to create and manage resources
Helm templates can also be used to parameterize configurations for namespaces, resource quotas, and limit ranges. A simple use of Helm charts, however, would require you to create more Argo CD applications to manage these namespaces. To avoid creating multiple applications one by one, use an ApplicationSet resource to specify the value files and create all the applications in one go.
-
Create a Helm chart and add the resource files from my example repository.
Here is the
templates/namespace.yamlfile:apiVersion: v1 kind: Namespace metadata: name: {{ .Values.namespace }} annotations: argocd.argoproj.io/sync-wave: "-1" labels: argocd.argoproj.io/managed-by: openshift-gitopsHere is the
templates/limit-range.yamlfile:apiVersion: v1 kind: LimitRange metadata: name: limit-range namespace: {{ .Values.namespace }} annotations: argocd.argoproj.io/sync-wave: "0" spec: limits: - default: cpu: {{ .Values.limits.default.cpu | default "200m" }} memory: {{ .Values.limits.default.memory | default "512Mi" }} defaultRequest: cpu: {{ .Values.limits.defaultRequest.cpu | default "100m"}} memory: {{ .Values.limits.defaultRequest.memory | default "256Mi"}} type: {{ .Values.limits.type | default "Container" }}Here is the
templates/resource-quota.yamlfile:apiVersion: v1 kind: ResourceQuota metadata: name: resource-quota namespace: {{ .Values.namespace }} annotations: argocd.argoproj.io/sync-wave: "0" spec: hard: requests.cpu: {{ .Values.quota.requests.cpu | default "1"}} requests.memory: {{ .Values.quota.requests.memory | default "1Gi"}} limits.cpu: {{ .Values.quota.limits.cpu | default "2"}} limits.memory: {{ .Values.quota.limits.memory | default "2Gi"}} pods: {{ .Values.quota.pods | default "10"}} persistentvolumeclaims: {{ .Values.quota.persistentvolumeclaims | default "20"}} resourcequotas: {{ .Values.quota.resourcequotas | default "1"}} services: {{ .Values.quota.services | default "5"}}The
values.yamlfile contains default values. You can create value files with different names and specify those in Argo CD while creating an application:# Default values for namespace-app. # This is a YAML-formatted file. # Declare variables to be passed into your templates. namespace: default-dev #specifies the quota to be used for resources quota: requests: cpu: '1' memory: 1Gi limits: cpu: '2' memory: 2Gi pods: "10" persistentvolumeclaims: "20" resourcequotas: "1" services: "5" #specifies the limit ranges for the chart limits: default: memory: 512Mi defaultRequest: cpu: 100m memory: 256Mi type: ContainerHere is the
Chart.yamlfile:apiVersion: v2 name: helm-namespace-config description: A Helm chart for Namespace Management type: application version: 0.1.0 appVersion: "1.16.0" -
Follow steps 3 and 4 from the first example in this article to grant additional permissions and create Argo CD applications to manage your namespaces.
-
Now use an
ApplicationSetresource to create multiple applications. Check the teams directory in my example repository, which contains custom value files for various teams. Add the relative paths of these custom value files in the list generator. This procedure generates the applications for specific teams with the required configurations, as illustrated in Figure 4.Here is the configuration file for the
ApplicationSetresource:apiVersion: argoproj.io/v1alpha1 kind: ApplicationSet metadata: name: namespace-config namespace: openshift-gitops spec: generators: - list: elements: - filepath: teams/team-a.yaml name: team-a - filepath: teams/team-b.yaml name: team-b - filepath: teams/team-c.yaml name: team-c template: metadata: name: '{{name}}-namespace-config' spec: project: default syncPolicy: automated: prune: true selfHeal: true syncOptions: - CreateNamespace=true source: repoURL: 'https://github.com/saumeya/blog-example-repo' targetRevision: HEAD path: helm-namespace-config helm: valueFiles: - '{{filepath}}' destination: server: 'https://kubernetes.default.svc' namespace: openshift-gitopsApply the
ApplicationSetconfiguration file to your cluster by running the following command:$ oc apply -f <application-set-file-name>.yaml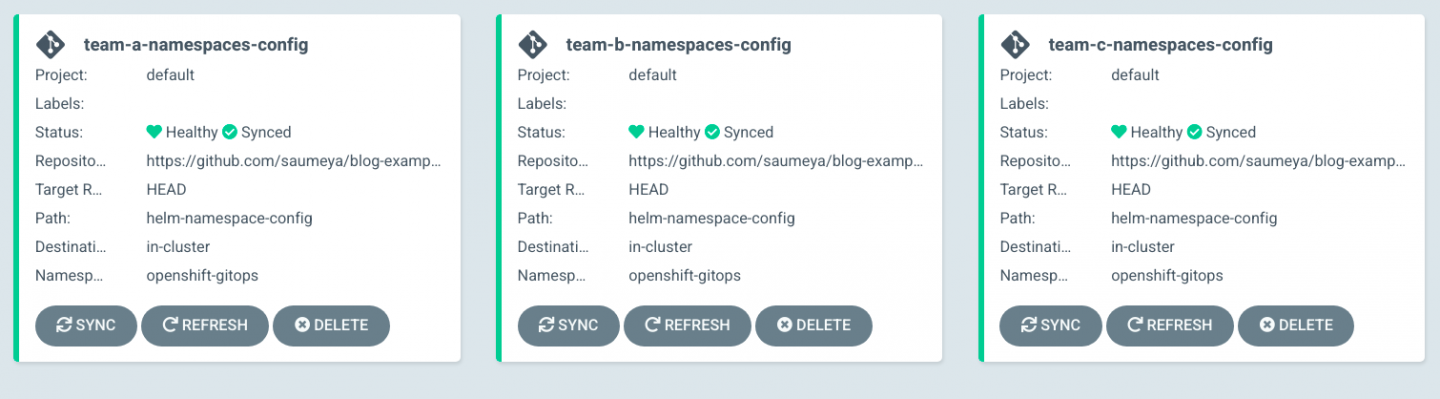
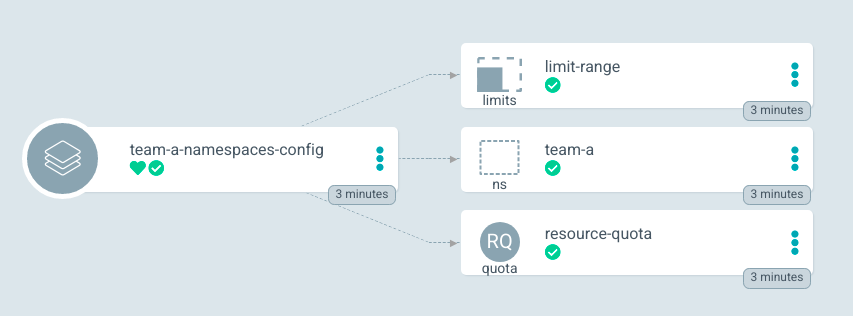
Figure 4. The Application Set created three Applications. Figure 4: The ApplicationSet has created three applications. You can now synchronize each application and click on an individual application to see the created resources, as illustrated in Figure 5.

More information about how to create applications using Helm can be found in Argo CD's documentation.
Conclusion
This article has shown how to use Argo CD in conjunction with other convenient open source tools to simplify the creation, management, and configuration of Kubernetes namespaces. Whenever you need to change the quotas or limits, all you need to do is modify the configuration files in the source repository and Argo CD does the rest of the work.
If you want to learn more about using Argo CD with Red Hat OpenShift, check out Part 1 and Part 2 of the "Building modern CI/CD workflows for serverless applications with Red Hat OpenShift Pipelines and Argo CD" series on Red Hat Developer.
Last updated: September 20, 2023