In this article, I'll give a brief overview of cross-origin resource sharing (CORS) in the context of modern web applications and their interactions with HTTP APIs. I will also provide a sample solution(hosted on GitHub) for avoiding CORS-related issues in a web application that's served from Red Hat OpenShift.
The sample solution uses Red Hat's Universal Base Images for Node.js, NGINX, and Java. Instructions are included in this post to help you deploy and test the sample solution for free in the Developer Sandbox for Red Hat OpenShift.
What exactly is CORS?
If you're not familiar with CORS or need a refresher, you should take a look at this excellent primer published by Julia Evans on wizardzines.com. To summarize, when JavaScript executing in a web browser on one origin (e.g., https://ui.foo.bar) initiates a request to an endpoint running on another origin (e.g., https://api.foo.bar), it's classed as a cross-origin request. If the target origin of the request doesn't return the appropriate CORS headers to confirm that it supports cross-origin requests, then the browser returns an error to the JavaScript code that invoked the request instead of revealing the contents of the response. In some instances, cross-origin requests also require a preflight HTTP OPTIONS request, which adds overhead to your application!
You might be wondering why web browsers enforce CORS security measures. Imagine a scenario where you visit a malicious website, and it executes JavaScript that initiates a cross-origin request to your bank's servers. If you had recently visited your bank's website, your web browser might still have a valid session stored, meaning the malicious request could potentially succeed in accessing your banking information. Thankfully, web browsers enforce CORS security measures to prevent this from happening.
CORS in practice
Needless to say, there are legitimate reasons for an application running on one origin to request resources from another origin; otherwise you wouldn't be reading this article. For example, a common scenario is that a web application hosted on an origin such as ui.foo.bar needs to request resources from a HTTP API hosted on api.foo.bar. Figure 1 illustrates this using an NGINX web server for the static content and a Quarkus-based Java application serving up an HTTP API.

In Figure 1, the requests from the React web application (ui.foo.bar) to the Quarkus-based HTTP API (api.foo.bar) will only be successful if the appropriate CORS headers are set on the responses returned by the HTTP API. This also assumes that api.foo.bar is hosted at a publicly addressable endpoint and that the team building it is willing to configure it to support CORS.
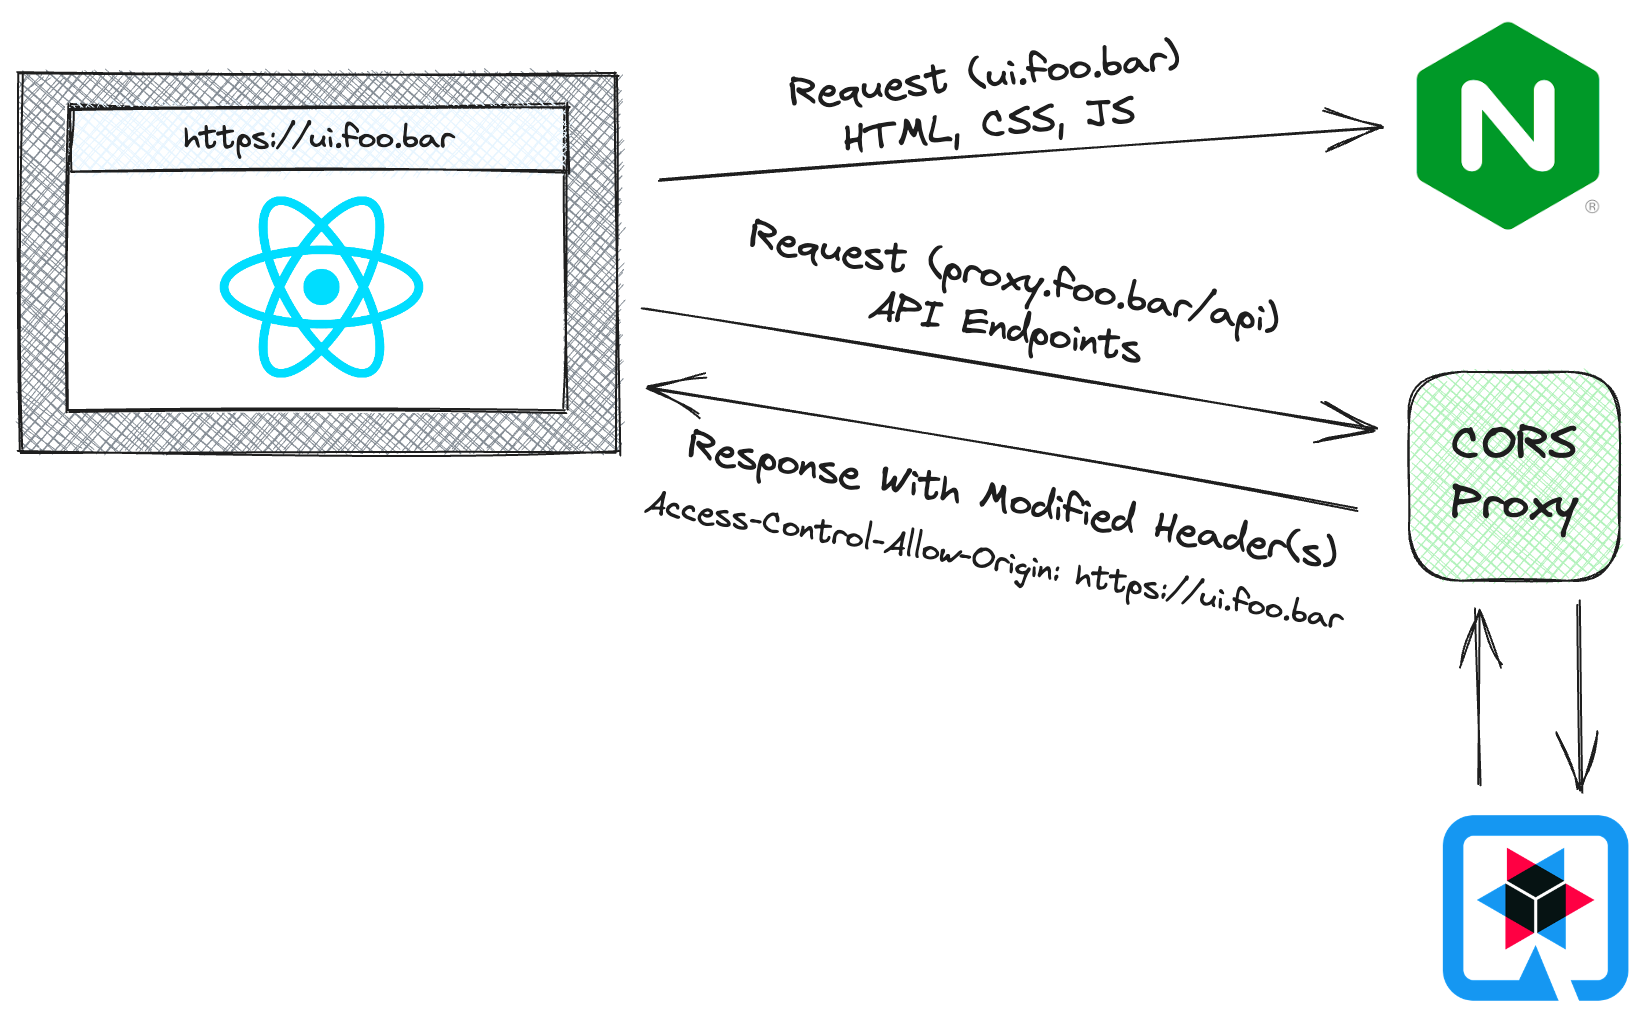
Assuming there's no way to return the CORS headers from the HTTP API, a common workaround is to use a CORS proxy, as shown in Figure 2. The CORS proxy will set the appropriate CORS headers, e.g., Access-Control-Allow-Origin: ui.foo.bar before returning responses from the HTTP API to the web browser.
A third solution, and the one I will demonstrate in this post, doesn't require setting any CORS headers and doesn't require a CORS proxy. That's because this solution will result in all requests being classified as same-origin, eliminating CORS entirely! It's possible to implement this solution using path-based routing built into OpenShift Routes, or by using the web server (such as Apache or NGINX) that's used to serve the React application as a reverse proxy to access the HTTP API.
NGINX reverse proxy solution
A sample solution is fully documented in this repository on GitHub; I'll provide an overview of the key points here, though. Figure 3 illustrates this solution.

The real magic is in the NGINX configuration in the react-ui/nginx.conf file. NGINX serves up the React application, but it also defines a custom location block that proxies HTTP API requests to the Quarkus back end:
location /hello {
    resolver $NAMESERVERS valid=10s;
    proxy_pass "$API_URL$request_uri";
    proxy_redirect "$API_URL" "";
}
The configuration might vary slightly from application to application, but this particular location block instructs NGINX to do the following for all request paths beginning with /hello:
- Use the nameservers defined in
$NAMESERVERSto resolve hostnames. This is important because the sample solution uses an internal OpenShift service URL, not a public hostname for the back end. - Proxy any request beginning with
/helloto an upstream URL defined by the$API_URLvariable. - Remove the internal hostname from the Location response header returned by the upstream API server. This ensures that if the API server issues a redirect, the URL for the redirect is pointing at NGINX and not the internal hostname for the Pod.
Note: You can find more information related to the proxy directives in NGINX's official ngx_http_proxy_module documentation.
The API_URL and NAMESERVERS variables referenced in the nginx.conf are replaced when the NGINX container starts, as seen in the CMD in the Containerfile for the image. As you might expect, the API_URL is the base URL of the Quarkus HTTP API, and the NAMESERVERS are specified to ensure that NGINX can resolve the internal Service hostname targeted by API_URL.
As for the React application, the code used to interact with the HTTP API can perform a same-origin request without specifying the hostname:
const response = await fetch('/hello')
That's pretty convenient, right? Since the React application can issue same-origin requests to reach the Quarkus HTTP API, there's no need to worry about CORS.
The following section will guide you through deploying the application to try it out for yourself, and with it deployed you'll be able to explore the path-based routing solution using OpenShift Routes.
Try it out
You can deploy the first sample solution on Developer Sandbox for Red Hat OpenShift and experiment with it for free. Follow these steps to deploy the NGINX reverse proxy solution, then continue reading to learn about the path-based solution.
Log in to Developer Sandbox, then open a terminal using the Web Terminal icon ( >_ ) in the upper-right corner. Issue the following commands in the terminal to clone the source repository and deploy the React-based front end and Quarkus-based back end into your project:
git clone https://github.com/evanshortiss/cors-nginx-blogpost cors-blog
cd cors-blog

export NAMESPACE=$(oc project -q)
export SOURCE_REPOSITORY="https://github.com/evanshortiss/cors-nginx-blogpost"

oc process -f manifests/frontend.yaml -p NAMESPACE=$NAMESPACE -p SOURCE_REPOSITORY=$SOURCE_REPOSITORY | oc apply -f -

oc process -f manifests/backend.yaml -p NAMESPACE=$NAMESPACE -p SOURCE_REPOSITORY=$SOURCE_REPOSITORY | oc apply -f -
Confirm that both applications are up and running using Topology View from the Developer perspective, as shown in Figure 4.

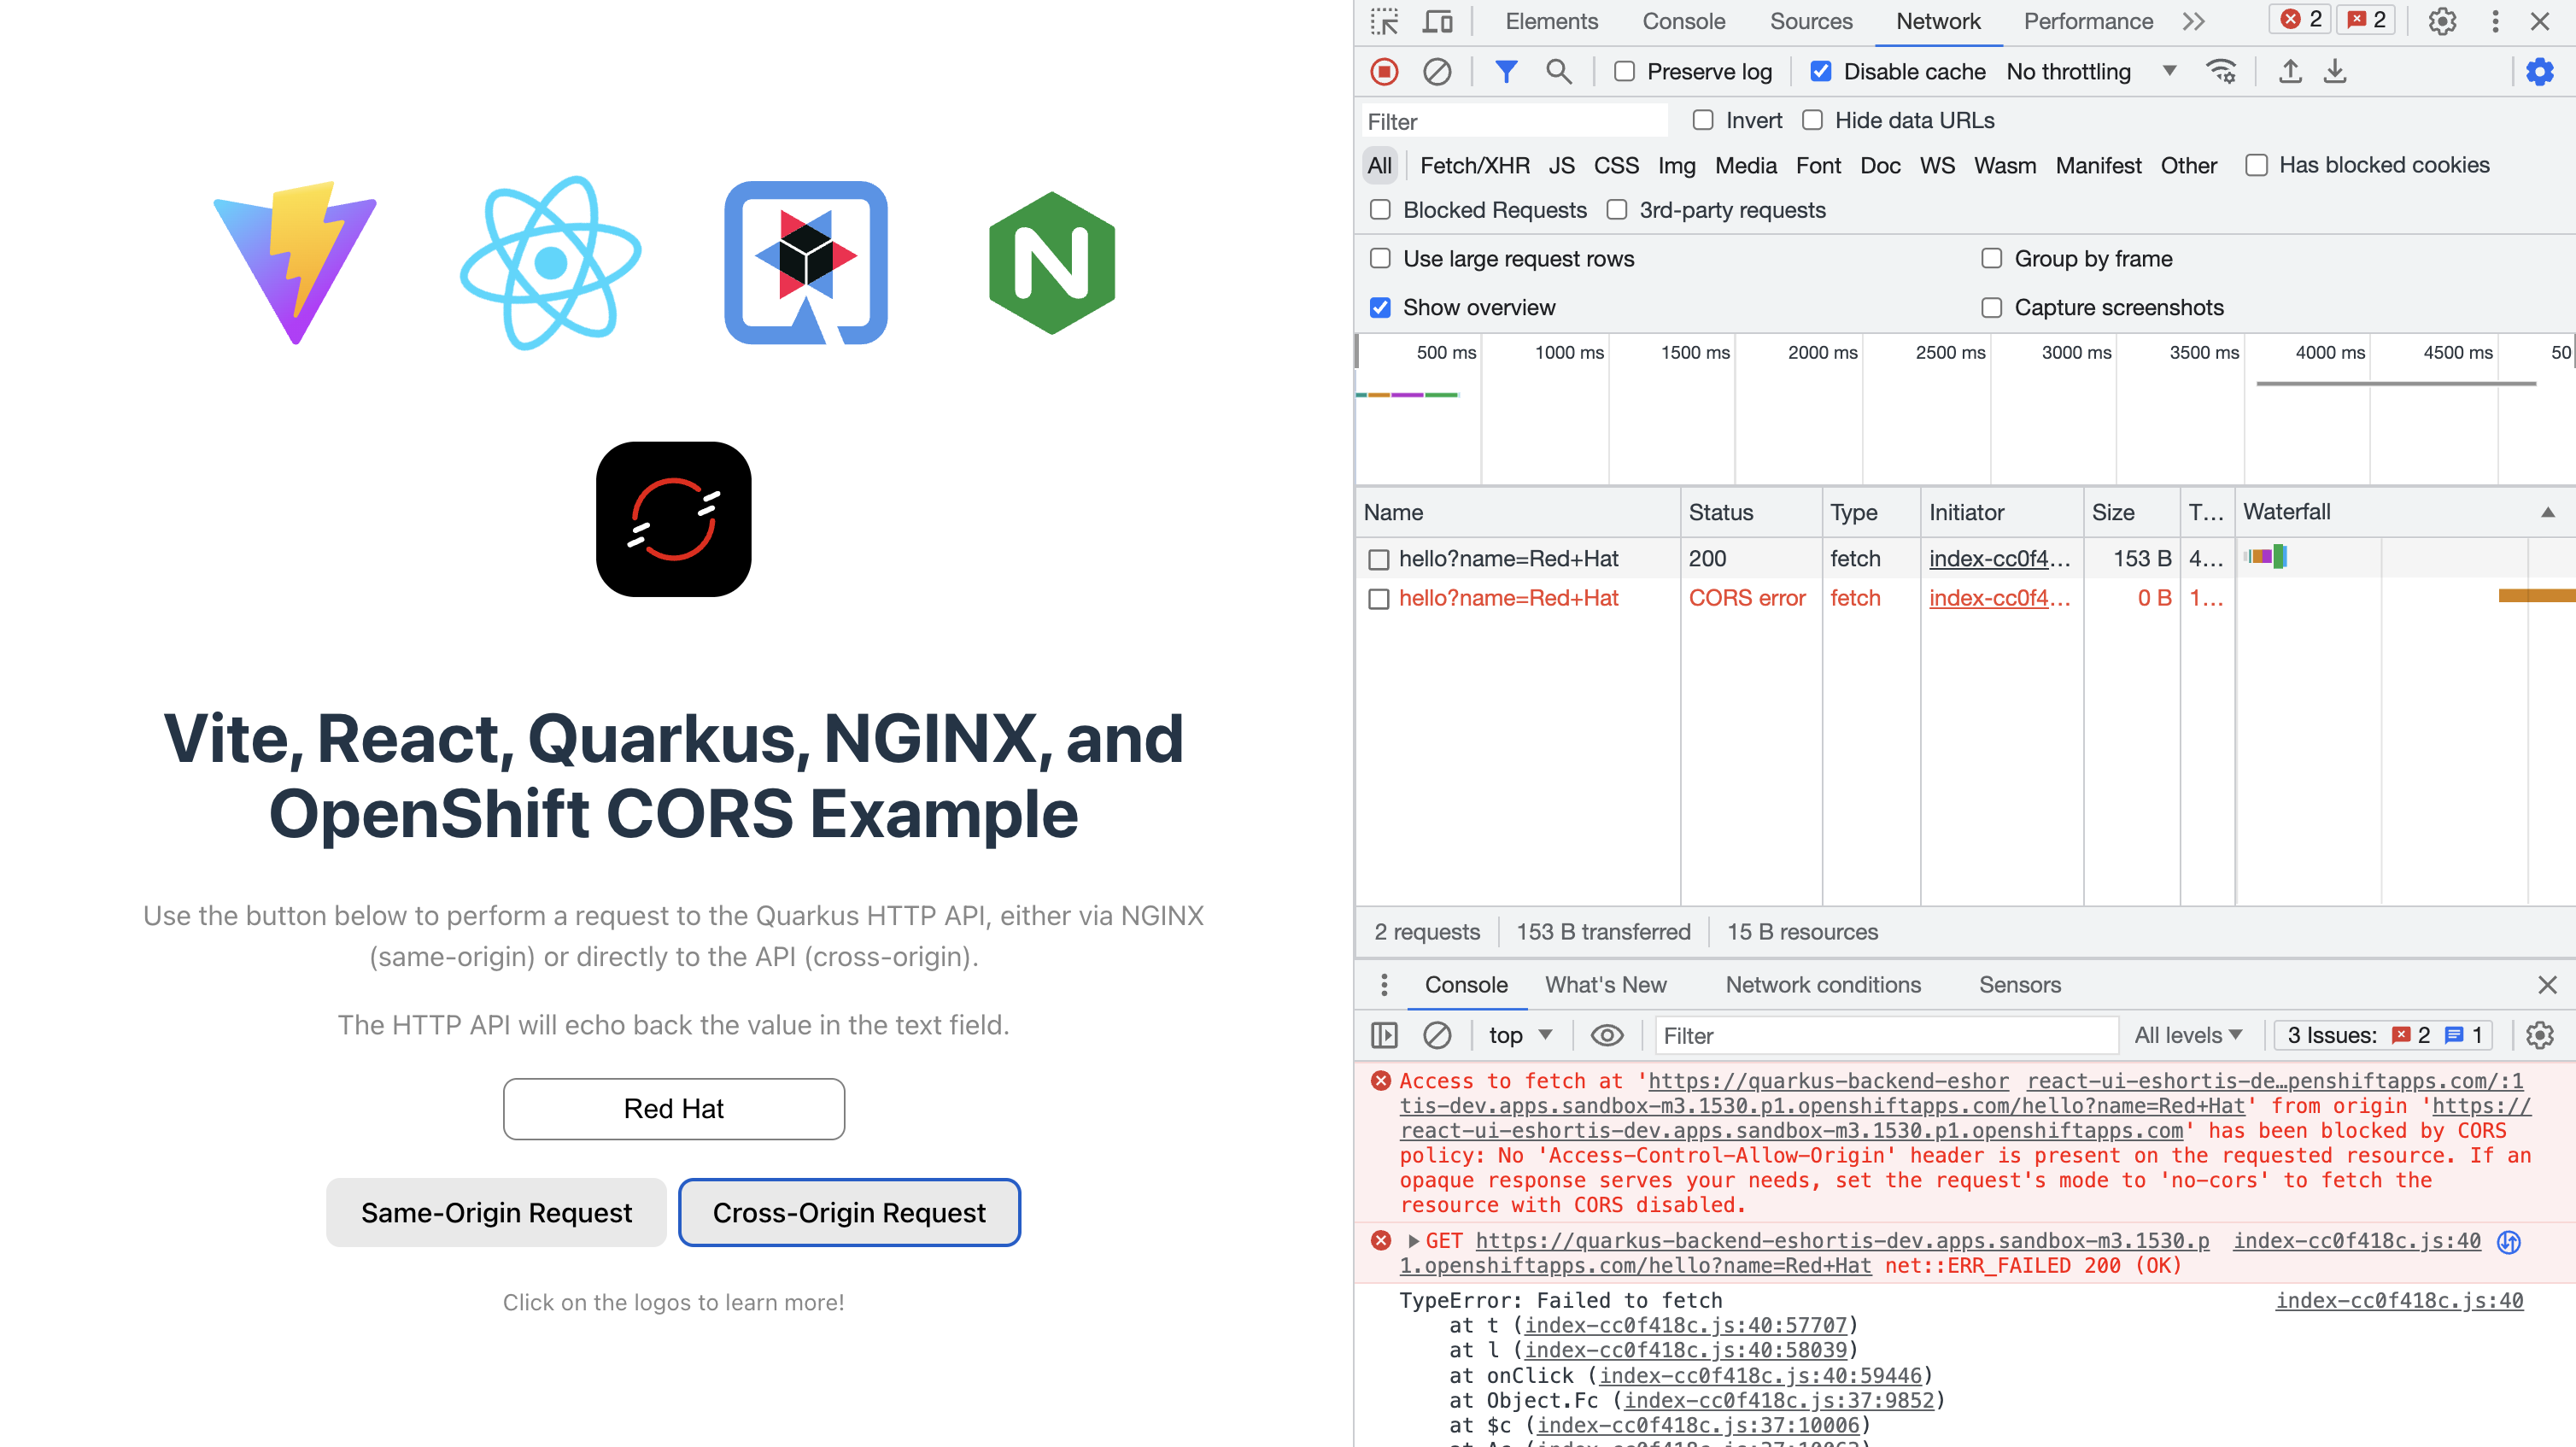
Click the arrow icon in the top-right of the NGINX item in the Topology View to open the React application in your web browser. The application has two buttons. The first performs a same-origin request to the Quarkus back end via NGINX, while the second performs a cross-origin request directly to the Quarkus backend.
As you might expect, the same-origin request routed via NGINX will succeed, but the cross-origin request will fail because the Quarkus HTTP API isn't configured to return the necessary CORS headers in its responses. You can use the Developer Tools in your web browser to confirm this, as shown in Figure 5.
OpenShift path-based routing solution
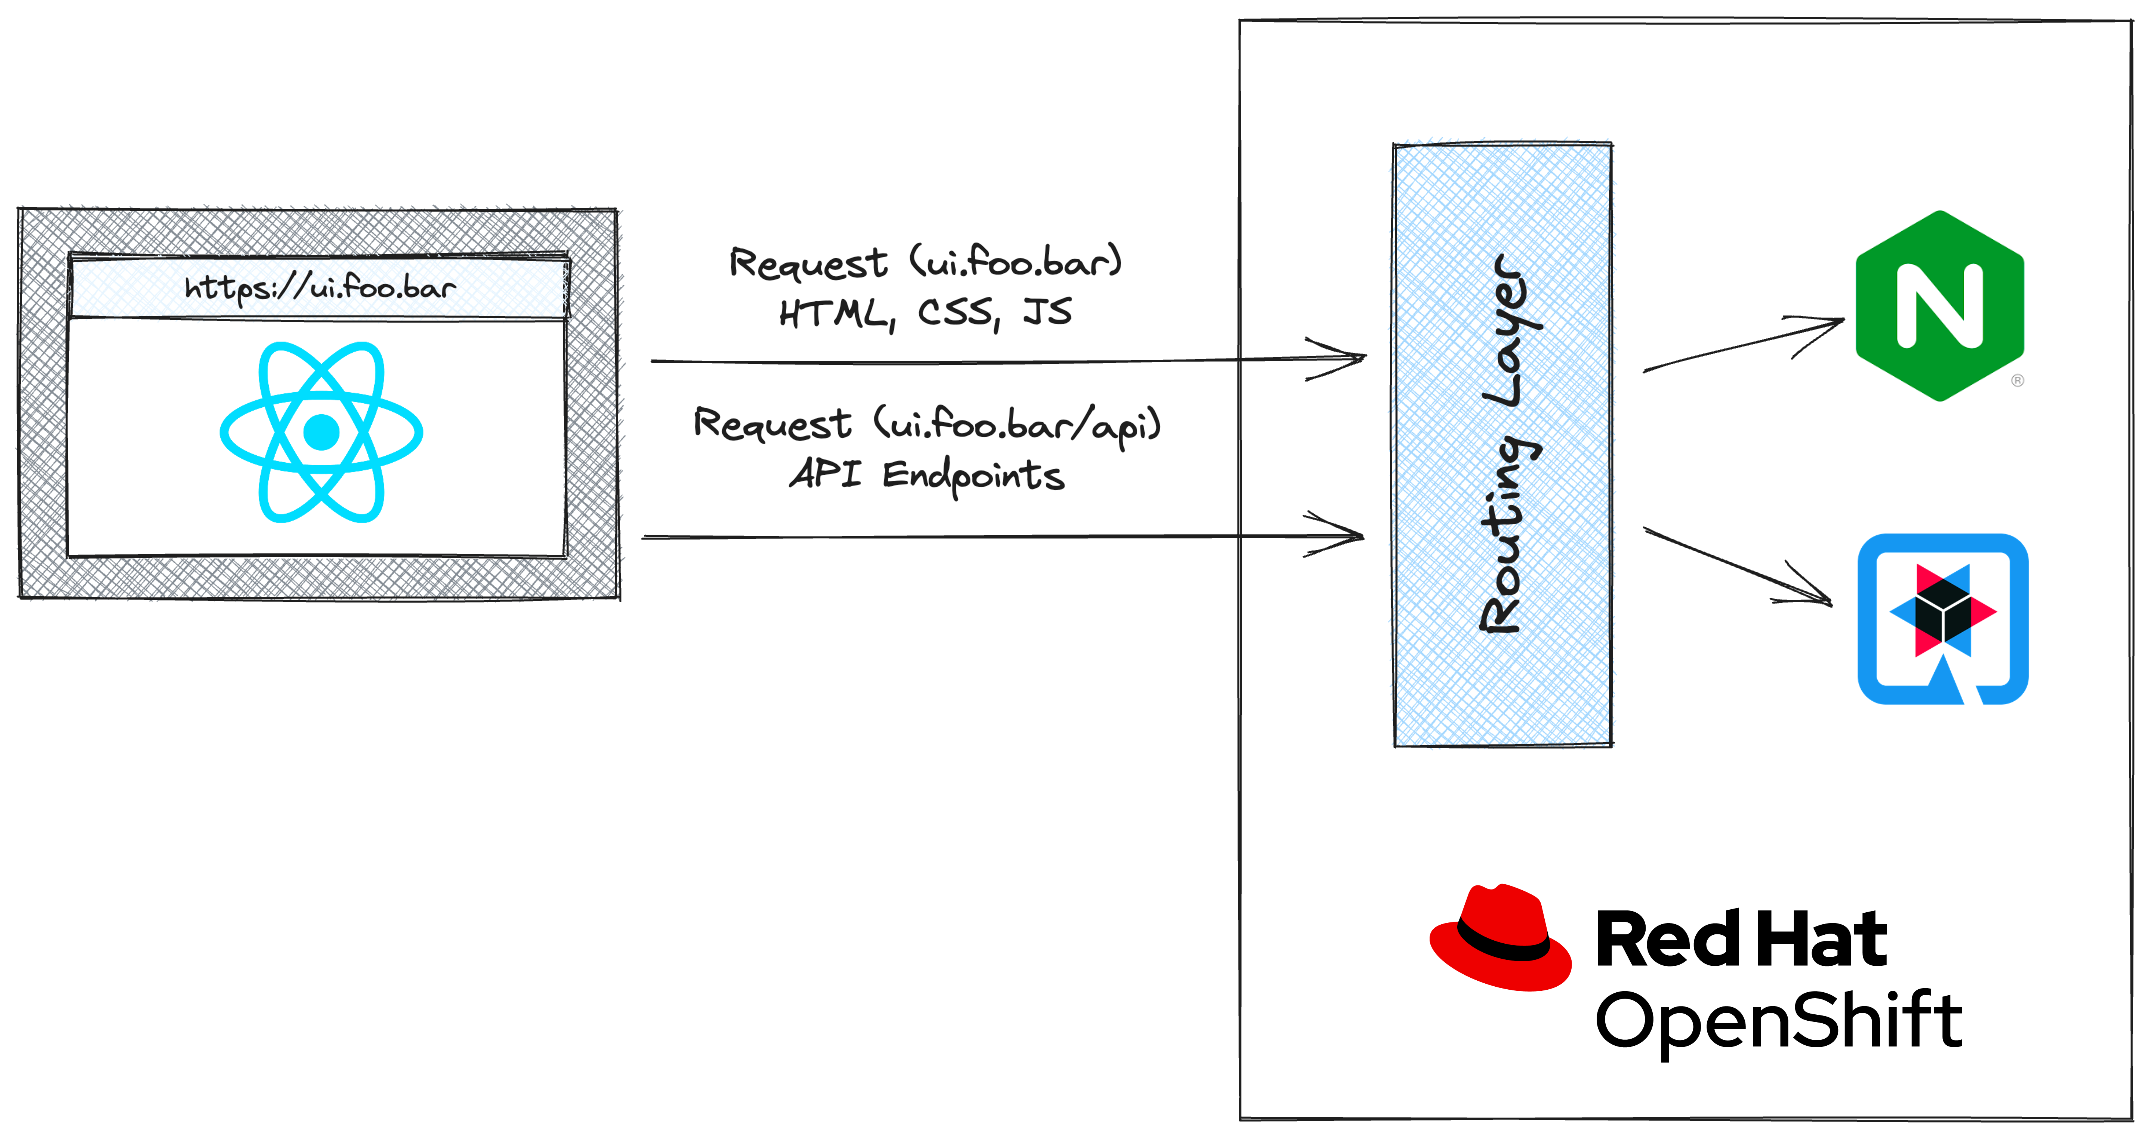
This solution is less flexible and only works if your back end is hosted on OpenShift. The upside is that it doesn't require you to maintain an NGINX proxy configuration. As part of this solution, you'll create two OpenShift routes that share a hostname. The first route will serve the HTML, CSS, and JavaScript by routing traffic to NGINX. The second route will be configured to use the same hostname as the first, but only route traffic that matches a specific URL pattern directly to the Quarkus HTTP API. Figure 5 illustrates the solution that uses OpenShift path-based Routes.
Start by deploying the sample application per the instructions in the last section. Next, you'll create a route that directs traffic to the NGINX service that serves the React application. Open the web terminal and create a file named ui-route.yaml that contains the following content:
kind: Route
apiVersion: route.openshift.io/v1
metadata:
  name: example
spec:
  to:
    kind: Service
    name: react-ui
  tls:
    termination: edge
    insecureEdgeTerminationPolicy: None
  path: /
  port:
    targetPort: 8080-tcp
Run the following command to create a route to access the React application:
oc create -f ui-route.yaml
Obtain the hostname for your new route using the following command:
oc get route example -o jsonpath='{.spec.host}' | xargs echo
Create a second file named backend-route.yaml that contains the following content. Make sure you replace the $HOSTNAME placeholder to match the value returned from the oc get route command:
kind: Route
apiVersion: route.openshift.io/v1
metadata:
  name: example-backend
spec:
  # Note that adding a trailing slash here will require incoming
  # requests to include the trailing slash to match this route.
  # Omit the trailing slash if both /hello and /hello/ should match.
  path: /hello
  # Replace $HOSTNAME with the value you obtained with "oc get route"
  host: $HOSTNAME
  to:
    kind: Service
    name: quarkus-backend
    weight: 100
  port:
    targetPort: 8080
  tls:
    termination: edge
  wildcardPolicy: None
This route specification uses the same hostname as the route you created to access the React application, but it only matches URLs starting with /hello and routes them to the Quarkus back end. Create the second route by issuing the following command:
oc create -f backend-route.yaml
You can test your new path-based configuration is working by visiting the URL returned by this command:
oc get route example -o jsonpath='https://{.spec.host}' | xargs echo
Visit the URL, enter a message in the text input, and then use the same-origin button to make a request. Confirm that the request was routed directly to the Quarkus back end using OpenShifts's path-based routing by viewing the Quarkus pod's logs and inspecting the X-Forwarded-For headers using these commands:
export POD_NAME=$(oc get pods -l 'app=quarkus-backend' -o jsonpath={.items[0].metadata.name})

oc logs $POD_NAME | grep -i 'x-forwarded-for'
The logs should contain an entry with two IP addresses listed in the X-Forwarded-For header and a more recent entry with a single IP address in the X-Forwarded-For header. The entry that was routed using path-based routing contains just your IP address. The entries routed via NGINX contain both your IP address and the IP address of an OpenShift Router Pod because the previous implementation involves the NGINX forwarding the requests to Quarkus application on behalf of the OpenShift Router. This can be seen in Figure 6.

Summary
Dealing with CORS can be tedious, but now you're equipped with the knowledge to work through it. Consider using the techniques discussed here with your applications hosted on OpenShift to avoid CORS entirely. The most important thing is never to get lazy and return Access-Control-Allow-Origin: * from your services unless you're 100% sure that it's the right decision for your application.
And, of course, be sure to try using the solutions outlined in this article in the Developer Sandbox for Red Hat OpenShift!
Last updated: September 19, 2023