You can now try Camel K in the Developer Sandbox for Red Hat OpenShift, an OpenShift environment you can access for a free, hands-on experience in building and deploying cloud-native applications quickly. This article will guide you to the Developer Sandbox and through a Camel K integration in a fully web-based experience—no local installs needed.
If you are unfamiliar with Camel K, it is a subproject of Apache Camel, which many know as the Swiss Army knife of integration. Camel K simplifies the process of running cloud-native integration flows in Kubernetes environments.
What’s so special about Camel K?
Many organizations and developers implement microservices with varied languages and frameworks, but they usually forget the existence of purpose-built technologies such as Apache Camel, packed with hundreds of connectors and out-of-the-box patterns to resolve typical and challenging integration scenarios, such as content-based routing, splitting or data aggregation, protocol bridging, data transformation, and so on.
Camel K was designed to encapsulate the key concepts of running integrations on containers, providing a significant degree of automation to simplify the process of creating, building, deploying, and operating integration flows in Kubernetes environments.
Usually, applications are defined in a complex project tree and include dependency descriptors to incorporate libraries necessary to run the application. Camel K, on the other hand, aims to simplify the project to let the developer focus on the process flow definition. It automatically analyzes the code to find needed dependencies and only requires the essential flow definitions and resources from the developer.
Access the Developer Sandbox
Follow these instructions to get started in the Developer Sandbox: How to access the Developer Sandbox for Red Hat OpenShift
Once you have your browser connected to the Developer Sandbox console, you’ll be all set to start the first part of this article’s tutorial.
Part 1: Roll the dice
The most straightforward way to get started with Camel K is from the Developer view. Follow the instructions below to deploy a “Hello world” example.
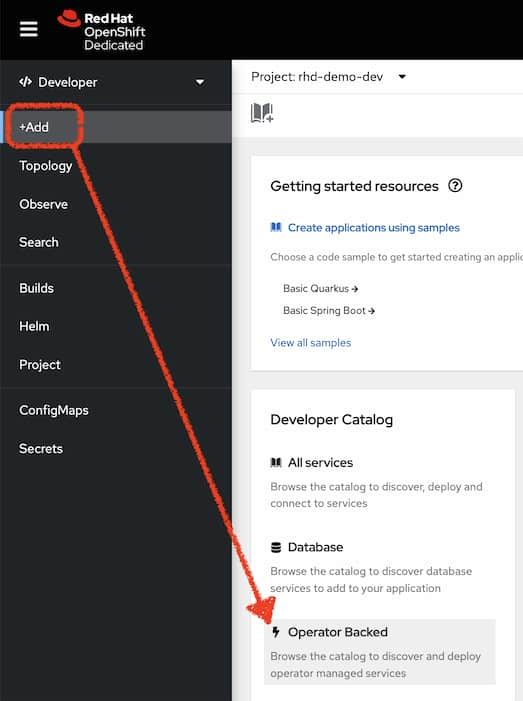
From the Developer view, click +Add in the left menu, and scroll down to the Developer Catalog to find the Operator Backed category, as shown in Figure 1.
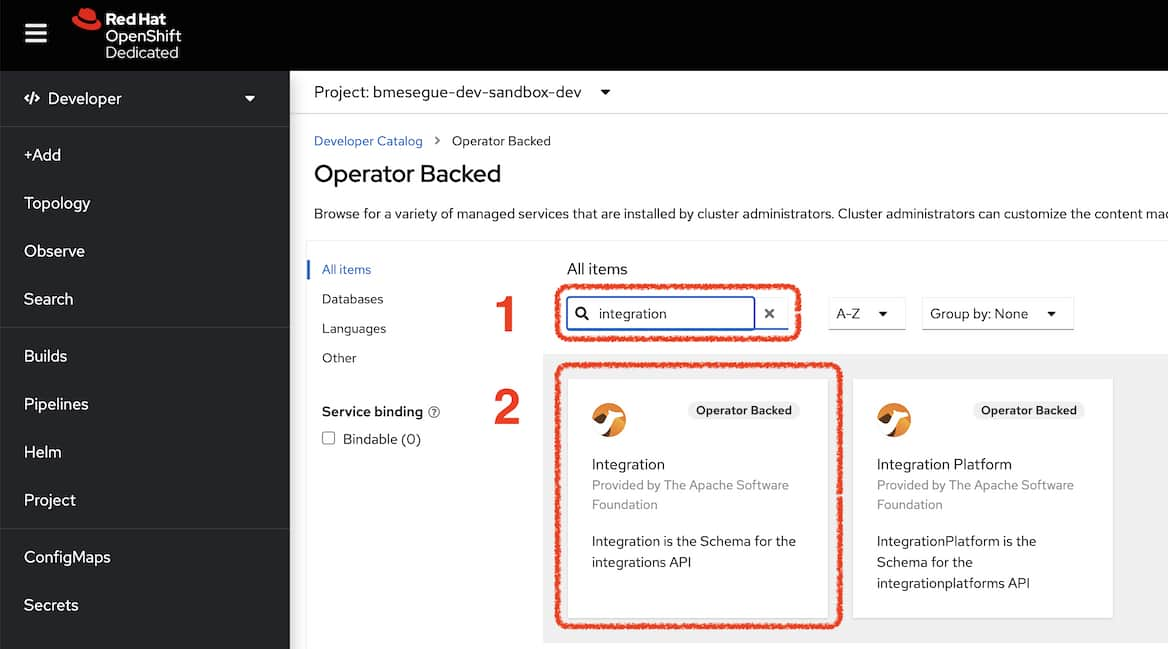
Locate the Integration resource in the catalog, as illustrated in Figure 2:
- Use the filter (type “integration”)
- Click on the Integration tile, then click the blue Create button that appears from the right.
Click on the Configure via YAML view radio button. You will then be presented with a definition screen similar to the one shown in Figure 3.
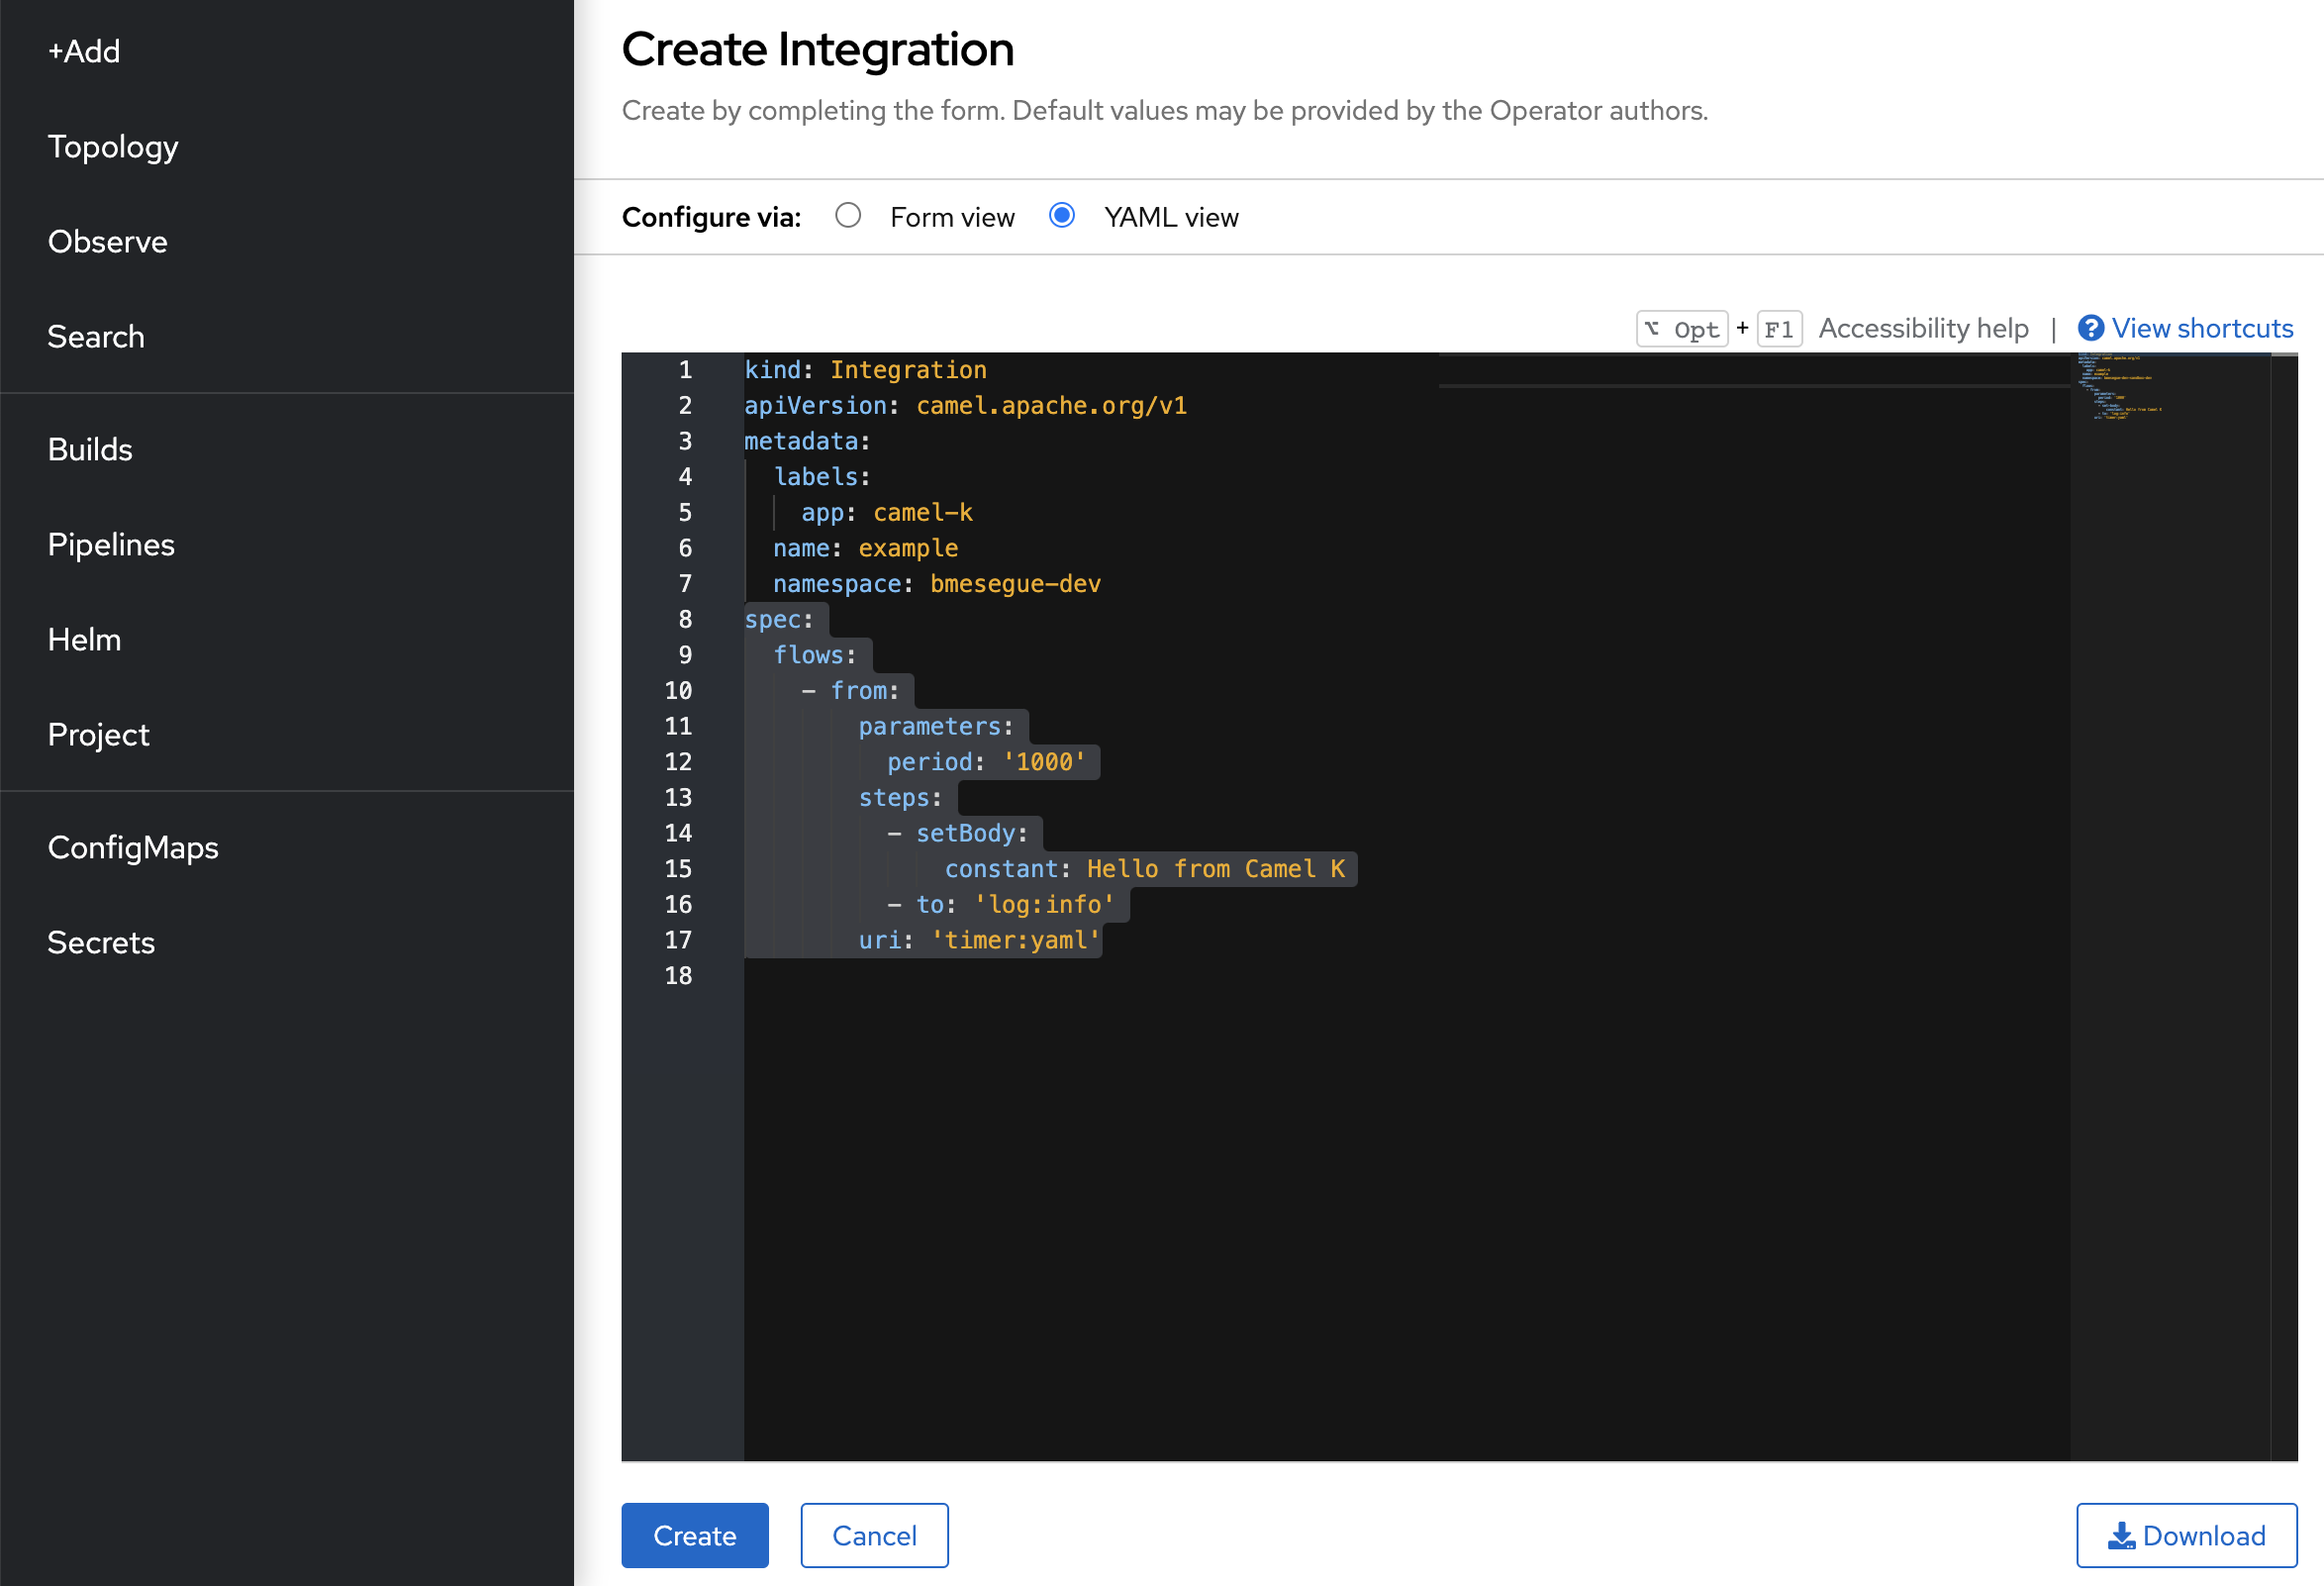
By selecting the YAML view, the interface lets you edit the definition and create the integration directly on the screen. This is a manual procedure that is very helpful when playing with the technology for the first time.
The default Camel route definition is very simplistic; let’s make it a bit more interesting so that you can start experiencing the Camel K operator in action.
Replace the default specification (spec definition) with the following snippet:
spec:
  traits:
    knative-service:
      enabled: false
  flows:
    - from:
        uri: 'platform-http:/roll-dice'
        steps:
          - set-body:
              simple: 'roll: ${random(1,6)}'
Note: by default, Camel K deploys the integration as a Knative service (serverless). In this example, we disable Knative to have full control over the route creation.
In the preceding code, the from element exposes an HTTP entry point for a service called roll-dice that will serve random numbers from 1 to 6 when clients submit HTTP requests.
Click Create.
When you create an integration as just described, the definition gets stored in your OpenShift project (namespace). Behind the scenes, the Camel K operator, deployed elsewhere, has visibility and picks up your definition to trigger a build and deployment on your project. This process takes some time.
To monitor the state of the integration deployment, open a terminal from where you can obtain information from the environment via the command line. Click the terminal icon at the top of your screen and then click the Start button below to initialize the terminal, as shown in Figure 4.
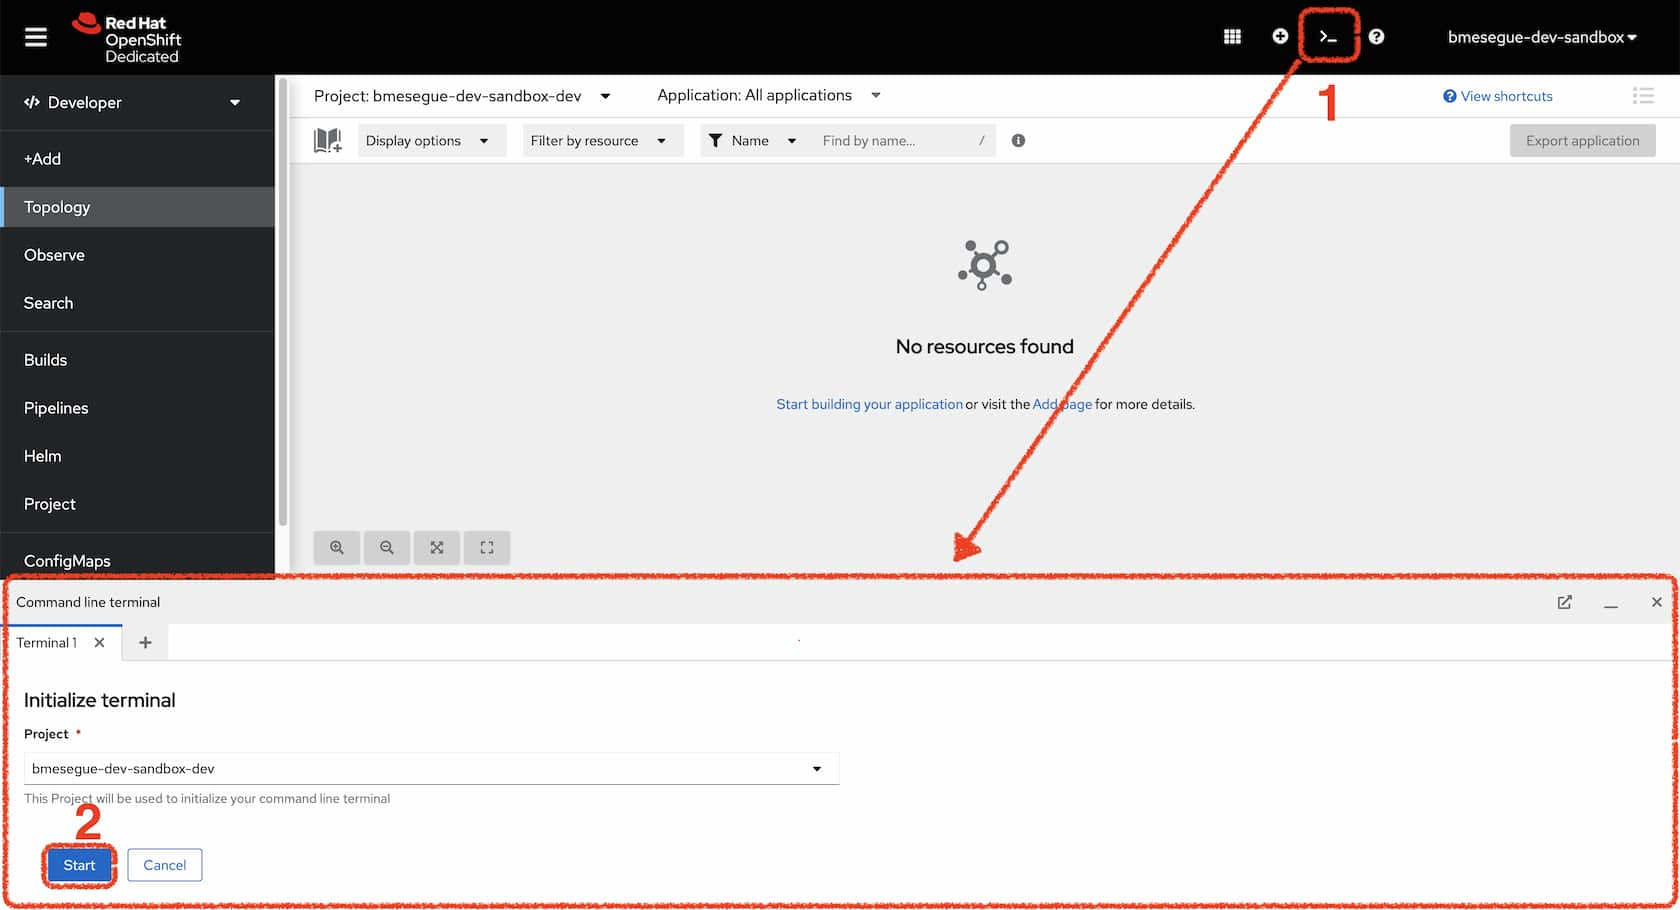
When you start the terminal, a new pod deploys. This is where your terminal is running.
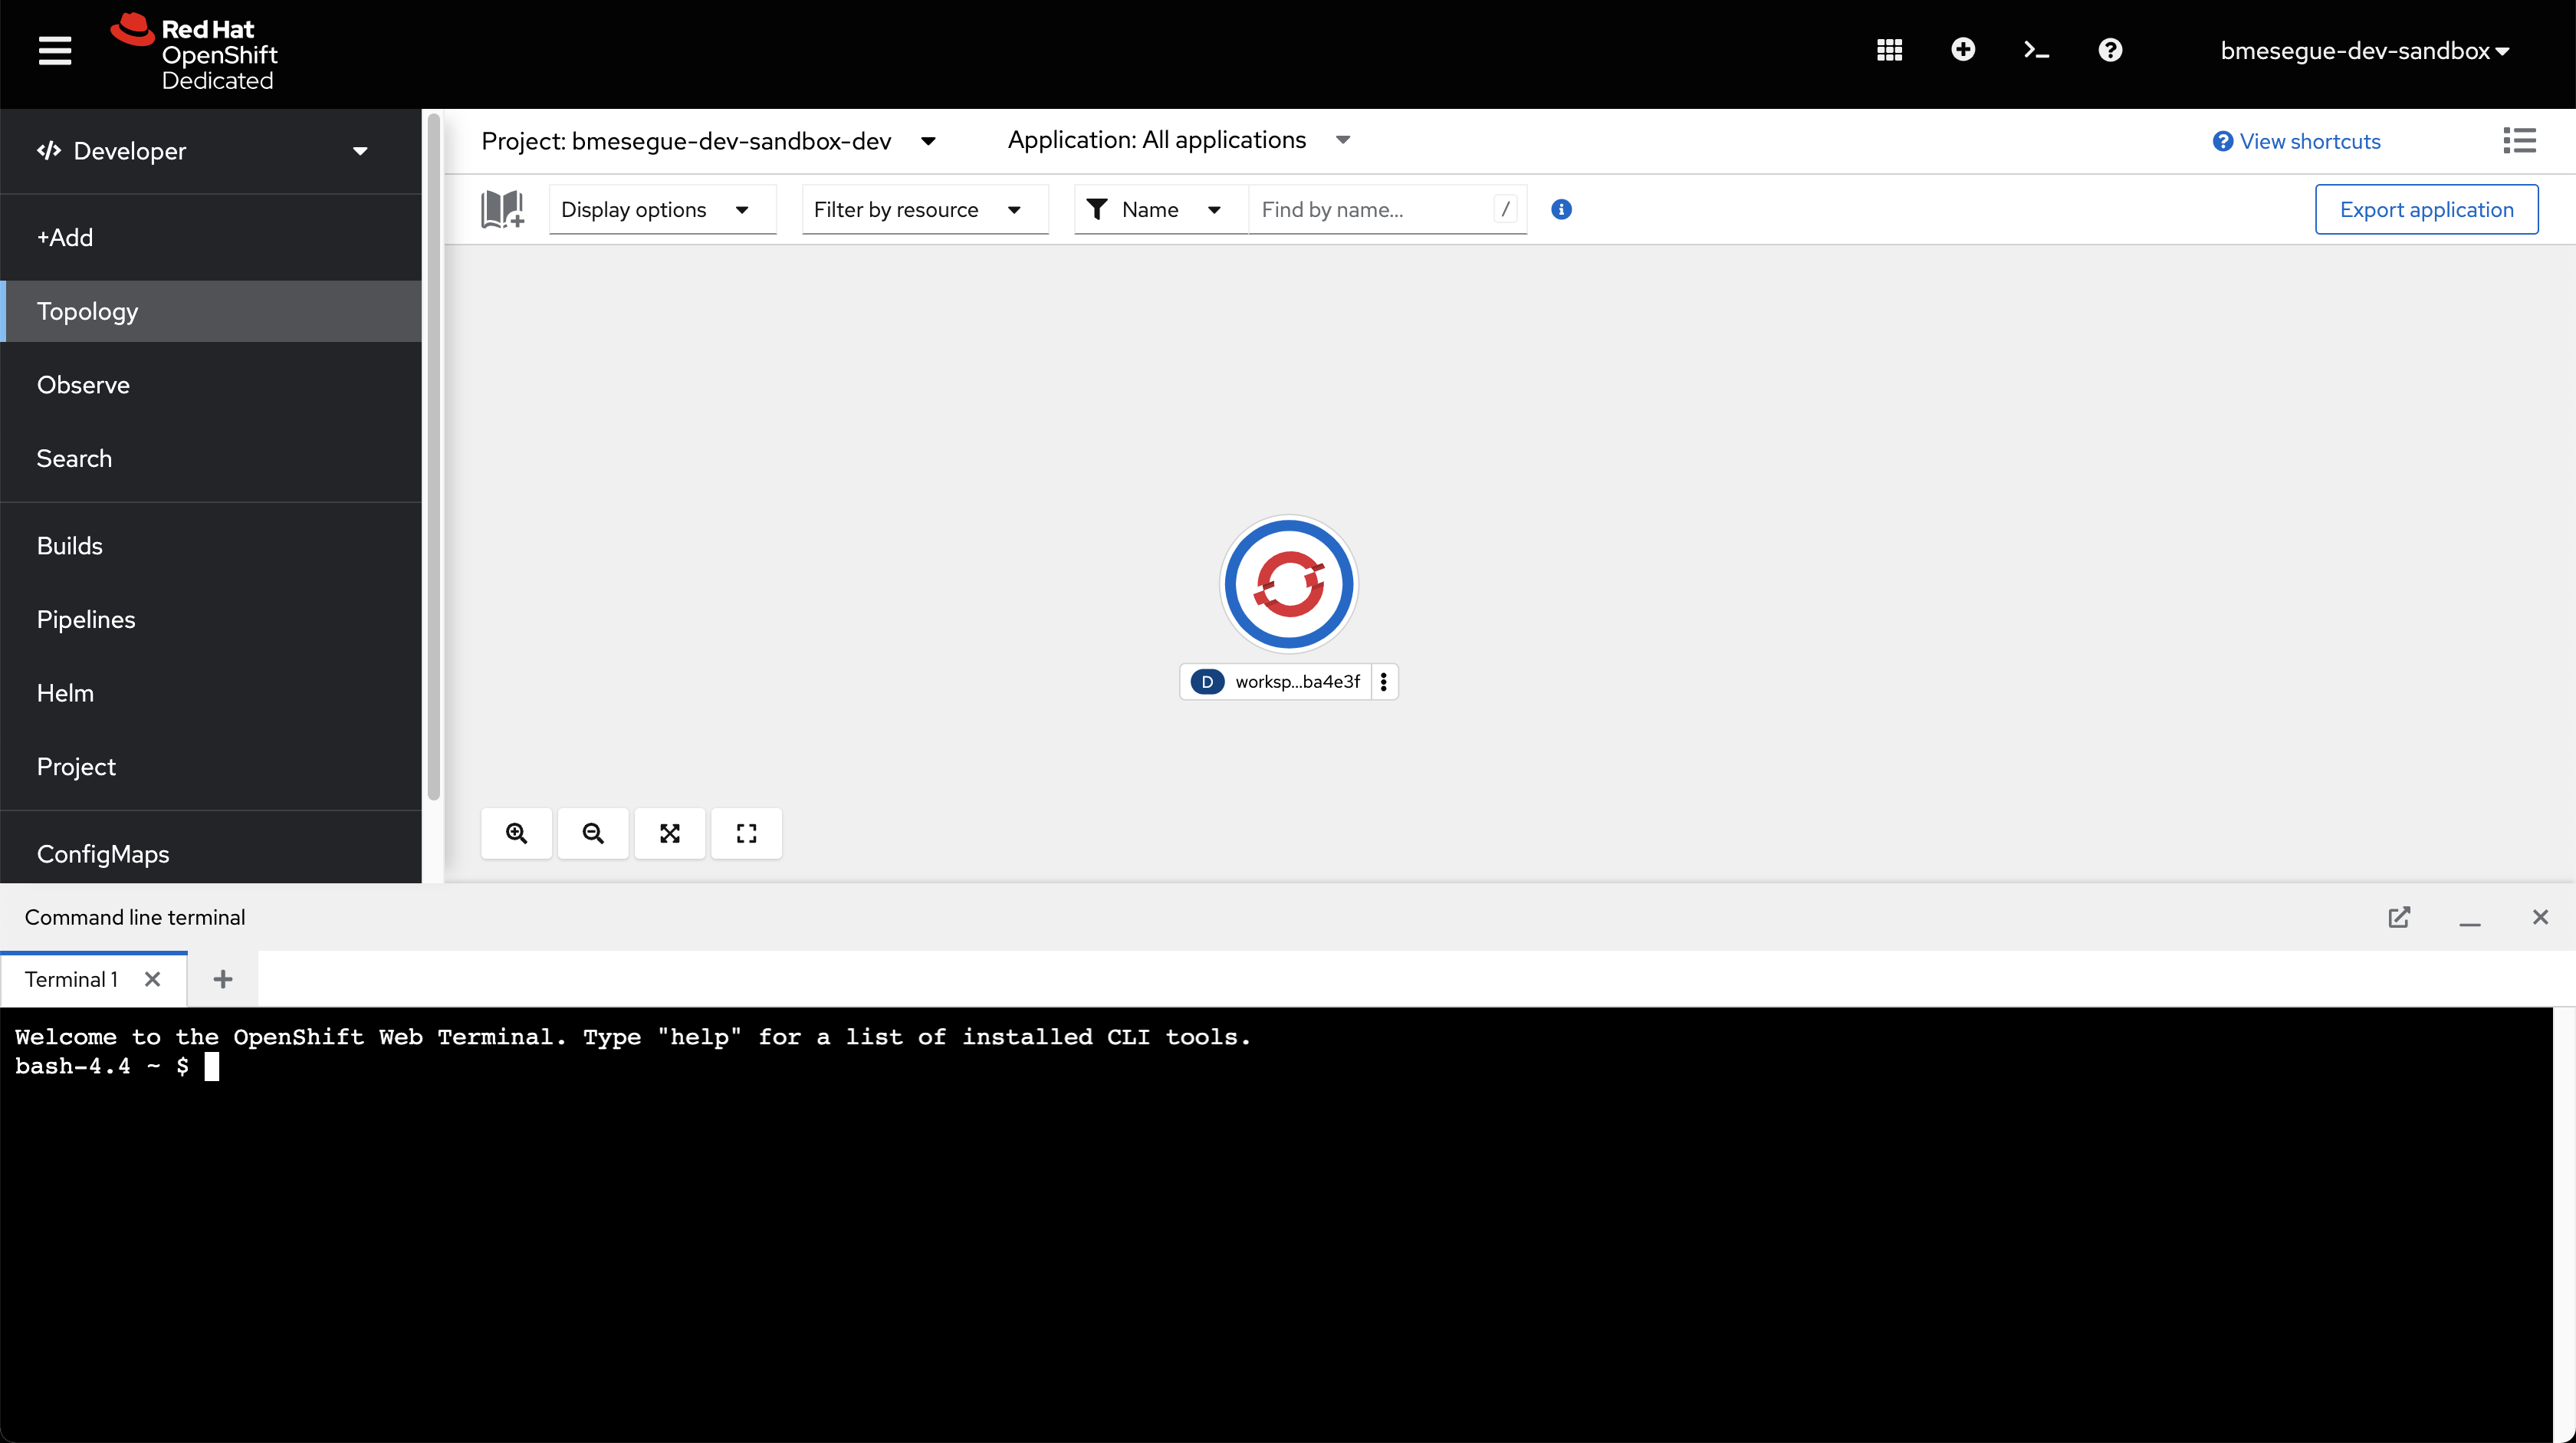
On your terminal, type:
oc get integration -w
The flag -w indicates to watch the resource for changes.
As the work progresses, its state will transition from Building Kit to Deploying to Running.
You should see an output similar to the following:
bash-4.4 ~ $ oc get integration -w
NAME      PHASE          KIT                        REPLICAS
example   Building Kit   kit-cdl6pa788ih7pmdvn6c0
example   Deploying      kit-cdl6pa788ih7pmdvn6c0
example   Running        kit-cdl6pa788ih7pmdvn6c0   0
example   Running        kit-cdl6pa788ih7pmdvn6c0   1
example   Running        kit-cdl6pa788ih7pmdvn6c0   1
example   Running        kit-cdl6pa788ih7pmdvn6c0   1
When the deployment completes, a new pod will run your integration definition:
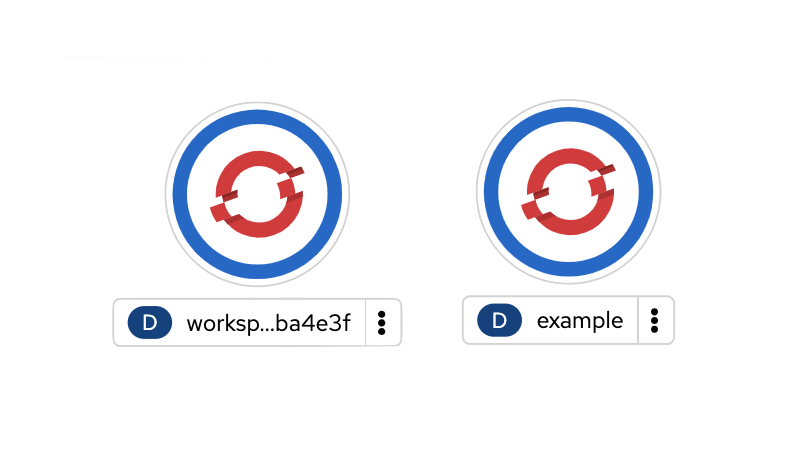
What’s interesting in this deployment is that the Camel K operator has the intelligence to recognize you’re exposing an HTTP endpoint and automatically deploys a Kubernetes service named example.
To test the service from within OpenShift, you can invoke it from the terminal. Enter the following cURL command and execute:
curl http://example/roll-dice
The command should return the value produced by the Camel integration. Executing it multiple times will produce random numbers from 1-6, simulating the dice rolling each time.
By default, the Developer Sandbox does not expose the service automatically to external consumers. If you want the service to be externally accessible, you can simply enable an OpenShift route by running the following command:
oc create route edge --service example --path=/roll-dice
The command above uses the OpenShift client oc to create a route that points to your new Camel example service, to expose to the external world.
Now you can also call the roll-dice service from your browser as if you were an external consumer. Notice the little icon attached to the Camel’s pod round graphic; click on it.
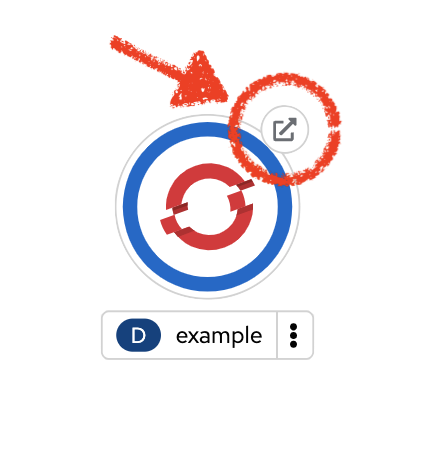
In your browser, it should look similar to Figure 8.

If you click the Reload button several times, you’ll see different values displayed.
When you’re done, to clean up your working project, delete your integration with the simple command shown below:
oc delete integration example
You also need to delete the route you manually created by executing:
oc delete route example
Part 2: Inside OpenShift Dev Spaces
If you want to play with Camel K in a more traditional developer workflow using a code editor and a terminal, the Developer Sandbox ships with an entire web-based IDE called Red Hat OpenShift Dev Spaces (formerly Red Hat CodeReady Workspaces).
Set up your dev environment with the Camel tutorials
The animated sequence in Figure 9 illustrates the actions to follow to open your development environment along with your tutorial instructions.
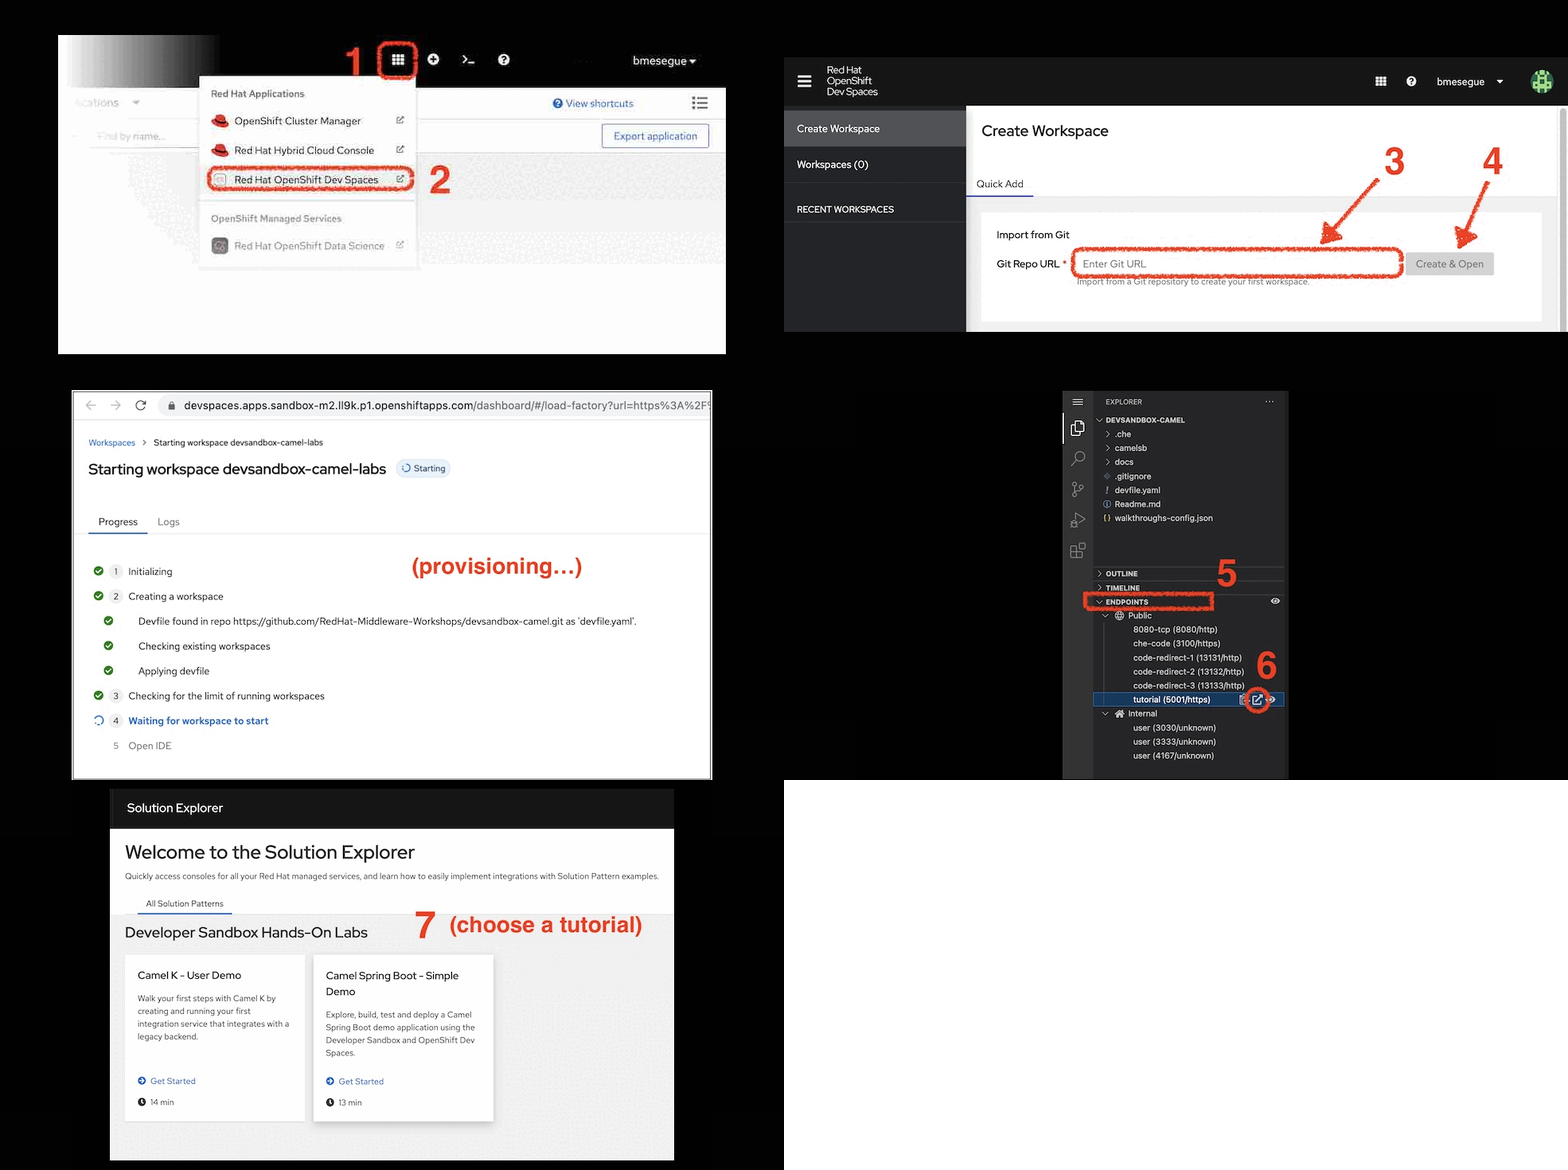
Follow these steps:
- From the web console, click the Applications icon as shown in Figure 9 (marked 1).
- Select Red Hat OpenShift Dev Spaces (2).
You will be prompted to log in and Authorize Access; select the "Allow selected permissions" option. -
When the Create Workspace dashboard in OpenShift Dev Spaces opens, copy the snippet below:
https://github.com/RedHat-Middleware-Workshops/devsandbox-camel.gitThen, paste it into the Git Repo URL field (3).
- Click Create & Open (4).
- When the workspace finishes provisioning and the IDE opens, click the deployable Endpoints accordion (5).
- Then, click on the icon (6), which opens the tutorial in a new browser tab.
- Choose the tutorial indicated in the next section.
Start the Camel K tutorial
Select the Camel K - User Demo tile, highlighted in Figure 10.
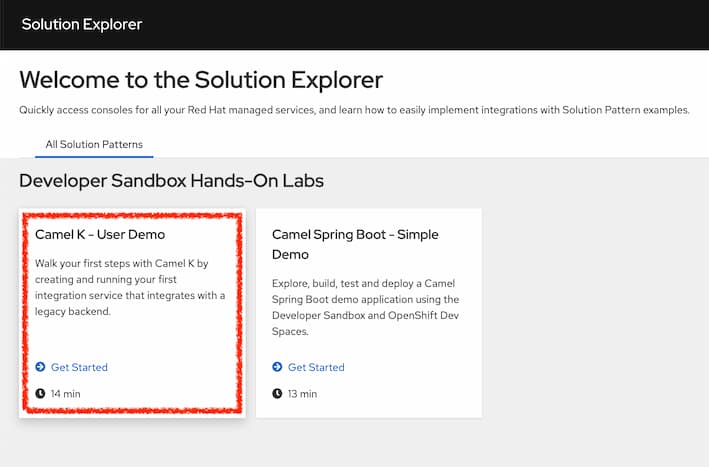
When you click on the tile, the Solution Explorer will show the lab introduction and the exercise chapters included, which you should be able to complete in around 15 minutes.
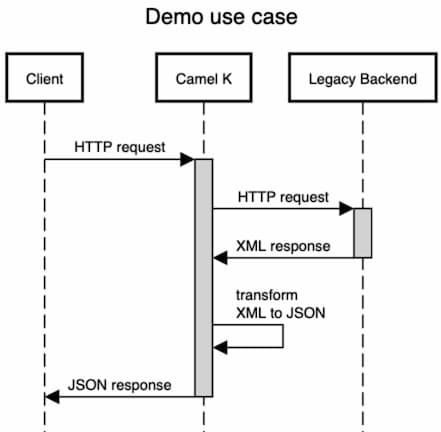
The aim of this use case demo is to help you get started with the basics of Camel K and play in the Developer Sandbox. For that reason, the use case selected is simple and friendly. The sequence diagram in Figure 11 illustrates the flow you’re about to create; you’ll get to see for yourself how little effort is required to complete it.
Enjoy the Camel ride!
More Apache Camel resources
This article ends here, but this should only be the start of your journey with Apache Camel. The Developer Sandbox for Red Hat OpenShift gives you the opportunity to play on a Kubernetes-based application platform with an integrated developer IDE (OpenShift Dev Spaces).
With your browser alone, you can quickly complete the Camel K lab and see by yourself how simply Camel resolves a typical use case and how easy it is to test, containerize, and run applications in OpenShift.
Camel K is a convenient way to build and deploy integrations with Apache Camel. Its simplicity and ease of use accelerate developers. You might, however, find other Camel runtimes better suited for more advanced use cases. We encourage you to check out the resources below to learn more about Camel K and explore different ways you can build applications with Apache Camel:
- Play with more tutorials in the Developer Sandbox for Red Hat OpenShift.
- A good place to start learning about Camel K is the Camel K topic page on Red Hat Developer.
- Learn how to implement a complete API integration using Camel K and AtlasMap.
- Learn more about the different Camel runtimes available by reading Choose the best Camel for your integration ride.
- Read Boost Apache Camel performance with Quarkus for a detailed look at Camel Quarkus.
- Visit the Red Hat Integration page on developers.redhat.com to see complementary capabilities around Camel.
