Enterprise Java applications don't run in a vacuum, but interact with other components such as databases, load balancers, monitoring, and so forth. Eclipse JKube makes it easier to build Java applications and connect them with the resources they need when running as containers under Kubernetes. This article builds on a previous article, Build a bootable JAR for cloud-ready microservices, and shows some advanced uses of JKube. We'll build and deploy a bootable JAR using Red Hat JBoss Enterprise Application Platform (JBoss EAP) and Jakarta EE, and incorporate a PostgreSQL database and MicroProfile capabilities.
How JKube helps build and deploy Java applications
The previous article in this series listed all the commands needed to create the application's resources (buildConfig, deployment, service, route, etc.) and the other actors (Prometheus, Grafana, Jaeger, etc.) used to implement some features, like tracing and observability, needed to build a cloud-ready application. However, developers are hoping for a developer-friendly tool that creates Kubernetes and Red Hat OpenShift manifests, making it easier to build and deploy their applications. Is there a way to do this with a solution that can be integrated with the standard build process, and avoid do-it-yourself scripting?
Eclipse JKube is a collection of plugins and libraries that builds container images, creates the OpenShift manifests at compile time, and gives an easy way to automatically generate the tasks required to make your application cloud-ready—it can create liveness and readiness probes, for instance. JKube provides an OpenShift Maven plugin that extends the features of Maven, giving developers an easy way to configure all the resources needed by an application to run in a PaaS environment.
In this article, you'll update the source code from the previous article in the series so you can configure and deploy that application on Red Hat OpenShift using JKube. You'll also see how to provision common layers, such as the data source, through the capabilities implemented by Galleon feature packs.
There are two other useful JKube concepts you'll use in these examples:
- An enricher is a structured way to add common capabilities, such as security secrets and
ConfigMaps, to images. - A profile is a group of enrichers and instructions for building instances (generators) that are applied together to an instance.
Implementation
Now it's time to move to the source code, available on my GitHub repository, and share my process with you. You'll reuse the source code from the previous article. To preserve the evolution path of my application, I created a new tag, JKube_Galleon_Runtime_EAP_XP_bootable_jar_version, in the repository for this article.
Environment configuration
You can follow the example in this article using:
- An OpenShift installation (I used version 4.8). You can use Red Hat CodeReady Containers if you want to install OpenShift locally.
- JBoss EAP 7.4
- JBoss EAP expansion pack (JBoss EAP XP) 3.0
- Apache Maven 3.8.2
- OpenJDK 11
- Git 2.31.1
You can use the tags to analyze the progress of the journey.
Environment provisioning
The first step is to get the source code needed for the demonstration. Open a terminal, select a folder, and clone the Git repository using the following command:
$ git clone https://github.com/mvocale/JBoss_EAP_cloud_ready.git
Go to your project folder and switch to the JKube_Galleon_Runtime_EAP_XP_bootable_jar_version tag, where I stored the code for an OpenShift deployment with JKube, using the following command:
$ git checkout tags/JKube_Galleon_Runtime_EAP_XP_bootable_jar_version
Now you can see the weather-app-eap-cloud-ready subproject. It contains the source code to use the Jakarta EE 8 and MicroProfile 4 specifications. They run JBoss EAP XP 3, in bootable JAR mode, and use Galleon to incorporate only the required subsystems on top of OpenShift 4.8. The final container image was improved using the runtime version of OpenJDK 11.
The repository also contains a deploy-openshift.sh file with all the instructions needed to install all the implemented components on OpenShift. If you don't want to perform every single step described here, you can launch the application after establishing a successful connection with CodeReady Containers or a remote OpenShift cluster.
Now it's time to connect to OpenShift to deploy your application. If you decided to use CodeReady Containers, you need to start it and log in as a developer using the following commands:
$ crc start
$ oc login -u developer -p developer https://api.crc.testing:6443
Otherwise, if you have an available OpenShift environment, log into it as follows, replacing $token and $server_url with your own values:
$ oc login --token=$token --server=$server_url
Create the project to host your application:
$ oc new-project redhat-jboss-eap-cloud-ready-demo --display-name="Red Hat JBoss EAP Cloud Ready Demo"
Next, using Maven and JKube, you will set all the components needed by the application to run in the final environment. Maven's pom.xml file will become the core of the implementation of the build and deployment process.
PostgreSQL database
The application needs a database to store information. We will create a PostgreSQL instance for this purpose using JKube later. In the meantime, I have used a repository called Galleon Feature Pack for integrating datasources into Red Hat JBoss Enterprise Application Platform to configure the data source subsystem. Take a look at the pom.xml file:
...
<properties>
    ...
    <version.eap.datasources.galleon.pack>7.4.0.GA-redhat-00003</version.eap.datasources.galleon.pack>
    <org.jboss.eap.datasources.postgresql.driver.version>42.2.23.redhat-00001</org.jboss.eap.datasources.postgresql.driver.version>
    ...
</properties>
...
<plugin>
    <groupId>org.codehaus.mojo</groupId>
    <artifactId>properties-maven-plugin</artifactId>
    <version>1.0.0</version>
    <executions>
        <execution>
            <goals>
                <goal>set-system-properties</goal>
            </goals>
            <configuration>
                <properties>
                    <property>
                        <name>org.jboss.eap.datasources.postgresql.driver.version</name>
                        <value>${org.jboss.eap.datasources.postgresql.driver.version}</value>
                    </property>
                </properties>
            </configuration>
        </execution>
    </executions>
</plugin>
<plugin>
    <groupId>org.wildfly.plugins</groupId>
    <artifactId>wildfly-jar-maven-plugin</artifactId>
    <version>${bootable.jar.maven.plugin.version}</version>
    <configuration>
        <feature-packs>
            ...
            <feature-pack>
                <location>org.jboss.eap:eap-datasources-galleon-pack:${version.eap.datasources.galleon.pack}</location>
            </feature-pack>
        </feature-packs>
        <cloud/>
        <layers>
            <layer>jaxrs-server</layer>
            <layer>microprofile-platform</layer>
            <layer>postgresql-datasource</layer>
        </layers>
        ...
        <executions>
            <execution>
                <goals>
                    <goal>package</goal>
                </goals>
            </execution>
        </executions>
    </configuration>
</plugin>
...
Two properties are key:
version.eap.datasources.galleon.packrepresents the version of the feature pack for JBoss EAP that provides a JDBC driver and a data source for the PostgreSQL database.org.jboss.eap.datasources.postgresql.driver.versionsets the versions of the PostgreSQL JDBC drivers.
The plugin section configures the following plugins:
properties-maven-pluginspecifies the version of the PostgreSQL JDBC driver.wildfly-jar-maven-pluginemploys theorg.jboss.eap:eap-datasources-galleon-packfeature pack to automatically provision and configure JBoss EAP to use the JDBC driver and data source subsystem, configured to interact with the PostgreSQL database.
JKube in action
Now it's time to focus on JKube to create what you need to deploy and run your application. In my previous article, I deployed my weather application as a bootable JAR employing an OpenShift chained build to use an OpenJDK runtime image. I also created all the applications needed to implement the tracing and observability features (Prometheus, Grafana, Jaeger) and the PostgreSQL database with a long list of commands invoking oc (the OpenShift command line interface). This approach worked well, but it's not suitable for CI/CD. What I needed was a way, possibly using a developer-friendly tool like Maven, to build and deploy all components of my business use case—the application and its dependencies.
JKube does exactly this job. The OpenShift Maven Plugin integrates JKube with Maven and exploits the build configuration already provided.
Configuring JKube
To use the OpenShift Maven plugin, configure JKube in the pom.xml file:
<properties>
    ...
    <version.jkube.openshift.maven.plugin>1.7.0</version.jkube.openshift.maven.plugin>
    ...
</properties>
<plugin>
    <groupId>org.eclipse.jkube</groupId>
    <artifactId>openshift-maven-plugin</artifactId>
    <version>${version.jkube.openshift.maven.plugin}</version>
    <executions>
        <execution>
            <goals>
                <goal>resource</goal>
                <goal>build</goal>
            </goals>
        </execution>
    </executions>
    ...
</plugin>
I used the 1.7 version of JKube and set two build goals:
resourcecreates OpenShift resources (service, route, etc.) based on conventions defined through the project's code. It also uses XML configurations defined inpom.xml, integrating them with resource fragments defined in thesrc/main/jkubedirectory of the project. We will cover those resources later.buildgenerates the final application container image that will be pushed to the registry (in my example, the internal OpenShift registry) and that will be used by the pod that runs the application.
Creating the application image
After configuring JKube in pom.xml and defining the build goal, it's time to tell JKube how to create the weather-app application image. Here's the the pom.xml fragment dedicated to this topic:
...
<properties>
    ...
    <jkube.build.strategy>docker</jkube.build.strategy>
    <application.runtime.image>registry.access.redhat.com/ubi8/openjdk-11-runtime:1.11-2.1645811205</application.runtime.image>
    ...
</properties>
...
<plugin>
    <groupId>org.eclipse.jkube</groupId>
    <artifactId>openshift-maven-plugin</artifactId>
    <version>${version.jkube.openshift.maven.plugin}</version>
    ...
    <configuration combine.self="override">
        <!-- Environment variables needed to configure the runtime image -->
        <images>
            <image>
                <name>weather-app-eap-cloud-ready</name> 1
                <build>
                    <from>${application.runtime.image}</from> 2
                    <assembly>
                        <targetDir>/deployments</targetDir> 3
                        <excludeFinalOutputArtifact>true</excludeFinalOutputArtifact>
                        <layers>
                            <layer>
                                <id>bootable</id>
                                <files>
                                    <file>
                                        <source>${project.build.directory}/${project.artifactId}-${project.version}-bootable.jar</source> 4
                                        <outputDirectory>.</outputDirectory>
                                    </file>
                                </files>
                            </layer>
                        </layers>
                    </assembly>
                    <entryPoint>
                        <shell>java -jar /deployments/${project.artifactId}-${project.version}-bootable.jar -Dwildfly.datasources.statistics-enabled=true</shell> 5
                    </entryPoint>
                </build>
            </image>
        </images>
    </configuration>
</plugin>
All the JKube configurations are inside the <configuration> XML tag. The main properties, each highlighted with a number near the XML tag in the example, are:
name: The final application image that is pushed into the internal registry and deployed in OpenShift.from: The image, created by JKube, that will build the final application imagetargetDir: The directory where Maven will put the application artifact (the bootable JAR file) that will be used to execute the weather applicationsource: The bootable JAR fileshell: The command that will execute the application pod
The jkube.build.strategy property near the top of the example is important because I used an OpenJDK runtime image (without developer tools such as Maven). The bootable JAR is built outside of OpenShift—specifically, in my example, on my laptop. So I send to OpenShift the binary archive with the executable JAR that will be run inside OpenShift. If I failed to specify this property, JKube would try by default to use a Source-to-Image (S2I) build strategy that uses a builder image to create a new application image from binary build data. This won't work if you want to use an OpenJDK runtime image.
Service resources
You need to create a Kubernetes service to expose the application running on a set of pods as a network service. My application needs to expose other ports that are usually provided by the OpenJDK image. For this reason, I configured JKube to create the weather-app-eap-cloud-ready service that will expose all the ports needed by the application, particularly 8080 for the web user interface and APIs and 9990 for the metrics exposed by JBoss EAP XP to implement the Metrics MicroProfile specification. Take a look at the pom.xml file:
...
<plugin>
    <groupId>org.eclipse.jkube</groupId>
    <artifactId>openshift-maven-plugin</artifactId>
    <version>${version.jkube.openshift.maven.plugin}</version>
    ...
    <configuration combine.self="override">
        ...
        <resources>
            <!-- This is the kubernetes service that expose the JBoss EAP service -->
            <services>
                <service>
                    <name>weather-app-eap-cloud-ready</name>
                    <type>NodePort</type>
                    <expose>true</expose>
                    <ports>
                        <port>
                            <name>health-check</name>
                            <protocol>TCP</protocol>
                            <port>9990</port>
                            <targetPort>9990</targetPort>
                        </port>
                        <port>
                            <name>http</name>
                            <protocol>TCP</protocol>
                            <port>8080</port>
                            <targetPort>8080</targetPort>
                        </port>
                        <port>
                            <name>https</name>
                            <protocol>TCP</protocol>
                            <port>8443</port>
                            <targetPort>8443</targetPort>
                        </port>
                        <port>
                            <name>jolokia</name>
                            <protocol>TCP</protocol>
                            <port>8778</port>
                            <targetPort>8778</targetPort>
                        </port>
                    </ports>
                </service>
            </services>
        </resources>
      ...
    </configuration>
</plugin>
Configuration is pretty simple: Set each service name and type and all the ports that you want to make available.
OpenShift route resources
You need to expose the Kubernetes service outside of OpenShift so users can access the application, and also to make available all the cloud-native features implemented using MicroProfile specifications: Metrics, Health, OpenTracing, etc.
JKube is able to automatically generate an OpenShift route descriptor starting from this Kubernetes service. However, you can't use JKube's solution because weather-app-eap-cloud-ready exposes multiple ports. The solution is to instruct JKube not to directly expose the Kubernetes services, but to use the route descriptors implemented in the source code instead.
To avoid the automatic route creation, configure the enricher as follows:
...
<plugin>
    <groupId>org.eclipse.jkube</groupId>
    <artifactId>openshift-maven-plugin</artifactId>
    <version>${version.jkube.openshift.maven.plugin}</version>
    ...
    <configuration combine.self="override">
        ...
        <enricher>
            <config>
                <jkube-openshift-route>
                    <!-- I need to use the fragments approach since my service expose multiple ports and the enricher is not able to automatically generates multiple routes -->
                    <generateRoute>false</generateRoute>
                </jkube-openshift-route>
            </config>
        </enricher>
    </configuration>
</plugin>
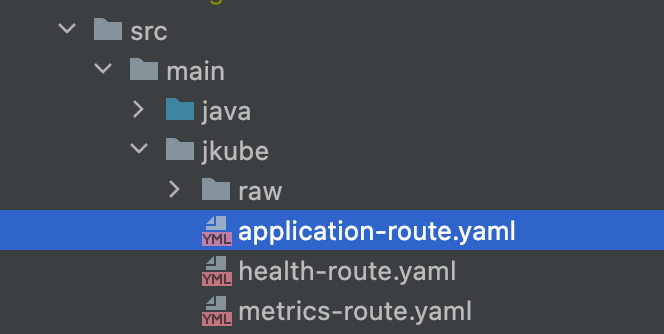
Next, you need to create YAML files that define the OpenShift routes inside the src/main/jkube directory.
JKube will pick up the resources using the YAML resource descriptors, enrich them, and finally combine all the resources in a single openshift.yml file that deploys all the resources into OpenShift.
The source code structure is shown in Figure 1.
The following route exposes the application outside of OpenShift:
kind: Route
apiVersion: route.openshift.io/v1
metadata:
  name: weather-app-eap-cloud-ready
  namespace: redhat-jboss-eap-cloud-ready-demo
  labels:
    app: weather-app-eap-cloud-ready
spec:
  to:
    kind: Service
    name: weather-app-eap-cloud-ready
  port:
    targetPort: 8080
  wildcardPolicy: None
The file creates the service and the route and defines the runtime image that the application uses.
Environment variables
Applications, and the tools that build them, often consult environment variables for important configuration information. JKube makes it easy to define these environment variables. Under the <resources> section of the pom.xml file, the <env> tag specifies the variables' names and values for interacting with the PostgreSQL database and Jaeger:
...
<plugin>
    <groupId>org.eclipse.jkube</groupId>
    <artifactId>openshift-maven-plugin</artifactId>
    <version>${version.jkube.openshift.maven.plugin}</version>
    ...
    <!-- JKube XML Configuration approach -->
    <configuration combine.self="override">
        <resources>
        ...
            <env>
                <!-- Variables needed with eap datasource galleon pack -->
                <POSTGRESQL_DATABASE>weather</POSTGRESQL_DATABASE>
                <POSTGRESQL_USER>mauro</POSTGRESQL_USER>
                <POSTGRESQL_PASSWORD>secret</POSTGRESQL_PASSWORD>
                <POSTGRESQL_URL>jdbc:postgresql://${env.WEATHER_POSTGRESQL_SERVICE_HOST}:${env.WEATHER_POSTGRESQL_SERVICE_PORT}/${env.POSTGRESQL_DATABASE}</POSTGRESQL_URL>
                <POSTGRESQL_DATASOURCE>WeatherDS</POSTGRESQL_DATASOURCE>
                <POSTGRESQL_ENABLED>true</POSTGRESQL_ENABLED>
                <POSTGRESQL_VALIDATE_ON_MATCH>false</POSTGRESQL_VALIDATE_ON_MATCH>
                <POSTGRESQL_BACKGROUND_VALIDATION>true</POSTGRESQL_BACKGROUND_VALIDATION>
                <POSTGRESQL_BACKGROUND_VALIDATION_MILLIS>60000</POSTGRESQL_BACKGROUND_VALIDATION_MILLIS>
                <POSTGRESQL_FLUSH_STRATEGY>IdleConnections</POSTGRESQL_FLUSH_STRATEGY>
                <JAEGER_AGENT_HOST>$(JAEGER_ALL_IN_ONE_RHEL8_SERVICE_HOST)</JAEGER_AGENT_HOST>
                <JAEGER_AGENT_PORT>$(JAEGER_ALL_IN_ONE_RHEL8_SERVICE_PORT_6831_UDP)</JAEGER_AGENT_PORT>
                <JAEGER_SAMPLER_PARAM>1</JAEGER_SAMPLER_PARAM>
                <JAEGER_SAMPLER_TYPE>const</JAEGER_SAMPLER_TYPE>
                <JAEGER_SERVICE_NAME>weather-app-eap-cloud-ready</JAEGER_SERVICE_NAME>
                <WILDFLY_TRACING_ENABLED>true</WILDFLY_TRACING_ENABLED>
            </env>
        </resources>
    ...
    </configuration>
</plugin>
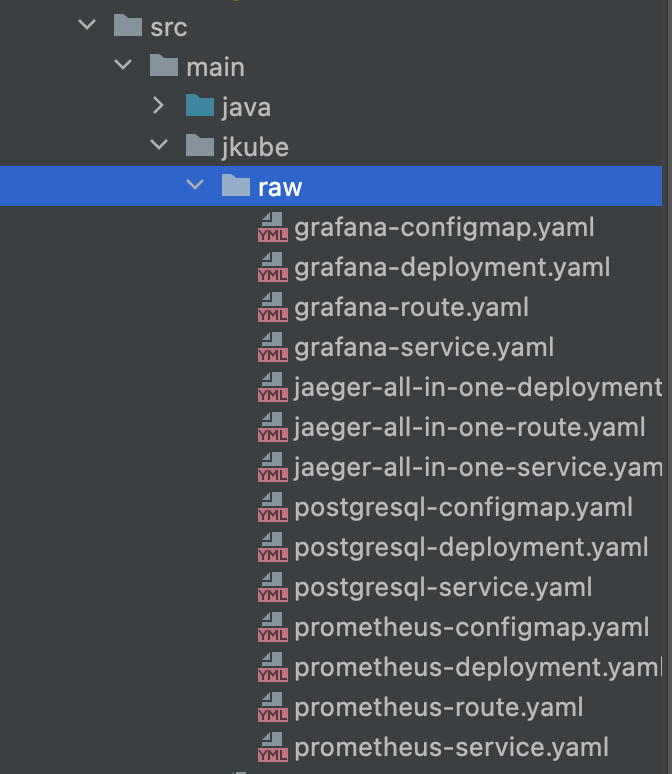
Application dependencies
In my previous article, I needed to execute a long list of commands manually or grouped by in the deploy-openshift.sh file. JKube makes these steps easy and automatic. Just group all the resources' YAML descriptors into a directory named src/main/jkube/raw. Why raw? JKube reserves this name for a profile that includes only generators, no enrichers. Figure 2 shows the contents of this directory.
The following YAML deploys the application's PostgreSQL database:
kind: Deployment
apiVersion: apps/v1
metadata:
  name: weather-postgresql
  namespace: redhat-jboss-eap-cloud-ready-demo
  labels:
    app: weather-postgresql
    app.openshift.io/runtime: postgresql
spec:
  replicas: 1
  selector:
    matchLabels:
      deployment: weather-postgresql
  template:
    metadata:
      labels:
        deployment: weather-postgresql
    spec:
      containers:
        - name: postgresql-13
          image: >-
            registry.redhat.io/rhel8/postgresql-13:1-31
          ports:
            - containerPort: 5432
              protocol: TCP
          envFrom:
            - configMapRef:
                name: postgres-config
Deploying the application
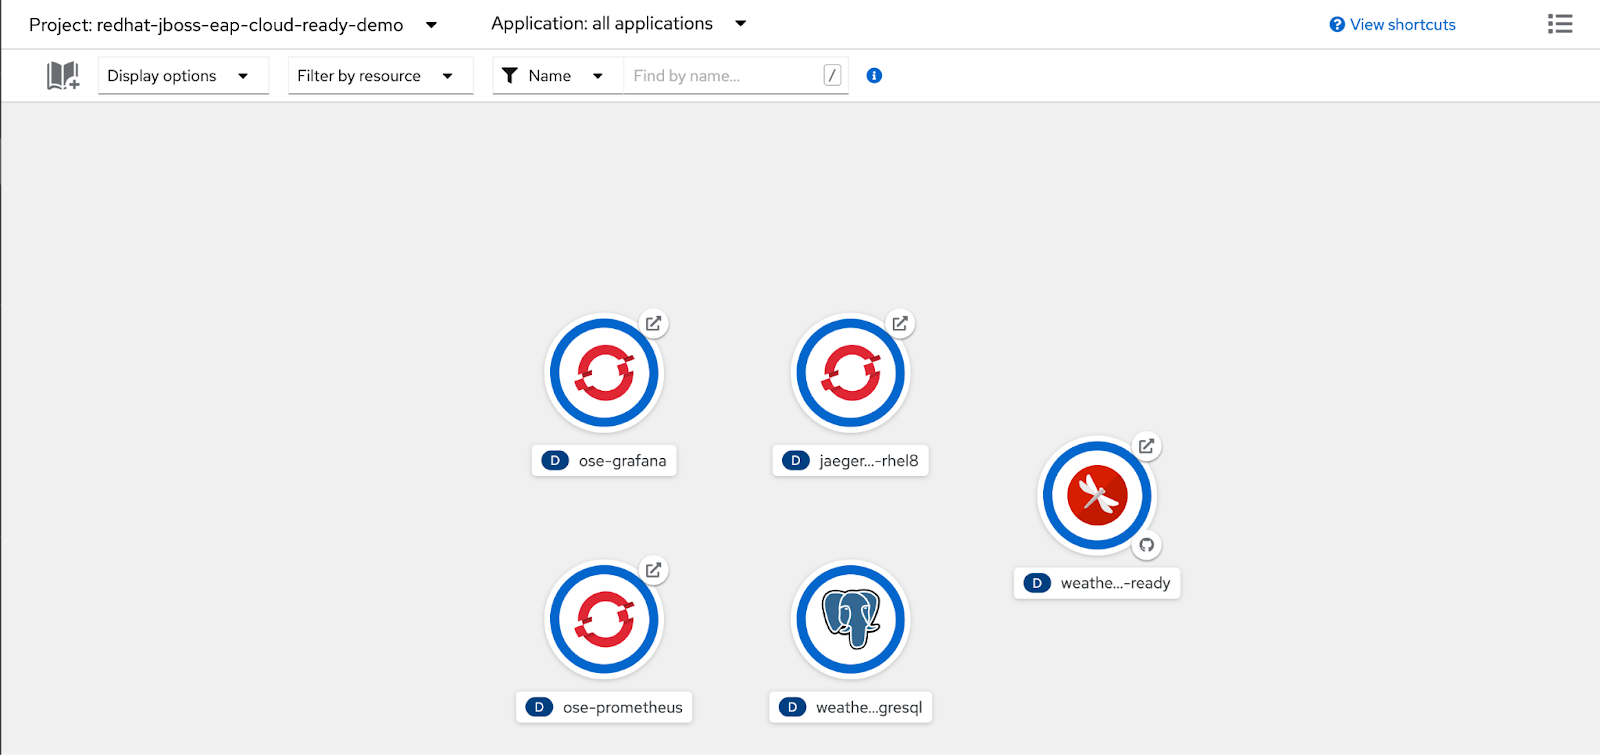
Everything is now in place to build all the resources needed by the application and run it in OpenShift. JKube allows simple deployment with a traditional Maven approach:
$ mvn oc:deploy
The application is compiled locally. After that, JKube performs all the tasks needed to deploy and execute the application on your OpenShift cluster, together with all components used by the application. In the end, you will see something like Figure 3 in the Topology view of your OpenShift console.
You can then test the application, using the steps described in another previous article of mine, to verify that it works.
To delete all the resources and clean up your project, enter:
$ mvn oc:undeploy
Conclusion
This article has shown you how to easily deploy an application and all its dependencies as a single task using JKube and Maven. This approach minimizes the learning curve, letting you create a solution that uses a consolidated approach like the Maven build to give you the power to manage and orchestrate all the components needed to implement a business use case. You can start to implement a Kubernetes deployment strategy using this approach. The impact really is as low as demonstrated in this article.
So don't stop evolving all of your applications: Continuous improvement is the key to the success of your architecture.
If you'd like to learn more about how Red Hat is working to improve the state of observability in distributed and cloud-based applications, read "Observability in 2022: Why it matters and how OpenTelemetry can help" on Red Hat Developer.
Last updated: September 20, 2023