Securing communications over networked services is an essential administrative task. This article shows you how to install and configure an SSL certificate to enable HTTPS-secured communication with Red Hat Decision Manager 7.11 on-premises. To minimize the requirements for our example, we will use a self-signed certificate. You can use the same steps with a certificate signed by a certificate authority (CA).
What is Red Hat Decision Manager?
Before we install and configure Red Hat Decision Manager, let's take a minute to review what it's used for.
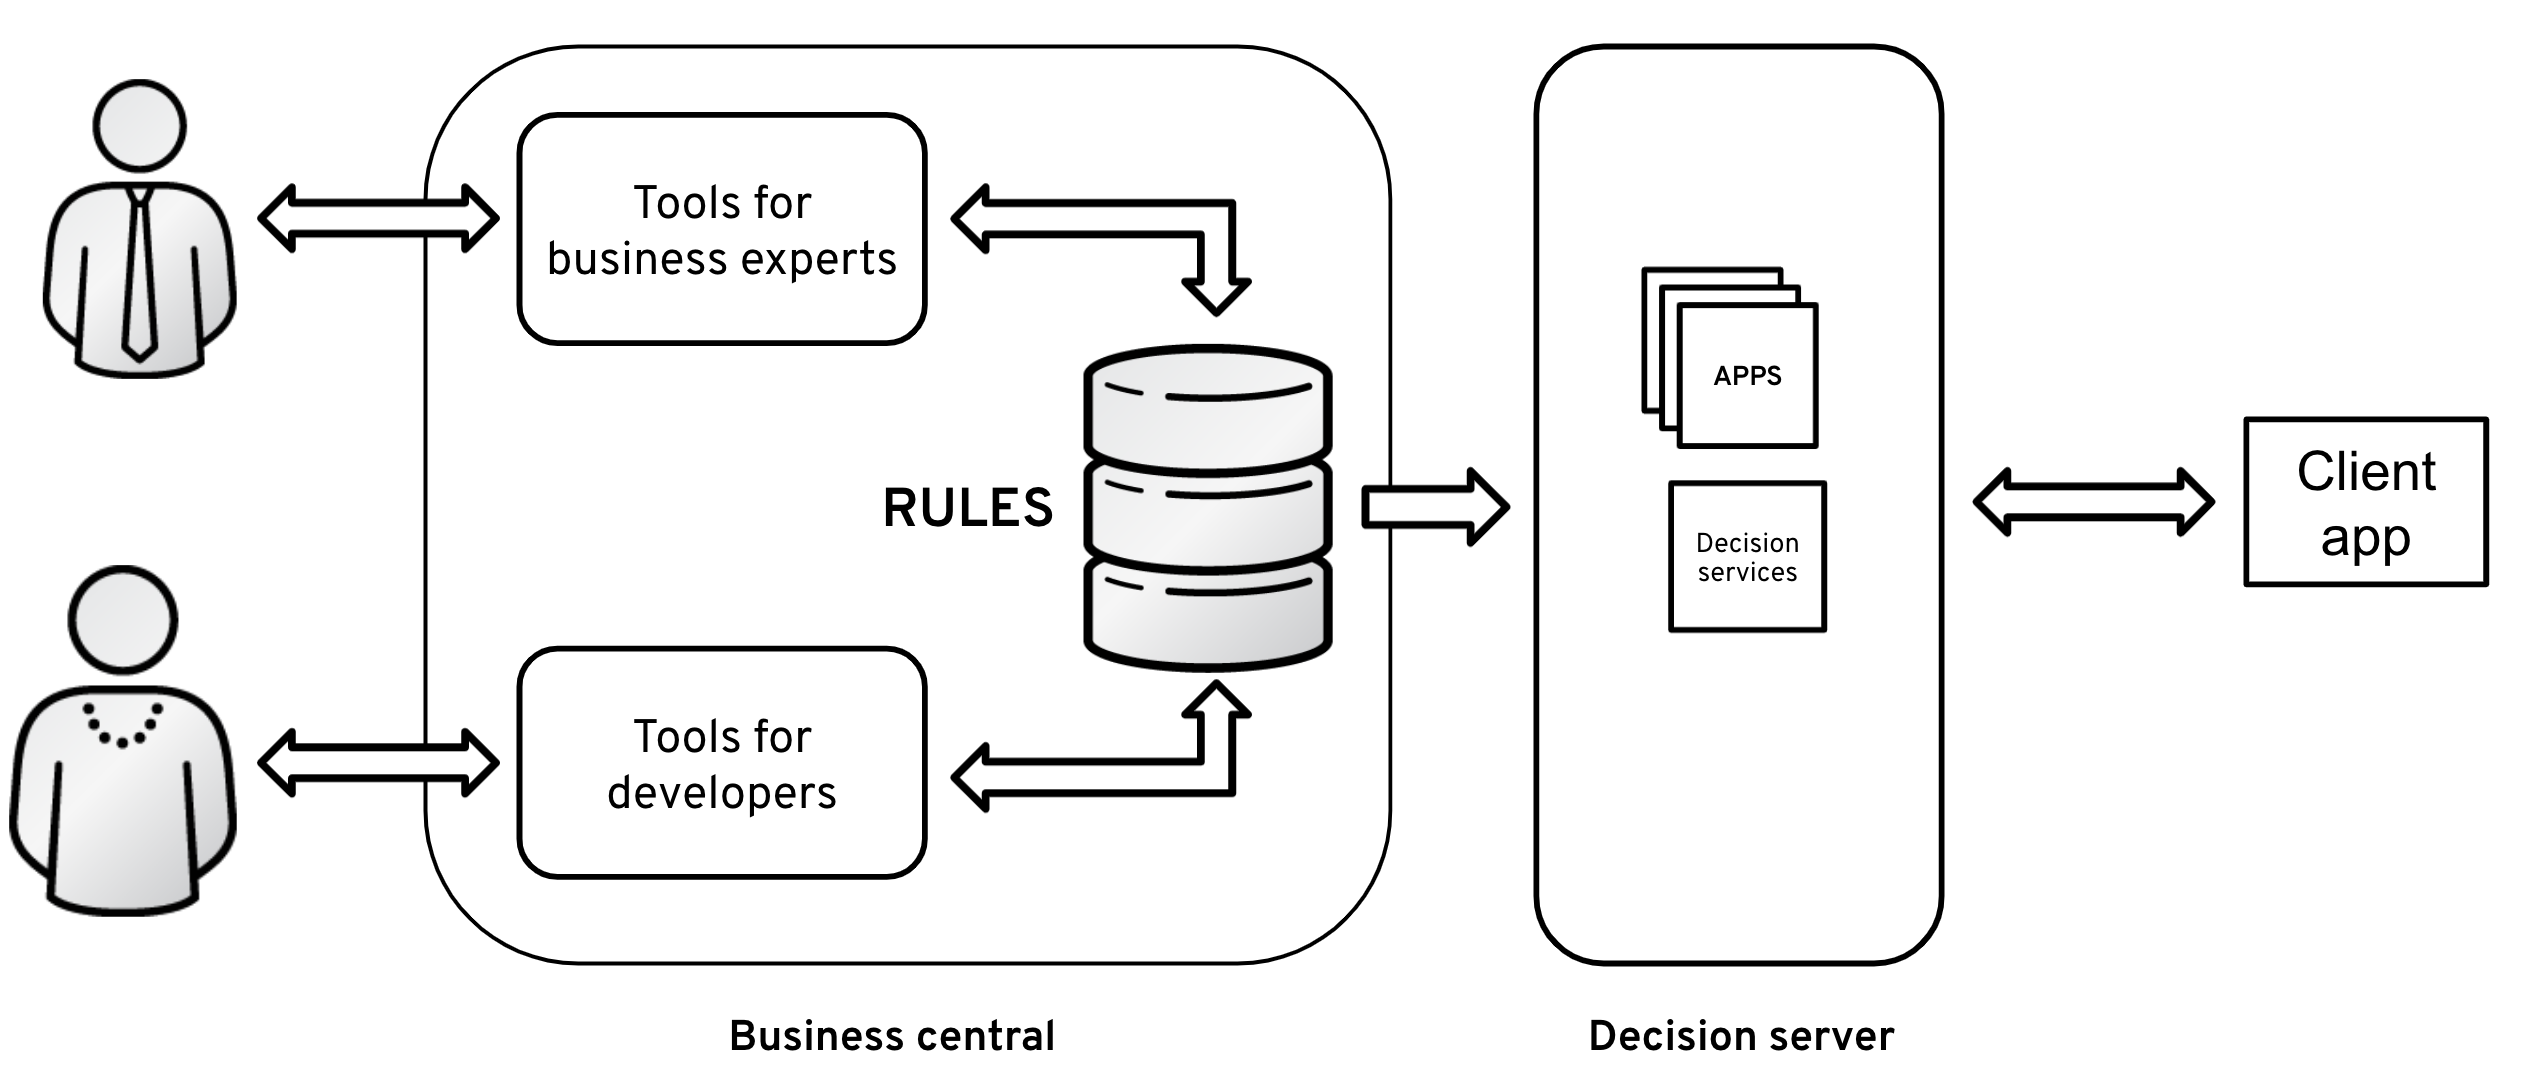
Red Hat Decision Manager is a scalable, open source business rules management system that includes business resource optimization and complex event processing (CEP) technology. Decision Manager helps organizations capture business logic and develop applications that automate business decisions. To achieve these goals, it includes tools for both business experts and developers, as shown in Figure 1.
Decision Manager 7 is a subset of Red Hat Process Automation Manager and is fully compatible with Red Hat OpenShift for deployment in hybrid cloud environments.
Red Hat Decision Manager's two major components are:
- Business Central: Contains components for authoring and management, such as the authoring and repository components. The authoring component helps both application developers and business experts create and manage rules. The repository component is based on Git and is used mainly to store and version business assets.
- Decision Server: The runtime server that hosts business rules. The compiled version from the Business Central component is usually deployed to the Decision Server.
You can host Red Hat Decision Manager on the following platforms:
- Red Hat JBoss Enterprise Application Platform (JBoss EAP)
- Red Hat JBoss Web Server
- Red Hat OpenShift Container Platform
- Oracle WebLogic Server
- IBM WebSphere Application Server
Now you have an overview. Let's get down to business.
Install Decision Manager and the Business Central server
If you have a Red Hat subscription, it is recommended that you download Decision Manager from the Red Hat product downloads site. Otherwise, you can download Decision Manager from Red Hat Developer.
The installation in this example is based on JBoss EAP. The operating system is Red Hat Enterprise Linux (RHEL) 7.
Step 1: Install OpenJDK
Before proceeding with the Red Hat Decision Manager installation, we'll install OpenJDK for RHEL 7. See the Red Hat Decision Manager documentation to learn more about supported configurations.
Enter the following to install the Red Hat build of OpenJDK:
$ sudo yum install java-11-openjdk-develStep 2: Check the installation
Check whether your OpenJDK installation was successful:
$ java -version

openjdk version "11.0.10" 2021-01-19 LTS

OpenJDK Runtime Environment 18.9 (build 11.0.10+9-LTS)

OpenJDK 64-Bit Server VM 18.9 (build 11.0.10+9-LTS, mixed mode, sharing)
Step 3: Create a non-root user
Now, create a non-root user:
$ id -u jboss &>/dev/null || sudo useradd -m -d /home/jboss jbossStep 4: Set up a directory for installing JBoss EAP
Set up your installation directory as follows:
$ sudo -u jboss mkdir -p /opt/redhat/rhdmStep 5: Download and extract JBoss EAP
Next, download JBoss EAP:
$ sudo -u jboss unzip <download-location>/jboss-eap-7.3.x.zip -d /opt/redhat/rhdmNote: It is recommended to install any patches that are present for the version of JBoss EAP that you install.
Step 6: Create a JBOSS_HOME environment variable
To refer to the /opt/redhat/rhdm/jboss-eap-7.3.x directory conveniently, you need to create a JBOSS_HOME environment variable:
$ export JBOSS_HOME=/opt/redhat/rhdm/jboss-eap-7.3.x
$ echo 'export JBOSS_HOME="/opt/redhat/rhdm/jboss-eap-7.3.x"' >> ~/.bashrc
$ source ~/.bashrc
Step 7: Create an admin user in JBoss EAP
Create your admin user as follows:
$ sudo -u jboss $JBOSS_HOME/bin/add-user.sh -a --user bcadmin \
--password changeme --role admin,rest-all,kie-server
Step 8: Install Business Central on JBoss EAP
Unzip and copy the Business Central deployable to your JBoss EAP instance:
$ unzip -qo <download-location>/rhdm-7.11.1-decision-central-eap7-deployable.zip \
-d <download-location>/tmp
$ sudo -u jboss cp -rf <download-location>/tmp/jboss-eap-7.3/* $JBOSS_HOME
Step 9: Deploy the WAR file
Next, create a .dodeploy marker file to deploy the WAR file:
$ sudo -u jboss touch $JBOSS_HOME/standalone/deployments/decision-central.war.dodeployStep 10: Start the JBoss server
Now, you can start the server:
$ sudo -u jboss $JBOSS_HOME/bin/standalone.sh -c standalone-full -b 0.0.0.0Step 11: Verify the installation
Finally, visit http://localhost:8080/decision-central/ and log in using your credentials. For these examples, the credentials are user bcadmin and password changeme.
Note: For non-workstation environments, it is recommended to create a service to start the JBoss EAP instance.
Install the Decision Server
To start this installation, simply repeat Steps 1 through 6 from the Business Central section, replacing Business Central with Decision Server for each step. Once you've done that, you can proceed to the next steps, as follows.
Step 7: Create an admin user in the JBoss EAP instance
Enter the following to create the admin user:
$ sudo -u jboss $JBOSS_HOME/bin/add-user.sh -a --user kieadmin --password changeme --role kie-serverStep 8: Install Decision Server on JBoss EAP
Unzip and copy the Decision Server deployable to the JBoss EAP instance:
$ sudo unzip /<download-location>/rhdm-7.11.1-kie-server-ee8.zip /opt/tmp/Software
$ sudo -u jboss cp -r /<download-location>/kie-server.war/  $JBOSS_HOME/standalone/deployments/
Step 9: Deploy the WAR file
Create a .dodeploy marker file to deploy the WAR file:
$ sudo -u jboss touch $JBOSS_HOME/standalone/deployments/kie-server.war.dodeployStep 10: Register KIE to Business Central
On the KIE/Decision Server, enter the following command:
$ $JBOSS_HOME/bin/jboss-cli.sh

[disconnected /]embed-server --server-config=standalone-full.xml --std-out=echo

[standalone@embedded /] /system-property=org.kie.server.id:add(value=kie-server1)

{"outcome" => "success"}

[standalone@embedded /] /system-property=org.kie.server.controller.user:add(value="bcadmin")

{"outcome" => "success"}

[standalone@embedded /] /system-property=org.kie.server.controller.pwd:add(value="changeme")

{"outcome" => "success"}

[standalone@embedded /] /system-property=org.kie.server.controller:add(value="https://bc-host:8443/decision-central/")

{"outcome" => "success"}

[standalone@embedded /] /system-property=org.kie.server.location:add(value="https://kie-host:8443/kie-server/services/")

{"outcome" => "success"}
Step 11: Connect Business Central and Decision Server
On the Business Central server, enter the following command to accept connections from the Decision Server:
$ $JBOSS_HOME/bin/jboss-cli.sh

[disconnected /]embed-server --server-config=standalone-full.xml --std-out=echo

[standalone@embedded /] /system-property=org.kie.server.user:add(value="kieadmin")

{"outcome" => "success"}

[standalone@embedded /] /system-property=org.kie.server.pwd:add(value="changeme")

{"outcome" => "success"}
Step 12: Restart your servers
As the final step in this section, you can restart the Decision Server and Business Central servers.
Create a self-signed certificate (optional)
If you are using a CA-signed certificate, you can skip this section.
Step 1: Generate a key
To start, generate a key without any password:
$ sudo -u jboss mkdir -p /opt/redhat/ca-cert/
$ cd /opt/redhat/ca-cert/
$ sudo -u jboss cp /etc/pki/ca-trust/extracted/java/cacerts .
$ keytool -genkeypair -alias jboss -keyalg RSA -keystore cacerts -storepass changeit

What is your first and last name?

[Unknown]: com.redhat.pramod.dev

What is the name of your organizational unit?

[Unknown]: consulting

What is the name of your organization?

[Unknown]: Red Hat

What is the name of your City or Locality?

[Unknown]: Sydney

What is the name of your State or Province?

[Unknown]: NSW

What is the two-letter country code for this unit?

[Unknown]: AU

Is CN=com.redhat.pramod.dev, OU=consulting, O=Red Hat, L=Sydney, ST=NSW, C=AU correct?

[no]: yes

Enter key password for <jboss>

(RETURN if same as keystore password):
Step 2: Verify the key
Now, verify the key:
$ keytool -list -keystore cacertsStep 3: Generate a certificate signing request
Enter the following to generate a certificate signing request:
$ keytool -certreq -keyalg RSA -alias jboss -keystore cacerts -file certreq.csrThat's it; you've completed the process to create a self-signed certificate.
Configure HTTPS on both servers
The last step is to configure HTTPS on both the Business Central and Decision Server servers. We'll start with Business Central.
Step 1: Export a certificate
You'll need a certificate from the keystore. Export it as follows:
$ keytool -export -alias jboss -keystore cacerts -file server.crtStep 2: Import the certificate
There are two ways to import the certificate. If you are using the .pfx file, enter the following command:
$ keytool -v -importkeystore -srckeystore client-key.pfx \
-srcstoretype PKCS12 -destkeystore cacerts -deststoretype JKS \
-srcstorepass client-password -deststorepass changeit \
-destalias servercert -srcalias client-key-alias-in-pfx \
-destkeypass changeit
If you are not using the .pfx file, import the signed certificate along with any intermediate certificates:
$ keytool -import -keystore cacerts -alias intermediateCA -file intermediate.ca
$ keytool -import -alias servercert -keystore cacerts -file server.crtNote: Use the servercert alias in the above command.
Step 3: Test the import
Test that your certificates were imported successfully:
$ keytool -list -v -keystore cacerts -storepass changeit | grep servercert -iStep 4: Add your new HTTPS configuration
Now, remove the default HTTPS configuration and add the new one:
$ /core-service=management/security-realm=CertificateRealm:add()
$ /core-service=management/security-realm=CertificateRealm/server-identity=ssl:add(alias="servercert",keystore-password=changeit, keystore-path="/opt/redhat/ca-cert/cacerts")
$ /core-service=management/security-realm=CertificateRealm/authentication=truststore:add(keystore-path="/opt/redhat/ca-cert/cacerts",keystore-password=changeit)
$ /subsystem=undertow/server=default-server/https-listener=https:remove
$ /subsystem=undertow/server=default-server/https-listener=https:add(security-realm=CertificateRealm, secure=true, socket-binding=https,enabled-protocols="TLSv1.1,TLSv1.2")
$ exit
After you've added the HTTP configuration, restart the JBoss EAP server. Then, repeat Steps 1 through 4 for the Decision Server.
Step 5: Validate the certificate on both servers
As the final step in this exercise, you can validate that the certificate is installed correctly on the Business Central and Decision Server servers by visiting their respective websites: https://bc-host:8080 and https://kie-host:8080.
Next steps with Red Hat Decision Manager
If you have reached this point in the exercise, you have successfully installed the certificate in your Decision Manager servers. As a future exercise, we could automate these steps using a tool such as Red Hat Ansible Platform or Terraform.
The following resources can help you make the most of Red Hat Decision Manager:
- Overview of Red Hat Decision Manager
- Datasheet for Red Hat Decision Manager
- Installing and Configuring Red Hat Decision Manager
- Download page for Red Hat Process Automation Manager
