Redhat Developers  Logo
  • Products

    Platforms

    • Red Hat Enterprise Linux
      Red Hat Enterprise Linux Icon
    • Red Hat AI
      Red Hat AI
    • Red Hat OpenShift
      Openshift icon
    • Red Hat Ansible Automation Platform
      Ansible icon
    • View All Red Hat Products

    Featured

    • Red Hat build of OpenJDK
    • Red Hat Developer Hub
    • Red Hat JBoss Enterprise Application Platform
    • Red Hat OpenShift Dev Spaces
    • Red Hat OpenShift Local
    • Red Hat Developer Sandbox

      Try Red Hat products and technologies without setup or configuration fees for 30 days with this shared Openshift and Kubernetes cluster.
    • Try at no cost
  • Technologies

    Featured

    • AI/ML
      AI/ML Icon
    • Linux
      Linux Icon
    • Kubernetes
      Cloud icon
    • Automation
      Automation Icon showing arrows moving in a circle around a gear
    • View All Technologies
    • Programming Languages & Frameworks

      • Java
      • Python
      • JavaScript
    • System Design & Architecture

      • Red Hat architecture and design patterns
      • Microservices
      • Event-Driven Architecture
      • Databases
    • Developer Productivity

      • Developer productivity
      • Developer Tools
      • GitOps
    • Automated Data Processing

      • AI/ML
      • Data Science
      • Apache Kafka on Kubernetes
    • Platform Engineering

      • DevOps
      • DevSecOps
      • Ansible automation for applications and services
    • Secure Development & Architectures

      • Security
      • Secure coding
  • Learn

    Featured

    • Kubernetes & Cloud Native
      Openshift icon
    • Linux
      Rhel icon
    • Automation
      Ansible cloud icon
    • AI/ML
      AI/ML Icon
    • View All Learning Resources

    E-Books

    • GitOps Cookbook
    • Podman in Action
    • Kubernetes Operators
    • The Path to GitOps
    • View All E-books

    Cheat Sheets

    • Linux Commands
    • Bash Commands
    • Git
    • systemd Commands
    • View All Cheat Sheets

    Documentation

    • Product Documentation
    • API Catalog
    • Legacy Documentation
  • Developer Sandbox

    Developer Sandbox

    • Access Red Hat’s products and technologies without setup or configuration, and start developing quicker than ever before with our new, no-cost sandbox environments.
    • Explore Developer Sandbox

    Featured Developer Sandbox activities

    • Get started with your Developer Sandbox
    • OpenShift virtualization and application modernization using the Developer Sandbox
    • Explore all Developer Sandbox activities

    Ready to start developing apps?

    • Try at no cost
  • Blog
  • Events
  • Videos

Testing Farm as GitHub Action: User stories

November 14, 2024
Petr Hracek Jan Macku
Related topics:
Artificial intelligenceAutomation and managementCI/CDContainers
Related products:
Developer ToolsRed Hat Enterprise LinuxRed Hat Enterprise Linux AI

Share:

    This article aims to show the possibilities of Testing Farm as GitHub Action and how to configure it. Testing Farm as GitHub Action is a GitHub Action for executing tests on the Testing Farm Service. You can check out previous articles about this action, such as Schedule tests the GitOps way with Testing Farm as GitHub Action, or Test GitHub projects with GitHub Actions and Testing Farm.

    The prerequisite for this action is to have TMT plans in GitHub or GitLab. For inspiration, look at our repositories on GitHub or GitLab. These repositories are focused on testing apps and stacks containers here.

    Minimal configuration

    The minimal configuration that can be used in the upstream project is as follows:

    name: Testing farm PR triggered tests
    on:
    pull_request_target:
    types: [opened, synchronize, reopened]

    jobs:
    tf:
    runs-on: ubuntu-latest
    permissions:
    contents: read
    pull-requests: write
    statuses: write
    steps:
    - name: Get User Permission
    id: checkAccess
    uses: actions-cool/check-user-permission@v2
    with:
    require: write
    username: ${{ github.triggering_actor }}
    env:
    GITHUB_TOKEN: ${{ secrets.GITHUB_TOKEN }}
    - name: Check User Permission
    if: steps.checkAccess.outputs.require-result == 'false'
    run: |
    echo "${{ github.triggering_actor }} does not have permissions on this repo."
    exit 1
    - name: Check out code
    uses: actions/checkout@v4
    with:
    ref: ${{ github.event.pull_request.head.sha }}
    - name: Schedule test on Testing Farm
    uses: sclorg/testing-farm-as-github-action@v3
    with:
    api_key: ${{ secrets.TF_API_KEY }}
    tmt_plan_regex: smoke
    pull_request_status_name: Smoke test

    This configuration executes tests in the Testing Farm environment. But you do not have any responses in a pull request.

    GitHub status configuration

    The configuration for updating statuses in each pull request looks like this:

    jobs:
    tests:
    runs-on: ubuntu-latest
    steps:
    - name: Schedule test on Testing Farm
    uses: sclorg/testing-farm-as-github-action@v3
    with:
    api_key: ${{ secrets.TF_API_KEY }}
    tmt_plan_regex: "smoke"
    pull_request_status_name: "Some Description"
    update_pull_request_status: "true"

    Once the tests are finished, you will see on the GitHub status window results, as shown in Figure 1.
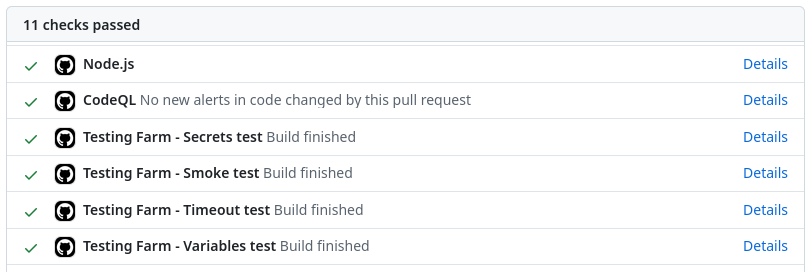
    GitHub status window.
    Figure 1: Example with enabled 'update_pull_request_status'  feature. GitHub status results are seen in status table in each PR.

    Create GitHub comment

    To enable dynamic comments on pull request showing results, use the following configuration:

    jobs:
    tests:
    runs-on: ubuntu-latest
    steps:
    - name: Schedule test on Testing Farm
    uses: sclorg/testing-farm-as-github-action@v3
    with:
    api_key: ${{ secrets.TF_API_KEY }}
    tmt_plan_regex: "smoke"
    pull_request_status_name: "Smoke test"
    create_issue_comment: "true"

    Once the tests are finished you will see the pull request GitHub comment, as shown in Figure 2.
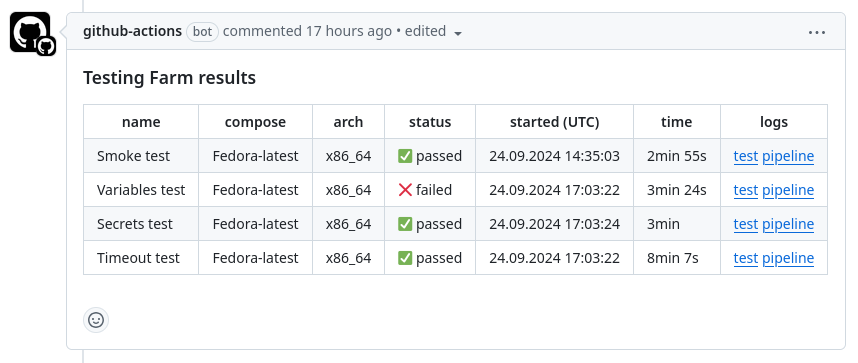
    Pull request in GitHub.
    Figure 2: Example with enabled 'create_issue_comment'. The results are in a table.

    Once the tests are executed again, the corresponding GitHub comment is updated.

    Create GitHub Job summary

    To see more logs, status, and the other information in the GitHub Job summary, use following configuration:

    jobs:
    tests:
    runs-on: ubuntu-latest
    steps:
    - name: Schedule test on Testing Farm
    uses: sclorg/testing-farm-as-github-action@v3
    with:
    api_key: ${{ secrets.TF_API_KEY }}
    tmt_plan_regex: "smoke"
    pull_request_status_name: "Smoke test"
    create_github_summary: "true"

    An example of GitHub Job summary is shown in Figure 3.
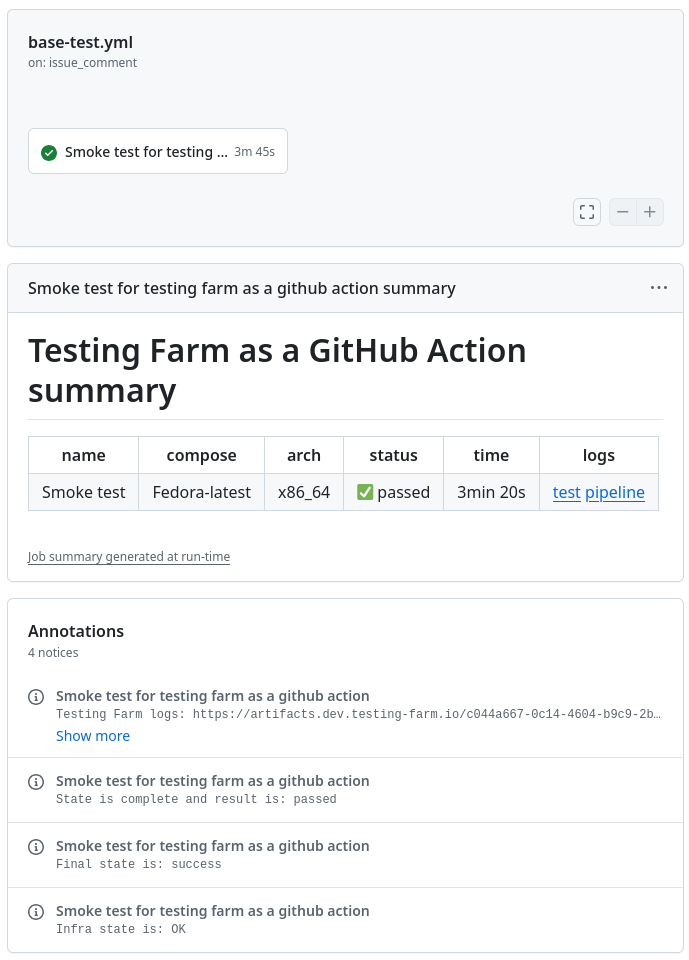
    GitHub Job summary.
    Figure 3: With enabled 'create_github_summary' each job is seen in GitHub action summary.

    GitHub Actions workflow with matrix testing

    To create a matrix job with action, use the following configuration:

    jobs:
    tests:
    runs-on: ubuntu-latest
    strategy:
    fail-fast: false
    matrix:
    os: ["fedora", "c9s", "c10s"]
    include:
    - os: fedora
    context: Fedora
    compose: Fedora-40
    - os: c9s
    context: CentOS Stream 9
    compose: CentOS-Stream-9
    - os: c10s
    context: CentOS Stream 10
    compose: CentOS-Stream-10
    steps:
    - name: Schedule test on Testing Farm
    uses: sclorg/testing-farm-as-github-action@v3
    with:
    api_key: ${{ secrets.TF_API_KEY }}
    tmt_plan_regex: smoke
    pull_request_status_name: ${{ matrix.context }}
    update_pull_request_status: true
    compose: ${{ matrix.compose }}
    variables: ${{ matrix.os }}

    It will spawn a Testing Farm job for each combination in the matrix (Figure 4).
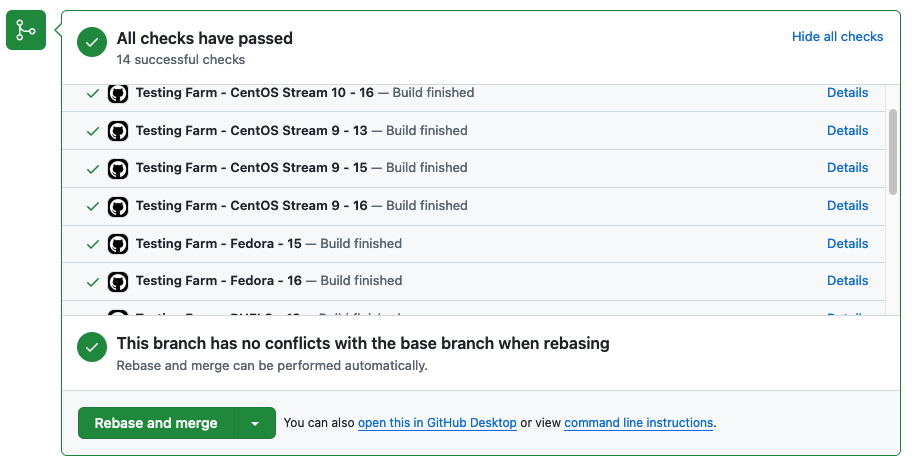
    Required workflows in GitHub status window.
    Figure 4: The example shows all required workflows in GitHub status window.

    Variable ${{ matrix.os }} is delivered to the Testing Farm host machine, where it is accessible for building, tests, and whatever you would like to do. 

    GitHub Action with hardware definition

    To create a matrix job with hardware definition, e.g., for AI systems, use the following configuration:

    jobs:
    tests:
    runs-on: ubuntu-latest
    strategy:
    fail-fast: false
        matrix:
         os: ["fedora", "c9s", "c10s"]
         include:
        - os: fedora
         context: Fedora
         compose: Fedora-40
    tmt_hardware: '{"gpu": {"device-name": "GK210 (Tesla K80)", "vendor-name": "NVIDIA"}}'
        - os: c9s
         context: CentOS Stream 9
         compose: CentOS-Stream-9
    tmt_hardware: “”
        - os: c10s
         context: CentOS Stream 10
         compose: CentOS-Stream-10
    tmt_hardware: “”
    steps:
    - name: Schedule test on Testing Farm
    uses: sclorg/testing-farm-as-github-action@v3
    with:
    api_key: ${{ secrets.TF_API_KEY }}
    tmt_plan_regex: smoke
    pull_request_status_name: ${{ matrix.context }}
    update_pull_request_status: true
    compose: ${{ matrix.compose }}
    variables: ${{ matrix.os }}
    tmt_hardware: "${{ matrix.tmt_hardware }}"

    It will spawn a Testing Farm job with specific hardware. In this case, GPU can be used for AI systems.
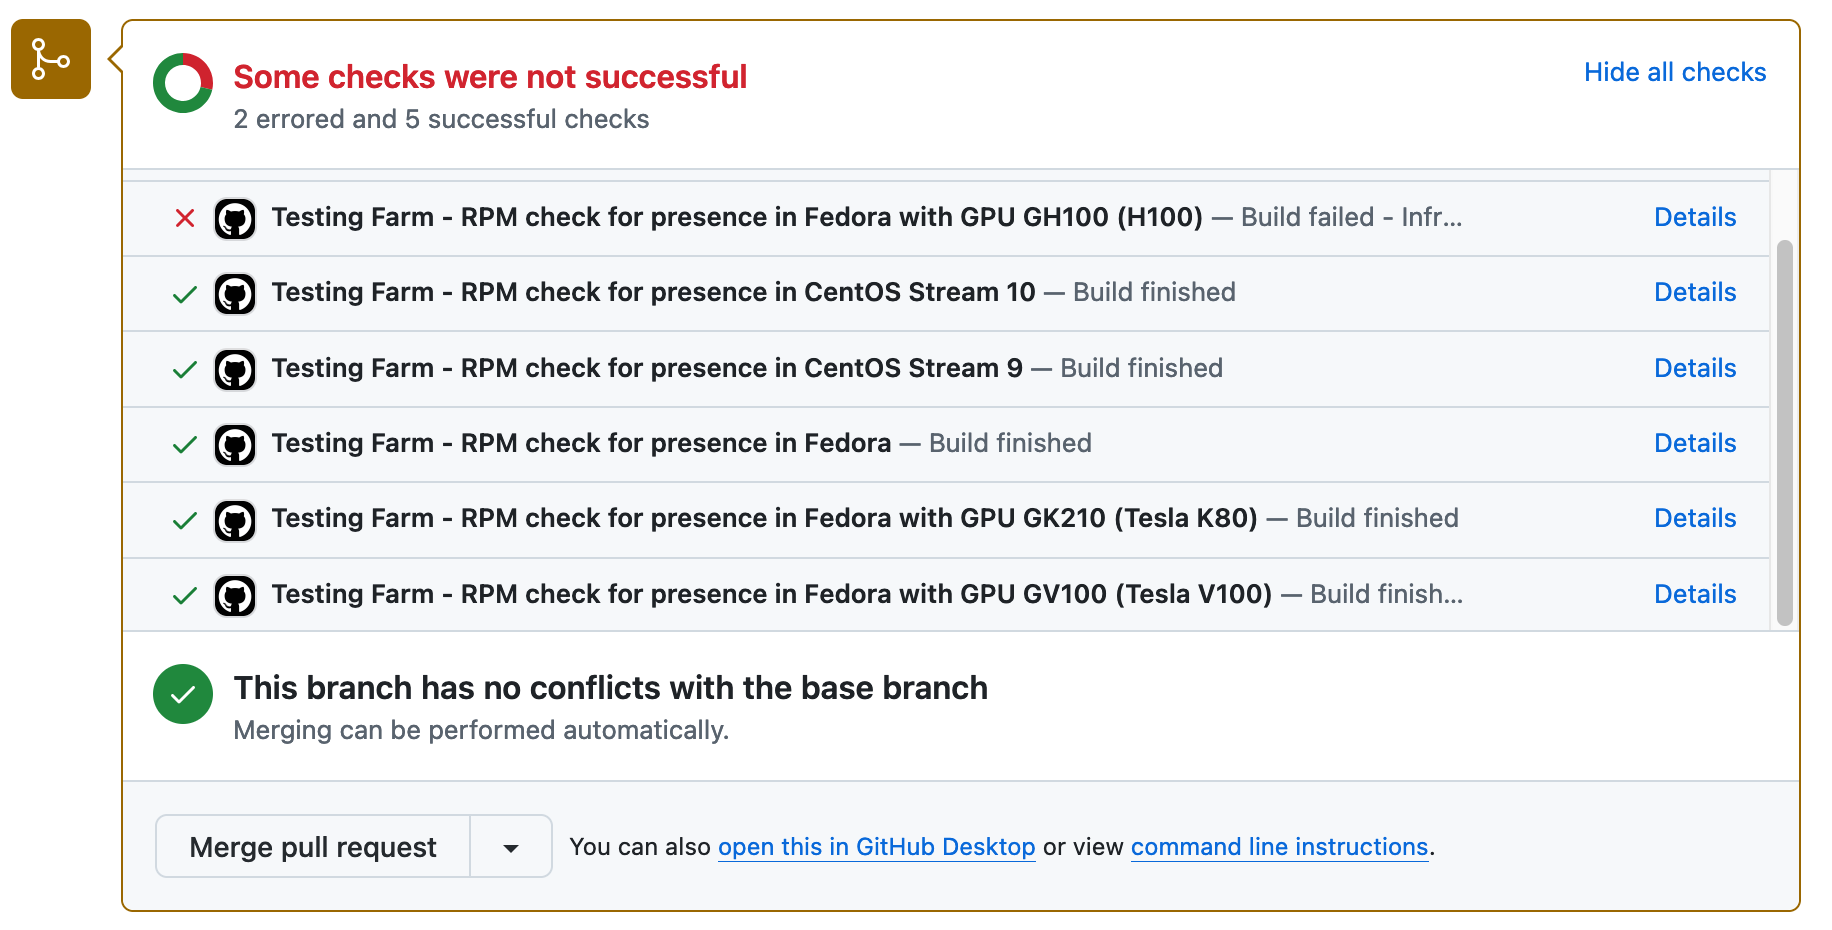
    GitHub status results with check on specific hardware
    Figure 5: The GitHub status results with enabled specific hardware definition. In this example GPU GK210 and GV100.

    Conclusion

    Testing Farm as GitHub Action lets you avoid the tedious work of setting up a testing infrastructure, writing a lot of GitHub Action workflows, and handling PR statuses.

    You can see that the action is widely configured from minimal configuration, over showing results in GitHub status window, and results in a lone table view overview, to a specific hardware configuration—in this case, showing GPUs mainly used for AI host systems.

    Related Posts

    • How Testing Farm makes testing your upstream project easier

    • Test GitHub projects with GitHub Actions and Testing Farm

    • Schedule tests the GitOps way with Testing Farm as GitHub Action

    • Deploy self-hosted GitHub Actions runners for Red Hat OpenShift

    Recent Posts

    • A deep dive into Apache Kafka's KRaft protocol

    • Staying ahead of artificial intelligence threats

    • Strengthen privacy and security with encrypted DNS in RHEL

    • How to enable Ansible Lightspeed intelligent assistant

    • Why some agentic AI developers are moving code from Python to Rust

    What’s up next?

    Configuring systems and applications manually to protect against security threats is time-consuming and requires skilled resources. Automation can help drastically reduce response times and vulnerability. Explore strategies for enhancing your security using automation in this short e-book.

    Get the e-book
    Red Hat Developers logo LinkedIn YouTube Twitter Facebook

    Products

    • Red Hat Enterprise Linux
    • Red Hat OpenShift
    • Red Hat Ansible Automation Platform

    Build

    • Developer Sandbox
    • Developer Tools
    • Interactive Tutorials
    • API Catalog

    Quicklinks

    • Learning Resources
    • E-books
    • Cheat Sheets
    • Blog
    • Events
    • Newsletter

    Communicate

    • About us
    • Contact sales
    • Find a partner
    • Report a website issue
    • Site Status Dashboard
    • Report a security problem

    RED HAT DEVELOPER

    Build here. Go anywhere.

    We serve the builders. The problem solvers who create careers with code.

    Join us if you’re a developer, software engineer, web designer, front-end designer, UX designer, computer scientist, architect, tester, product manager, project manager or team lead.

    Sign me up

    Red Hat legal and privacy links

    • About Red Hat
    • Jobs
    • Events
    • Locations
    • Contact Red Hat
    • Red Hat Blog
    • Inclusion at Red Hat
    • Cool Stuff Store
    • Red Hat Summit
    © 2025 Red Hat

    Red Hat legal and privacy links

    • Privacy statement
    • Terms of use
    • All policies and guidelines
    • Digital accessibility

    Report a website issue