Welcome back to this ongoing series of posts about using Large Language Models(LLMs) with Node.js. In the first post, we took a look at creating and using a LLM chat bot with Node.js. The second post added a feature to help generate an email summarization while also making the data returned from the LLM was a properly structured JSON object
This next post will take a look at improving the chat bot’s results using a paradigm called Retrieval Augmented Generation or RAG.
What is RAG?
Before we start, let's see what this concept is all about. Like most human conversations, how someone responds to a question will depend on the context. If you ask multiple people the same question, you might get different answers depending on that person's context or knowledge. LLMs are really no different, they are trained on a certain set of data and if that data is wrong, or out-dated, then the answers they give might not be what you expected.
One option would be to retrain the LLM, but this is time consuming, and there is also the possibility that we won’t have the ability to do that anyway. This is where Retrieval Augmented Generation or RAG comes in handy.
At a high level the process has 2 main concepts
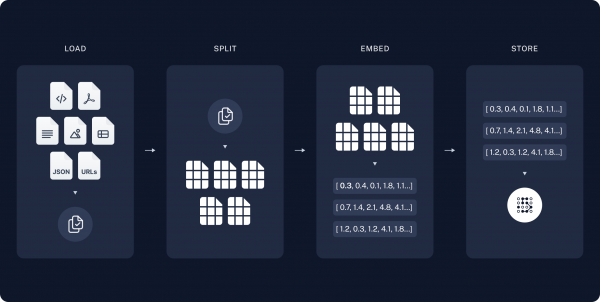
Indexing, which usually happens “offline”. This is where we load and store the extra context. This can be really anything, like pdfs, markdown files or even data scraped from a webpage. These are usually split and stored in some sort of vector data

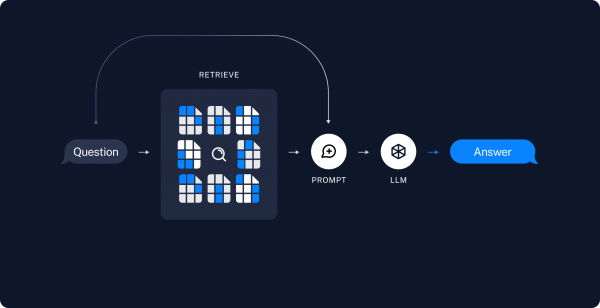
The next concept is Retrieval and Generation. This is where you would find the relevant chunks of data most closely related to your new context. Using only the relevant chunks is important here since you are limited in how much you can add to the prompt. Those bits of data are added to our question prompt to give our model the proper context

Parasol and RAG
If you remember from the first post, the chat bot would reply based on the claims summary that we were providing, but if we wanted to know something like what the rental car policy is, or what Parasols contact information was, our model was not equipped with that knowledge.
This is where the RAG concept comes into play. As mentioned before, retraining our model can be time consuming, and you might not even have access to it anyway, so retraining would be impossible.
For this use case, we have a pdf file that contains policy related information, like the car rental policy as well as the contact information for our fictitious company. This information will be used as the extra context when querying our model.
Prepare the Context
As mentioned above, we need to add our extra context, which in this case is a pdf file, to some type of vector database for later access. In this example, we will be using an in-memory database. These next few steps are usually done “offline”, meaning that they aren’t usually part of the application, but at some point beforehand. Those steps, as outlined in the image in the previous section, are to load the document, split it into chunks, embed with the proper embeddings, then store them into the vector database.
For those that would like to follow along, the code for this functionality can be found in this branch of our application.
Load
Since we are using langchain.js, we can use the PDFLoader class to load our pdf document. This would look something like this:
const loader = new PDFLoader(path.join(__dirname, '../', 'resources', 'policies', 'policy-info.pdf'));

const docs = await loader.load();
Split
The next part is to take those loaded documents and spit them into smaller chunks. This is important for both better indexing and since what we pass to the prompt is limited, this allows us to only get the pieces we need.
const textSplitter = new RecursiveCharacterTextSplitter({
    chunkSize: 200,
    chunkOverlap: 20
  });

const splits = await textSplitter.splitDocuments(docs);
Embed and Store
The last steps once our docs are split is to then generate embeddings for those chunks. I won’t go in depth on embeddings, but this is the process of converting the text we just loaded from our documents into a numerical representation. This is important for getting all our data in a compatible format to perform a better relevancy search. All of that is then stored into a vector database of some kind
In this example we are just using the in-memory store that langchain.js provides
  // Instantiate Embeddings function
  const embeddings = new HuggingFaceTransformersEmbeddings();

  const vectorStore = await MemoryVectorStore.fromDocuments(
    splits,
    embeddings
  );
Use the Context
Once all the setup has been done, and like i mentioned earlier, that part is usually done at some other point, and not usually part of the application, we can use that new knowledge in our prompt so we can get a context aware answer to our question.
Creating the Prompt and Chain
The key to any chatbot is the construction of the prompt and chain that we pass to the model. In this example, we need to add some “context” to our prompt, that will be filled in with the relevant pieces of information from our loaded document.
The full code for the prompt can be found here. Below is a shortened version.
const prompt = ChatPromptTemplate.fromMessages([
    [ 'system',
      'You are a helpful, respectful and honest assistant named "Parasol Assistant".' +
  .....
      'You must answer in 4 sentences or less.' +
      'Don\'t make up policy term limits by yourself' +
      'Context: {context}'
    ],
    [ 'human', '{input}' ]
  ]);
Notice, the {context} parameter, this is where our new context will be injected.
We can use langchain.js here to create a document chain, and yes, that is the actual name of the function createStuffDcouemtnsChain
  const ragChain = await createStuffDocumentsChain({
    llm: model,
    prompt
  });
And then create our retrieval chain based on our document chain and the vector store retriever
const retrievalChain = await createRetrievalChain({
    combineDocsChain: ragChain,
    retriever: vectorStore.asRetriever();
  });
Finally, we can use that newly created chain to ask the question.
const result = await retrievalChain.stream({
    input: createQuestion(question)
  });
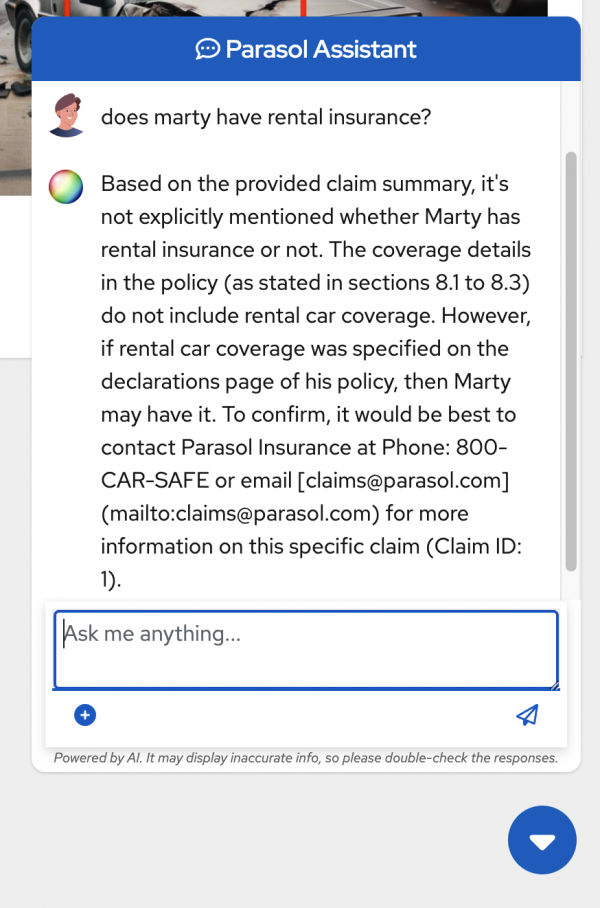
The result returned will be more context aware now.

As we can see, there is information that is referencing the pdf document we loaded. Here is a screenshot of the relevant parts of that document, that our result references:

Conclusion
As you can see, without too much more code, we are able to make our chatbot more context aware without having to retrain it. This is very useful for those industries, who might not feel comfortable training a model with their sensitive data.
Stay tuned for the next post in this series, where we will add some function tooling
As always if you want to learn more about what the Red Hat Node.js team is up to check these out:
https://developers.redhat.com/topics/nodejs
https://developers.redhat.com/topics/nodejs/ai
https://github.com/nodeshift/nodejs-reference-architecture
https://developers.redhat.com/e-books/developers-guide-nodejs-reference-architecture
