I recently needed to run a virtual machine (VM) created using virt-manager outside of libvirt. I was investigating an issue that required running QEMU with the machine option dump-guest-core=on. By default, libvirt runs with that option off, so I decided to set up a standalone QEMU environment. I found the process of configuring the test VM and writing the boot script more involved than expected, so I decided to document the steps I took.
I hope this article makes it easier for you to configure and run your own QEMU-based VM for similar investigations. Note that I do not recommend the approach described here for a VM running in production (at least, not without backup).
Create the test VM
This article assumes that you created a VM with virt-manager or another tool in the libvirt framework. I advise against using a VM that you care about, so we'll start by using virt-manager to create a test VM from scratch. Another option would be to use a clone of an existing VM.
The virtualization host that I used for my investigations was also a VM. If you want to do the same, you'll need to configure your virtualization environment to allow running nested VMs. (Follow the link for instructions for enabling nested virtualization on Fedora.) Running your virtualization host as a VM will make it easier to debug the virtualization host kernel if that is something you need to be able to do.
Step 1: Install a guest OS using virt-manager's New VM wizard
The New VM wizard breaks down installation to five steps:
- Name the guest VM and choose the installation type.
- Locate and configure the installation media.
- Choose memory and CPU settings.
- Configure the virtual machine's storage.
- Configure networking, architecture, and other hardware settings.
I won't describe all the steps in detail because that has been done elsewhere. Instead, I offer the following tips:
- In step 3 of 5, Choose memory and CPU settings, I usually choose the defaults. If you're going for a minimal install, or if your virtualization host doesn't have much memory (RAM), you might decrease the amount of memory from the default value.
- In step 4 of 5, I leave the box labeled Enable storage for this virtual machine checked, but decrease the storage space to 10GB. As noted earlier, my virtualization host is also a VM, and I do not usually allocate more than 60GB of storage for that host. If I want to install several VMs, I need to keep each one relatively small.
- In step 5 of 5, on the Ready to begin the installation screen, check the box labeled Customize configuration before install. This action allows you to configure the chipset and firmware to your liking. As an example, if you want your new VM to boot using UEFI, you can change the Firmware setting from
BIOStoUEFI x86_64: /usr/share/edk2/ovmf/OVMF_CODE.fd. You might also want to change the Chipset setting toQ35(fromi440FX), assuming this value is not already the default.
Note: If you want to change your VM's chipset or firmware, do so before installing the OS.
I also find it useful to note the network interface's MAC address so that I can assign it a suitable name on the system that provides DHCP services.
Step 2: Install the OS
My only advice here is to make sure that you install whatever packages you need for testing purposes. Otherwise, I advise keeping things fairly minimal.
Step 3: Boot and test the OS under virt-manager
Make sure that your newly installed OS boots and that you can log in. If you want to test a particular facility using a standalone QEMU environment, make sure that this facility is also working.
In my case, I made sure that the network device was working and that I could log in via SSH. That way, I could make the VM headless and still log in to see that the setup still worked. In retrospect, this step might have been unnecessary due to turning on options that ultimately provided a console.
Step 4: Reduce the size of the virt-manager configuration
Next, it's time to remove the clutter from the typical virt-manager configuration. Doing this reduces the size of the QEMU command that we have to work with later on.
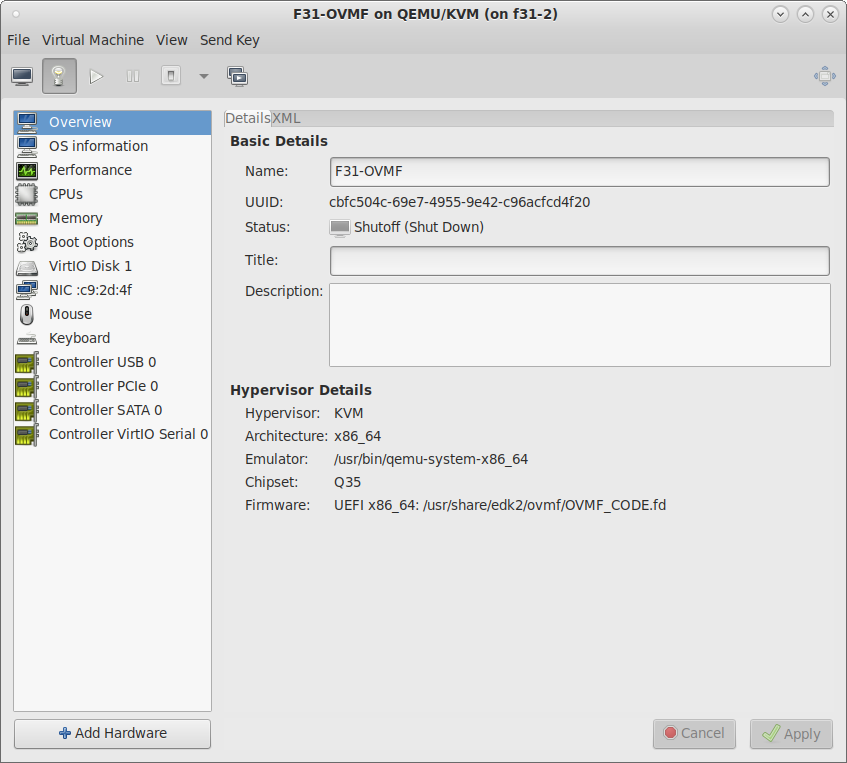
Figure 1 shows the hardware details for a VM that I named F31-OVMF.

I removed the following devices:
- SATA CDROM 1
- Tablet
- Display spice
- Sound ich9
- Serial 1
- Channel qemu-ga
- Channel spice
- Video QXL
- USB Redirector 1
- USB Redirector 2
- RNG /dev/urandom
Note that not all devices can be removed. As an example, I clicked the Remove button on Controller VirtIO Serial 0, but virt-manager added it back.
Figure 2 shows the resulting hardware details for F31-OVMF once I finished removing devices.
Boot the VM again and make sure that it still works. If you made the changes outlined above, the VM will boot headless and you will need to connect to it via SSH. Do not skip this step. You still need to start the VM again in order to write virt-manager's (now reduced) QEMU command to a log file.
Create a boot script from the QEMU command
With the test VM set up, the next thing to do is create the script you will use to start the VM in a standalone QEMU environment. You can use the QEMU command as the basis for your script, but you'll have to make a number of edits first. The biggest hurdle is identifying and removing any file descriptors that reference resources that are unavailable outside of libvirt. Once again, I'll guide you through the steps.
Step 1: Locate the QEMU log file on your virtualization host
Log files for QEMU running under libvirt or virt-manager are found in /var/log/libvirt/qemu. For my VM, this file is named F31-OVMF.log. Locate this file and prepare to open it using your favorite text editor.
Step 2: Copy lines from the log file to your new script
Open the log file and scroll through it until you find the line that looks something like this:
/usr/bin/qemu-system-x86_64 \
Look above this line and identify all the environment variables that are set for running this command. These lines all end with a backslash character (\). In my log file, the first environment variable line starts with LC_ALL=C \.
Copy the lines starting from the first environment variable and ending at the bottom of the file. Paste these lines into a new file, skipping any obvious cruft from the bottom of the log file. This will be the script that you run to start the VM as a standalone QEMU environment, so I suggest naming it something like start-<VM>. I named my file start-F31-OVMF.
This is what my soon-to-be script looks like, so far:
LC_ALL=C \
PATH=/usr/local/sbin:/usr/local/bin:/usr/sbin:/usr/bin \
HOME=/var/lib/libvirt/qemu/domain-3-F31-OVMF \
XDG_DATA_HOME=/var/lib/libvirt/qemu/domain-3-F31-OVMF/.local/share \
XDG_CACHE_HOME=/var/lib/libvirt/qemu/domain-3-F31-OVMF/.cache \
XDG_CONFIG_HOME=/var/lib/libvirt/qemu/domain-3-F31-OVMF/.config \
QEMU_AUDIO_DRV=none \
/usr/bin/qemu-system-x86_64 \
-name guest=F31-OVMF,debug-threads=on \
-S \
-object secret,id=masterKey0,format=raw,file=/var/lib/libvirt/qemu/domain-3-F31-OVMF/master-key.aes \
-machine pc-q35-4.1,accel=kvm,usb=off,vmport=off,dump-guest-core=off \
-cpu EPYC-IBPB,x2apic=on,tsc-deadline=on,hypervisor=on,tsc-adjust=on,arch-capabilities=on,cmp-legacy=on,perfctr-core=on,virt-ssbd=on,rdctl-no=on,skip-l1dfl-vmentry=on,mds-no=on,monitor=off \
-drive file=/usr/share/edk2/ovmf/OVMF_CODE.fd,if=pflash,format=raw,unit=0,readonly=on \
-drive file=/var/lib/libvirt/qemu/nvram/F31-OVMF_VARS.fd,if=pflash,format=raw,unit=1 \
-m 2048 \
-overcommit mem-lock=off \
-smp 2,sockets=2,cores=1,threads=1 \
-uuid cbfc504c-69e7-4955-9e42-c96acfcd4f20 \
-display none \
-no-user-config \
-nodefaults \
-chardev socket,id=charmonitor,fd=37,server,nowait \
-mon chardev=charmonitor,id=monitor,mode=control \
-rtc base=utc,driftfix=slew \
-global kvm-pit.lost_tick_policy=delay \
-no-hpet \
-no-shutdown \
-global ICH9-LPC.disable_s3=1 \
-global ICH9-LPC.disable_s4=1 \
-boot strict=on \
-device pcie-root-port,port=0x10,chassis=1,id=pci.1,bus=pcie.0,multifunction=on,addr=0x2 \
-device pcie-root-port,port=0x11,chassis=2,id=pci.2,bus=pcie.0,addr=0x2.0x1 \
-device pcie-root-port,port=0x12,chassis=3,id=pci.3,bus=pcie.0,addr=0x2.0x2 \
-device pcie-root-port,port=0x13,chassis=4,id=pci.4,bus=pcie.0,addr=0x2.0x3 \
-device pcie-root-port,port=0x14,chassis=5,id=pci.5,bus=pcie.0,addr=0x2.0x4 \
-device pcie-root-port,port=0x15,chassis=6,id=pci.6,bus=pcie.0,addr=0x2.0x5 \
-device pcie-root-port,port=0x16,chassis=7,id=pci.7,bus=pcie.0,addr=0x2.0x6 \
-device qemu-xhci,p2=15,p3=15,id=usb,bus=pci.2,addr=0x0 \
-device virtio-serial-pci,id=virtio-serial0,bus=pci.3,addr=0x0 \
-drive file=/var/lib/libvirt/images/F31-OVMF.qcow2,format=qcow2,if=none,id=drive-virtio-disk0 \
-device virtio-blk-pci,scsi=off,bus=pci.4,addr=0x0,drive=drive-virtio-disk0,id=virtio-disk0,bootindex=1 \
-netdev tap,fd=39,id=hostnet0,vhost=on,vhostfd=40 \
-device virtio-net-pci,netdev=hostnet0,id=net0,mac=52:54:00:c9:2d:4f,bus=pci.1,addr=0x0 \
-device virtio-balloon-pci,id=balloon0,bus=pci.5,addr=0x0 \
-sandbox on,obsolete=deny,elevateprivileges=deny,spawn=deny,resourcecontrol=deny \
-msg timestamp=on
Step 3: Create the shell script
Next, edit this log file into a workable shell script by doing the following:
- Add
#!/bin/shas the file's first line. I also add a blank line after this one, but that's not strictly necessary. - Adjust the environment variable section:
- Remove the backslash (
\) character from the end of each environment variable line. - Place the word
exportfollowed by a space at the beginning of each of these lines. - Add a blank line at the end of this section.
- Remove the backslash (
- Use a leading
#character to comment out theexport PATH=andexport HOME=lines. (It might be possible to disable other lines that set environment variables, but I have not tested doing this.)
The beginning of my script now looks like this:
#!/bin/sh
export LC_ALL=C
#export PATH=/usr/local/sbin:/usr/local/bin:/usr/sbin:/usr/bin
#export HOME=/var/lib/libvirt/qemu/domain-3-F31-OVMF
export XDG_DATA_HOME=/var/lib/libvirt/qemu/domain-3-F31-OVMF/.local/share
export XDG_CACHE_HOME=/var/lib/libvirt/qemu/domain-3-F31-OVMF/.cache
export XDG_CONFIG_HOME=/var/lib/libvirt/qemu/domain-3-F31-OVMF/.config
export QEMU_AUDIO_DRV=none

/usr/bin/qemu-system-x86_64 \
Now scroll down the file and edit the following from the qemu-system-x86_64 command:
- Delete the line starting with
-object secret. - Delete the line starting with
-chardev socket. (This line references a file descriptor that is not accessible outside of thelibvirtenvironment.) - Delete the line starting with
-sandbox. - Delete the line starting with
-mon. - Change the line
-display noneto-display gtk. Make sure you leave the trailing backslash at the end of this line. - Change the
-netdev tapline tonetdev bridge,id=ID, whereIDis the same as theidin the original-netdev tapline. In this case, it'shostnet0, so the line in question changes from:
-netdev tap,fd=39,id=hostnet0,vhost=on,vhostfd=40 \
to:
-netdev bridge,id=hostnet0 \
Note that this change removes another fd= argument from the overall command. Again, this line references a file descriptor that is not available from the standalone environment outside of libvirt.
Also note that, for this change to work, it's necessary to have a bridge named br0 configured on the virtualization host. For a bridge named something else, like br1, use the following instead:
-netdev bridge,id=hostnet0,bridge=br1
Consult the QEMU network options documentation for further information.
You're nearly done editing, but you have a few more options for simplifying the script. First, you can search the file for fd=. Hopefully, there won't be any occurrences, but if there are, you need to figure out how to safely remove these references to file descriptors. You might try deleting the lines in question. If that doesn't work, consult the QEMU documentation.
Second, you could remove the -nodefaults line. (With this line gone, you probably could simplify the script even more, but I've haven't explored that option.)
Now, make the script executable. For my example script, I used:
# chmod a+x start-F31-OVMF
Finally, with all of the edits in place, this is what my script looks like:
#!/bin/sh

export LC_ALL=C
#export PATH=/usr/local/sbin:/usr/local/bin:/usr/sbin:/usr/bin
#export HOME=/var/lib/libvirt/qemu/domain-3-F31-OVMF
export XDG_DATA_HOME=/var/lib/libvirt/qemu/domain-3-F31-OVMF/.local/share
export XDG_CACHE_HOME=/var/lib/libvirt/qemu/domain-3-F31-OVMF/.cache
export XDG_CONFIG_HOME=/var/lib/libvirt/qemu/domain-3-F31-OVMF/.config
export QEMU_AUDIO_DRV=none

/usr/bin/qemu-system-x86_64 \
-name guest=F31-OVMF,debug-threads=on \
-S \
-machine pc-q35-4.1,accel=kvm,usb=off,vmport=off,dump-guest-core=off \
-cpu EPYC-IBPB,x2apic=on,tsc-deadline=on,hypervisor=on,tsc-adjust=on,arch-capabilities=on,cmp-legacy=on,perfctr-core=on,virt-ssbd=on,rdctl-no=on,skip-l1dfl-vmentry=on,mds-no=on,monitor=off \
-drive file=/usr/share/edk2/ovmf/OVMF_CODE.fd,if=pflash,format=raw,unit=0,readonly=on \
-drive file=/var/lib/libvirt/qemu/nvram/F31-OVMF_VARS.fd,if=pflash,format=raw,unit=1 \
-m 2048 \
-overcommit mem-lock=off \
-smp 2,sockets=2,cores=1,threads=1 \
-uuid cbfc504c-69e7-4955-9e42-c96acfcd4f20 \
-display gtk \
-no-user-config \
-rtc base=utc,driftfix=slew \
-global kvm-pit.lost_tick_policy=delay \
-no-hpet \
-no-shutdown \
-global ICH9-LPC.disable_s3=1 \
-global ICH9-LPC.disable_s4=1 \
-boot strict=on \
-device pcie-root-port,port=0x10,chassis=1,id=pci.1,bus=pcie.0,multifunction=on,addr=0x2 \
-device pcie-root-port,port=0x11,chassis=2,id=pci.2,bus=pcie.0,addr=0x2.0x1 \
-device pcie-root-port,port=0x12,chassis=3,id=pci.3,bus=pcie.0,addr=0x2.0x2 \
-device pcie-root-port,port=0x13,chassis=4,id=pci.4,bus=pcie.0,addr=0x2.0x3 \
-device pcie-root-port,port=0x14,chassis=5,id=pci.5,bus=pcie.0,addr=0x2.0x4 \
-device pcie-root-port,port=0x15,chassis=6,id=pci.6,bus=pcie.0,addr=0x2.0x5 \
-device pcie-root-port,port=0x16,chassis=7,id=pci.7,bus=pcie.0,addr=0x2.0x6 \
-device qemu-xhci,p2=15,p3=15,id=usb,bus=pci.2,addr=0x0 \
-device virtio-serial-pci,id=virtio-serial0,bus=pci.3,addr=0x0 \
-drive file=/var/lib/libvirt/images/F31-OVMF.qcow2,format=qcow2,if=none,id=drive-virtio-disk0 \
-device virtio-blk-pci,scsi=off,bus=pci.4,addr=0x0,drive=drive-virtio-disk0,id=virtio-disk0,bootindex=1 \
-netdev bridge,id=hostnet0 \
-device virtio-net-pci,netdev=hostnet0,id=net0,mac=52:54:00:c9:2d:4f,bus=pci.1,addr=0x0 \
-device virtio-balloon-pci,id=balloon0,bus=pci.5,addr=0x0 \
-msg timestamp=on
Step 4: Run the VM using your newly created script
As root, run your new script. I ran mine as follows:
[root@f31-2 ~]# ./start-F31-OVMF
If it works, a window similar to Figure 3 pops up.

Select Machine -> Pause to cancel the pause and continue the boot process. At this point, the machine should boot and, ultimately, you should see a login prompt as shown in Figure 4.

Log in and make sure that the VM functions as expected.
Conclusion
You should now have a workable script for booting your VM in a standalone QEMU environment. The next steps depend on your use case. In my case, I modified the dump-guest-core option, changing the value from off to on, and then proceeded with my investigations.