Nowadays technology companies are adopting the API as one of the most valuable pieces of their business.
What does it mean when we talk about API-first development? We already know the benefits of using an API-first approach:
- Reduced interdependencies
- Earlier validation
- Early feedback with the freedom to change
- Improved efficiency
This article describes what it means to use the API-first design approach. It also walks through an example of using this approach with the OpenAPI Specification and with oas-tools as the Node.js back-end application, which enables you to care only about the business logic. All the validation of incoming requests are done by the oas-tools library (based on the OpenAPI Specification file provided).
What does "API-first approach" mean?
With the API-first approach, designing the API is the first priority before writing any code. Design of the API involves thorough thinking and planning through collaboration with different stakeholders. This result in high-level documentation describing the intent of the API.
This API contract acts as a central draft keeping all your team members aligned on what your API’s objectives are and how your API’s resources are exposed. The finalization of the contract allows the team to build the interface of the application.
After this, the cross-functional teams rely on this interface to build the rest of the application independent of each other. For example, the back-end developer starts building out the implementation logic behind the API, the front-end developer starts working on different front-end applications, and quality testers start writing tests for the exposed interface.
Choose an API specification
The first step is to choose an API specification. API specification is a term that is often used interchangeably with API definition. While these terms have many similarities, they are different entities.
An API specification provides a broad understanding of how an API behaves and how the API links with other APIs. It explains how the API functions and the results to expect when using the API.
There are several API specification options:
We need to choose the one that makes our work easier and supports the languages that we are going to use.
For this article, I am going to show how to use the API-first approach using the OpenAPI Specification 3.0.0 and using oas-tools for our Node.js application.
Define the API using OpenAPI 3.0
Before we start coding, we need to create the API that is going to be used by our developers.
This is our final API definition file:
openapi: 3.0.0
info:
 title: Hello World API
 description: This is our Hello World API.
 version: '1.0'
paths:
 /hello:
   post:
     x-swagger-router-controller: helloWorldRoute
     operationId: helloWorldPost
     tags:
       - /hello
     description: >-

       Returns Hello world message.
     parameters:
       - name: greeting
         in: query
         description: Name of greeting
         required: true
         schema:
           type: string
     responses:
       '200':
         description: Successful request.
         content:
           application/json:
             schema:
               $ref: '#/components/schemas/Hello'
       default:
         description: Invalid request.
         content:
           application/json:
             schema:
               $ref: '#/components/schemas/Error'
   get:
     x-swagger-router-controller: helloWorldRoute
     operationId: helloWorldGet
     tags:
       - /hello
     description: >-
       Returns Hello world message
     parameters:
       - name: greeting
         in: query
         description: Name of greeting
         required: true
         schema:
           type: string
     responses:
       '200':
         description: Successful request.
         content:
           application/json:
             schema:
               $ref: '#/components/schemas/Hello'
       default:
         description: Invalid request.
         content:
           application/json:
             schema:
               $ref: '#/components/schemas/Error'
servers:
 - url: '/api'
components:
 schemas:
   Hello:
     properties:
       msg:
         type: string
     required:
       - msg
   Error:
     properties:
       message:
         type: string
     required:
       - message
Let's decompose it to have a better understanding:
openapi: 3.0.0defines the version of the OpenAPI Specification that we are going to use.infoprovides extra information about the API, such as a description, title, and the current version.serversprovides a list of servers and the base path for the API.pathsspecifies application endpoints. As you can see, we have one path located at/helloand then we define two REST operations:getandpost.
Let's look at the post operation:
paths:
/hellois the endpoint.post:is the operation type.x-swagger-router-controller: helloWorldRoute: We will cover it later; annotations foroas-tools.operationId: helloWorldPost: We will cover it later; annotations foroas-tools.
tags:
- /hello: Used for logical grouping.description: Description of the endpoint.
parameters: Parameters required or allowed for the endpoint.
- name: greeting: Name of the parameter.in: query: Defines where the parameter is located (query, body, etc.)description: Name of greeting: Description of the parameter.required: true: Specifies whether the parameter is required or optional.schema: Type of the parameter (boolean, number, string, etc.)type:string: Specifies a string parameter.
responses: What we are expecting as a result of the call.
-
'200': Specifies the 200 status response; we can add the ones that we need, for example, 401 if the user is not authorized, etc.description: Successful request.: Description of the response.content:: Content of the 200 status code response.application/json:: Content type returned by 200 status response.schema:: Type of object returned.$ref: '#/components/schemas/Hello': Hello object returned, which is composed of themsgproperty.default:: Default response.description:: Description of the default response.content:: Content of the default response.application/json:: Content type returned by the default response.schema:: Type of object returned by the default response.$ref: '#/components/schemas/Error': Error object returned by the default response.
Looking at the specification, we should be able to call it by using the following URL: GET <serverUrl>/api/hello?greeting=redhat.
Now that we have the API definition completed, what can we use to increase our development speed? For the Node.js back-end app, we are going to use oas-tools.
Node.js back-end development
oas-tools is a Node.js module for managing RESTful APIs defined with OpenAPI specs over Express servers. Automatically it’s going to check if an incoming request matches our definition, and it will reject it if it doesn’t satisfy our requirements. The result? Less coding time, all the validations are managed by oas-tools, and we need to care only about the business logic.
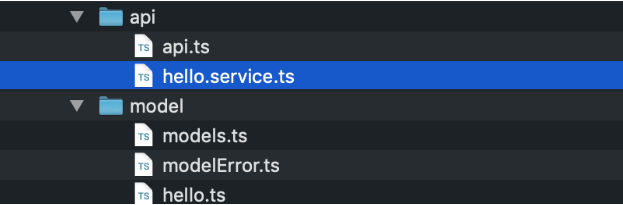
I have created a project that has all the required steps and integrations done. Looking into it, we are going to cover the different pieces needed to make it work. You can find the project can at github.com/rhappdev/nodejs-template.
There are two branches:
master: Using the OpenAPI 2.x specopenapi3: Using the OpenAPI 3.0.0 spec
We are going to cover OpenAPI 3.0, but the two are nearly the same.
The example is a Node.js + Express + oas-tools using TypeScript as the base programming language.
Here are the main commands you can use:
- Transpile to TypeScript:
npm run build:live. - Run TypeScript application:
npm run dev. - Run transpiled application:
npm start. - Run tests:
npm run test.
Initialize the oas-tools middleware
The following setup is required to initialize the middleware, which is located at src/middlewares/swagger.ts:
const swaggerDoc = loadDocumentSync(basePath + "/definition/swagger.yaml");
   const options = {
       controllers: basePath + "/routes",
       loglevel: "debug",
       strict: true,
       validator: true,
       docs: {
           apiDocs: "/api-docs",
           apiDocsPrefix: "",
           swaggerUi: "/docs",
           swaggerUiPrefix: ""
       }
   };
   swaggerTools.configure(options);
   swaggerTools.initialize(swaggerDoc, app, function() {
       cb();
   });
swaggerDoc: Contains the location of the OpenAPI Specification file.options: Specifies the configuration.controllers: Location of the route controllers.loglevel: By defining a log level, you can categorize the logs and the amount of information that is going to appear.strict: Indicates whether validation must stop the request process if errors were found when validating according to the specification file.validator: Indicates whether validator middleware should be used.docs: Shows theswagger-uiinterface, which is located at/docsendpoint, to visualize and interact with the API’s resources without having any of the implementation logic in place. It’s automatically generated from your OpenAPI Specification.
swaggerTools.configure: Sets up the custom configuration.swaggerTools.initialize: Initializes the middleware.
Add special annotations
oas-tools required special annotations to define the router controller and the operationId to be used. As you saw in the .yaml file, we have the following annotations:
paths:
 /hello:
   post:
     x-swagger-router-controller: helloWorldRoute
     operationId: helloWorldPost
x-swagger-router-controller specifies the name of the controller file associated with the /hello path. helloWorldRoute, exports two routes:
export const helloWorldGet = Router().use("/", asyncHandler(getHelloWorld, "helloWorldGet"));export const helloWorldPost = Router().use("/", asyncHandler(getHelloWorld, "helloWorldPost"));
helloWorldGet and helloWorldPost need to be added as operationId’s.
Implement the business logic
Now that we have done all the required setup to validate the request and to ensure that it matches our specification, let’s define the business logic, as you can see src/controllers/hello contains the following:
export async function getHelloWorld(req: Request, res: Response): P<any> {
   const greeting =
   req.swagger.params && req.swagger.params.greeting.value ? req.swagger.params.greeting.value : "World";
   debug.log("Greeting: ", greeting);
   res.send({"msg": "hello " + greeting} as Hello);
}
oas-tools provides the parameters inside the req.swagger property. The previous code gets the parameters and returns the Hello object with the msg property, as we defined in the spec.
Run the application and check it
Type npm run dev and see how oas-tools is initialized, which checks if the controllers and routes are defined:
2018-12-12T16:34:24.498Z info: Valid specification file
2018-12-12T16:34:24.505Z info: Specification file dereferenced
2018-12-12T16:34:24.506Z debug: Register: POST - /hello
2018-12-12T16:34:24.506Z debug:   POST - /hello
2018-12-12T16:34:24.506Z debug:     OAS-doc has x-swagger-router-controller property
2018-12-12T16:34:24.748Z debug:       Controller for POST - /hello: OK
2018-12-12T16:34:24.753Z debug: Register: GET - /hello
2018-12-12T16:34:24.753Z debug:   GET - /hello
2018-12-12T16:34:24.753Z debug:     OAS-doc has x-swagger-router-controller property
2018-12-12T16:34:24.753Z debug:       Controller for GET - /hello: OK
Once the service is up and running, we can create two curl requests to check if oas-tools does the required job.
- GET request with
greetingparameter is OK
Request:curl -X GET "http://localhost:8001/api/hello?greeting=redhat" -H "accept: application/json"
Response:
{ "msg": "hello redhat" } - GET request without greeting parameter fails
Request:curl -X GET "http://localhost:8001/api/hello" -H "accept: application/json"
Response:
[{"message":"Missing parameter greeting in query. "}]
As you can see, with this easy example. You only need to focus on the business logic. The oas-tools middleware checks the incoming request against the API specification.
Extras
In addition, if you are working on a client app, there are code generators for many languages, which means that you don’t need to generate the required classes if you want to call to the back end:
The tool that does this for us is at github.com/swagger-api/swagger-codegen.git.
Note: Use tag 3.0.0 for OpenAPI version 3 and tag master for version 2.x.
First of all, download the tool and type the following:
mvn clean package
java -jar modules/swagger-codegen-cli/target/swagger-codegen-cli.jar generate -i <yaml DefinitionFileLocation>.yaml -l typescript-angular -o test
By running this command, we are able to generate the required classes for any programming language that is supported by the swagger-codegen-cli tool. The above command generates the classes for Angular projects.
Many available languages are supported: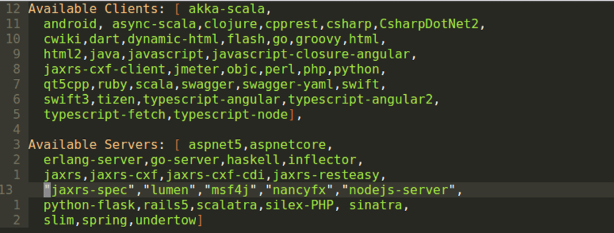
Conclusion
In this article, we have seen how we can set up a Node.js microservice by generating first the API Specification file and focusing only on developing the business logic. All the validation of the API will be managed by oas-tools, and as a result, we will save development time.
Other resources
Here are other articles on the Red Hat Developer blog about related topics:
Last updated: January 12, 2024