OpenShift and Kubernetes do a great job of working to make sure calls to your microservice are routed to the correct pods. After all, that's one of the raison d'être for Kubernetes: routing and load balancing. What if, however, you want to customize the routing? What if you want to run two versions at the same time? How do Istio Route Rules handle this?
[This is part two of my ten-week Introduction to Istio Service Mesh series. My previous article was Part 1: Introduction to Istio; It Makes a Mesh of Things. Want to see this in a video? Check out the video edition here.]
Route rules are, well, rules that determine routing. While the possible configurations can get quite complicated, the overall functionality remains simple: route the request based on certain parameters and HTTP header values. Let's look at some examples.
Kubernetes Default: 50/50 Split
This example allows you to use two versions of a microservice. Let's call them "v1" and "v2", running in OpenShift. With each running in its own Kubernetes-managed pod, the default behavior is an evenly balanced, round robin routing. Each pod will receive a percentage of requests based on its number of microservice instances, or replicas. With Istio we can change that balance.
For this example, we have two deployments of our "recommendation" service running in OpenShift, named "recommendation-v1" and "recommendation-v2".
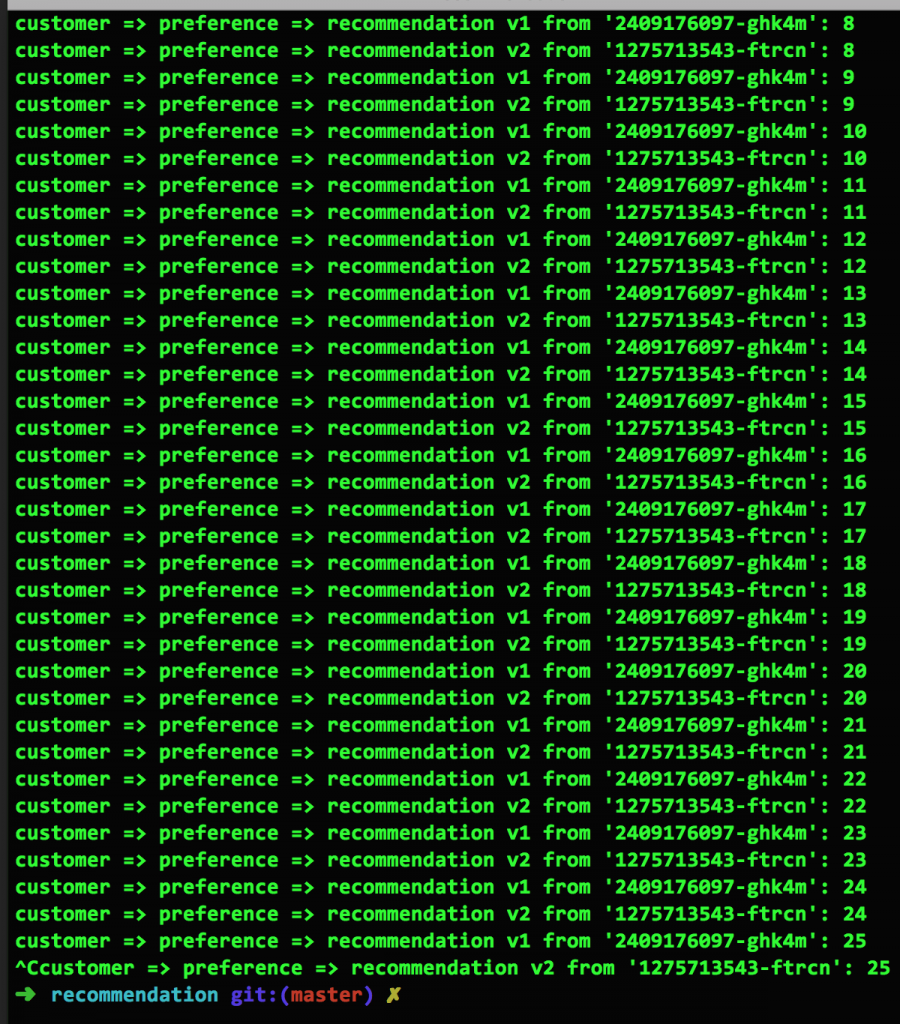
In Figure 1, we see the results of each service running one instance of their respective microservices with an even distribution between them. Looking at the screen capture, you can clearly see the 1--2-1-2-... pattern. This is the default routing from Kubernetes:
Multiple Versions, Weighted Distribution
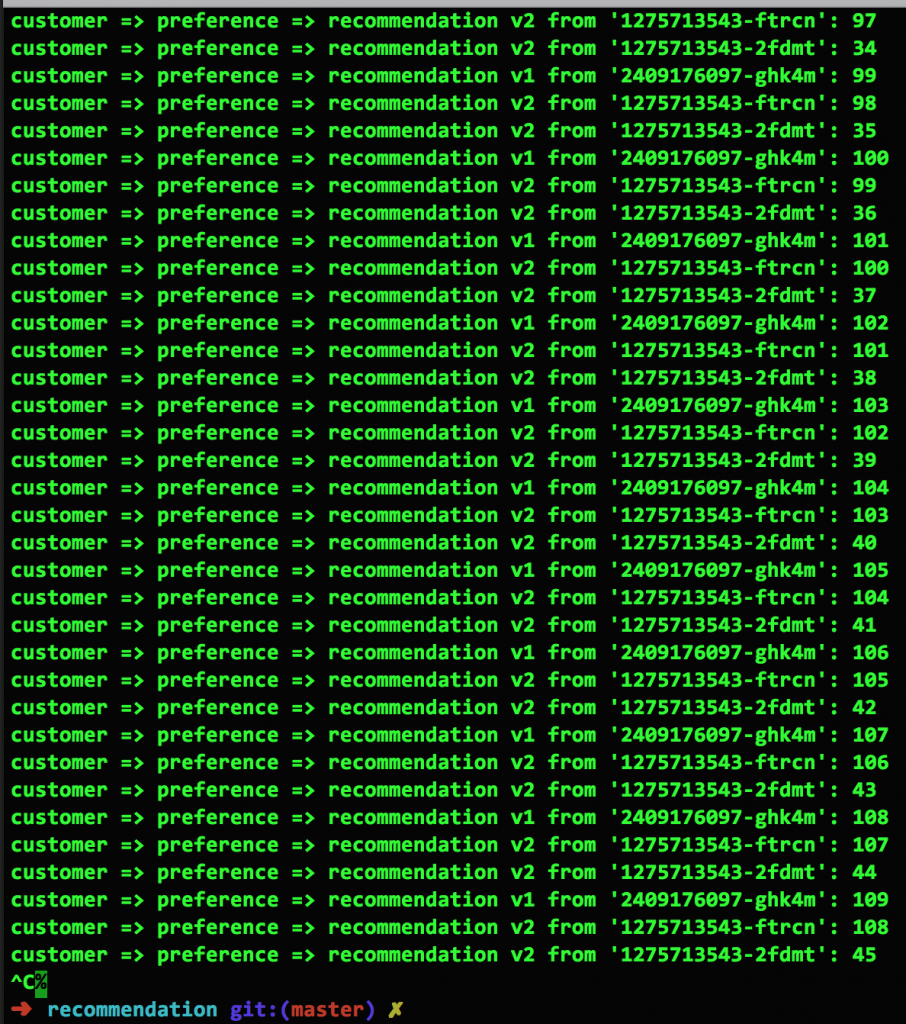
In Figure 2, we see the results after increasing the number of v2 replicas to two (the command is oc scale --replicas=2 deployment/recommendation-v2). As you would expect, the mix is now 1/3 for v1, 2/3 for v2. The 1-2-2-1-2-2-... pattern is obvious:
Ignoring a Version with Istio
Using Istio, we can alter this distribution just about any way we please. For example, we can direct all traffic to recommendation-v1 using the following Istio yaml file:
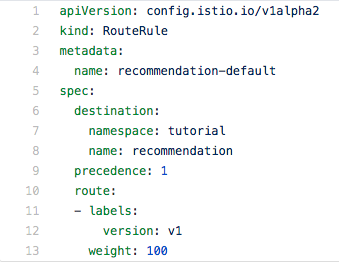
Here are some things to notice. The pods are selected by using their labels. In this example, the "v1" label is being used. The weight is 100; meaning 100% of the traffic will be routed to all recommendation pods with the v1 label.
Uneven Version Split (Canary Deployment)
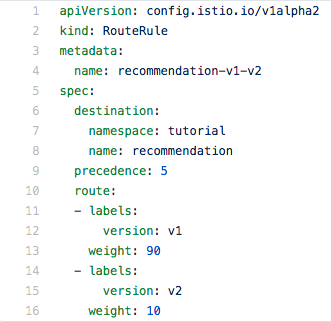
Next, using the weight parameter, we can direct traffic to both pods without regard to the number of microservice instances running in each. For example, here we are directing 90% of the traffic to v1 and 10% percent to v2:
Mobile Users Only
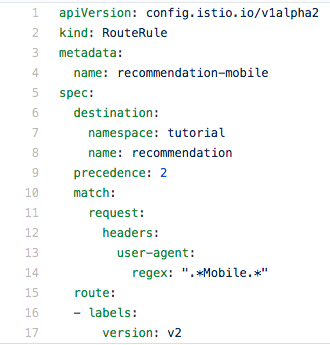
For our final example, we'll route mobile users to v2, while everyone else is directed to v1. This is done by using a regular expression to choose the client based on the user-agent value in the request header.
What Can You Do?
Seeing this example of using a regular expression to select a request based on information in the header should get the creative wheels turning. The power is unlimited, given that you can inject header values in to your source code.
Ops, not Dev
Keep in mind, all of this is happening without any changes to your code; excepting of course, the unique case where you inject values into the request header. Developers will benefit from the knowledge of Istio and will undoubtedly use it in developmental testing. In production, Istio configuration will most likely be a function of the operations team.
I cannot stress this enough: there are no changes to your source code. You do not need to build a new image or start a new container. This all happens outside of your source code.
Let Your Mind Wander
Because you can use regular expressions against the request header, just imagine how powerful that is. Want to direct your biggest customer to a special version of your microservice? How about those that use the Google Chrome browser? Pretty much any characteristic you want can be used to direct traffic.
Try It for Yourself, for Free
Reading about Istio, Kubernetes and OpenShift is one thing, but wouldn't you rather give it a try for yourself? The Red Hat Developer Program team has put together a detailed and thorough tutorial that you can use immediately to jump into these leading technologies. It's open source, so there's no cost. It works on macOS, Linux and Windows, with source code in Java or node.js (with more languages coming soon). Point your browser to the Red Hat Developer Demo github repo and get started today.
Next: Gracefully Handling Problems
This is the power of Istio Route Rules. Now imagine if you could use this power to handle errors. That will be covered in our next blog post.
Stay tuned!
All articles in the "Introduction to Istio" series:
- Part 1: Introduction to Istio Service Mesh
- Part 2: Istio Route Rules: Telling Service Requests Where to Go
- Part 3: Istio Circuit Breaker: How to Handle (Pool) Ejection
- Part 4: Istio Circuit Breaker: When Failure Is an Option
- Part 5: Istio Tracing & Monitoring: Where Are You and How Fast Are You Going?
- Part 6: Istio Chaos Engineering: I Meant to Do That
- Part 7: Istio Dark Launch: Secret Services
- Part 8: Istio Smart Canary Launch: Easing into Production
- Part 9: Istio Egress: Exit Through the Gift Shop
- Part 10: Istio Service Mesh Blog Series Recap
