 Cross language development in one project
In this tutorial style article I'll discuss how to configure Eclipse for Java Native Interface (JNI) development based on a sample project that you can copy and modify. I.e, you can have a single project that can be both Java and C at the same time, and support a full code navigation and debugging of both languages.
This article is focused on the configuration of Eclipse rather than explaining JNI itself, however there are links to JNI literature at the end.
Introduction
JNI is useful in many situations, for example if your Java applications needs to interface with a native C library. An example of this is Eclipse's own interface, which on Linux is drawn by a native C library "GTK", thus the native Linux look. Further, sometimes you may have custom 'C' code in your Java applications. Developing, and especially debugging this custom code can be difficult and cumbersome, but it doesn't have to.
In this tutorial I will provide a sample project that I glued together based on various tutorials (see further readings) and explain each of the components. This combined with the JNI literature and other tutorials listed at the bottom of this article should help you getting started with JNI development.
Please post comments if you have questions/feedback.
I shall assume you have some familiarity with the following:
- Java
- C
- GCC (Tutorial)
- makefiles (Tutorial 1, Tutorial 2, Tutorial 3, and quick reference)
- You don't need to have JNI knowledge as this project can be used to learn about JNI, but reading introduction chapters 1 and 2 from the book first would help you a lot.
- Eclipse basics
- Eclipse for Java development (Tutorial)
- Eclipse for C development (See 'getting started' from User Guide)
You require the following packages for JNI development:
- Java Development tools (JDK as oppose to JRE)
- dnf install java-1.8.0-openjdk.x86_64
- dnf install java-1.8.0-openjdk-devel.x86_64 # contains jni.h
- dnf install java-1.8.0-openjdk-src.x86_64 # useful to view Java source code
- dnf install java-1.8.0-openjdk-debuginfo.x86_64 # for C debugging.
- C Development tools
- dnf install groups install "C Development Tools and Libraries"
- Eclipse with C and Java
- Eclipse comes in packages designed for certain languages. But you can add additional languages via plugin installation.
- You can install the "Eclipse for Java development" and from the market place install the "CDT" plugin (Tutorial).
Quick start
You can download sample project (or follow newest master), import it into your Eclipse and do the following:
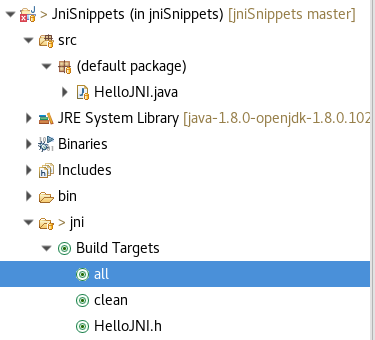
- In the "jni" folder, you should see 'C' "Build Targets". Run "all",

or from the command line:cd jni make all - This should produce HelloJNI.h and libhello.so
- in the 'Src' java package, right click on HelloJNI.java and click on "Run as -> Java application" (You will see an error in the console saying "java.lang.UnsatisfiedLinkError: no hello in java.library.path...")
- Edit the newly created run configuration (Run -> Run Configurations -> HelloJNI), go to "Arguments tab and under "VM arguments" add: -Djava.library.path=jni
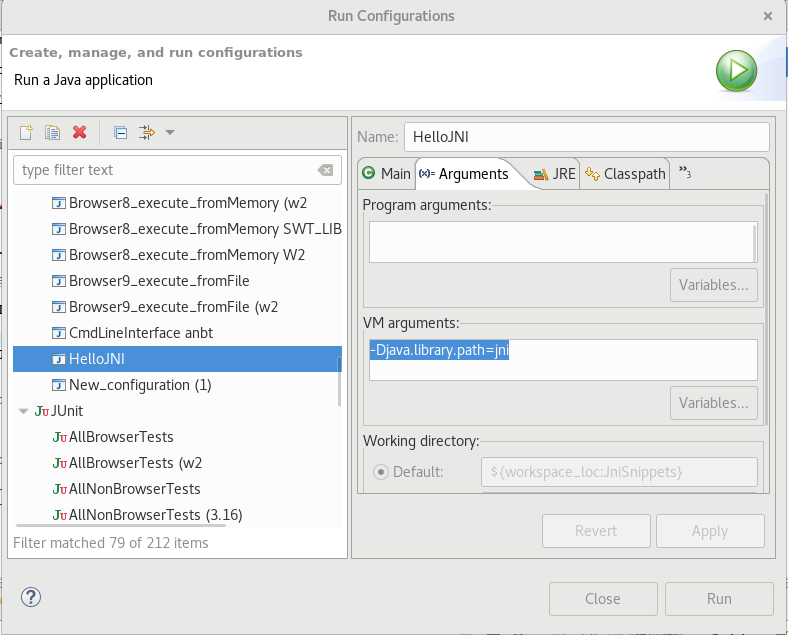
- Now run this configuration and you should see the following in your console:
Java: Hello world.
c: Hello World!

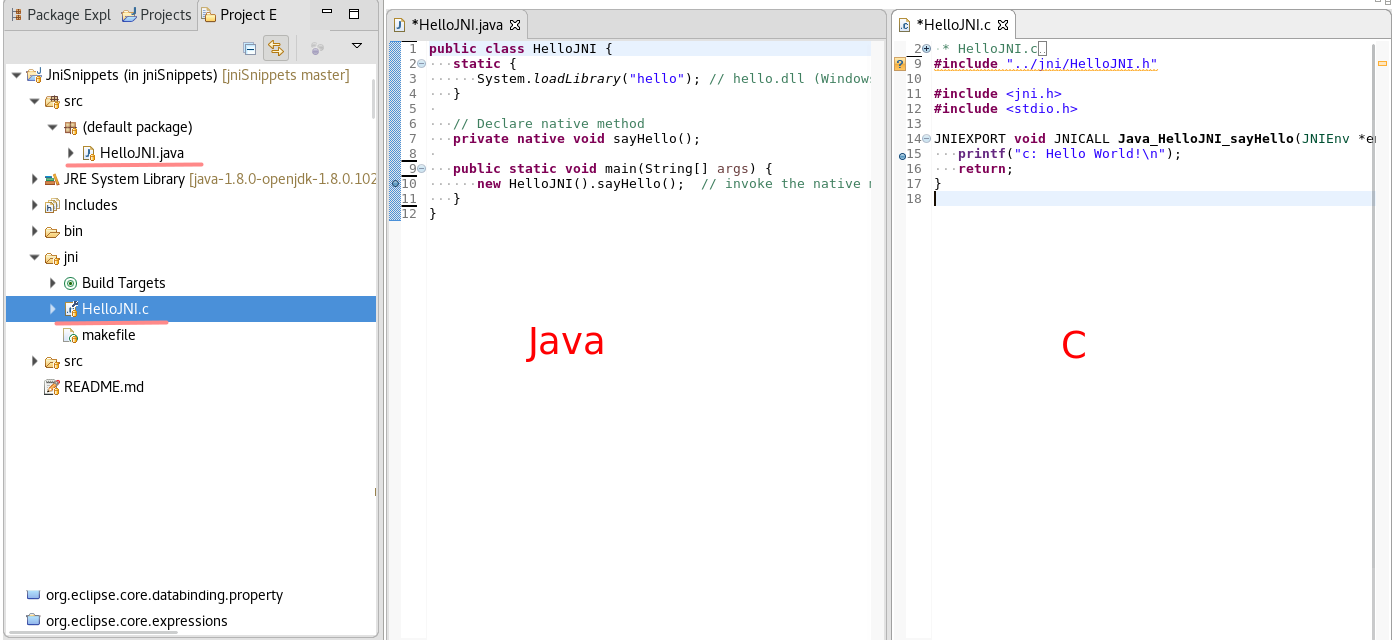
You may note, this project is both a 'Java' and a 'C' project.
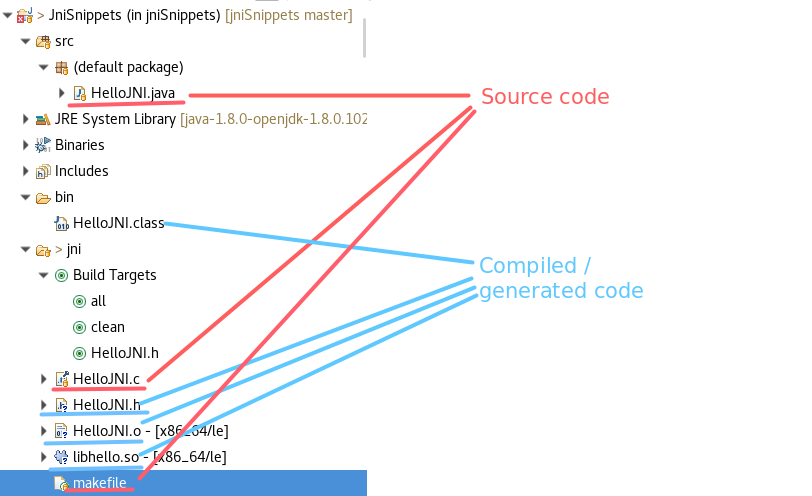
General overview of JNI compilation and the Eclipse project
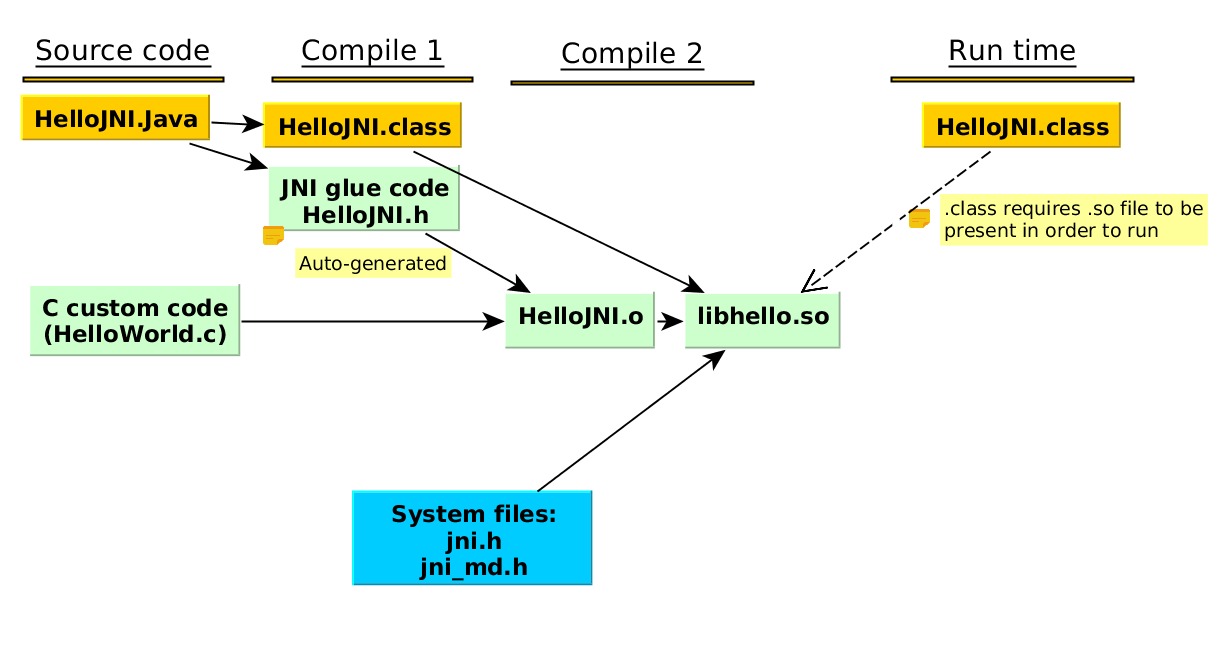
The following diagram illustrates what is going when you compile and run your JNI project:
 Note:
Note:
- There are two compile cycles. In the first compile your Java source code is parsed for the 'native' keyword and a '.h' header file is generated by javah (Java header compiler).
- Subsequently the header file is combined with your C source code (and the jni.h from the system) to produce an objective file and a shared library (libhello.so).
- The .h header file contains the glue code between Java and your C file. So when you add java native methods, you need to re-generate your header first (HelloJNI.h makefile target), then use the function prototype in your C file.
- However, the makefile target 'all' does both in one step if you didn't add any extra native calls in Java.
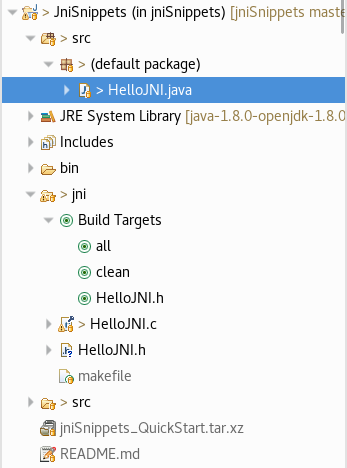
The project layout has the following files:
If the above doesn't make any sense, read chapters 1 and 2 from the book.
Note the following about this project:
- Eclipse compiles .java '.class' files into ./bin. To compensate, the makefile defines a CLASS_PATH variable (../bin), which is used by vpath and javah.
- To run a Java file, the run time configuration of the Java file has to be updated. In the "VM arguments", we add "-Djava.library.path=jni"so that Java can find the '.so' library. (See quick start)
- The compilation of the .c/.h files adds the include paths to jni.h and jni_md.h:
gcc $(CFLAGS) -fPIC -I/usr/lib/jvm/java/include -I/usr/lib/jvm/java/include/linuxThese may vary slightly if you installed your Java in some other location.
- The makefile adds "DEBUGFLAGS" so that you can debug the 'C' part of your code.
Code navigation and Java/C project nature
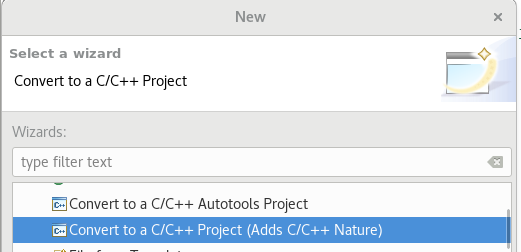
By opening up HelloJNI.java and HelloJNI.c, you should be able to navigate code the way you can normally navigate through java/c files in Eclipse. I.e open declarations and things like that. The reason is that the Java project has an added "C/C++" nature, so that it understands both languages.
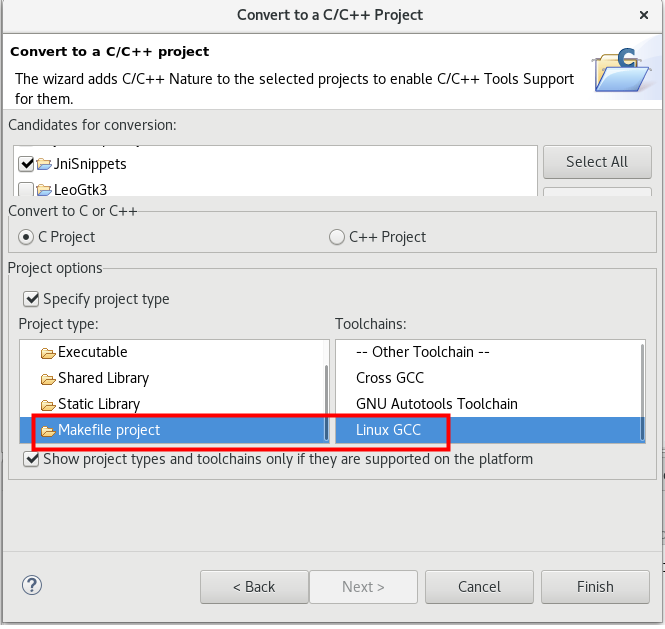
Normally, this can be accomplished by creating a java project, then right clicking on it -> New -> Other -> Convert to a C/C++ Project (Adds C/C++ Nature) -> next.
In the dialog, in Project type, select "Makefile Project" -> in Toolchains, select "Linux GCC"
A note on perspectives
When I do Java development, I switch to the Java perspective. When I work on C, I switch to the C perspective.

The perspectives display certain features, for example the C perspective typically switches to the "Project Explorer", which will display the build targets:
Where as in Java you typically view the "Package Explorer" which doesn't show the make targets.
I tried these two to hot keys: Alt+j and Alt+c in the keyboard shortcut preferences. (Show Perspective (...))
Debugging Java and C
Debugging the C part is a two step procedure.
- To debug the Java part, launch with standard Java debugger:

- To debug the C part, you should ideally pause somewhere in Java and then attach the CDT debugger to the Java process. After that CDT will break on breakpoints in the C code.
You can do so as following:
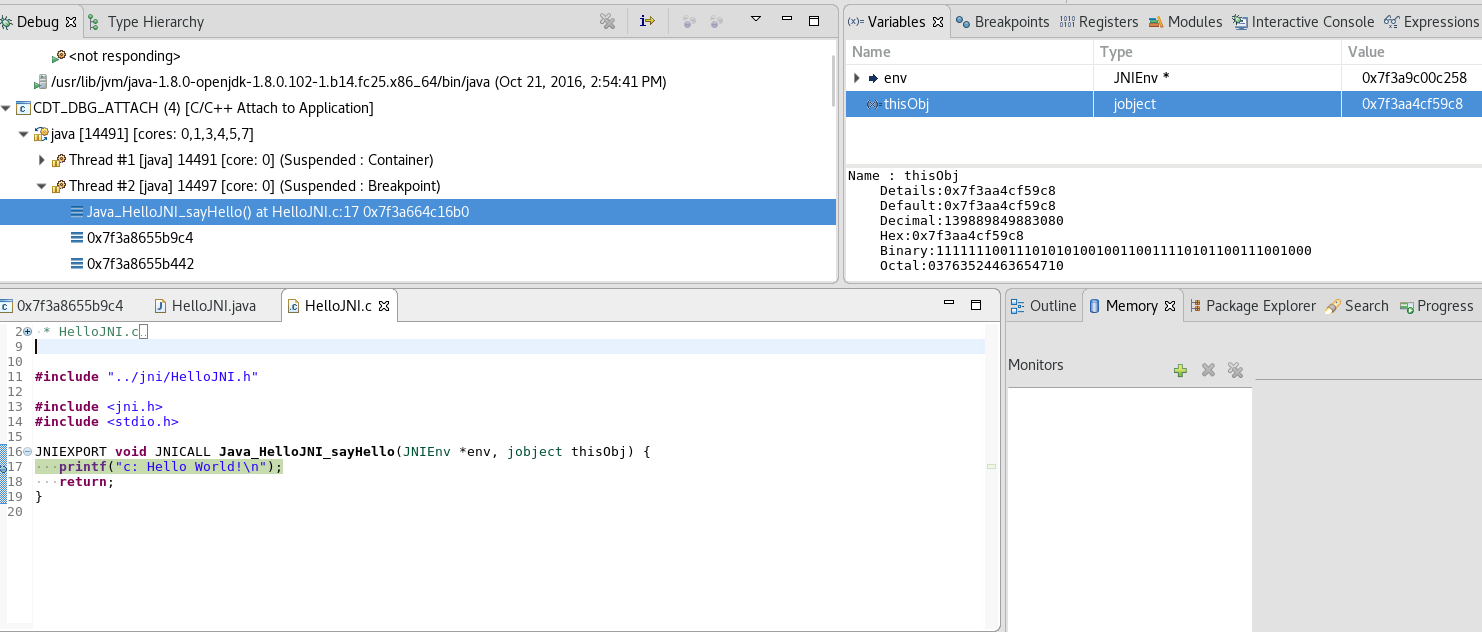
- Set a breakpoint in the Java code before a JNI call.
- Set a breakpoint in the C code:
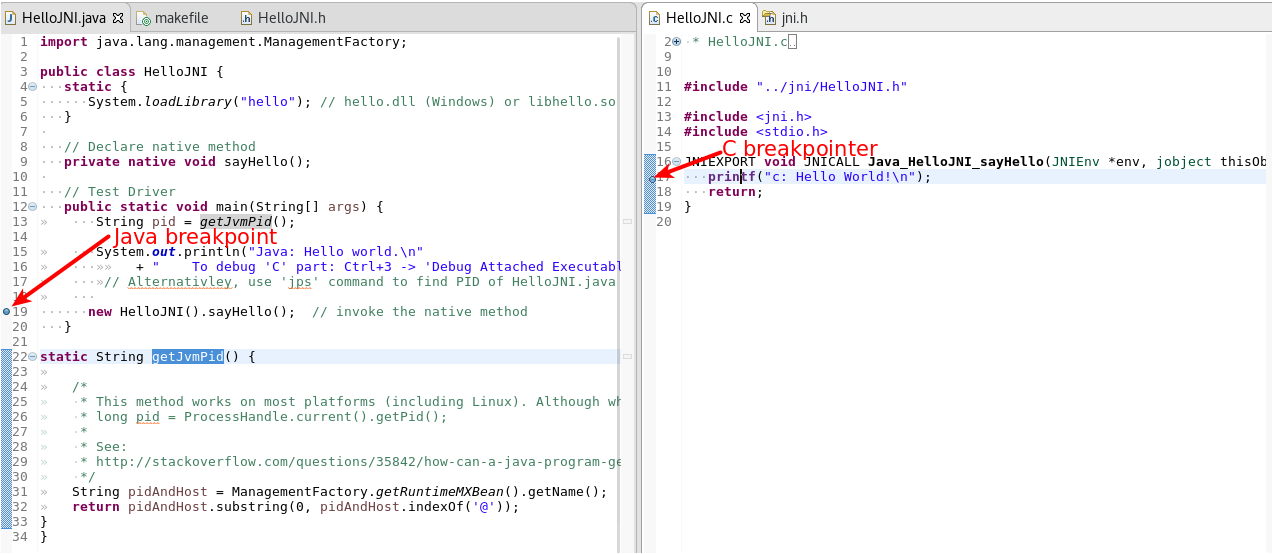
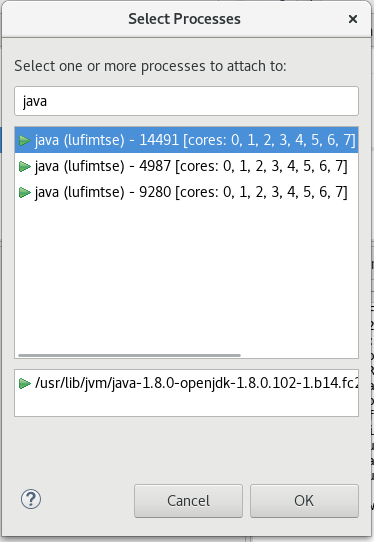
- Run HelloJNI.java in debug. It should break somewhere before the JNI call. The sample project should have printed the PID of the process. Make a note of the PID:

Alternatively, you can use the command line utility "jps" (java process) to list the PID of Java processes:

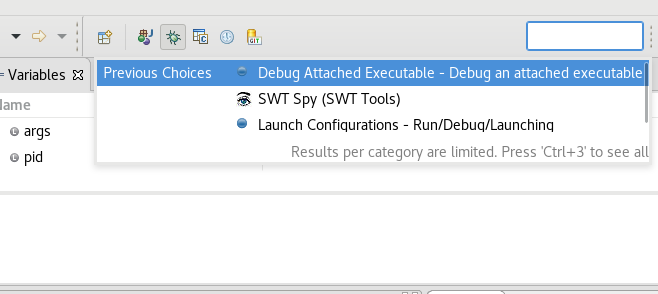
- From the Quick Access entry (Ctrl+3), search for "Debug Attached Executable":
- You will be asked to select a process. Type "Java" and select the one with the PID noted above
- By now you should be in the debug perspective. You will see two entries in the Debug view. The debugger attached to the thread of the JVM, but it hasn't stopped at the "C" breakpoint just yet. Click on pthread_join() and then on continue.
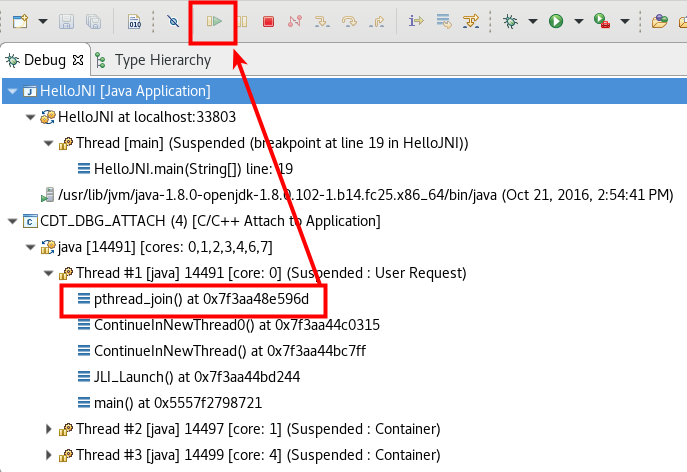
- Next click on "HelloJNI.main" from the Java entry. Now you can continue here also. Now CDT should break in the C process.
You can now step through the C part of the JNI program, inspect variable content etc..
Switching between Java and GDB consoles
You may notice that your Java console dissapeared and instead the GDB console showed up. (Btw, you can type GDB commands into it).
To switch between them, click on this button:

Checking native code with -Xcheck:jni
It's sometimes easy to make subtle mistakes in your JNI code. For example forget to check for exceptions after calling a JNI function from your C code.
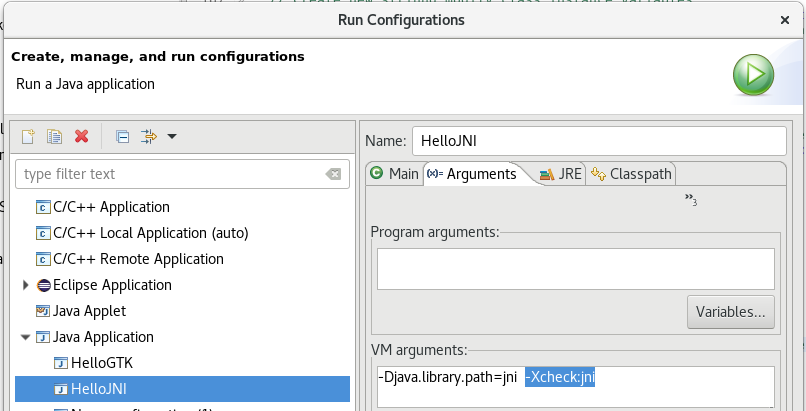
In C, gcc has a flag "-Wall", which prints all warnings when compiling. JVM has something similar. You can add the "-Xcheck:jni" vm argument to your run-time configuration and Java will print additional runtime errors when it thinks you forgot to do something.
Adding -Xcheck:jni to run configuration:
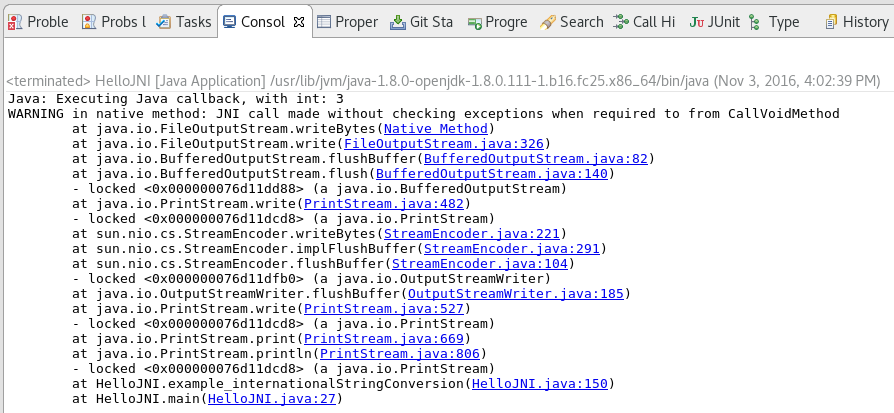
As an example, if you run the following native code without checking if an exception occurred after doing so, you will get a warning in the Java console when you run the snippet:
JNIEXPORT void JNICALL Java_HelloJNI_cCallingJava (JNIEnv *env, jobject thisObj) {
....
(*env)->CallVoidMethod(env,thisObj, javaMethod, 3);
.... // we forgot to check for exceptions here...
}
Error in console when running snippet (not compiling):
The fix in this case is to check for an error:
JNIEXPORT void JNICALL Java_HelloJNI_cCallingJava (JNIEnv *env, jobject thisObj) {
....
(*env)->CallVoidMethod(env,thisObj, javaMethod, 3);
// Check if exception occured:
if ((*env)->ExceptionCheck(env) == JNI_TRUE) {
return;
}
....
}
Misc notes
Adding includes
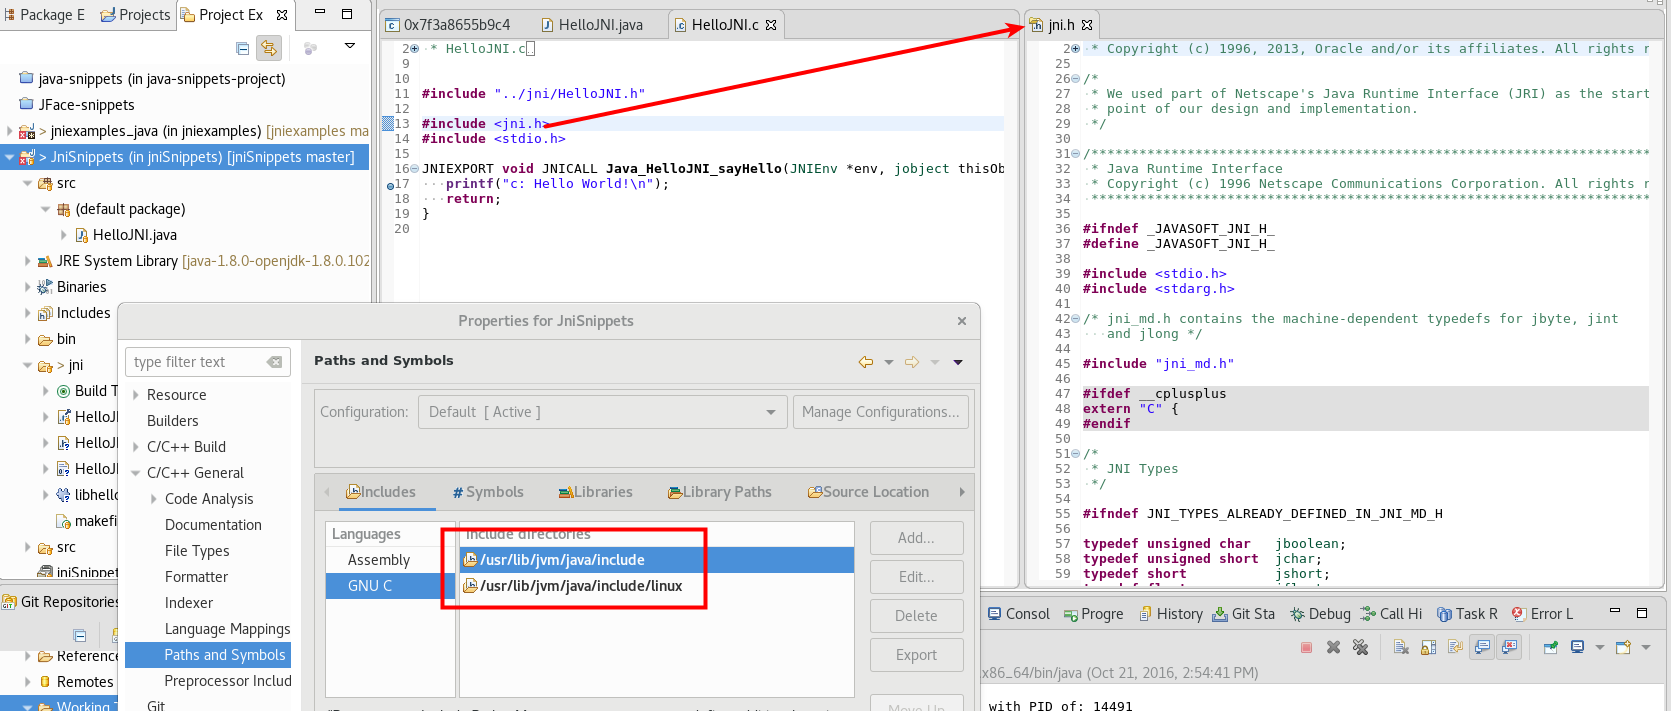
You might notice that in HelloJNI.c, when you hover over '<jni.h>' and press F3, you will jump to it's declaration. This works because I added the includes into the project properties manually. "jni.h" by default is not in the system path. I added the includes so that the CDT indexer knows how to find them. Similarly, if you use custom includes for CDT to recognize them, you should add them to the Paths and Symbols in your project.
It's also worth reading over jni.h and jni_md.h. These define a lot of the types that you'll be using for JNI development, for example jint and jlong are defined in jni_md.h:
typedef int jint;
typedef long jlong;
typedef signed char jbyte;
Naming of library files
Note, on Linux, your '.so' file should be named : libYOURNAME.so ("lib" prefix and ".so" extension), but the loadLibrary function should only say YOURNAME. The reason is cross-platform compatibility as library files on windows have 'dll' and don't have 'lib' prefix.
System.loadLibrary("hello");
libhello.so
Further Readings
JNI Literature
- Book: Java Native Interface: Programmer's Guide and Specification"
This is a very good book on getting started with JNI and also good as a reference. The first couple of chapters get you going, while the advance chapters go into more rigorous depth. The end is used as a reference. - Oracle's JNI documentation
Other Eclipse / JNI tutorials:
- The following is a good tutorial if you want to create a new JNI project from scratch, as well as JNI basics.
http://www3.ntu.edu.sg/home/ehchua/programming/java/JavaNativeInterface.html- This extensive Stack overflow post relates to the article above:
http://stackoverflow.com/questions/23612450/how-to-create-a-makefile-for-jni-configuration-in-linux-and-eclipse
- This extensive Stack overflow post relates to the article above:
- The following covers Eclipse JNI setup for a windows machine:
http://www.bogotobogo.com/cplusplus/eclipse_CDT_JNI_MinGW_64bit.php