In this article, we will provide hands-on instructions to deploy confidential containers on bare metal with the Intel Trust Domain Extensions (TDX) and Advanced Micro Devices (AMD) Secure Encrypted Virtualization-Secure Nested Paging (SEV-SNP) Trusted Execution Environments (TEEs).
These instructions are targeted for the second preview release (0.2.0) and will be updated with additional capabilities in the following releases. You must use Red Hat OpenShift 4.18.
For additional information on this solution, confidential computing, bare-metal clusters, use cases, and demos, we recommend reading our previous articles, Introducing confidential containers on bare metal and Learn about Confidential Containers.
Hardware setup
To use either Intel TDX or AMD SEV-SNP, a Basic Input/Output System (BIOS) supporting the functionality is required. Please reach out to your original equipment/device manufacturer (OEM/ODM) or independent BIOS vendor to learn if such a BIOS is available and follow the corresponding installation instructions.
Next, we will describe two examples: Intel TDX and AMD SEV-SNP. Each example is based on a specific BIOS vendor.
Intel TDX
Intel TDX BIOS settings for a Quanta S6Q system with 5th Gen Intel Xeon Scalable processors:
Socket Configuration →
Memory Configuration →
Memory Map →
Volatile Memory Mode → 1LM
Processor Configuration →
Memory Encryption (TME) → Enabled
Total Memory Encryption (TME) Bypass → Auto
Total Memory Encryption Multi-Tenant (Intel TME-MT) → Enabled
Memory Integrity → Enabled or Disabled
Trusted Domain Extension (TDX) → Enabled
TDX Secure Arbitration Mode Loader (SEAM Loader) → Enabled
TME-MT/TDX key split → Non-zero value*
SW Guard Extensions (SGX) → Enabled
SGX Factory Reset → Enabled
[*] Using 1 as TME-MT/TDX key split allows the user to run up to 64 TDX VMs concurrently. For more details on the values you can use, refer to the official Intel documentation.
AMD SEV-SNP with AMD BIOS
AMD CBS →
CPU Common Options →
SEV-ES ASID Space Limit Control → Manual
SEV-ES ASID Space Limit → 100*
SNP Memory Coverage → Enabled
SMEE → Enabled
CBS →
NBIO common →
SEV-SNP → Enabled
[*] It should actually be set to the desired value based on the number of SEV-SNP VMs you will be running. By setting it to 100, you will be able to run up to 100 SEV-SNP VMs concurrently.
For more information about Intel TDX or AMD SEV-SNP, visit the following links:
- Intel TDX
- AMD SEV-SNP, more on GitHub
Limitations and issues
Let's discuss the limitations and issues you may encounter during this process.
- Trustee deployments:
- While deployment of the Trustee in an enclave is not supported for release 0.2.0, we recommend installing it in a trusted environment (e.g., in an isolated system or cluster). For additional information on the Trustee solution, refer to our previous article, Introducing Confidential Containers Trustee: Attestation Services Solution Overview and Use Cases.
- Trustee deployments must have internet access to reach out to Intel and AMD services to fetch the required certs for the worker nodes as part of the remote attestation process.
- No encryption and integrity protection of the confidential virtual machine (CVM) root filesystem (rootfs): For release 0.2.0, the CVM executes inside the TEE and runs the container workload. Lack of encryption and integrity protection of the rootfs could allow a malicious admin to exfiltrate and/or tamper with data written to the rootfs. Integrity protection and encryption for the rootfs is currently a work in progress. You must ensure that all your application writes are in memory.
- Note: In the upcoming releases, we will provide default policies to ensure that the rootfs is secured.
- No encrypted container image support: Only signed container image support is available with this preview. Encrypted container image support is a work in progress.
- Communication between the Kata shim and the agent components inside CVM is susceptible to tampering: The agent components inside the CVM are responsible for executing Kubernetes API commands from the Kata shim running on the OpenShift worker node. We use an agent policy in the CVM that turns off Kubernetes exec and log APIs for the containers to avoid exfiltration of sensitive data via the Kubernetes API. However, this is incomplete. Further work is ongoing to harden the communication channel between the shim and the agent components.
- No native support for encrypted pod-to-pod communication: Any pod-to-pod communication is unencrypted, and you must use transport layer security (TLS) at the application level for any pod-to-pod communication.
- Container image double pull on the worker node and inside the CVM: The container image is downloaded and executed in the CVM that executes inside the TEE. However, currently, the image is also downloaded on the worker node.
- No integration with OpenShift updates and upgrades. Upgrading the CoCo stack, will require a re-install.
- Intel TDX specific packages do not come from Red Hat CoreOS nor Red Hat Enterprise Linux.
We do not recommend using this work in production environments due to the gaps we have mentioned that are still works in progress.
Using the Assisted Installer
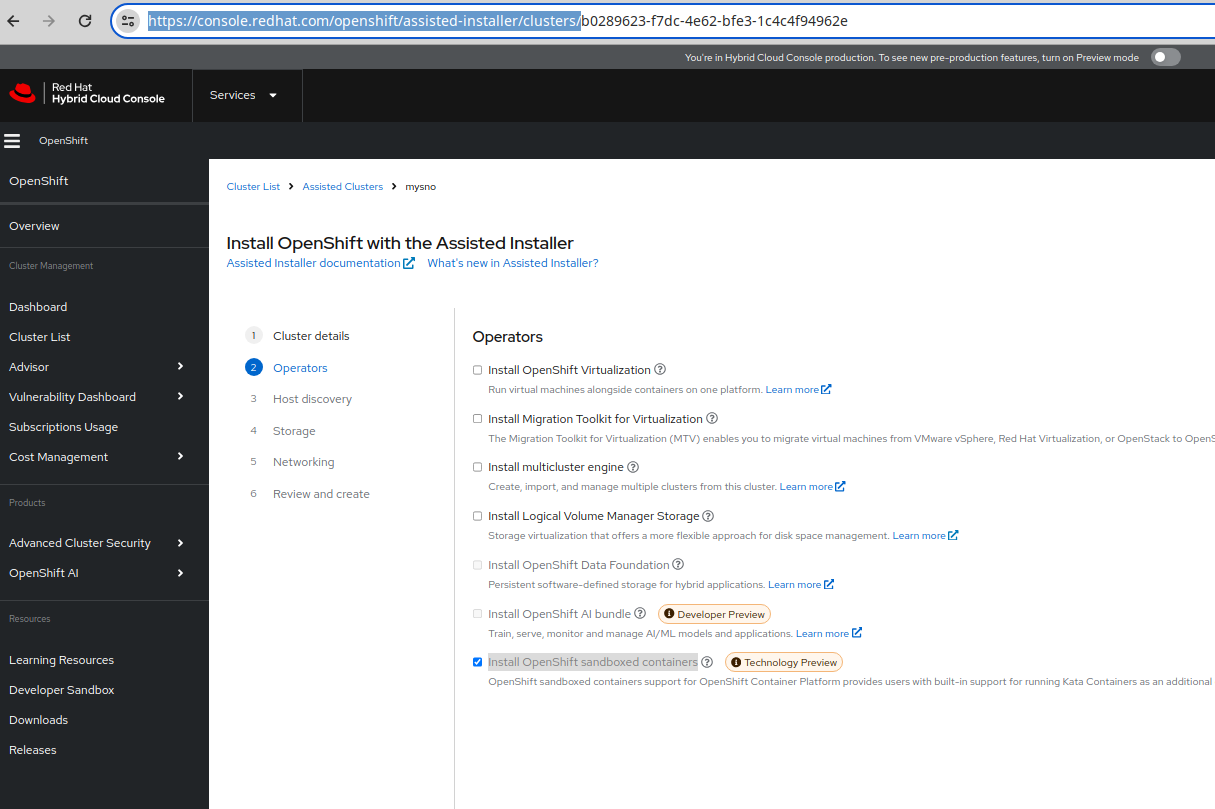
The Assisted Installer for Red Hat OpenShift Container Platform is a user-friendly installation solution offered on Red Hat Hybrid Cloud Console, as shown in Figure 1. The Assisted Installer supports various deployment platforms with a focus on bare metal, such as Nutanix, vSphere, and Oracle Cloud Infrastructure.
The Red Hat OpenShift sandboxed containers operator has been added to the Assisted Installer. Users can install the OpenShift Container Platform with OpenShift sandboxed containers operator enabled on bare metal using the Assisted Installer.
To do this, the user should select Install OpenShift sandboxed containers on the Operators page when deploying a new RHOCP cluster with https://console.redhat.com/openshift/assisted-installer/clusters.
All other installation steps are the same for any OpenShift cluster deployed via the Assisted Installer.
Deploying an OpenShift cluster
Follow these instructions to deploy an OpenShift cluster:
- Launch Red Hat Hybrid Cloud Console.
- Click the Preview mode slider on the banner to enable preview features.
- Click Create cluster.
- On the Cluster details page, enter values in the Cluster name and Base domain fields.
- Note: For release 0.2.0, you must use OpenShift 4.18.
- Optional: Select 1 (single node OpenShift) from the Number of control plane nodes list to deploy a single node OpenShift cluster. The default is 3 (highly available cluster), which creates a multi-node cluster.
- Click Next.
- On the Operator page, select Install OpenShift sandboxed containers and click Next.
- On the Host discovery page, click Add hosts and select Full image file: Provision with physical media.
- Click Generate Discovery ISO.
- Click Download Discovery ISO and then click Close.
- Boot the host with the downloaded image. When the host is discovered on the Hybrid Cloud Console, click Next.
- On the Storage page, click Next.
- On the Networking page, click Next.
- On the Review and create page, click Begin installation.
- When the installation is complete, download the
kubeconfigand copykubeadmin-passwordfor the console.
Confidential containers install helper scripts
A collection of scripts is provided so the user can install the confidential compute attestation operator and OpenShift sandboxed containers with Intel TDX and AMD SEV-SNP content.
To use those scripts, run:
podman run --privileged -v $HOME:/host quay.io/openshift_sandboxed_containers/install-helpers:0.2.0 cp -a /install-helpers /host/install-helpersRun the following Helper script for deploying the Trustee operator:
cd $HOME/install-helpers/trusteeNow the user will have to either deploy Trustee stand-alone, or deploy Intel Trust Authority (ITA) with Trustee. Those instructions are mutually exclusive, and the user should be aware of the kind of deployment to be performed.
To deploy the Trustee stand alone:
For a TDX deployment, which relies on Intel Data Center Attestation Primitives (DCAP), first run the following:
export TDX=trueNow run for both TDX and SEV-SNP deployments the following command:
./install.shTo deploy Intel Trust Authority (ITA) with Trustee, you will need to get the Intel Trust Authority key from Intel's website.
Once you have the Intel Trust Authority key, run the following:
export ITA_KEY=$your_value
./install.sh
Helper script for deploying confidential containers
This script configures confidential containers on bare-metal OpenShift worker nodes using the OpenShift sandboxed containers operator and installs the dependencies for AMD SEV-SNP or Intel TDX.
Note: If you are not using a single node OpenShift installation or a converged OpenShift multi node cluster, you must label at least one worker node for deployment and export the label via the BM_NODE_LABEL env variable, before executing the install.sh script.
export NODENAME=<node>
oc label node $NODE_NAME coco_bm=true
export BM_NODE_LABEL="coco_bm=true"
Run the following commands:
cd $HOME/install-helpers/baremetal-cocoFor TDX deployments you will need to get a Provision Certificate from here and run the following command:
export PCCS_API_KEY=$your_valueFor both TDX and SEV-SNP deployments run the following command, passing either tdx or snp as an argument to the -t option:
./install.sh -t tdx|snpCreating your first confidential pod
Check that the runtimeclass name is kata-cc:
# oc get runtimeclass
NAME       HANDLER    AGE
kata       kata       2d15h
kata-cc    kata-tdx   2d15h
If it's an SEV-SNP host, then you'll see the handler named kata-snp instead of kata-tdx.
Start confidential pod with kata-cc runtimeclass:
apiVersion: v1
kind: Pod
metadata:
  name: ocp-cc-pod
  labels:
    app: ocp-cc-pod
spec:
  runtimeClassName: kata-cc
  containers:
    - name: skr-openshift
      image: registry.access.redhat.com/ubi9/ubi:latest
      command:
        - sleep
        - "36000"
      securityContext:
        privileged: false
        seccompProfile:
          type: RuntimeDefault
# oc apply -f ocp-cc-pod.yaml
# oc get pods
NAME READY STATUS RESTARTS AGE
ocp-cc-pod 1/1 Running 6 (176m ago) 2d14h
# oc rsh ocp-cc-podIn case you’re using a TDX-capable system, you can run the following command to check the guest protection:
# dmesg|grep -i tdx
[    0.000000] tdx: Guest detected
[    0.098847] process: using TDX aware idle routine
[    0.099015] Memory Encryption Features active: Intel TDX
[    0.099015] TECH PREVIEW: Intel Trusted Domain Extensions (TDX) may not be fully supported.
If you’re using an SEV-SNP capable system instead, you can run the following command to check the guest protection:
# dmesg | grep -i -e sev
[    0.051860] Memory Encryption Features active: AMD SEV SEV-ES SEV-SNP
[    0.164539] SEV: APIC: wakeup_secondary_cpu() replaced with wakeup_cpu_via_vmgexit()
[    0.169567] SEV: Using SNP CPUID table, 29 entries present.
[    0.230105] SEV: SNP guest platform device initialized.
[    1.104567] sev-guest sev-guest: Initialized SEV guest driver (using vmpck_id 0)
Secure key release example
A key or secret can be stored in Trustee and safely released to a confidential pod after successful attestation.
Create a key/secret as follows:
oc create secret generic encryption-key -n trustee-operator-system --from-literal key=the-keyAdd the key path to the kbsconfig custom resource:
CR_NAME=$(oc get kbsconfig -n trustee-operator-system -o=jsonpath='{.items[0].metadata.name}')
oc patch KbsConfig -n trustee-operator-system $CR_NAME --type=json -p='[{"op":"add", "path":"/spec/kbsSecretResources/-", "value":"encryption-key"}]'
Fetch the key from the confidential pod:
oc exec -it ocp-cc-pod -- curl http://127.0.0.1:8006/cdh/resource/default/encryption-key/keyDeploying a signed container image
Container image signing is the process of adding a digital signature to a container image to ensure its authenticity and integrity.
The signature is used to verify that the image has not been tampered with or modified in any way, and that it is the same image that was originally signed.
To create the signature, define the security policy:
policy_json=$(cat << EOF
{
    "default": [
        {
            "type": "reject"
        }
    ],
    "transports": {
        "docker": {
            "ghcr.io/confidential-containers/test-container-image-rs": [
                {
                    "type": "sigstoreSigned",
                    "keyPath": "kbs:///default/cosign-public-key/test"
                }
            ],
            "quay.io/prometheus": [
                {
                    "type": "insecureAcceptAnything"
                }
            ]
        }
    }
}
EOF
  )
Get the public key corresponding to the private key that was used to sign the container image:
public_key=$(curl -sSL "https://raw.githubusercontent.com/confidential-containers/guest-components/075b9a9ee77227d9d92b6f3649ef69de5e72d204/image-rs/test_data/signature/cosign/cosign1.pub")Mount the secrets in Trustee:
oc create secret generic security-policy --from-literal test="${policy_json}" -n trustee-operator-system
oc create secret generic cosign-public-key --from-literal test="${public_key}" -n trustee-operator-system
CR_NAME=$(oc get kbsconfig -n trustee-operator-system -o=jsonpath='{.items[0].metadata.name}')
oc patch KbsConfig -n trustee-operator-system $CR_NAME --type=json -p='[{"op":"add", "path":"/spec/kbsSecretResources/-", "value":"security-policy"}]'
oc patch KbsConfig -n trustee-operator-system $CR_NAME --type=json -p='[{"op":"add", "path":"/spec/kbsSecretResources/-", "value":"cosign-public-key"}]'
Create the confidential pod with signed container image:
cat << EOF > signed-image-pod.yaml
apiVersion: v1
kind: Pod
metadata:
  name: signed-image-tests
  annotations:
    io.katacontainers.config.hypervisor.kernel_params: "agent.aa_kbc_params=cc_kbc::http://kbs-service.trustee-operator-system:8080 agent.image_policy_file=kbs:///default/security-policy/test agent.enable_signature_verification=true"
spec:
  runtimeClassName: kata-cc
  containers:
    - name: test-signed-image
      image: ghcr.io/confidential-containers/test-container-image-rs:cosign-signed
      imagePullPolicy: Always
      command:
        - sleep
        - infinity
EOF
oc apply -f signed-image-pod.yaml
Troubleshooting and debugging
When troubleshooting CoCo installation issues, you can monitor the operator's status, kbs service/configuration pods status, and the installation logs to determine at which stage the issues occurred. Then you can retrieve diagnostic data relevant to that stage.
For TDX, check if TDX is correctly enabled in BIOS:
# dmesg | grep tdx
[    0.000000] Command line:
…..
kvm_intel.tdx=1 systemd.unified_cgroup_hierarchy=1 cgroup_no_v1=all psi=0
[    0.115359] virt/tdx: BIOS enabled: private KeyID range [32, 64)
…..
[   26.385943] virt/tdx: CMR[0]: [0x100000, 0x77800000)
[   26.385945] virt/tdx: CMR[1]: [0x100000000, 0x3ffe000000)
[   27.147798] virt/tdx: 1042424 KB allocated for PAMT
[   27.147805] virt/tdx: module initialized
For SEV-SNP, check if SEV-SNP is correctly enabled in BIOS:
# dmesg | grep -i -e sev
[    0.000000] SEV-SNP: RMP table physical range [0x0000007fcf700000 - 0x000000804fcfffff]
[    0.005479] SEV-SNP: Reserving start/end of RMP table on a 2MB boundary [0x0000007fcf600000]
[    0.005486] SEV-SNP: Reserving start/end of RMP table on a 2MB boundary [0x000000804fc00000]
[    3.807612] ccp 0000:23:00.1: sev enabled
[   10.874711] ccp 0000:23:00.1: SEV API:1.55 build:17
[   10.875532] ccp 0000:23:00.1: SEV-SNP API:1.55 build:17
[   13.614341] kvm_amd: SEV enabled (ASIDs 10 - 509)
[   13.614345] kvm_amd: SEV-ES enabled (ASIDs 1 - 9)
[   13.614347] kvm_amd: SEV-SNP enabled (ASIDs 1 - 9)
Check the installed operators:
# oc get operators
NAME                                                              AGE
intel-device-plugins-operator.openshift-operators                 2d17h
intel-device-plugins-operator.openshiftoperators                  2d17h
nfd.openshift-nfd                                                 2d17h
sandboxed-containers-operator.openshift-sandboxed-containers-op   2d17h
trustee-operator.trustee-operator-system                          2d16h
Check the kbs services and configuration status:
# oc get pods -n trustee-operator-system
NAME                                                   READY   STATUS    RESTARTS       AGE
trustee-deployment-cffcd4446-9fbdd                     1/1     Running  0              14h
trustee-operator-controller-manager-6f69487776-2r8g6   2/2     Running   13 (41h ago)   2d15h
Once the operators and pods are ready, you can try to retrieve key from CDH:
# oc exec -it ocp-cc-pod -- curl http://127.0.0.1:8006/cdh/resource/default/kbsres1/key1
    res1val1
Check and monitor kbs service pod logs related:
# oc logs trustee-deployment-xxxx-xxx -n trustee-operator-system
[2025-01-29T14:38:43Z INFO  kbs] Using config file
/etc/kbs-config/kbs-config.json
[2025-01-29T14:38:43Z WARN  attestation_service::rvps] No RVPS address provided and will launch a built-in rvps
[2025-01-29T14:38:43Z INFO  attestation_service::token::simple] No Token Signer key in config file, create an ephemeral key and without CA pubkey cert
[2025-01-29T14:38:43Z INFO  kbs] Starting HTTP server at [0.0.0.0:8080]
[2025-01-29T14:38:43Z INFO  actix_server::builder] starting 56 workers
……
More to come
This article provided detailed instructions on deploying confidential containers on bare metal. In future articles, we will provide hands-on instructions for deploying an AI workload using Red Hat OpenShift AI and confidential containers on bare metal.
Last updated: June 26, 2025