Redhat Developers  Logo
  • Products

    Featured

    • Red Hat Enterprise Linux
      Red Hat Enterprise Linux Icon
    • Red Hat OpenShift AI
      Red Hat OpenShift AI
    • Red Hat Enterprise Linux AI
      Linux icon inside of a brain
    • Image mode for Red Hat Enterprise Linux
      RHEL image mode
    • Red Hat OpenShift
      Openshift icon
    • Red Hat Ansible Automation Platform
      Ansible icon
    • Red Hat Developer Hub
      Developer Hub
    • View All Red Hat Products
    • Linux

      • Red Hat Enterprise Linux
      • Image mode for Red Hat Enterprise Linux
      • Red Hat Universal Base Images (UBI)
    • Java runtimes & frameworks

      • JBoss Enterprise Application Platform
      • Red Hat build of OpenJDK
    • Kubernetes

      • Red Hat OpenShift
      • Microsoft Azure Red Hat OpenShift
      • Red Hat OpenShift Virtualization
      • Red Hat OpenShift Lightspeed
    • Integration & App Connectivity

      • Red Hat Build of Apache Camel
      • Red Hat Service Interconnect
      • Red Hat Connectivity Link
    • AI/ML

      • Red Hat OpenShift AI
      • Red Hat Enterprise Linux AI
    • Automation

      • Red Hat Ansible Automation Platform
      • Red Hat Ansible Lightspeed
    • Developer tools

      • Red Hat Trusted Software Supply Chain
      • Podman Desktop
      • Red Hat OpenShift Dev Spaces
    • Developer Sandbox

      Developer Sandbox
      Try Red Hat products and technologies without setup or configuration fees for 30 days with this shared Openshift and Kubernetes cluster.
    • Try at no cost
  • Technologies

    Featured

    • AI/ML
      AI/ML Icon
    • Linux
      Linux Icon
    • Kubernetes
      Cloud icon
    • Automation
      Automation Icon showing arrows moving in a circle around a gear
    • View All Technologies
    • Programming Languages & Frameworks

      • Java
      • Python
      • JavaScript
    • System Design & Architecture

      • Red Hat architecture and design patterns
      • Microservices
      • Event-Driven Architecture
      • Databases
    • Developer Productivity

      • Developer productivity
      • Developer Tools
      • GitOps
    • Secure Development & Architectures

      • Security
      • Secure coding
    • Platform Engineering

      • DevOps
      • DevSecOps
      • Ansible automation for applications and services
    • Automated Data Processing

      • AI/ML
      • Data Science
      • Apache Kafka on Kubernetes
      • View All Technologies
    • Start exploring in the Developer Sandbox for free

      sandbox graphic
      Try Red Hat's products and technologies without setup or configuration.
    • Try at no cost
  • Learn

    Featured

    • Kubernetes & Cloud Native
      Openshift icon
    • Linux
      Rhel icon
    • Automation
      Ansible cloud icon
    • Java
      Java icon
    • AI/ML
      AI/ML Icon
    • View All Learning Resources

    E-Books

    • GitOps Cookbook
    • Podman in Action
    • Kubernetes Operators
    • The Path to GitOps
    • View All E-books

    Cheat Sheets

    • Linux Commands
    • Bash Commands
    • Git
    • systemd Commands
    • View All Cheat Sheets

    Documentation

    • API Catalog
    • Product Documentation
    • Legacy Documentation
    • Red Hat Learning

      Learning image
      Boost your technical skills to expert-level with the help of interactive lessons offered by various Red Hat Learning programs.
    • Explore Red Hat Learning
  • Developer Sandbox

    Developer Sandbox

    • Access Red Hat’s products and technologies without setup or configuration, and start developing quicker than ever before with our new, no-cost sandbox environments.
    • Explore Developer Sandbox

    Featured Developer Sandbox activities

    • Get started with your Developer Sandbox
    • OpenShift virtualization and application modernization using the Developer Sandbox
    • Explore all Developer Sandbox activities

    Ready to start developing apps?

    • Try at no cost
  • Blog
  • Events
  • Videos

How to use RHEL as a WSL Podman machine

September 30, 2024
Jeff Maury
Related topics:
ContainersDeveloper ToolsApplication modernizationVirtualizationWindows
Related products:
Developer ToolsImage mode for Red Hat Enterprise LinuxPodman Desktop

Share:

    This article from last year details the steps and actions required to build and run your Red Hat Enterprise Linux (RHEL) Windows Subsystem for Linux (WSL) image.

    The purpose of this article is to describe the options needed for the RHEL WSL distribution so that it can be used as a Podman machine.

    Requirements

    To use the RHEL WSL image as a Podman machine, ensure that the following packages are installed:

    • podman
    • podman-docker
    • procps-ng
    • openssh-server
    • net-tools
    • iproute
    • dhcp-client
    • sudo
    • systemd-networkd

    Luckily, all but the last package are available from the preconfigured RHEL 9 repositories. The last package (systemd-networkd) is available from the EPEL 9 repository and will need to be configured when building the image.

    Build the image

    Navigate to image builder (Figure 1).

    Image builder welcome page
    Figure 1: Image builder welcome page.

    On the upper right menu, enable the Preview mode (Figure 2).

    Image builder welcome page in preview mode
    Figure 2: Image builder welcome page in preview mode.

    Click Add blueprint to open the Create image dialog wizard (Figure 3).

    Image builder create image page
    Figure 3: New image output options page.

    On the Image output page, select the following:

    • From the Release list, select Red Hat Enterprise Linux (RHEL) 9.
    • From the Select target environments option, select WSL - Windows Subsystem for Linux (`.tar.gz`).
    • Click Next.

    On the Register page, select Automatically register and enable advanced capabilities.

    • From the dropdown menu, choose an activation key to use for the image. See Creating an activation key.
    • Click Next.

    On the OpenSCAP page, as it is not supported for WSL images, click Next.

    On the File system configuration page, select Recommended: Use automatic partitioning.

    • Click Next.

    On the Content page, complete the following steps to add additional packages to your image:

    • On the Repository snapshot step:
      • Select Use latest content.
      • Click Next.
    • On the Custom repositories step, shown in Figure 4, click the Create and manage repositories here link.

      Image builder custom repositories page
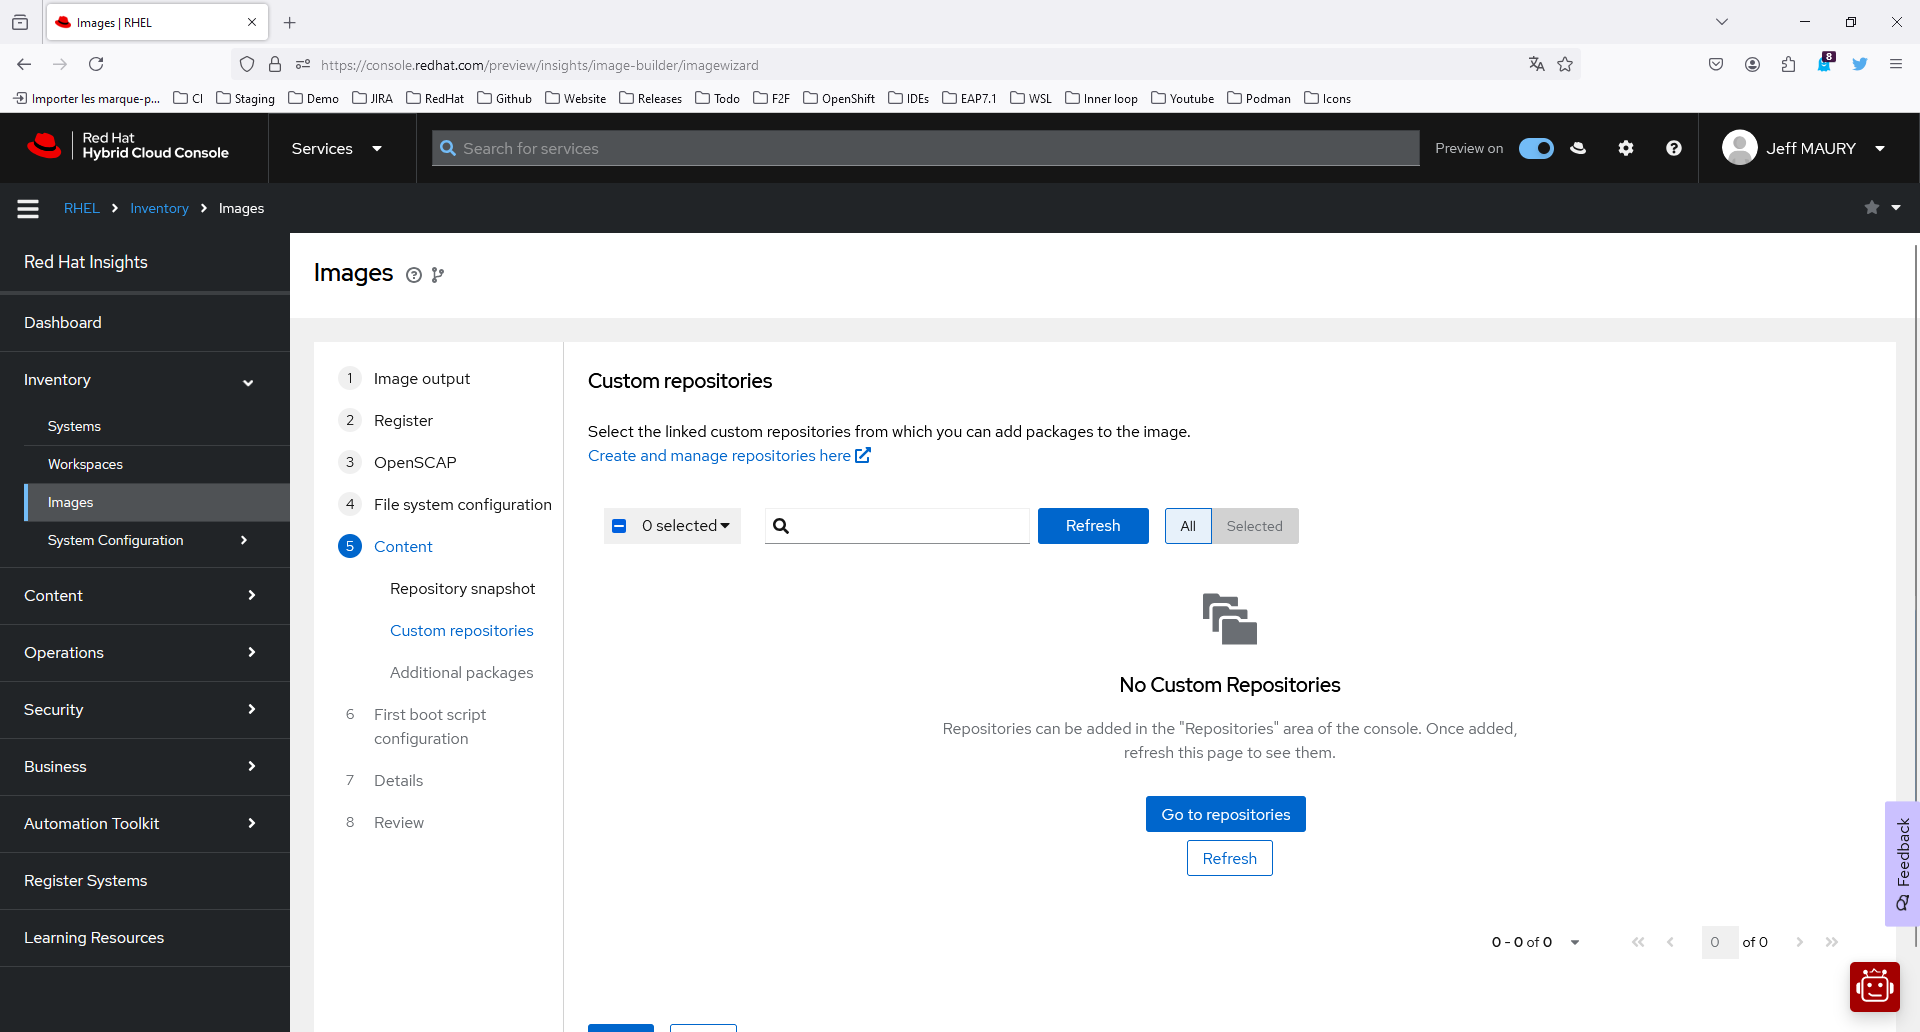
      Figure 4: New image custom repositories page.
    • This will open a new tab (Figure 5).

      Console repositories management
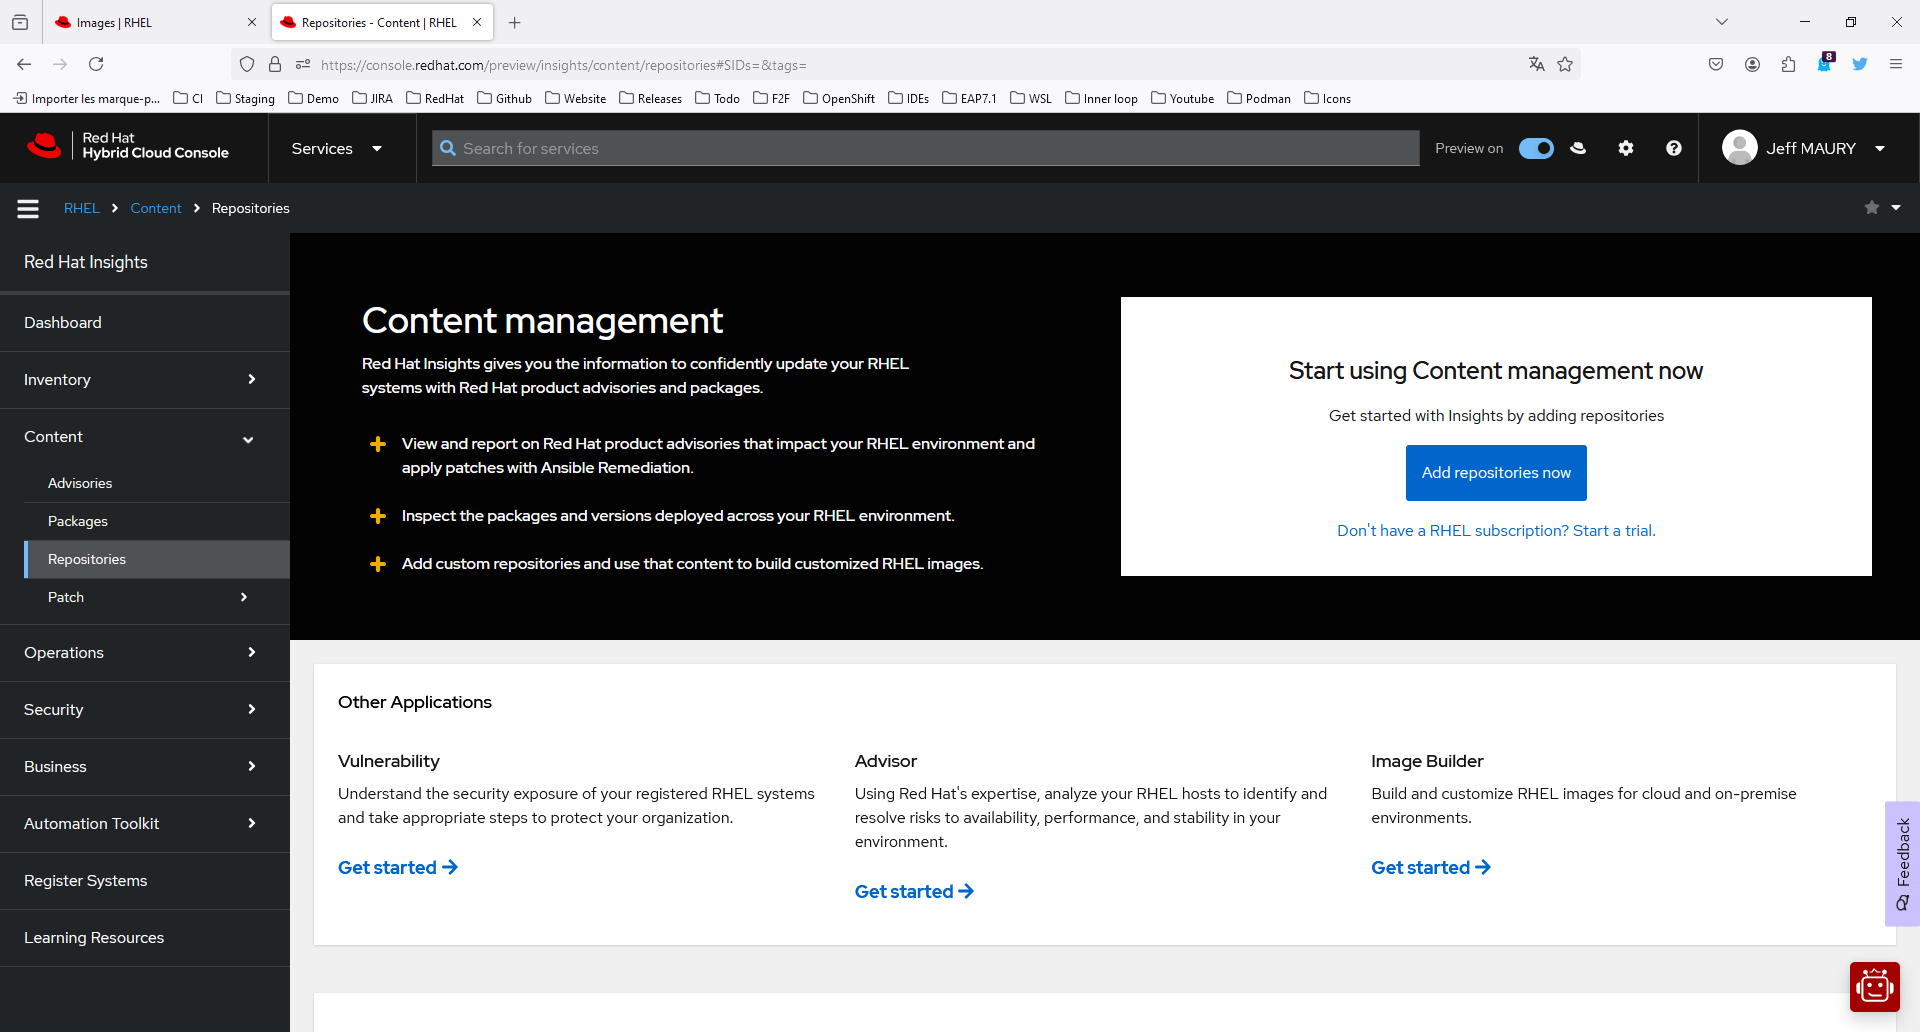
      Figure 5: Repositories management welcome page.

    Click Add repositories now (Figure 6).

    Console add repositories page
    Figure 6: New repositories page.

    Click Add repositories (Figure 7).

    Console add repository page
    Figure 7: New repository options page.

    On the Add custom repositories page, select the following:

    • In the Name list, enter EPEL 9.
    • In the URL field, enter: https://dl.fedoraproject.org/pub/epel/9/Everything/x86_64/
    • In the GPG key field, enter: https://dl.fedoraproject.org/pub/epel/RPM-GPG-KEY-EPEL-9
    • Click Save.

    Close the tab and switch back to the previous one.

    • In the filter input field, type EPEL.
    • Select the EPEL 9 repository as shown in Figure 8.
    Console repository created page
    Figure 8: New repository added page.

    Click Next.

    • On the Additional packages step:
      • On the Available packages search field, enter podman and click the → button.
      • Select the podman and podman-docker packages.
      • On the Available packages search field, enter procps-ng and click the → button.
      • Select the procps-ng package.
      • On the Available packages search field, enter openssh-server and click the → button.
      • Select the openssh-server package.
      • On the Available packages search field, enter net-tools and click the → button.
      • Select the net-tools package.
      • On the Available packages search field, enter iproute and click the → button.
      • Select the iproute package.
      • On the Available packages search field, enter dhcp-client and click the → button.
      • Select the dhcp-client package.
      • On the Available packages search field, enter sudo and click the → button.
      • Select the sudo package and click the > button to add the selected package shown in the package search results to the Chosen packages dual list box.
      • On the Available packages search field, enter systemd and click the → button.
      • Select the systemd-networkd package.
      • Click Next.

    On the First boot script configuration page, click Next.

    On the Details page:

    • In the Blueprint name, enter rhel-wsl.
    • Click Next.

    On the Review page:

    • Click Create blueprint and build image (Figure 9).
    Image builder built images page
    Figure 9: Image builder images list.

    The image is being built. Once the build is finished, the download link will be available. Click the Download (.tar.gz) link and save the downloaded file to one of your local folders.

    Create the RHEL WSL Podman machine

    Launch Podman Desktop and go to the Settings → Resources page, as shown in Figure 10.

    Podman Desktop resources page
    Figure 10: Podman Desktop resources page.

    On the Podman provider, click Create new ...

    On the Create Podman machine page, click the Browse button for the Image Path field and select the file downloaded from image builder. See Figure 11.

    Podman Desktop create Podman machine page
    Figure 11: The new Podman machine page in Podman Desktop.

    Click the Create button. The machine will be created and started. After a short time, the operation status should be reported, as depicted in Figure 12.

    Podman Desktop Podman machine created
    Figure 12: Podman Machine new machine created page.

    Let's play with the RHEL WSL Podman machine

    Go to the Images page and pull the httpd image (Figure 13).

    Podman Desktop pull image page
    Figure 13: Podman Desktop pull image page.

    Click Done (Figure 14).

    Podman Desktop images list page
    Figure 14: Podman Desktop images list page.

    Start the image by clicking on the Run image icon (Figure 15).

    Podman Desktop start container page
    Figure 15: Podman Desktop create container options page.

    Once the container is started, you can access the Apache server on http://localhost:9000.

    Related Posts

    • Getting started with RHEL on WSL

    • Create customized RHEL images for the WSL environment

    • Rootless containers with Podman: The basics

    • Podman and Buildah for Docker users

    • Containerize .NET for Red Hat OpenShift: Windows containers and .NET Framework

    • Create a Windows golden image for OpenShift Virtualization

    Recent Posts

    • How to run a fraud detection AI model on RHEL CVMs

    • How we use software provenance at Red Hat

    • Alternatives to creating bootc images from scratch

    • How to update OpenStack Services on OpenShift

    • How to integrate vLLM inference into your macOS and iOS apps

    What’s up next?

    Read Podman in Action for easy-to-follow examples to help you learn Podman quickly, including steps to deploy a complete containerized web service.

    Get the e-book
    Red Hat Developers logo LinkedIn YouTube Twitter Facebook

    Products

    • Red Hat Enterprise Linux
    • Red Hat OpenShift
    • Red Hat Ansible Automation Platform

    Build

    • Developer Sandbox
    • Developer Tools
    • Interactive Tutorials
    • API Catalog

    Quicklinks

    • Learning Resources
    • E-books
    • Cheat Sheets
    • Blog
    • Events
    • Newsletter

    Communicate

    • About us
    • Contact sales
    • Find a partner
    • Report a website issue
    • Site Status Dashboard
    • Report a security problem

    RED HAT DEVELOPER

    Build here. Go anywhere.

    We serve the builders. The problem solvers who create careers with code.

    Join us if you’re a developer, software engineer, web designer, front-end designer, UX designer, computer scientist, architect, tester, product manager, project manager or team lead.

    Sign me up

    Red Hat legal and privacy links

    • About Red Hat
    • Jobs
    • Events
    • Locations
    • Contact Red Hat
    • Red Hat Blog
    • Inclusion at Red Hat
    • Cool Stuff Store
    • Red Hat Summit

    Red Hat legal and privacy links

    • Privacy statement
    • Terms of use
    • All policies and guidelines
    • Digital accessibility

    Report a website issue