Creating virtual machines (VMs) from golden images is a common practice. It minimizes the deployment time for new VMs, and it provides a familiar environment for the VM's owner. The admin gets an automated and consistent way to create golden images that can encapsulate all environment requirements, reducing the manual work and frictions, leading to a more secure environment. This article will show how to utilize the Red Hat OpenShift Virtualization Windows UEFI installer pipeline to prepare a golden image of Windows 11 in an automated, repeatable and deterministic manner.
The pipeline downloads the official Windows ISO from Microsoft download website, modifies it to enable an unattended installation, triggers the installation of Windows operating systems, installs the guest agent and the drivers for Red Hat OpenShift Virtualization and generalizes the resulting disk image. In this way, users are able to instantiate as many Windows based VMs as required, in a comfortable and easy way, from a customized golden image.
Prerequisites
The pipeline has a couple of prerequisites to run properly in an OpenShift environment. These prerequisites are:
- Red Hat OpenShift, at least version 4.13; the best integration with the web UI is in 4.16.
- Red Hat OpenShift Virtualization.
- Red Hat OpenShift Pipelines.
Additional information about managing VMs using OpenShift Pipelines can be found at the operator documentation.
Hands-on OpenShift Virtualization Windows UEFI Installer Pipeline
In the following sections, we are going to demonstrate how to get Windows 11 golden image as well as how to deploy a VM using the golden image with the assists of the OpenShift Virtualization Windows UEFI Installer Pipeline.
Get Windows 11 URL
To get started, we are going to need to get the Windows 11 ISO download link. In this example, we are going to download from Microsoft’s website, though the ISO could also be provided by an internal web server. For such purpose, we need to access the Microsoft official download website. On the website, you should be able to find Download Windows 11 Disk Image (ISO) for x64 devices section as shown in Figure 1.
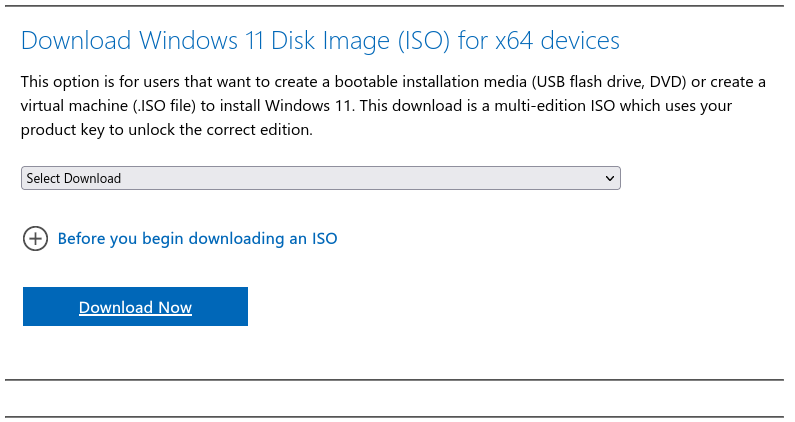
Then, in the dropdown menu (Select Download), select Windows 11 multi-edition ISO for x64 devices option and click the Download Now button. The website will take a few seconds to load the requested options, and you will be prompted to select the language as shown in Figure 2.
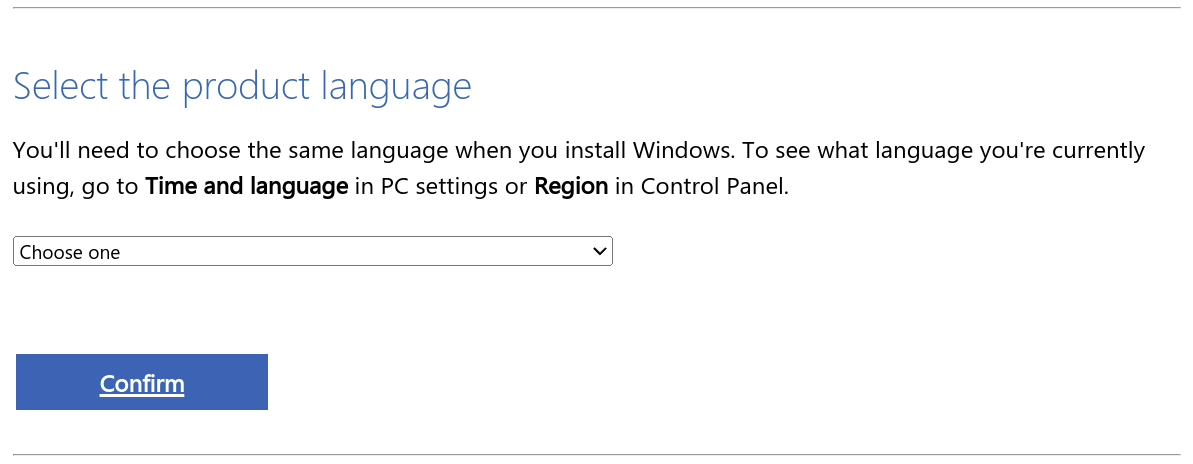
Here, you have to choose the English (United States) option and click the Confirm button. Finally, you will see the 64-bit Download button as shown in Figure 3.
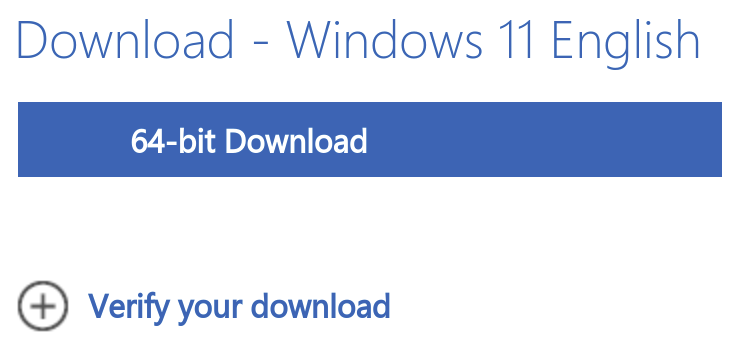
You will need to right-click on the button and select the Copy Link option. Save this link for later usage. Great, so now we have 24 hours valid download link for Windows 11—better hurry up.
Please note that this process may be done automatically using the getisourl.py script. The script is available here as are usage instructions.
Create the Windows 11 golden image
The next step is to set up the PipelineRun. This will trigger a set of task that will generate our Windows 11 golden image. In the left menu, go to Pipelines section and Pipelines subsection as shown in Figure 4.

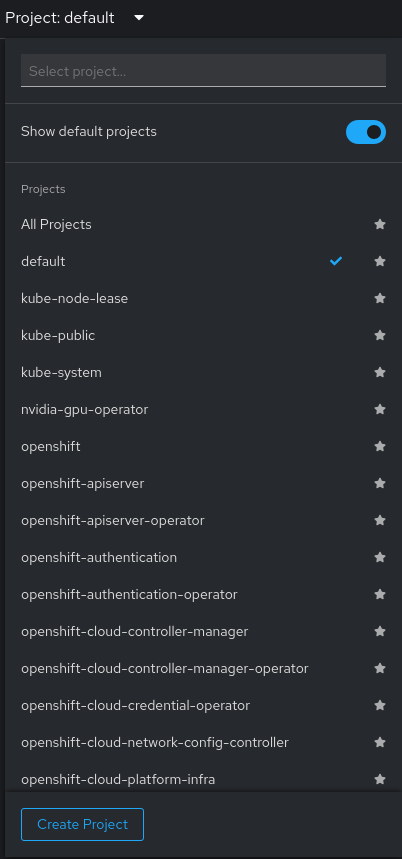
Now you have to select the Project on which you want to have your Windows 11 golden image available. Please note that the Pipeline cannot be used directly, as it is in any project starting with "openshift" or "kube". To run any Pipeline, the ServiceAccount "pipeline" is required in the target project. OpenShift Pipelines Operator does not deploy this ServiceAccount in such projects. Therefore, in case you want to run the pipeline in one of these projects, you need to either manually create the ServiceAccount or to specify a different ServiceAccount in the OpenShift Virtualization Windows UEFI Installer Pipeline. Nevertheless, we are going to stick with the "default" project (see Figure 5) in this case and, later on, we will import the resulting golden image into the "openshift-virtualization-os-images" to make it available cluster wide.
It’s time to trigger the action that will create the Windows 11 golden image. For this purpose, you need to click Create → PipelineRun as shown in Figure 6.

A YAML editor will be shown, and you can find the PipelineRun manifest in ArtifactHUB here.
You just need to copy and paste the YAML manifest and replace the spec.params.[“winImageDownloadURL”].value: ${WIN_IMAGE_DOWNLOAD_URL} for the Windows 11 download link obtained from the previous step. You might want to adjust the spec.params.[“aceptEULA”].value. By setting this parameter to True, you are agreeing to the applicable Microsoft end user license agreement(s) for each deployment or installation for the Microsoft product(s). The final PipelineRun YAML manifest should look similar to the below:
apiVersion: tekton.dev/v1
kind: PipelineRun
metadata:
    generateName: windows11-installer-run-
spec:
    params:
    -   name: winImageDownloadURL
        value: "https://windows-11-download-link.com"
    -   name: aceptEULA
        value: False # By setting this parameter to "True", you are agreeing to the applicable Microsoft end user license agreement(s) for each deployment or installation for the Microsoft product(s).
    pipelineRef:
[...]
    taskRunSpecs:
    -   pipelineTaskName: modify-windows-iso-file
        podTemplate:
            securityContext:
                runAsGroup: 107
                runAsUser: 107
Behind the scenes, the pipeline spams a Windows VM to create the golden image. A sysprep is injected to this VM, it automates the installation and configuration process. The sysprep is available in a ConfigMap automatically created in your OpenShift cluster and project where you want to execute the PipelineRun, and it can be located here.
This sysprep may be modified to automatically install and configure your Windows VMs created using the generated golden image as well. We will explore an example later. Please note that updates to those syspreps are not supported by Red Hat.
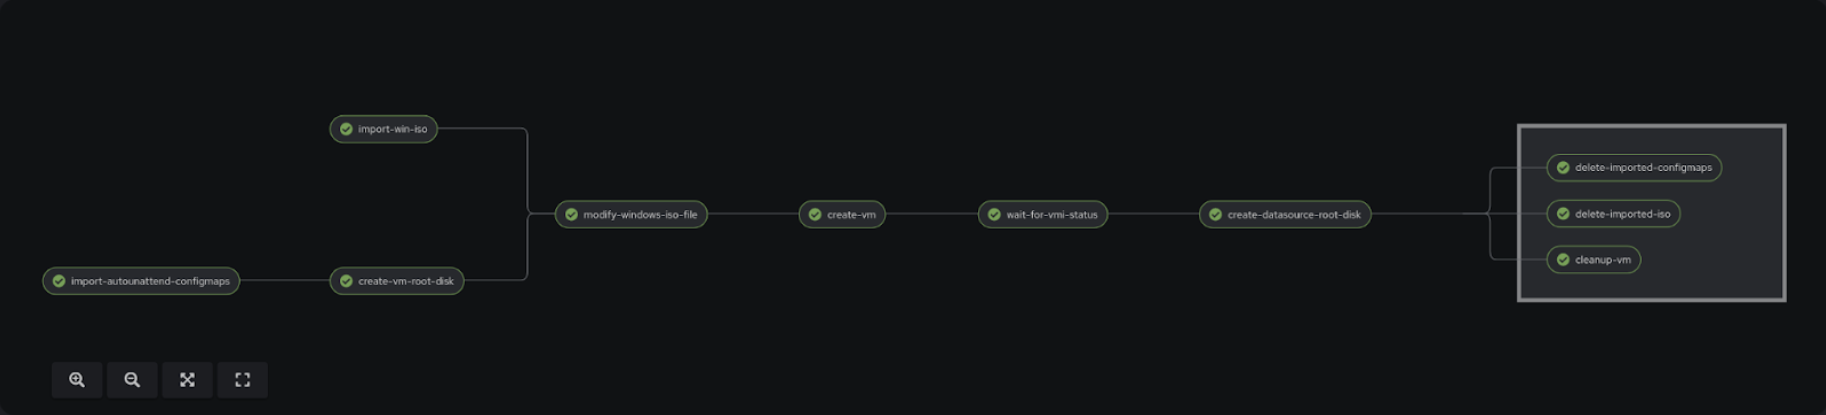
Then click the Create button and the PipelineRun will start. You will be redirected to the PipelineRun overview page, where you can see the progress. The pipeline may take around 20–60 minutes to complete, depending on your cluster resources, so just be patient. Once completed, you will see the PipelineRun output shown in Figure 7.
To check if the golden image is present in our cluster, you can go to Virtualization → Bootable volumes as shown in Figure 8.

In this section, you should be able to see a DataSource containing our brand new Windows 11 golden image (see Figure 9).

Make the Windows 11 Golden Image cluster wide available
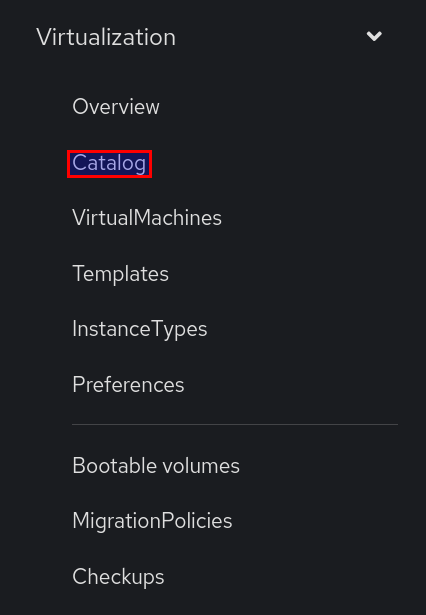
If a cluster admin wants to enable regular users to create VMs based in the golden image just created, the most convenient way to create VMs is using InstanceTypes. However, in order to make our new golden image selectable from the InstanceTypes tab, an extra step is required. Navigate to Virtualization → Catalog as shown in Figure 10.
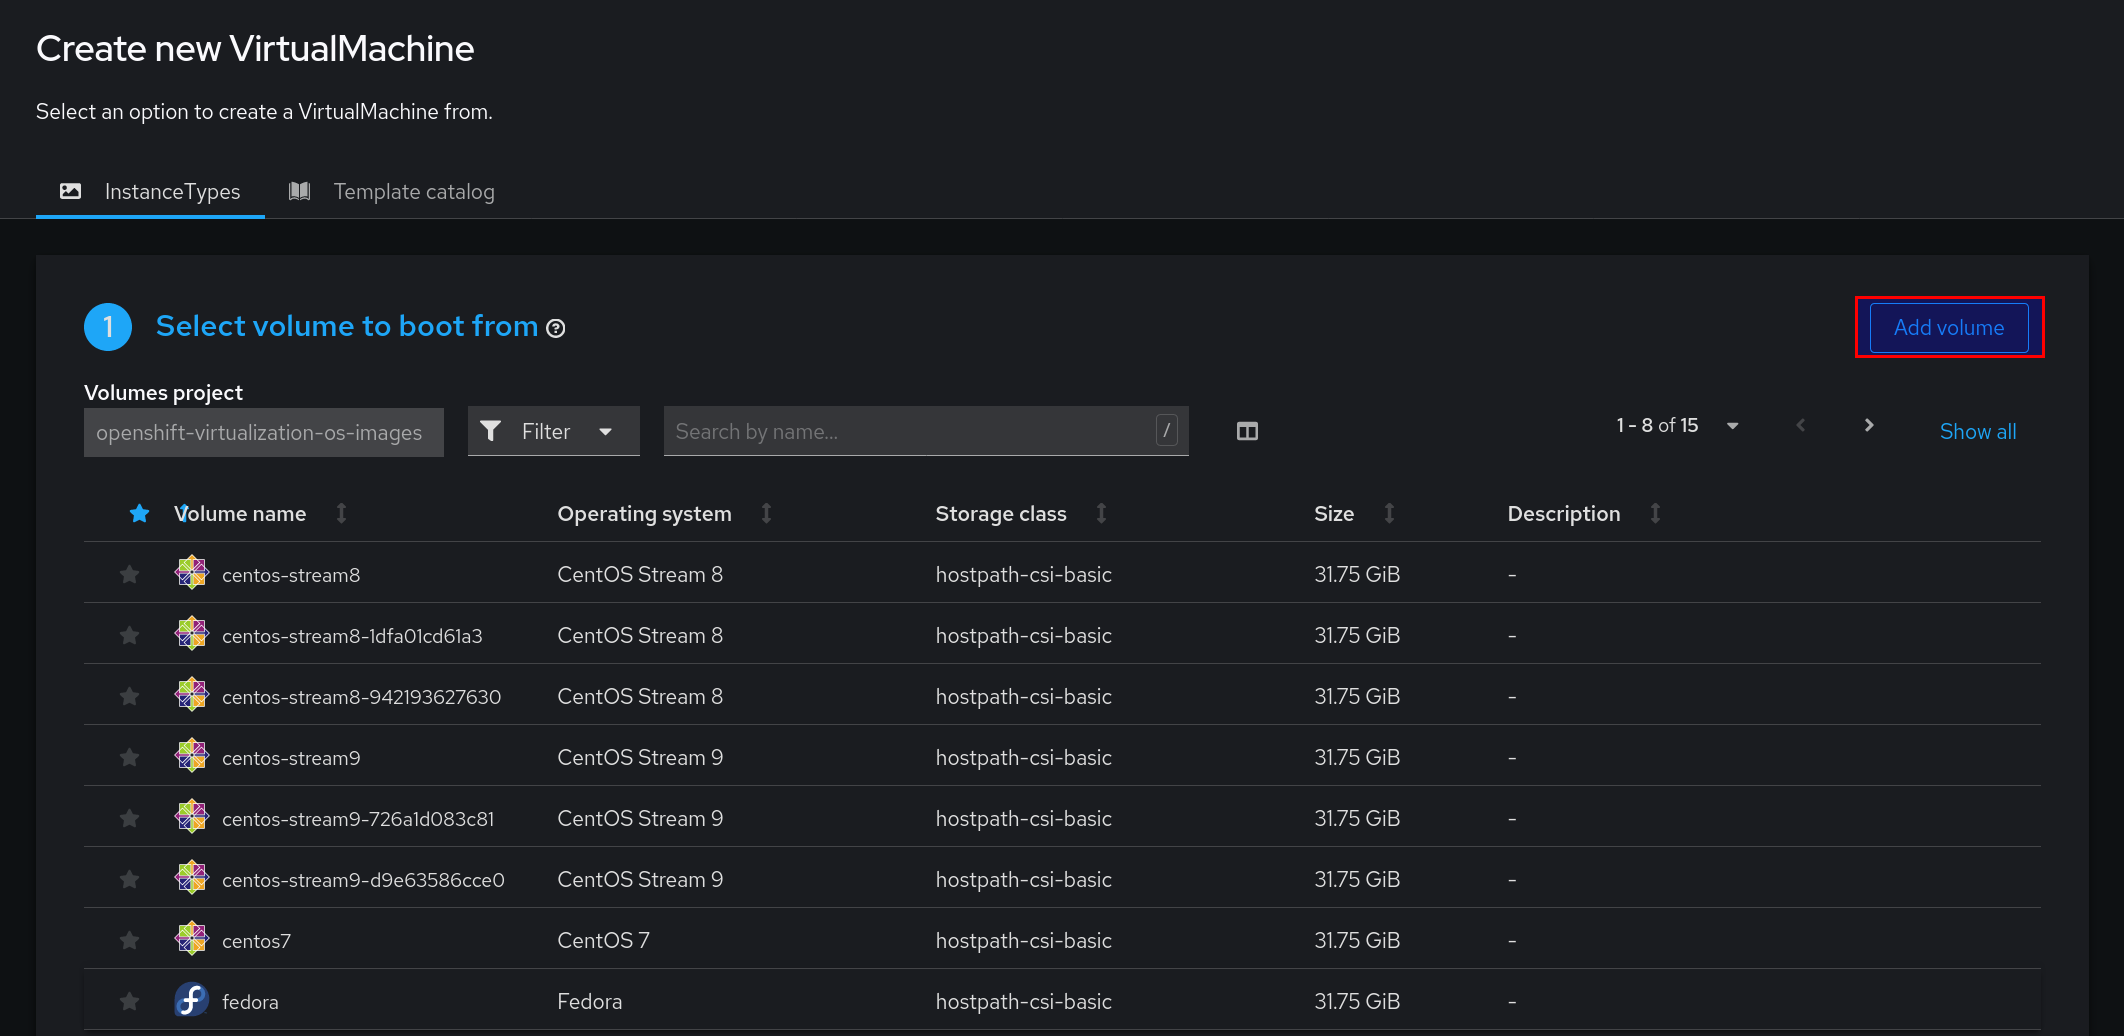
Go to the InstanceTypes tab (shown by default), and click the Add volume button as shown in Figure 11.
Now you need to fill out the required fields as shown in Figure 12.
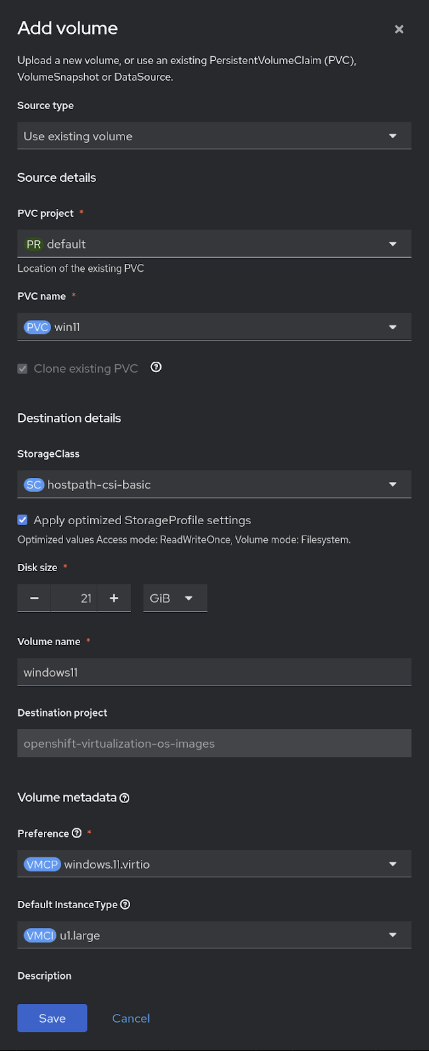
Note that you can select another StorageClass and Default InstanceType depending on your cluster resources and/or needs. However, due to the known CNV-42080, do not use win11 as the Volume name value.
You just need to wait a bit for the importing process to finish, and you will be ready to create your first Windows 11 VM inside OpenShift Virtualization.
Create a Windows 11 virtual machine
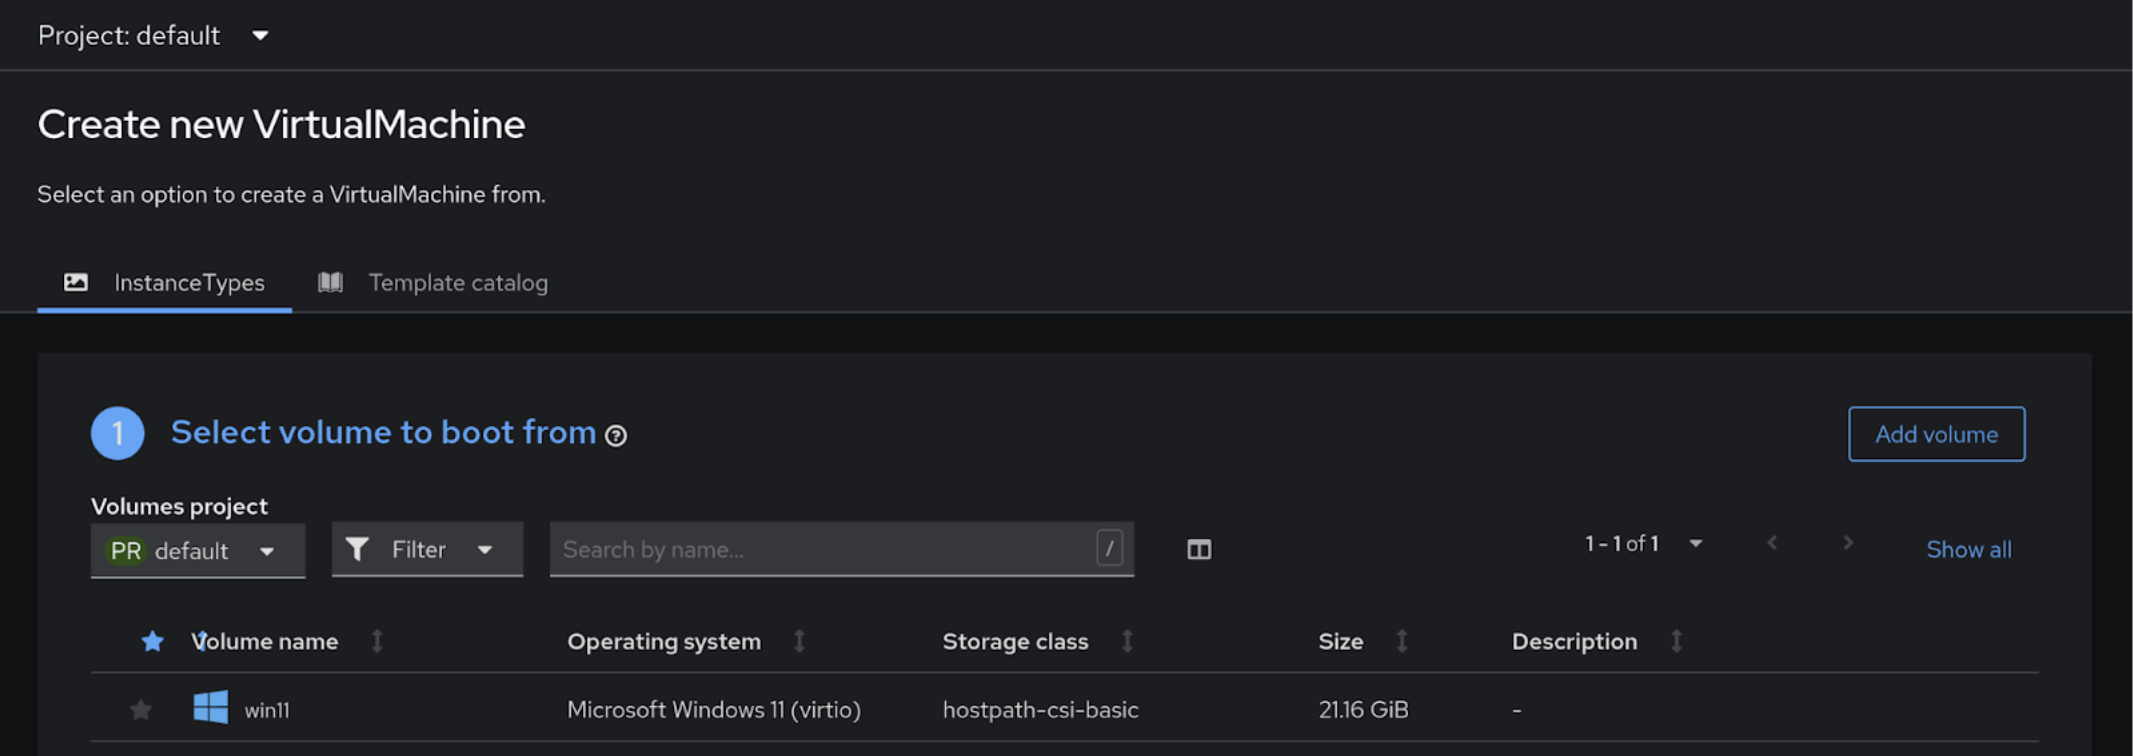
Now that you have the Windows 11 golden image created and imported into the InstanceTypes catalog, it is time to create a VM using it! Go once again to section Virtualization → Catalog as shown in Figure 10.
Under Select volume to boot from, look for our new win11 volume. You can use the search bar as shown in Figure 13.
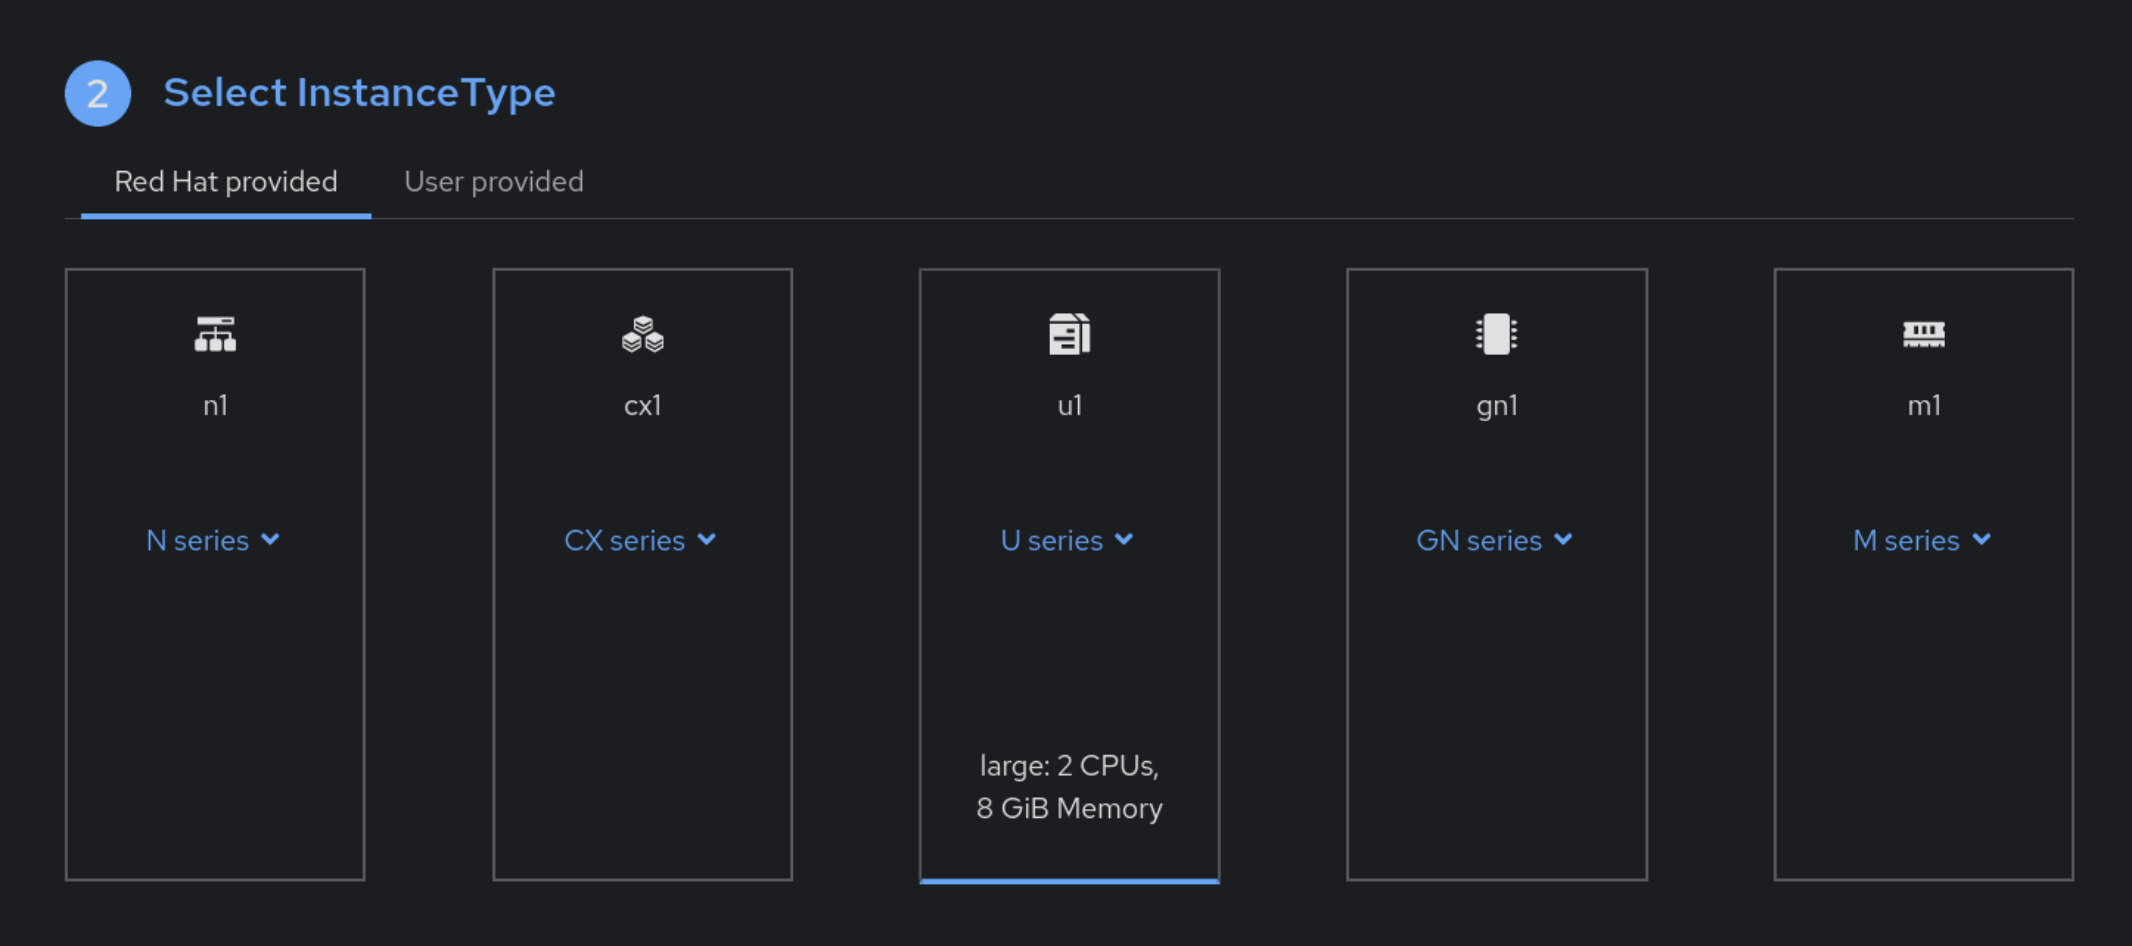
In section Select InstanceType, the default InstanceType will be automatically selected. You may customize it depending on your needs. In this case, we will select the u1.large InstanceType as shown in Figure 14.
The section VirtualMachine details will show the summary of the selected options. In this step, you can modify some extra parameters like the name of the VM or the Storage Class or add a sysprep. As mentioned before, a sysprep can be used to automate some steps of the configuration process. You can click the Sysprep button highlighted in Figure 15 to do so.
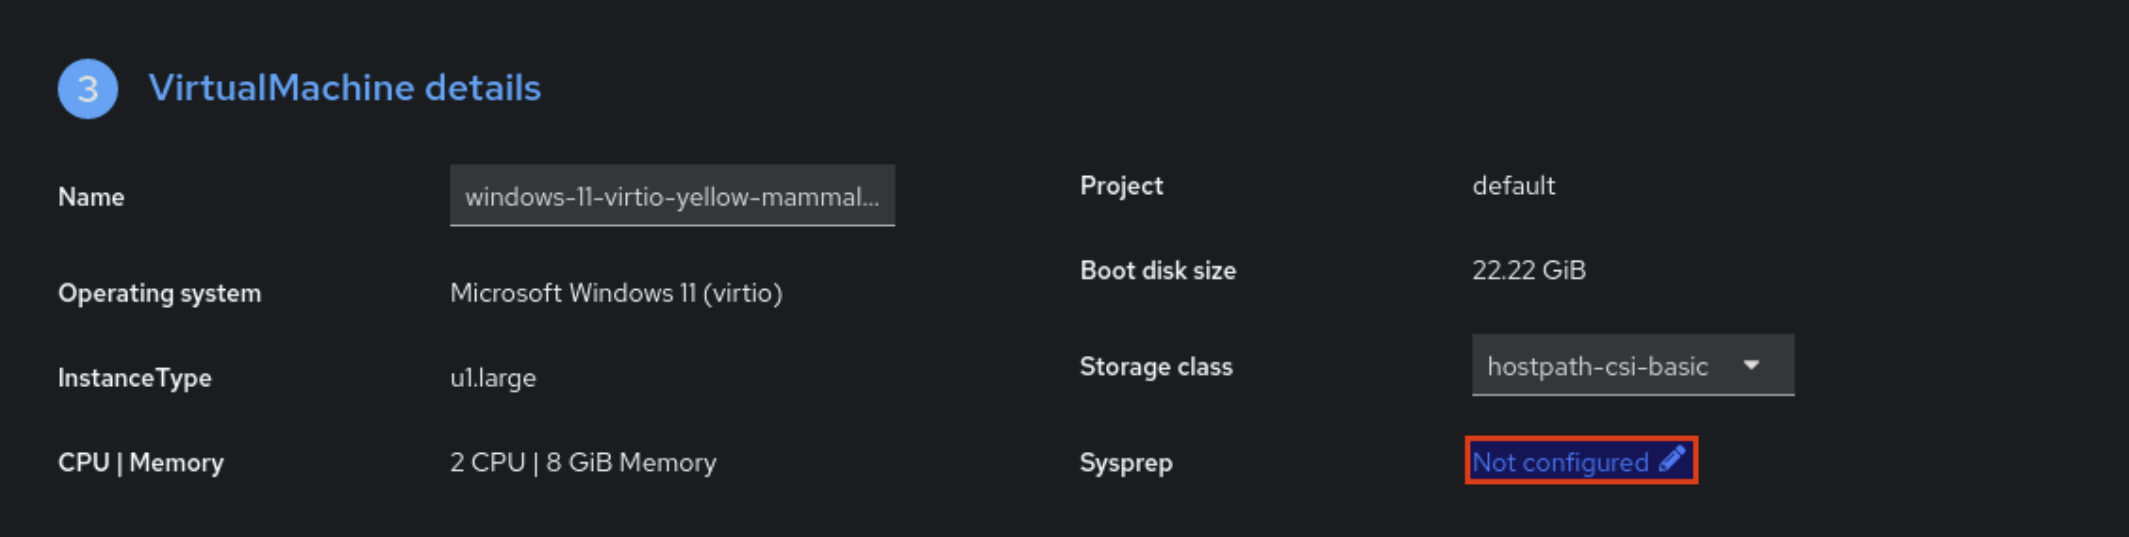
A new window will appear, in here, you can input in the Unattend.xml answer file text box a sysprep of your choice. For demonstration purposes, we are going to define a sysprep that will perform some configuration actions such as: skip the OOBE, create an administrator account, establish the time zone, etc.:
<?xml version="1.0" encoding="utf-8"?>
<unattend
    xmlns="urn:schemas-microsoft-com:unattend">
    <settings pass="specialize">
     <component name="Microsoft-Windows-Deployment" processorArchitecture="amd64" publicKeyToken="31bf3856ad364e35" language="neutral" versionScope="nonSxS">
         <ExtendOSPartition>
             <Extend>true</Extend>
         </ExtendOSPartition>
     </component>
    </settings>
    <settings pass="oobeSystem">
     <component
         xmlns:wcm="http://schemas.microsoft.com/WMIConfig/2002/State"
         xmlns:xsi="http://www.w3.org/2001/XMLSchema-instance" name="Microsoft-Windows-Shell-Setup" processorArchitecture="amd64" publicKeyToken="31bf3856ad364e35" language="neutral" versionScope="nonSxS">
         <OOBE>
             <HideEULAPage>true</HideEULAPage>
             <HideOEMRegistrationScreen>true</HideOEMRegistrationScreen>
             <HideOnlineAccountScreens>true</HideOnlineAccountScreens>
             <HideWirelessSetupInOOBE>true</HideWirelessSetupInOOBE>
             <NetworkLocation>Work</NetworkLocation>
             <SkipUserOOBE>true</SkipUserOOBE>
             <SkipMachineOOBE>true</SkipMachineOOBE>
             <ProtectYourPC>3</ProtectYourPC>
         </OOBE>
         <AutoLogon>
             <Password>
                 <Value>123456</Value>
                 <PlainText>true</PlainText>
             </Password>
             <Enabled>true</Enabled>
             <Username>Administrator</Username>
         </AutoLogon>
         <UserAccounts>
             <AdministratorPassword>
                 <Value>123456</Value>
                 <PlainText>true</PlainText>
             </AdministratorPassword>
         </UserAccounts>
         <RegisteredOrganization/>
         <RegisteredOwner/>
         <TimeZone>Eastern Standard Time</TimeZone>
     </component>
    </settings>
</unattend>
All you need to do is to copy and paste it in the "Unattend.xml answer file" text box and click the Save button.
Finally, at the bottom of the page, the Create VirtualMachine is shown. Click it with the Start this VirtualMachine after creation option enabled, as shown in Figure 16. The VM will be created and started as soon as possible.

Here is how to get those Boot Configuration Data (BCD) elements all sorted before you enable BitLocker or restart. Launch a PowerShell as an Administrator and run the following commands:
bcdedit /set '{current}' device partition=C:
bcdedit /set '{current}' osdevice partition=C:

$bcdOutput = bcdedit /enum all | Out-String
$pattern = "(?msi)Resume from Hibernate\s*--+\s*identifier\s+({[0-9a-fA-F-]+})"

if ($bcdOutput -match $pattern) {
    $identifier = $Matches[1]
    bcdedit /set $identifier device partition=C:
} else {
    Write-Output "Identifier for 'Resume from Hibernate' not found."
}

bcdedit /set '{memdiag}' device partition=\Device\HarddiskVolume1
That’s all. Now you have a fully working Windows 11 VM. Moreover, by using your fresh new Windows 11 golden image, you can spam as many Windows 11 VMs as your cluster resources allows you.
Configure additional Windows versions
This pipeline is not limited to only Windows 11, it can be used to deploy other Windows versions. For this purpose, you need to get a valid download URL and populate the field spec.params.[“winImageDownloadURL”].value with it. However, you would also need to provide a compatible autounattendConfigMapName and preferenceName parameters. Moreover, it is also recommended adding the parameters baseDvName and isoDVName. This may sound a bit overwhelming, but do not worry; it is easier than you might think. Let’s see an example. In this case, we would like to create a Windows 10 golden image. For this purpose, first you need to get a valid download URL and add/modify the mentioned parameters:
apiVersion: tekton.dev/v1
kind: PipelineRun
metadata:
    generateName: windows10-installer-run-
spec:
    params:
    -   name: winImageDownloadURL
        value: "https://windows-10-download-link.com"
    -   name: aceptEULA
        value: False # By setting this parameter to "True", you are agreeing to the applicable Microsoft end user license agreement(s) for each deployment or installation for the Microsoft product(s).
    -  name: preferenceName
       value: windows.10.virtio
    -  name: autounattendConfigMapName
       value: windows10-efi-autounattend
    -  name: baseDvName
       value: win10
    -  name: isoDVName
       value: win10
    pipelineRef:
[...]
    taskRunSpecs:
    -   pipelineTaskName: modify-windows-iso-file
        podTemplate:
            securityContext:
                runAsGroup: 107
                runAsUser: 107
After the pipeline finishes, you will have a Windows 10 golden image available in the target namespace.
Customize the installation process
In case you want to customize your golden image to fit your needs, you can modify or create the sysprep that generates the golden image. For this purpose, you need to create a new ConfigMap with the following structure:
apiVersion: v1
kind: ConfigMap
metadata:
  name: windows-autounattend-custom
data:
  autounattend.xml: |
    <?xml version="1.0" encoding="utf-8"?>
    <unattend xmlns="urn:schemas-microsoft-com:unattend" xmlns:wcm="http://schemas.microsoft.com/WMIConfig/2002/State">
      #Insert here your custom configurations
    </unattend>
  post-install.ps1 |
    #Insert here your commands to perform customizations
To create the ConfigMap, you need to navigate to Workloads → ConfigMaps, as shown in Figure 17.
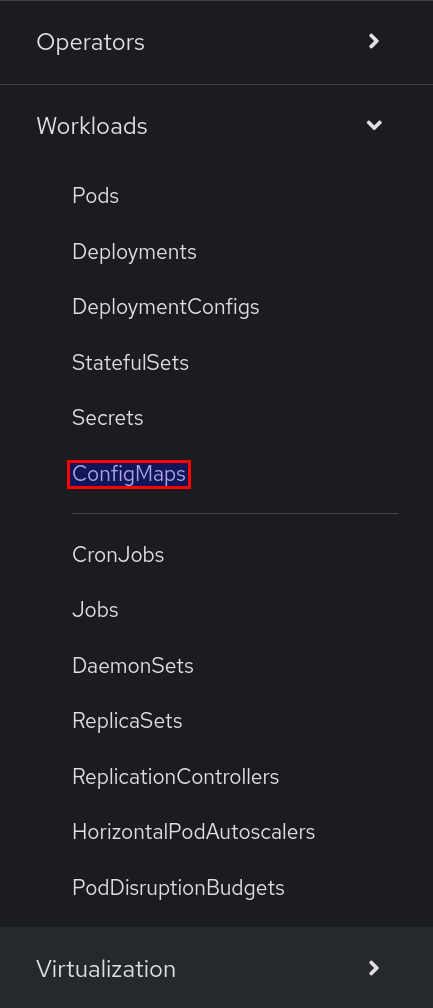
You need to create the ConfigMap in the same project where you want to run the pipeline and create the Windows golden image. Click the Create ConfigMap button. A YAML editor will show up, here you can paste your customized brand new sysprep.
In order to inform your pipeline that you want to use a custom sysprep, you need to modify the parameter spec.params.[“autounattendConfigMapName”].value. In this case, your new sysprep is called windows-autounattend-custom, and the final pipelineRun manifest should look like this:
apiVersion: tekton.dev/v1
kind: PipelineRun
metadata:
    generateName: windows10-installer-run-
spec:
    params:
[...]
    -   name: autounattendConfigMapName
        value: windows10-autounattend-custom
[...]
    pipelineRef:
[...]
Finally, you can create the pipelineRun button and your new Windows golden image should be ready soon to create as many VMs as you need based on it.
Conclusion
In this article, we have shown how the OpenShift Virtualization Windows UEFI installer pipeline can be used to create customized Windows 11 and 10 golden images. Moreover, we have shown the recommended workflow to create an OpenShift Virtualization virtual machine from these golden images, as well as the way to further customize the final virtual machines using Sysprep.
In case you are interested in working with Windows virtual machines, try using the OpenShift Virtualization Windows UEFI installer pipeline to create your golden images. You may use the default autounattend file or customize it to fit your needs. The possibilities are endless!
Last updated: July 7, 2025