As AI and machine learning become integral to modern applications, developers need robust platforms that simplify the development and deployment process. Red Hat OpenShift AI offers a powerful and flexible environment tailored for these needs, making it easier for AI engineers and DevOps teams to collaborate and deliver high-quality AI solutions. In this blog post, we’ll explore how to set up a fraud detection system using Red Hat OpenShift AI, complete with a practical example and a demo API.
Developer experience with OpenShift
OpenShift AI simplifies the journey for teams working on AI applications. Utilizing OpenShift AI and Red Hat OpenShift, developers can enjoy a streamlined and efficient workflow. Let's take a look at an overview of the process:
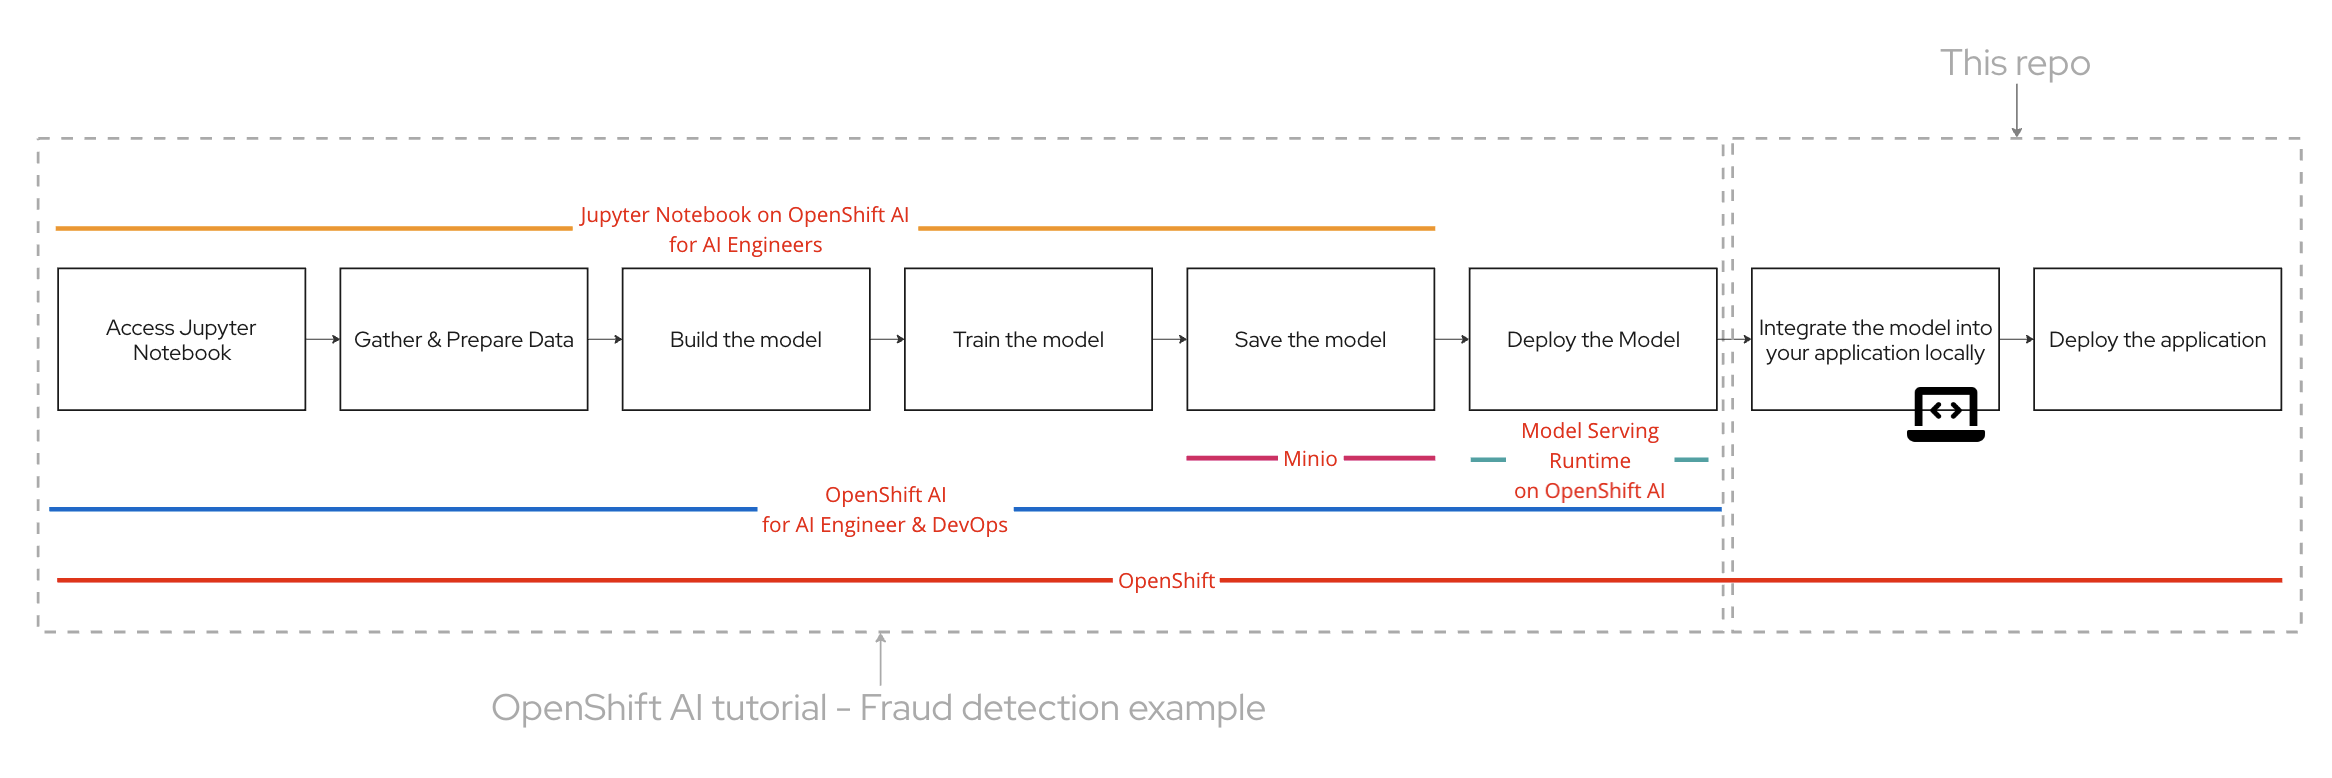
- Access Jupyter Notebook: Begin by accessing the Jupyter Notebook on OpenShift AI. This environment is ideal for AI engineers to experiment and develop their models.
- Gather & Prepare Data: Collect and preprocess the data necessary for training the fraud detection model. Ensuring high-quality data is crucial for building an accurate model.
- Build the Model: Develop the fraud detection model using machine learning algorithms. The Jupyter Notebook provides a convenient interface for this step.
- Train the Model: Train your model using the prepared dataset. This involves adjusting the model parameters to improve its accuracy in detecting fraudulent activities.
- Save the Model: Once the model is trained, save it for future deployment. This step ensures that the model can be easily accessed and utilized in the application.
- Deploy the Model: Deploy the trained model using OpenShift AI. This platform streamlines the deployment process, making it simple for AI engineers and DevOps teams to collaborate.
- Integrate the Model: Integrate the deployed model into your application locally. This step involves ensuring that the application can interact with the model to perform real-time fraud detection.
- Deploy the Application: Finally, deploy the application, ensuring that the fraud detection model is fully functional within the operational environment.
Red Hat Developer Sandbox, along with Red Hat OpenShift and Red Hat OpenShift AI are free to use and readily available for to try out the developer experience with these products. Signup for the Red Hat Developer Sandbox now!
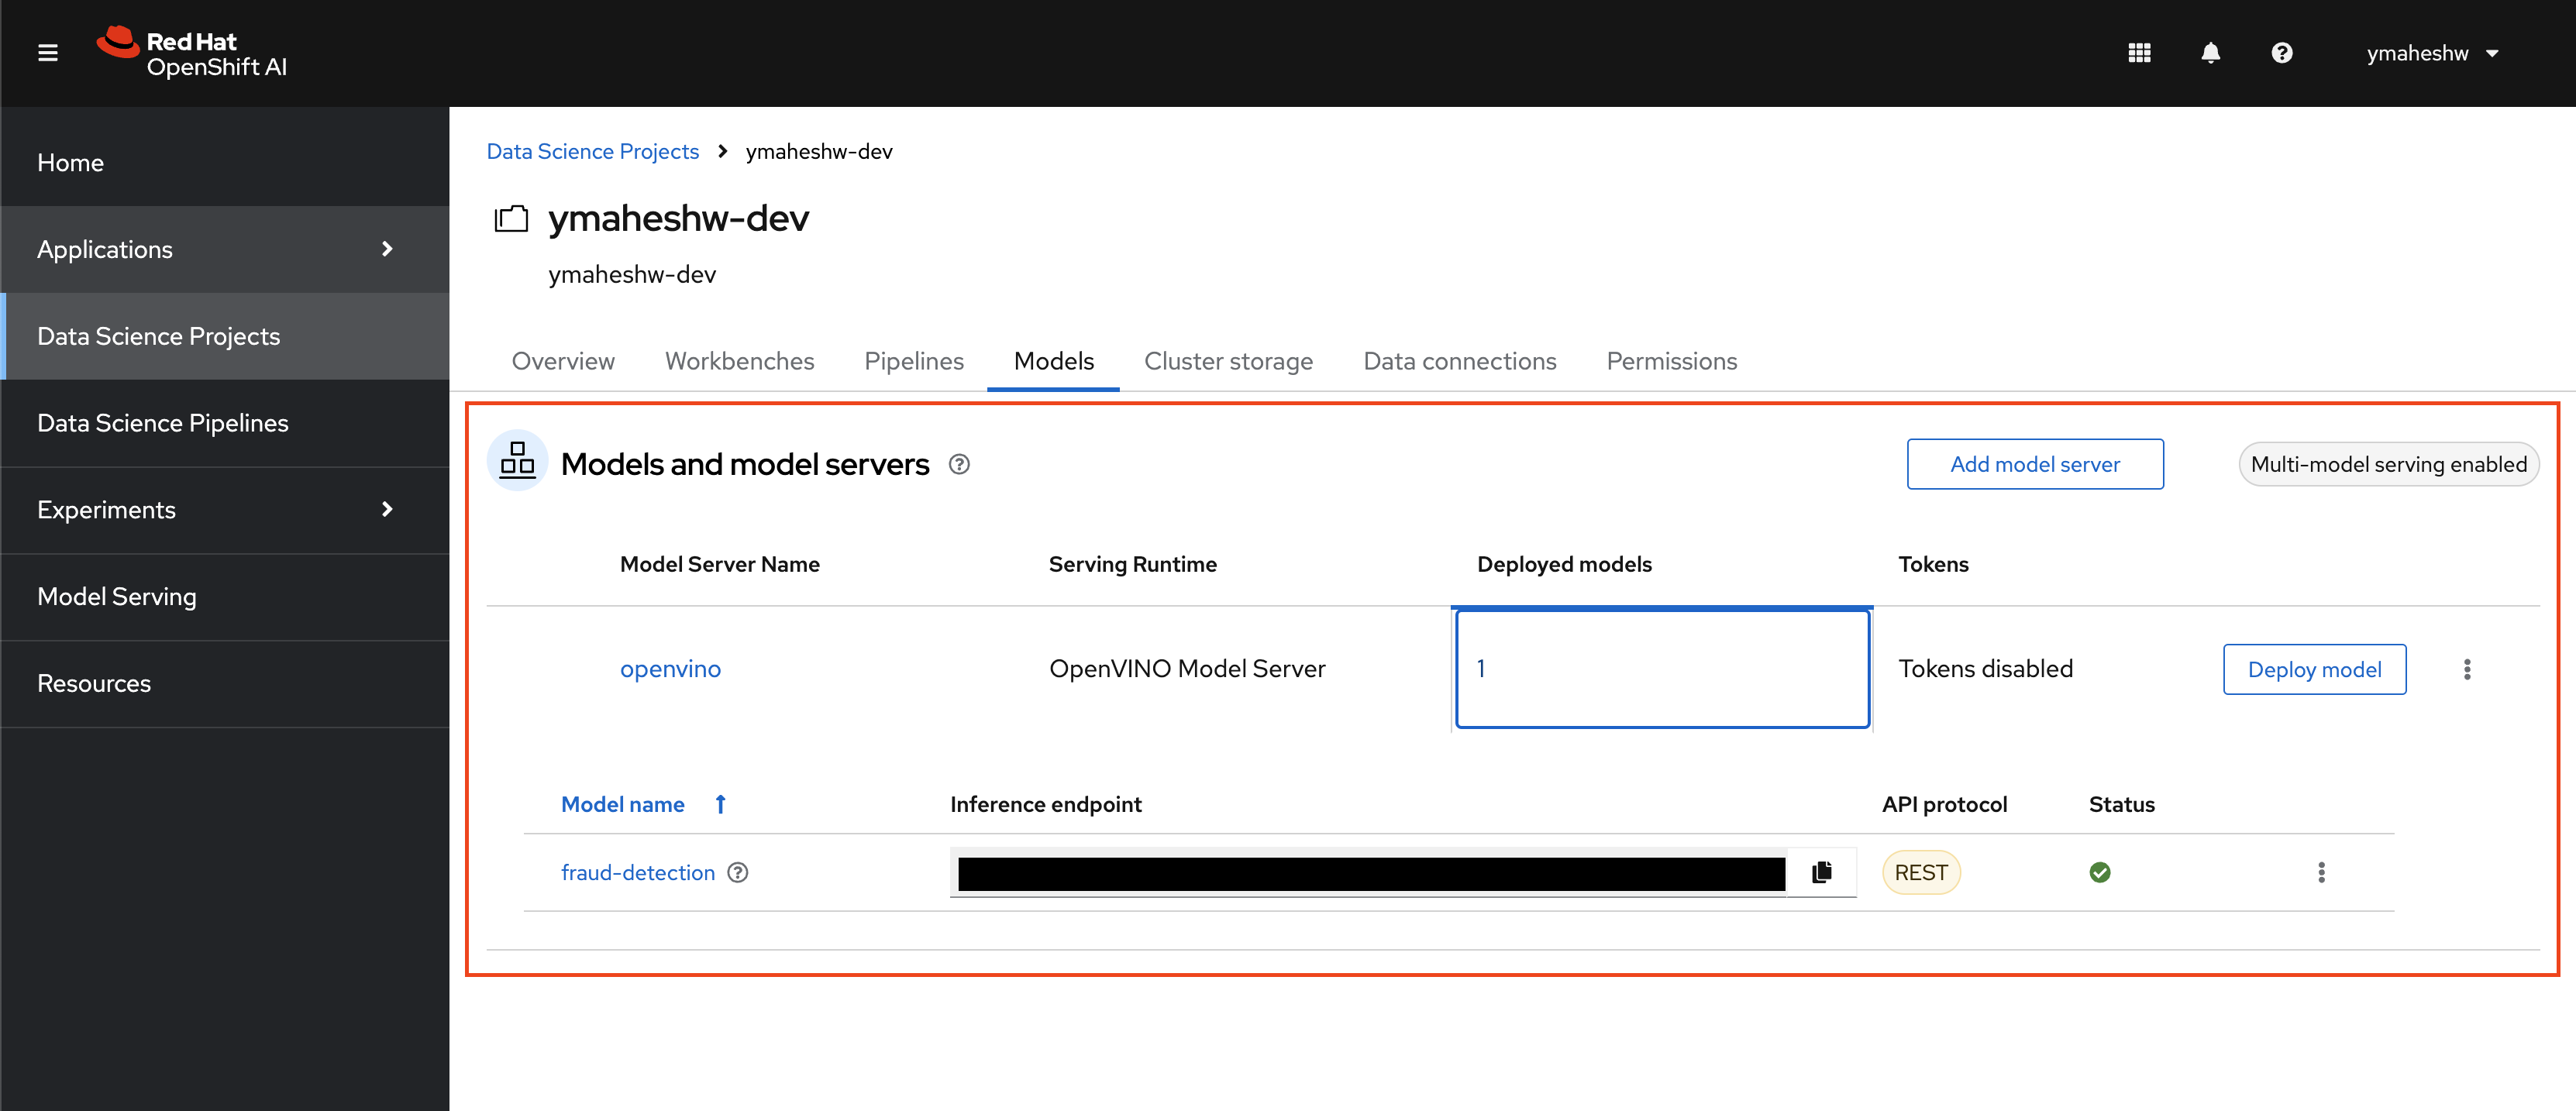
Build, train, store, and serve the model using OpenShift AI Sandbox
Red Hat OpenShift AI streamlines the entire lifecycle of AI models. You can build and train your machine learning models within a Jupyter Notebook environment on OpenShift AI, ensuring a seamless development process. Once trained, models are easily stored using integrated solutions like Minio, providing secure and scalable storage. Deploying these models for serving is straightforward with OpenShift AI, enabling efficient and reliable inference. This end-to-end support simplifies AI workflows, allowing teams to focus on innovation.
For a detailed example of implementing a fraud detection system, you can refer to the OpenShift AI tutorial - Fraud detection example. This tutorial provides a comprehensive guide to setting up and deploying a fraud detection model using OpenShift AI.
By the end of 4.2 on the article, you will have a model deployed on OpenShift AI. Once you have that we will need a service that does the job of connecting to the model.
Create a service that talks to the model
Integrate the fraud detection AI model into your API to identify fraudulent transactions. The provided Python application uses Flask to set up an API endpoint that processes transaction data. It loads a pre-trained scaler for data normalization and constructs a request to the model server. Depending on the environment, the app uses a different URL for the model server, ensuring flexibility. When a transaction is submitted, the app preprocesses the data, sends it to the model server for inference, and returns a response indicating if the transaction is fraudulent. For more details, see app.py.
Here’s a brief overview of what's going on:
- Receives data via POST request
- Scales the data using a pre-loaded scaler
- Sends the scaled data to a model server
- Processes the model’s response to classify the data as ‘fraud’ or ‘not fraud’
- Responds with the classification result
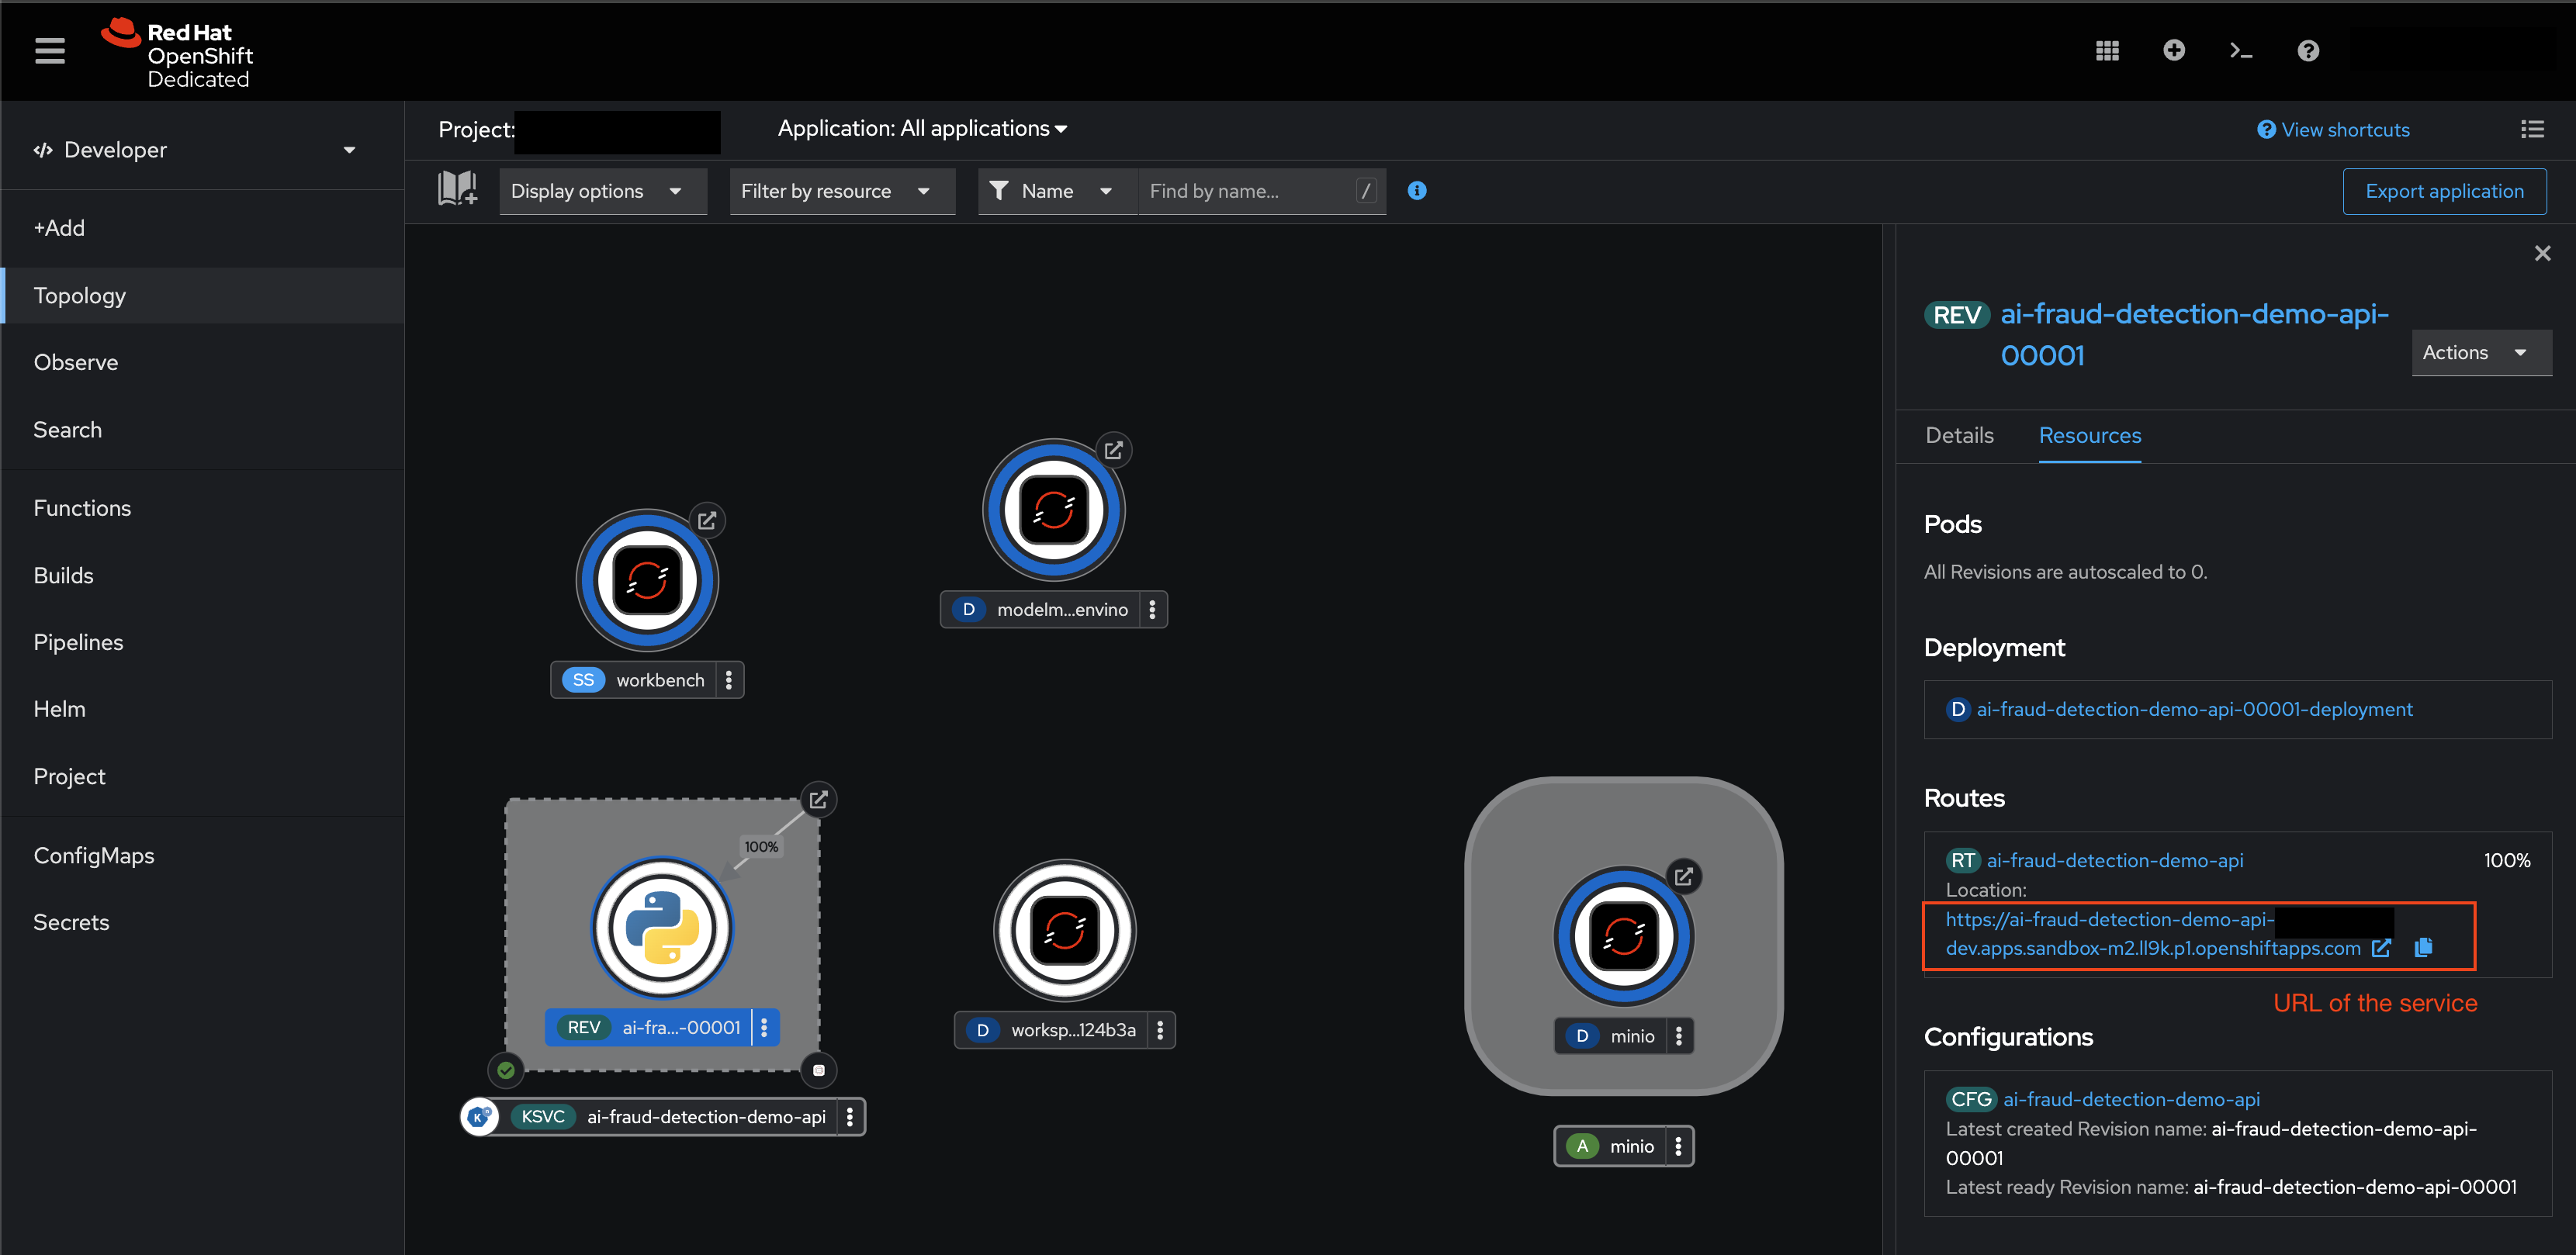
This internal platform service enables other applications on your cluster to interface with the AI model. The service accepts an array in the format:
[distance, ratio_to_median, pin, chip, online]It responds with a message indicating whether the transaction is fraudulent:
{
   "message": "fraud/not fraud"
}
Deploying the service to the Developer Sandbox
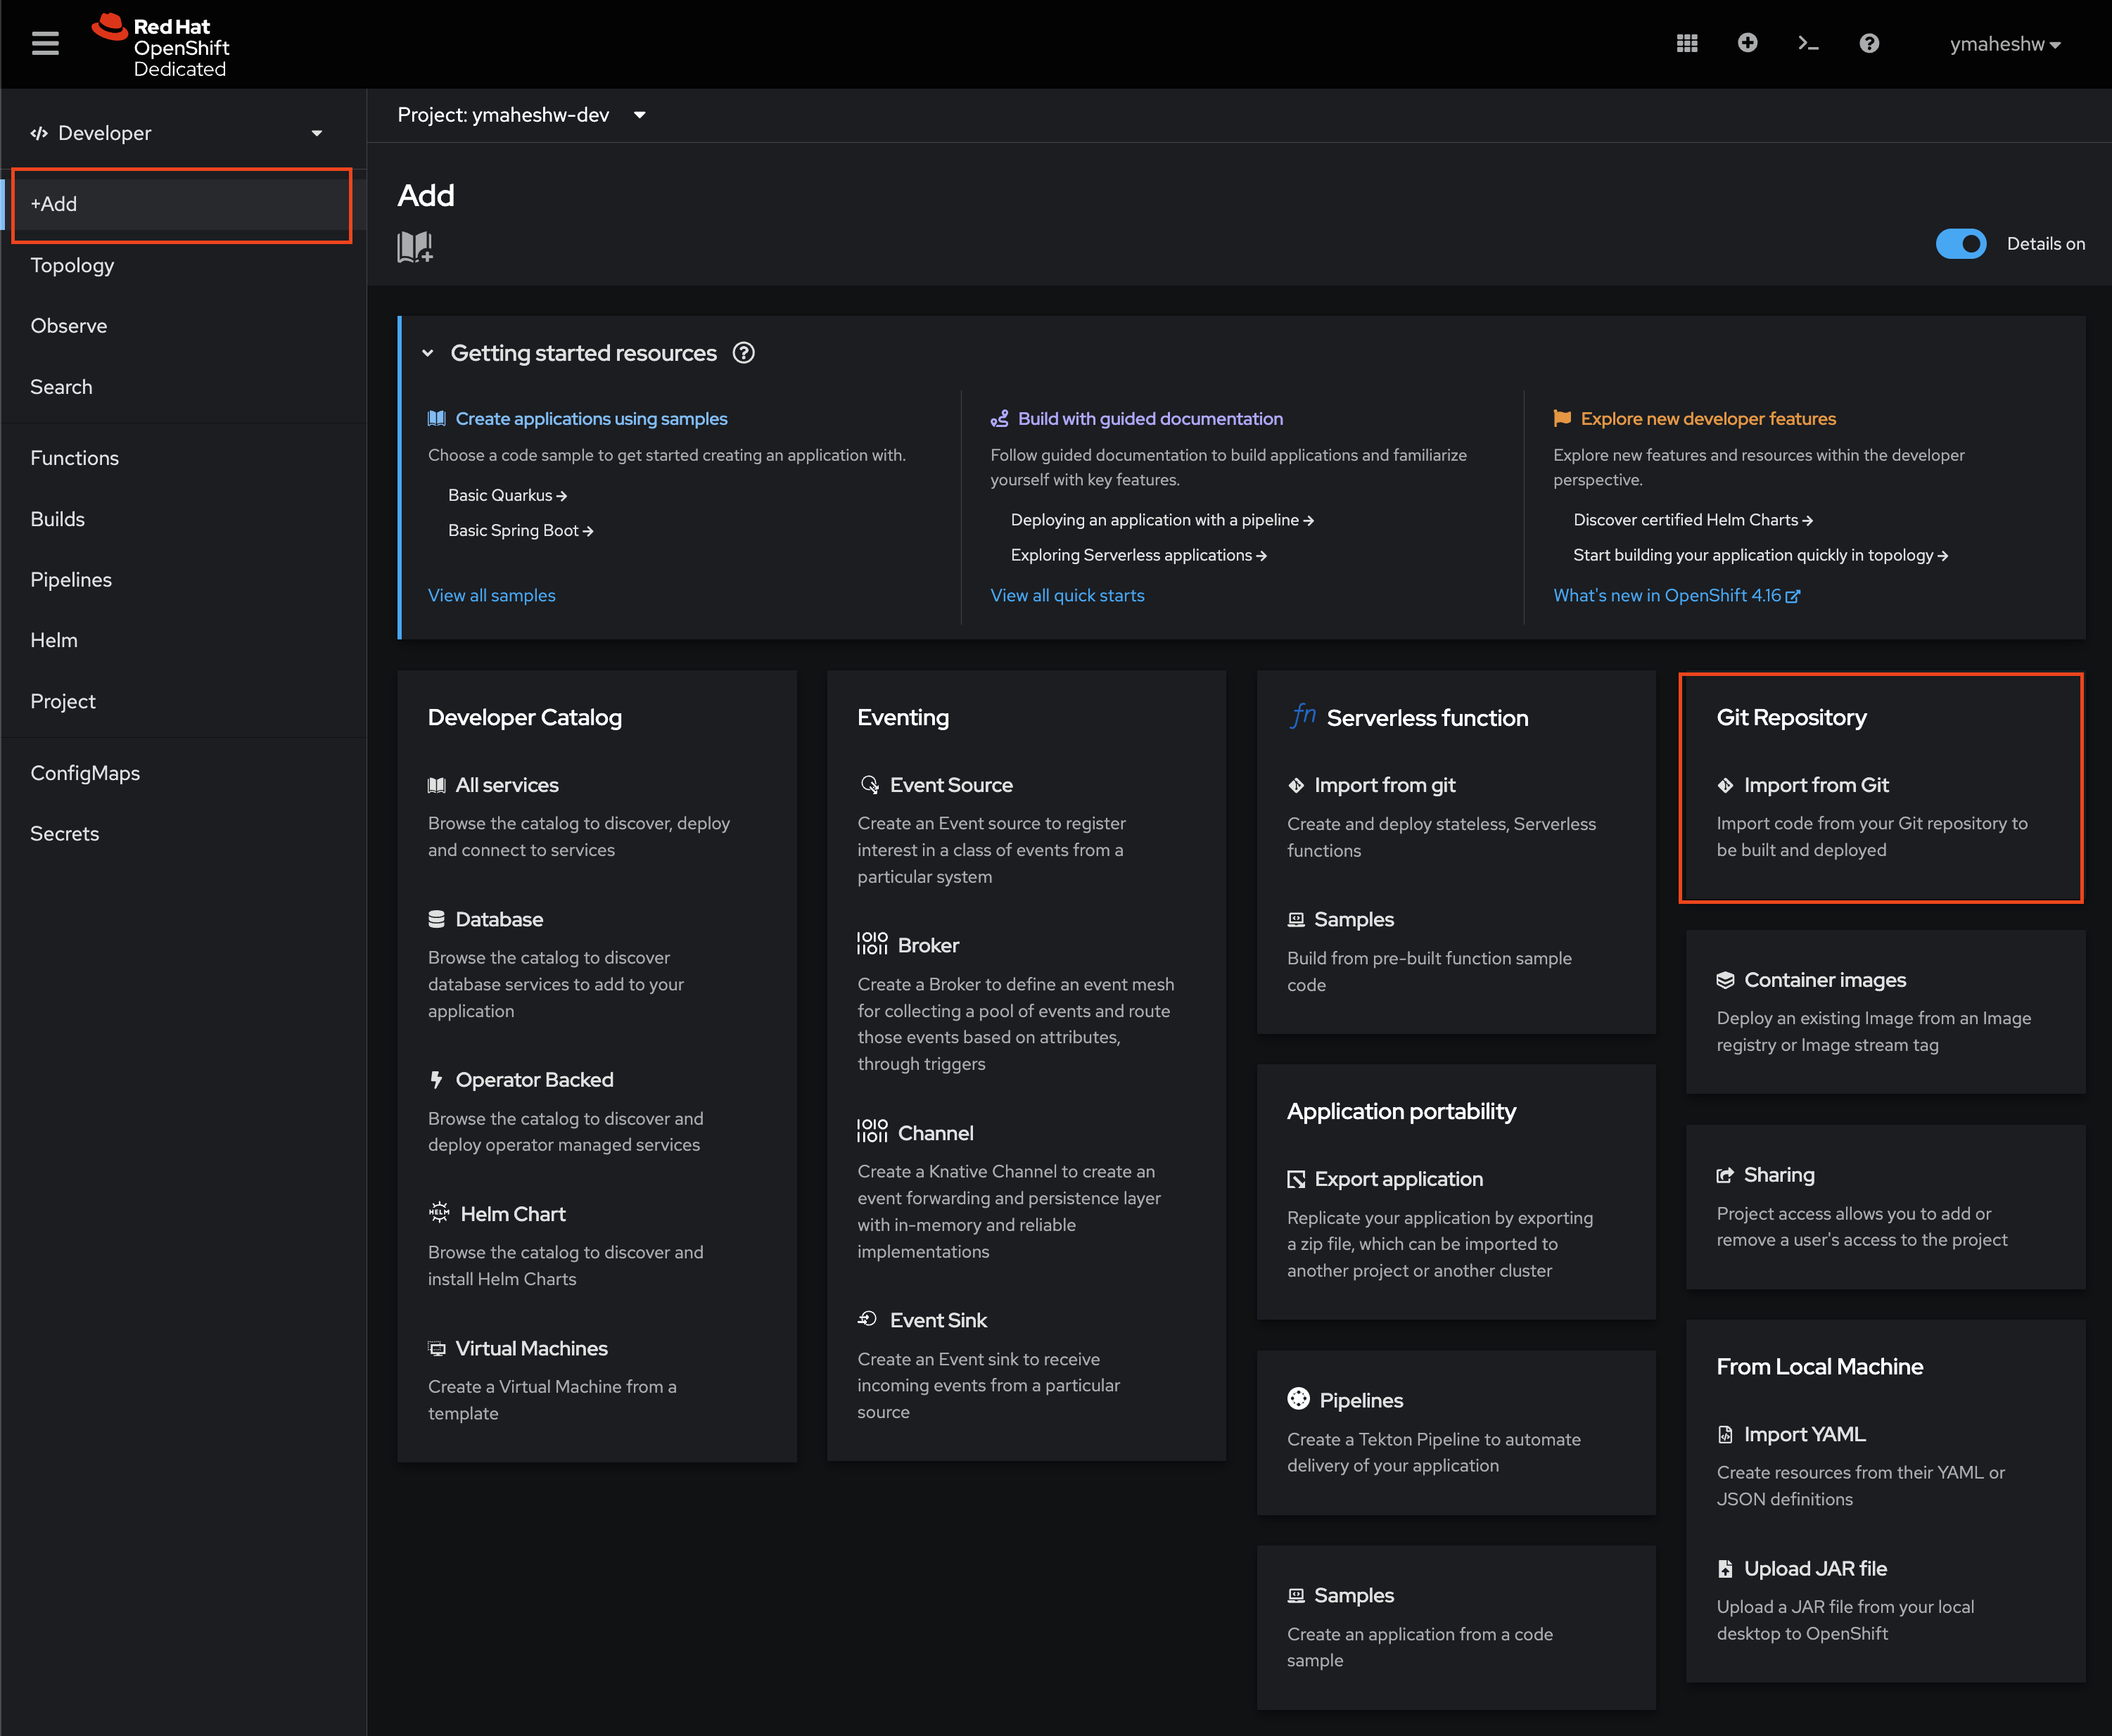
OpenShift simplifies application deployment through its Source-to-Image (S2I) feature, making it an ideal choice for developers who want to deploy applications quickly without diving into the complexities of container management. S2I streamlines the process by automating the creation of container images from source code. OpenShift’s S2I feature makes application deployment fast and efficient, allowing developers to focus on coding rather than managing containers. This streamlined approach not only speeds up the development process but also simplifies the deployment of applications in a modern cloud-native environment.
- Copy the Repository URL: Start by copying the URL of your repository.
- Log in to OpenShift Developer Sandbox: Access your OpenShift Developer Sandbox and log in.
- Navigate to the Developer View: Once logged in, switch to the Developer view.
- Add a New Application: Click on the “+Add” button.
- Import from Git: Select the “Import from Git” option.
-
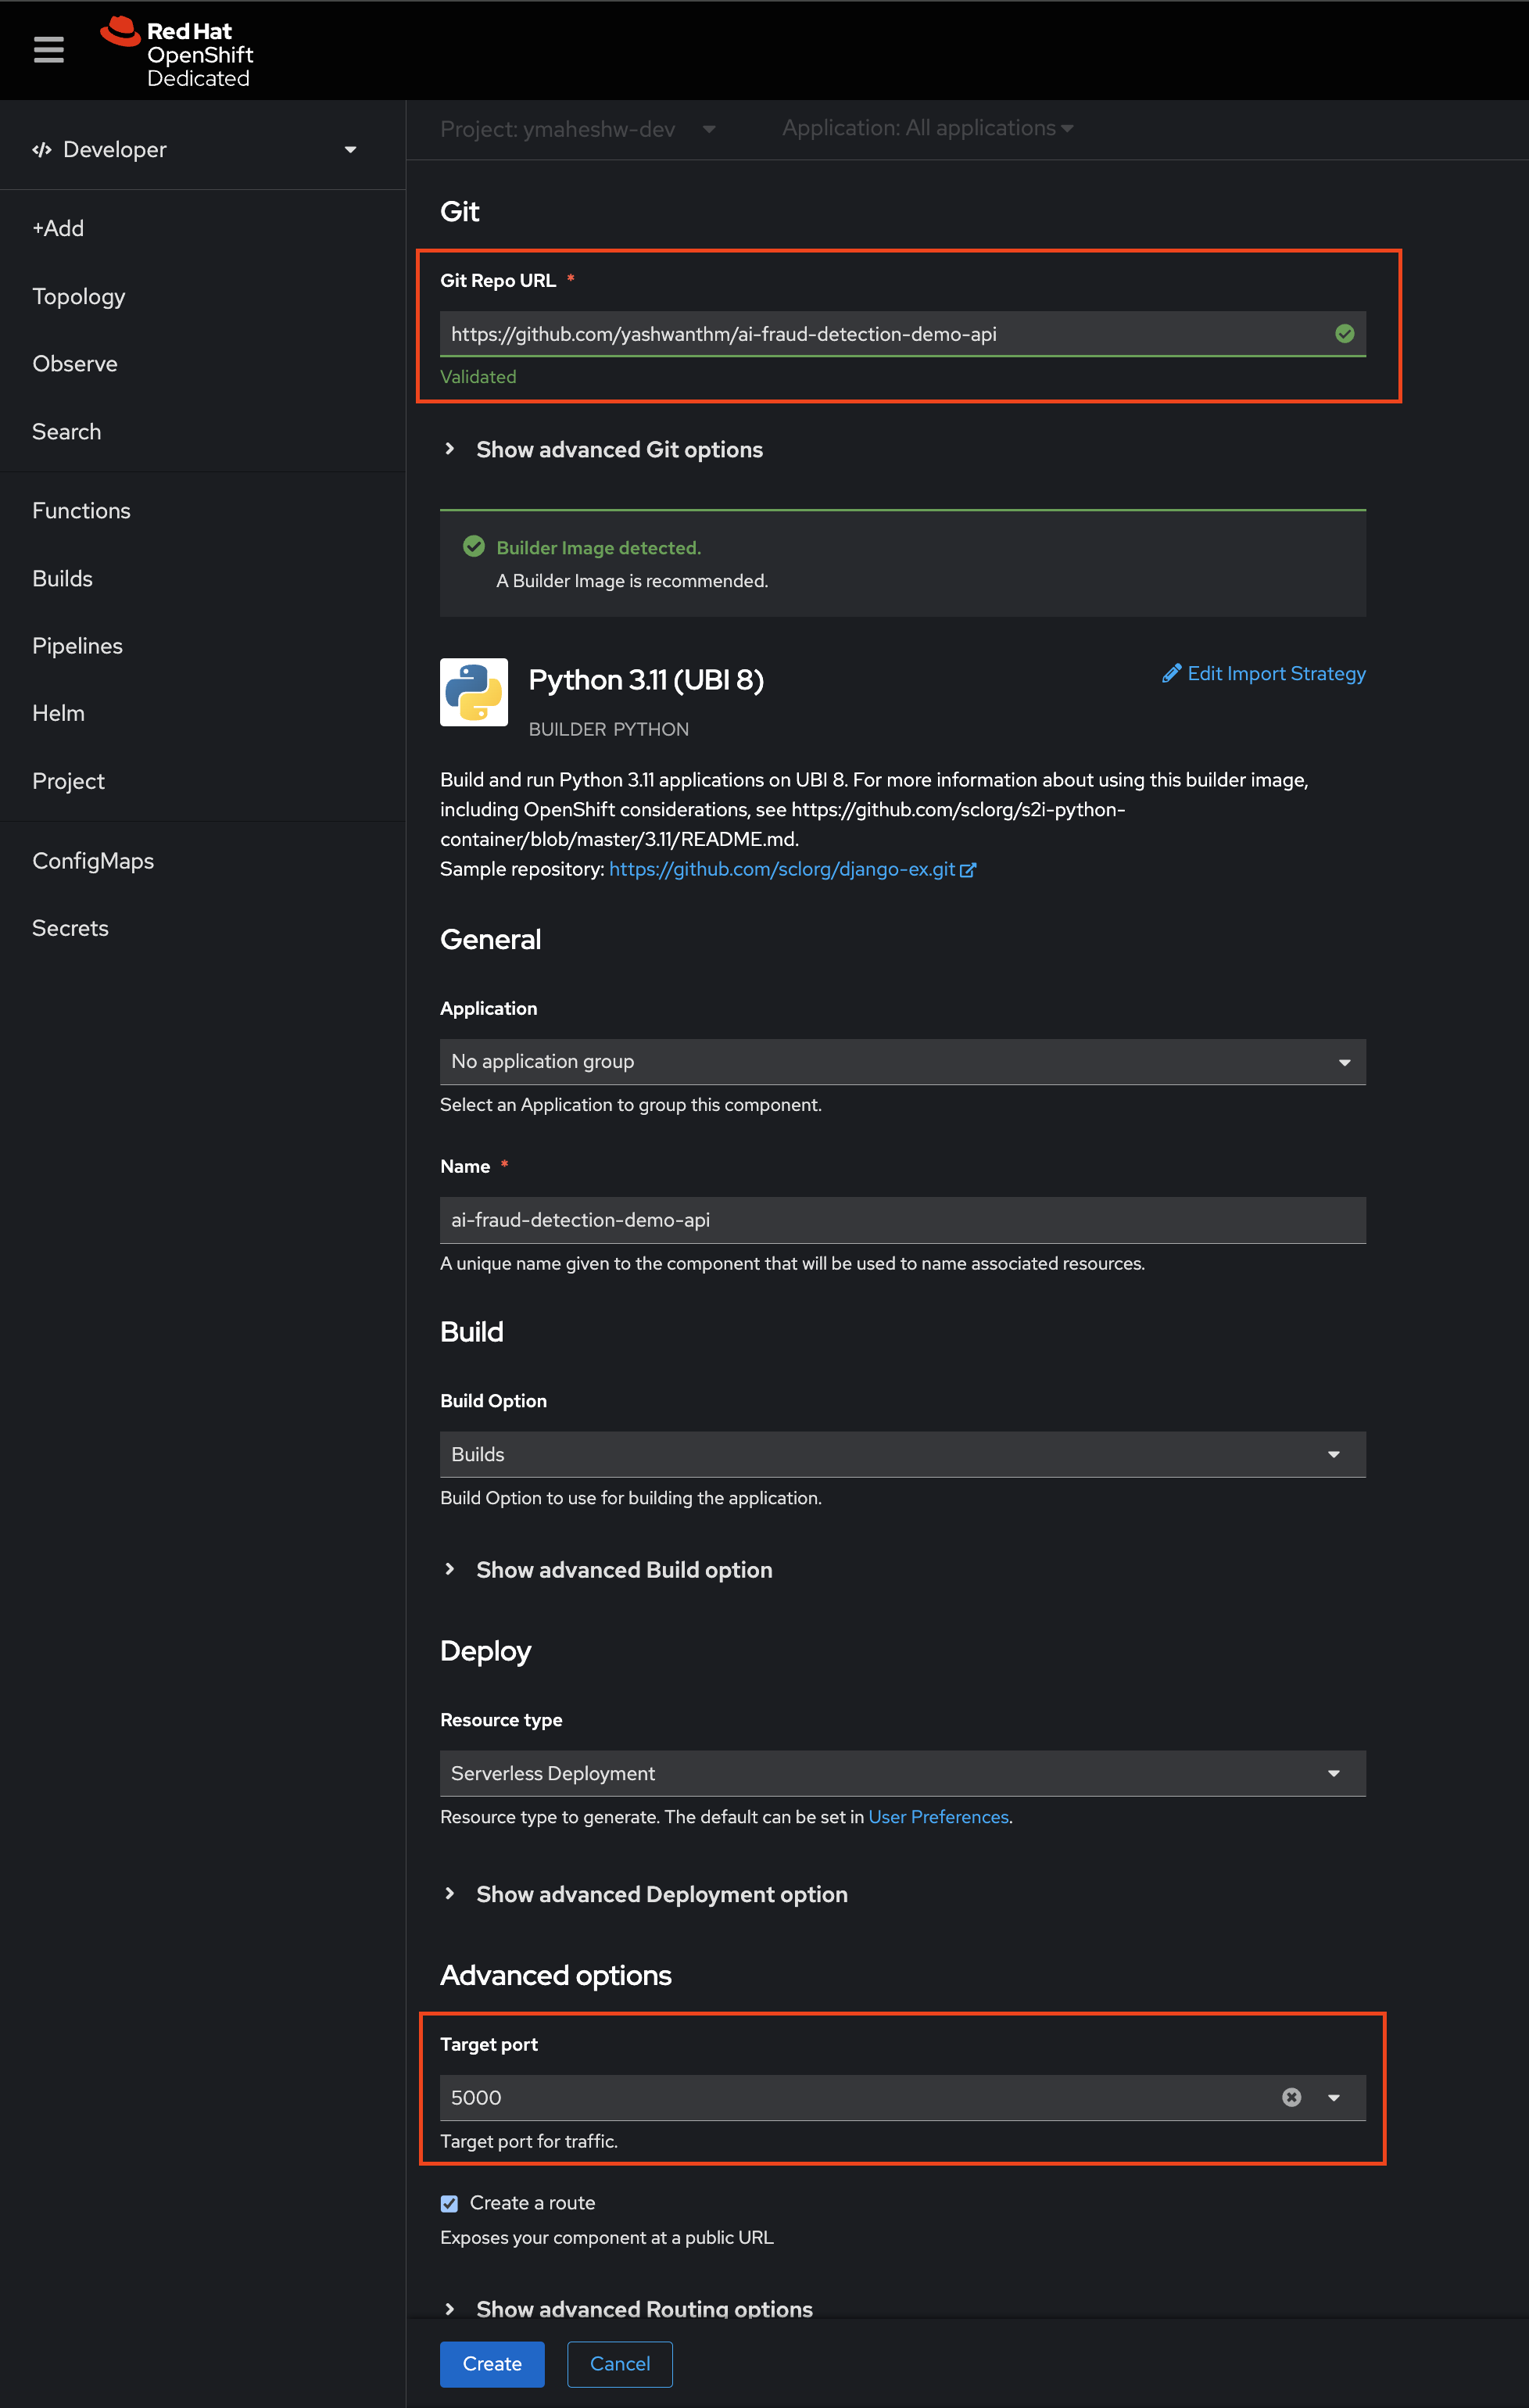
- Paste Repository URL: Paste the URL of your repository into the provided field.
- Configure Port and Create: Set the port to 5000 and click on the “Create” button.
-
- . Monitor Build Progress: Wait for the build process to complete. Once finished, you should see your application in the topology view.
-
- Test Your Service: To verify the deployment, execute a POST request in your terminal:
curl -X POST http://<ENTER YOUR ENDPOINT> -H "Content-Type: application/json" -d '{"data": [100, 1.2, 0.0, 0.0, 1.0]}'
Test a bit more
Case 1: Not a fradulent transaction
- same location as the last transaction (distance=0)
- same median price as the last transaction (ratio_to_median=1)
- using a pin number (pin=1)
- using the credit card chip (chip=1)
- not an online transaction (online=0)
`[0.0, 1.0, 1.0, 1.0, 0.0]`curl -X POST http://<ENTER YOUR ENDPOINT> -H "Content-Type: application/json" -d '{"data": [0.0, 1.0, 1.0, 1.0, 0.0]}'Case 2: Fraudulent transaction
- very far away from the last transaction (distance=100)
- median price similar to the last transaction (ratio_to_median=1.2)
- not using a pin number (pin=0)
- not using the credit card chip (chip=0)
- is an online transaction (online=1)
[100, 1.2, 0.0, 0.0, 1.0]curl -X POST http://<ENTER YOUR ENDPOINT> -H "Content-Type: application/json" -d '{"data": [100, 1.2, 0.0, 0.0, 1.0]}'
By leveraging Red Hat OpenShift AI, businesses can significantly enhance their Developer Expeirence for AI Engineers, Platform Engineers and Application Developers. The platform with Red Hat OpenShift and OpenShift AI simplifies the development and deployment process, providing a seamless experience for AI engineers and DevOps teams. By following the steps outlined in this blog post and utilizing the provided resources, you can build, deploy and serve intelligent applications that leverage AI models.