Redhat Developers  Logo
  • Products

    Featured

    • Red Hat Enterprise Linux
      Red Hat Enterprise Linux Icon
    • Red Hat OpenShift AI
      Red Hat OpenShift AI
    • Red Hat Enterprise Linux AI
      Linux icon inside of a brain
    • Image mode for Red Hat Enterprise Linux
      RHEL image mode
    • Red Hat OpenShift
      Openshift icon
    • Red Hat Ansible Automation Platform
      Ansible icon
    • Red Hat Developer Hub
      Developer Hub
    • View All Red Hat Products
    • Linux

      • Red Hat Enterprise Linux
      • Image mode for Red Hat Enterprise Linux
      • Red Hat Universal Base Images (UBI)
    • Java runtimes & frameworks

      • JBoss Enterprise Application Platform
      • Red Hat build of OpenJDK
    • Kubernetes

      • Red Hat OpenShift
      • Microsoft Azure Red Hat OpenShift
      • Red Hat OpenShift Virtualization
      • Red Hat OpenShift Lightspeed
    • Integration & App Connectivity

      • Red Hat Build of Apache Camel
      • Red Hat Service Interconnect
      • Red Hat Connectivity Link
    • AI/ML

      • Red Hat OpenShift AI
      • Red Hat Enterprise Linux AI
    • Automation

      • Red Hat Ansible Automation Platform
      • Red Hat Ansible Lightspeed
    • Developer tools

      • Red Hat Trusted Software Supply Chain
      • Podman Desktop
      • Red Hat OpenShift Dev Spaces
    • Developer Sandbox

      Developer Sandbox
      Try Red Hat products and technologies without setup or configuration fees for 30 days with this shared Openshift and Kubernetes cluster.
    • Try at no cost
  • Technologies

    Featured

    • AI/ML
      AI/ML Icon
    • Linux
      Linux Icon
    • Kubernetes
      Cloud icon
    • Automation
      Automation Icon showing arrows moving in a circle around a gear
    • View All Technologies
    • Programming Languages & Frameworks

      • Java
      • Python
      • JavaScript
    • System Design & Architecture

      • Red Hat architecture and design patterns
      • Microservices
      • Event-Driven Architecture
      • Databases
    • Developer Productivity

      • Developer productivity
      • Developer Tools
      • GitOps
    • Secure Development & Architectures

      • Security
      • Secure coding
    • Platform Engineering

      • DevOps
      • DevSecOps
      • Ansible automation for applications and services
    • Automated Data Processing

      • AI/ML
      • Data Science
      • Apache Kafka on Kubernetes
      • View All Technologies
    • Start exploring in the Developer Sandbox for free

      sandbox graphic
      Try Red Hat's products and technologies without setup or configuration.
    • Try at no cost
  • Learn

    Featured

    • Kubernetes & Cloud Native
      Openshift icon
    • Linux
      Rhel icon
    • Automation
      Ansible cloud icon
    • Java
      Java icon
    • AI/ML
      AI/ML Icon
    • View All Learning Resources

    E-Books

    • GitOps Cookbook
    • Podman in Action
    • Kubernetes Operators
    • The Path to GitOps
    • View All E-books

    Cheat Sheets

    • Linux Commands
    • Bash Commands
    • Git
    • systemd Commands
    • View All Cheat Sheets

    Documentation

    • API Catalog
    • Product Documentation
    • Legacy Documentation
    • Red Hat Learning

      Learning image
      Boost your technical skills to expert-level with the help of interactive lessons offered by various Red Hat Learning programs.
    • Explore Red Hat Learning
  • Developer Sandbox

    Developer Sandbox

    • Access Red Hat’s products and technologies without setup or configuration, and start developing quicker than ever before with our new, no-cost sandbox environments.
    • Explore Developer Sandbox

    Featured Developer Sandbox activities

    • Get started with your Developer Sandbox
    • OpenShift virtualization and application modernization using the Developer Sandbox
    • Explore all Developer Sandbox activities

    Ready to start developing apps?

    • Try at no cost
  • Blog
  • Events
  • Videos

How to install KServe using Open Data Hub

June 27, 2024
JooHo Lee
Related topics:
Artificial intelligenceData ScienceKubernetesOpen sourceServerless
Related products:
Red Hat OpenShiftRed Hat OpenShift AIRed Hat OpenShift ServerlessRed Hat OpenShift Service Mesh

Share:

    KServe is a highly scalable and standards-based model inference platform on Kubernetes for scalable AI. Open Data Hub (ODH) now seamlessly incorporates KServe as an integral component within its ecosystem. In earlier iterations, utilizing KServe necessitated the execution of a relatively intricate installation script. However, with the release of Open Data Hub 2.5, significant strides have been made to streamline and alleviate the complexities associated with this process. Users can now experience a more user-friendly and efficient installation procedure, underscoring our commitment to enhancing accessibility and usability within the Open Data Hub framework.

    This article will delve into a simplified method for installing KServe. The installation process can be summarized as follows:

    1. Install required operators:
      • Red Hat OpenShift Serverless
      • Red Hat OpenShift Service Mesh
      • Open Data Hub
    2. Deploy service mesh control plane by creating DataScienceClusterInitialization.
    3. Deploy knative-serving by creating DataScienceCluster.
    4. Install KServe.

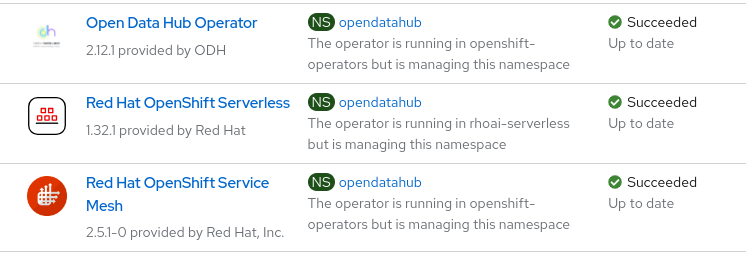
    Installing required operators

    Users are responsible for the installation of operators on Red Hat OpenShift. To facilitate this process, users are required to install the KServe-dependent operators via OperatorHub. Figure 1 illustrates the successful installation of all three operators.

    installed operators for OpenDataHub KServe
    Figure 1: Show installed operators

    Deploy service mesh control planes with DataScienceClusterInitialization

    Open Data Hub's DataScienceClusterInitialization refers to the process of setting up and initializing a cluster environment tailored for ODH components. After installing the necessary operators, Open Data Hub's DataScienceClusterInitialization makes service mesh control plane deployment easy. A DSCI is automatically created when you install the Open Data Hub operator. When the DataScienceClusterInitialization is created, it triggers the creation of a ServiceMeshControlPlane, which is an Istio object that configures the service mesh control plane.

    This setup results in the deployment of three primary pods in the istio-system namespace (Figure 2):

    • istiod pod for managing configurations and policies.

    • istio-ingressgateway pod for handling incoming traffic, and optionally.

    • istio-egressgateway pod for managing outgoing traffic. 

    These components ensure robust traffic management, security, and observability for the services within the mesh.

    Diagram to show the relationship between istio-system and OpenDataHub
    Figure 2: DSClnitialization enabling ISTIO components

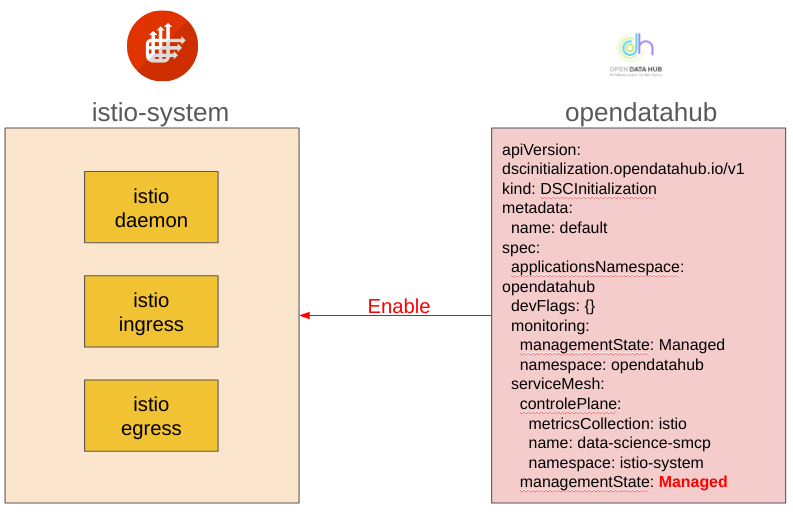
    The managementState field in ODH specifies whether a particular component is being managed (Managed) by ODH, left unmanaged (Unmanaged) for users to configure directly, or marked for removal (Removed) to be deleted.

    • Managed: This means that ODH creates and manages the object. ODH handles its lifecycle, including creation, configuration, and deletion.
    • Unmanaged: In this case, ODH does not manage the object, and users are responsible for its configuration. ODH does not interfere with the object's lifecycle; it remains as configured by the user.
    • Removed: This indicates that ODH intends to delete the associated object. It marks the object for removal upon cluster uninstallation, effectively uninstalling it from the cluster.

    These management states allow users to control how ODH interacts with specific components, allowing for tailored management approaches based on individual needs and preferences.

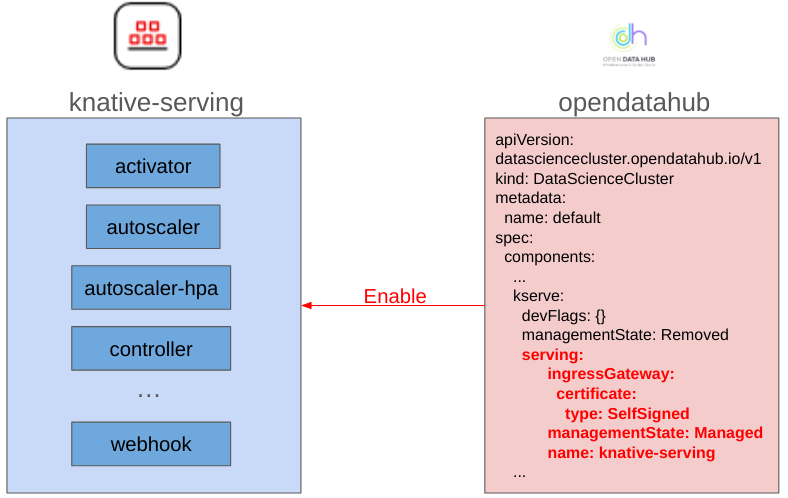
    Deploying knative-serving with DataScienceCluster

    Post Istio installation, the subsequent step involves confirming completion by verifying that all three pods are in the "Ready" state.

      oc wait --for=condition=ready pod -l app=istiod -n istio-system --timeout=10s
      oc wait --for=condition=ready pod -l app=istio-ingressgateway -n istio-system --timeout=10s
      oc wait --for=condition=ready pod -l app=istio-egressgateway -n istio-system --timeout=10s

    To streamline this process, Open Data Hub's DataScienceCluster facilitates the installation of essential objects such as the gateway and service for knative-serving, net-istio controller, and seamless integration with ISTIO.

    Beginning with Open Data Hub 2.5, a new specification has been introduced to the kserve field. An illustrative example is provided in Figure 3, featuring the creation and application of a Self-Signed Certificate to the gateway. However, users have the flexibility to furnish their preferred certificates, contributing to a more tailored and user-friendly experience.

    Diagram to show the relationship between knative-serving OpenDataHub
    Figure 3: DataScienceCluster enabling the Knative-Serving components

    Apply user's certificate with DataScienceCluster

    If you have a user's certificate to apply, follow these straightforward steps:

    1. Place or create a certificate secret. Generate or create a certificate secret in the istio-system namespace. Replace <your-secret-name> with a suitable name for your secret, and <path-to-your-certificate> with the actual path to the certificate file.

      oc create secret tls <your-secret-name> --cert=path/to/cert/file --key=path/to/key/file  -n istio-system
    2. Apply DataScienceCluster. Use Provided instead of SelfSigned in the DataScienceCluster to integrate the user's certificate. Ensure to adjust any specific configurations as needed.

            serving:
              ingressGateway:
                certificate:
                  type: Provided
                  secretName:  <your-secret-name> 
              managementState: Managed

    Now, your Knative gateway is configured with the user's certificate, providing secure communication.
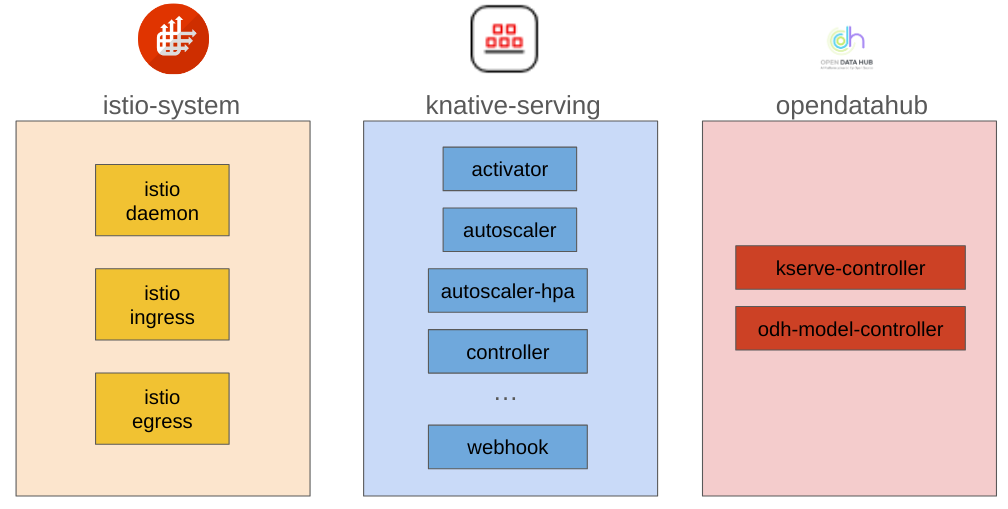
    Deploy KServe

    After completing the knative-serving installation, follow these simple steps to deploy KServe:

    1. Update DataScienceCluster configuration. Locate the DataScienceCluster configuration and look for the Kserve field within the configuration.
    2. Set managementState to Managed. Locate the managementState field for the KServe installation within the DataScienceCluster configuration. Change its value from Remove to Managed.

      kserve:
        managementState: Managed
    3. Verify successful KServe installation. After a successful installation of KServe, ensure the following pods are running in each namespace (Figure 4).
    Diagram to show the relationship among istio-system,knative-serving and OpenDataHub
    Figure 4: Show deployed components in each namespace.

    Conclusion

    We hope that in the future, you will find it easy to install KServe through Open Data Hub and deploy and use your desired models effortlessly. With the enhancements introduced in Open Data Hub, the installation process and integration have been significantly streamlined, allowing you to set up a robust AI model deployment environment without the complexities.

    This guide aims to help you smoothly complete the installation and configuration of KServe, alleviating potential challenges in the model deployment process. We look forward to seeing how the continued innovation and improvements in Open Data Hub will enhance the efficiency and productivity of your AI and machine learning projects.

    Explore the possibilities with KServe, effortlessly deploy AI models, and achieve great success in your endeavors. Should you have any questions or require further assistance, our community and support channels are always available to help. Wishing you success in your AI model deployments!

    Related Posts

    • Empower conversational AI at scale with KServe

    • Model training in Red Hat OpenShift AI

    • AI/ML pipelines using Open Data Hub and Kubeflow on Red Hat OpenShift

    • Why GPUs are essential for AI and high-performance computing

    • From notebooks to pipelines: Using Open Data Hub and Kubeflow on OpenShift

    • Create an OpenShift AI environment with Snorkel

    Recent Posts

    • Meet the Red Hat Node.js team at PowerUP 2025

    • How to use pipelines for AI/ML automation at the edge

    • What's new in network observability 1.8

    • LLM Compressor: Optimize LLMs for low-latency deployments

    • How to set up NVIDIA NIM on Red Hat OpenShift AI

    What’s up next?

    Learn how to access a large language model using Node.js and LangChain.js. You’ll also explore LangChain.js APIs that simplify common requirements like retrieval-augmented generation (RAG).

    Start the activity
    Red Hat Developers logo LinkedIn YouTube Twitter Facebook

    Products

    • Red Hat Enterprise Linux
    • Red Hat OpenShift
    • Red Hat Ansible Automation Platform

    Build

    • Developer Sandbox
    • Developer Tools
    • Interactive Tutorials
    • API Catalog

    Quicklinks

    • Learning Resources
    • E-books
    • Cheat Sheets
    • Blog
    • Events
    • Newsletter

    Communicate

    • About us
    • Contact sales
    • Find a partner
    • Report a website issue
    • Site Status Dashboard
    • Report a security problem

    RED HAT DEVELOPER

    Build here. Go anywhere.

    We serve the builders. The problem solvers who create careers with code.

    Join us if you’re a developer, software engineer, web designer, front-end designer, UX designer, computer scientist, architect, tester, product manager, project manager or team lead.

    Sign me up

    Red Hat legal and privacy links

    • About Red Hat
    • Jobs
    • Events
    • Locations
    • Contact Red Hat
    • Red Hat Blog
    • Inclusion at Red Hat
    • Cool Stuff Store
    • Red Hat Summit

    Red Hat legal and privacy links

    • Privacy statement
    • Terms of use
    • All policies and guidelines
    • Digital accessibility

    Report a website issue